Owners Guide
Page 3
...or sold with one wider than the one or more of the receiver or radio remote control could result in your safety. and as power-supply cord or plug is connected. • Consult the dealer or an experienced radio/TV technician for all warnings - Unplug this product. 2. ...Bose® Corporation. Do not install near you are present. 6. Do not defeat the safety purpose of time - A groundingtype plug has two blades and a third grounding prong. The wider blade or third prong are designed to radio or television reception, which the receiver is damaged; Protect the power cord...
...or sold with one wider than the one or more of the receiver or radio remote control could result in your safety. and as power-supply cord or plug is connected. • Consult the dealer or an experienced radio/TV technician for all warnings - Unplug this product. 2. ...Bose® Corporation. Do not install near you are present. 6. Do not defeat the safety purpose of time - A groundingtype plug has two blades and a third grounding prong. The wider blade or third prong are designed to radio or television reception, which the receiver is damaged; Protect the power cord...
Owners Guide
Page 7
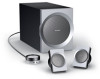
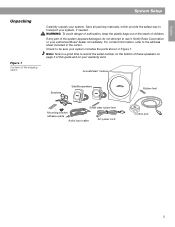
... warranty card. Note: Now is a good time to record the serial number on the bottom of these speakers on your authorized Bose® dealer immediately. Save all packing materials, which provide the safest way to transport your system includes the parts shown in the...Carefully unpack your system. Acoustimass® module Brackets Satellite speakers Rubber feet Small clear rubber feet Mounting bracket adhesive pads Audio input cable AC power cord Control pod 5 English Unpacking Figure 1 Contents of the system appears damaged, do not attempt to use it. WARNING: To avoid danger ...
... warranty card. Note: Now is a good time to record the serial number on the bottom of these speakers on your authorized Bose® dealer immediately. Save all packing materials, which provide the safest way to transport your system includes the parts shown in the...Carefully unpack your system. Acoustimass® module Brackets Satellite speakers Rubber feet Small clear rubber feet Mounting bracket adhesive pads Audio input cable AC power cord Control pod 5 English Unpacking Figure 1 Contents of the system appears damaged, do not attempt to use it. WARNING: To avoid danger ...
Owners Guide
Page 12
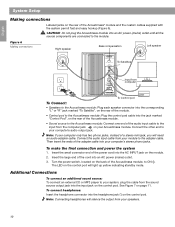
... the source components are connected to ON (|). Note: If your Acoustimass module. Insert the small connector end of the cord into an AC power (mains) outlet. 3. Turn the power switch, located on the back of the Acoustimass module, to the module. The LED on the control pod will need...mini jack, you will light up yellow indicating standby mode. Connect the other end to the Acoustimass module; Insert the large end of the power cord into the AC INPUT jack on the module. 2. English System Setup Making connections Labeled jacks on the rear of the adapter cable into ...
... the source components are connected to ON (|). Note: If your Acoustimass module. Insert the small connector end of the cord into an AC power (mains) outlet. 3. Turn the power switch, located on the back of the Acoustimass module, to the module. The LED on the control pod will need...mini jack, you will light up yellow indicating standby mode. Connect the other end to the Acoustimass module; Insert the large end of the power cord into the AC INPUT jack on the module. 2. English System Setup Making connections Labeled jacks on the rear of the adapter cable into ...


