Owner's guide
Page 3
...Connecting the speakers to the module 8 3 Connecting the module to the media center . . . . 10 4 Connecting the system video to your TV 12 5 Connecting a cable box or other component . . . 17 To connect another component 19 To get digital... audio from the component . . . . . 20 To use video pass through 21 6 Connecting audio from your TV as an option 22 7 Installing the FM and AM... only 38 The media center 39 Display 39 Disc tray 39 OPERATION 40 Playing a video disc or CD 40 Selecting a play option 40 Keeping your discs clean 41 Checking ...
...Connecting the speakers to the module 8 3 Connecting the module to the media center . . . . 10 4 Connecting the system video to your TV 12 5 Connecting a cable box or other component . . . 17 To connect another component 19 To get digital... audio from the component . . . . . 20 To use video pass through 21 6 Connecting audio from your TV as an option 22 7 Installing the FM and AM... only 38 The media center 39 Display 39 Disc tray 39 OPERATION 40 Playing a video disc or CD 40 Selecting a play option 40 Keeping your discs clean 41 Checking ...
Owner's guide
Page 4
... TO THE PERFORMANCE 47 Changing system features 47 To get to the System menu 47 Selecting a new option 48 Language choices 48 Audio options 49 Video options 50 Media center options 52 Choosing new settings 53 To get to the Settings menu 53 Settings options 54 REFERENCE 59 Replacing remote batteries...
... TO THE PERFORMANCE 47 Changing system features 47 To get to the System menu 47 Selecting a new option 48 Language choices 48 Audio options 49 Video options 50 Media center options 52 Choosing new settings 53 To get to the Settings menu 53 Settings options 54 REFERENCE 59 Replacing remote batteries...
Owner's guide
Page 6
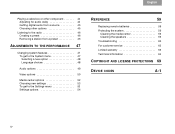
Using Bose® proprietary signal processing technology, the 3•2•1 system provides improved spaciousness from stereo recordings and bold movie effects for text displays 2 System features include: &#... speakers • Easy-to-hide Acoustimass® module • Integrated DVD/CD player and AM/FM tuner • Remote and media center controls • HDMI video connection to your TV • Audio In connectors for three components • Your choice of language for surround-sound sources. Svenska Nederlands FraItnaçliainso...
Using Bose® proprietary signal processing technology, the 3•2•1 system provides improved spaciousness from stereo recordings and bold movie effects for text displays 2 System features include: &#... speakers • Easy-to-hide Acoustimass® module • Integrated DVD/CD player and AM/FM tuner • Remote and media center controls • HDMI video connection to your TV • Audio In connectors for three components • Your choice of language for surround-sound sources. Svenska Nederlands FraItnaçliainso...

Owner's guide
Page 11
..., the front, or the back • with 2 on a surface that can block the ventilation openings. Continue with the front port aimed out from audio or video tapes to prevent magnetic damage to face the listening area 3. English DEsepuatsñcohl FItralniaçnaois Nederlands Svenska SETUP 1.
..., the front, or the back • with 2 on a surface that can block the ventilation openings. Continue with the front port aimed out from audio or video tapes to prevent magnetic damage to face the listening area 3. English DEsepuatsñcohl FItralniaçnaois Nederlands Svenska SETUP 1.
Owner's guide
Page 16
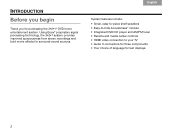
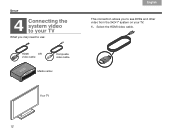
Select the HDMI video cable. HDMI OR video cable Composite video cable Media center Your TV 12 Svenska Nederlands FItralniaçnaois DEsepuatsñcohl English SETUP 4 Connecting the system video to your TV What you may need to use: This connection allows you to see DVDs and other video from the 3•2•1® system on your TV. 1.
Select the HDMI video cable. HDMI OR video cable Composite video cable Media center Your TV 12 Svenska Nederlands FItralniaçnaois DEsepuatsñcohl English SETUP 4 Connecting the system video to your TV What you may need to use: This connection allows you to see DVDs and other video from the 3•2•1® system on your TV. 1.

Owner's guide
Page 17
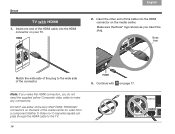
Check to see if your TV: TV with HDMI or TV without HDMI on page 14 on the side or rear connector panel of the TV. 3. This may be located on page 15 13 Follow the directions that are appropriate for your TV has an unused HDMI connector for VIDEO IN. English DEsepuatsñcohl FItralniaçnaois Nederlands Svenska SETUP 2.
Check to see if your TV: TV with HDMI or TV without HDMI on page 14 on the side or rear connector panel of the TV. 3. This may be located on page 15 13 Follow the directions that are appropriate for your TV has an unused HDMI connector for VIDEO IN. English DEsepuatsñcohl FItralniaçnaois Nederlands Svenska SETUP 2.
Owner's guide
Page 18
... ONLY PASS-THROUGH connectors on your TV. 2. Bose logo Match the wide side of the plug to the wide side of this HDMI connection, you insert the plug. Make sure the Bose® logo shows as you do not need the supplied yellow Composite video cable to the TV. 14 Insert one end... of the media center for video from a component.Neither S-Video nor Composite signals can pass through the HDMI cable to make...
... ONLY PASS-THROUGH connectors on your TV. 2. Bose logo Match the wide side of the plug to the wide side of this HDMI connection, you insert the plug. Make sure the Bose® logo shows as you do not need the supplied yellow Composite video cable to the TV. 14 Insert one end... of the media center for video from a component.Neither S-Video nor Composite signals can pass through the HDMI cable to make...

Owner's guide
Page 19
... that component from the TV, and see "To use video pass through" on your TV, it may be in use either S-Video or Component connectors, you need the appropriate cables. Plug the Composite video cable into the yellow VIDEO IN connector on page 21. 15 Yellow Yellow Note: ...There may be other kinds of the Composite video cable. 2. English DEsepuatsñcohl FItralnia...
... that component from the TV, and see "To use video pass through" on your TV, it may be in use either S-Video or Component connectors, you need the appropriate cables. Plug the Composite video cable into the yellow VIDEO IN connector on page 21. 15 Yellow Yellow Note: ...There may be other kinds of the Composite video cable. 2. English DEsepuatsñcohl FItralnia...

Owner's guide
Page 20
a Note: If you make this Composite connection, you can use video pass through" on the back of the media center. . Svenska Nederlands FItralniaçnaois DEsepuatsñcohl English SETUP 3. Continue with 5 on the media center for further information. 4. See "To use the ONLY PASS-THROUGH connector on the next page. 16 Insert the other end into the yellow Composite VIDEO OUT connector on page 21 for video from another component.
a Note: If you make this Composite connection, you can use video pass through" on the back of the media center. . Svenska Nederlands FItralniaçnaois DEsepuatsñcohl English SETUP 3. Continue with 5 on the media center for further information. 4. See "To use the ONLY PASS-THROUGH connector on the next page. 16 Insert the other end into the yellow Composite VIDEO OUT connector on page 21 for video from another component.
Owner's guide
Page 21
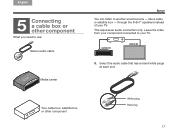
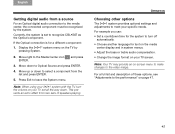
like a cable or satellite box - through the 3•2•1® speakers instead of your TV. Select the audio cable that has red and white plugs at each end. This requires an audio connection only. Leave the video from your component connected to another sound source - Your cable box, satellite box, or other component What you need to use: You can listen to your TV. Stereo audio cable Media center 5. English DEsepuatsñcohl FItralniaçnaois Nederlands Svenska SETUP 5 Connecting a cable box or other component White plug Red plug 17
like a cable or satellite box - through the 3•2•1® speakers instead of your TV. Select the audio cable that has red and white plugs at each end. This requires an audio connection only. Leave the video from your component connected to another sound source - Your cable box, satellite box, or other component What you need to use: You can listen to your TV. Stereo audio cable Media center 5. English DEsepuatsñcohl FItralniaçnaois Nederlands Svenska SETUP 5 Connecting a cable box or other component White plug Red plug 17

Owner's guide
Page 25
..., which are available at most electronics stores. DO NOT use one matched pair as shown here: Video in from your digital cable into the appropriate AUDIO IN connector on the next page. 21 You can make a pass through the media center to ... FItralniaçnaois Nederlands Svenska SETUP 5. Plug the other end of the two ONLY PASS-THROUGH connectors (on the left) if you have a Composite or S-Video connection between the TV and the media center (not HDMI or Component). Be sure to use either of your component...
..., which are available at most electronics stores. DO NOT use one matched pair as shown here: Video in from your digital cable into the appropriate AUDIO IN connector on the next page. 21 You can make a pass through the media center to ... FItralniaçnaois Nederlands Svenska SETUP 5. Plug the other end of the two ONLY PASS-THROUGH connectors (on the left) if you have a Composite or S-Video connection between the TV and the media center (not HDMI or Component). Be sure to use either of your component...
Owner's guide
Page 26
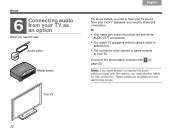
... cable box does not provide red and white AUDIO OUT connectors. • You watch TV programs without using a cable or satellite box. • You connect a video camera or game console to make this connection.
... cable box does not provide red and white AUDIO OUT connectors. • You watch TV programs without using a cable or satellite box. • You connect a video camera or game console to make this connection.
Owner's guide
Page 37
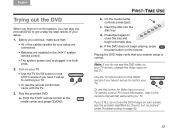
... no picture" under Troubleshooting on page 62. 33 If you do not see the DVD image on your screen, see the DVD video on your TV screen, change the Video Input on the TV. Point the 3•2•1 remote control at both ends. 2. Insert the disc into the disc tray. Press Eject... on the remote. If the DVD does not begin automatic play the provided DVD to get a step-by-step review of the cables needed for Video Input on your TV remote control. Or use the remote control that came with the TV. 3. Turn on your TV. • Use the TV On...
... no picture" under Troubleshooting on page 62. 33 If you do not see the DVD image on your screen, see the DVD video on your TV screen, change the Video Input on the TV. Point the 3•2•1 remote control at both ends. 2. Insert the disc into the disc tray. Press Eject... on the remote. If the DVD does not begin automatic play the provided DVD to get a step-by-step review of the cables needed for Video Input on your TV remote control. Or use the remote control that came with the TV. 3. Turn on your TV. • Use the TV On...
Owner's guide
Page 39
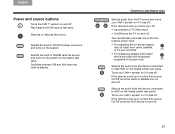
Your remote also provides one of the two buttons shown here: • For adjusting the on-screen aspect ratio of video from the device connected to AUX on the media center rear panel. If the remote is provided with the source last used . If the remote ... FM/AM radio as source and turns on the system. Selects the audio from the TV source and turns your TV: • Input selects a TV Video Input. • On/Off turns the TV on and off . Turns your 3•2•1 system on if it was off . Silences or restores the sound...
Your remote also provides one of the two buttons shown here: • For adjusting the on-screen aspect ratio of video from the device connected to AUX on the media center rear panel. If the remote is provided with the source last used . If the remote ... FM/AM radio as source and turns on the system. Selects the audio from the TV source and turns your TV: • Input selects a TV Video Input. • On/Off turns the TV on and off . Turns your 3•2•1 system on if it was off . Silences or restores the sound...
Owner's guide
Page 40
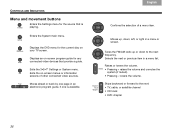
... to the next frequency. Exits the 3•2•1® Settings or System menu. Displays the DVD menu for any connected video devices that is available. Confirms the selection of other connected video sources. Enters the System main menu. Svenska Nederlands FItralniaçnaois DEsepuatsñcohl English CONTROLS AND INDICATORS Menu and...
... to the next frequency. Exits the 3•2•1® Settings or System menu. Displays the DVD menu for any connected video devices that is available. Confirms the selection of other connected video sources. Enters the System main menu. Svenska Nederlands FItralniaçnaois DEsepuatsñcohl English CONTROLS AND INDICATORS Menu and...
Owner's guide
Page 41
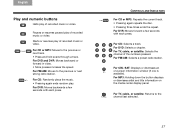
... Returns to the previous or next track. • Press and hold scans through a track. Pauses or resumes paused play of recorded music or video. For CBL•SAT: Displays or dismisses an on the media center display panel. English DEsepuatsñcohl FItralniaçnaois Nederlands Svenska Play and.... For FM/AM: Moves to the previous or next strong radio station. For TV, cable, or satellite: Selects the channel of recorded music or video. For CD: Selects a track. For FM/AM: Selects a preset radio station. For MP3: Holding down the button displays or dismisses artist and ...
... Returns to the previous or next track. • Press and hold scans through a track. Pauses or resumes paused play of recorded music or video. For CBL•SAT: Displays or dismisses an on the media center display panel. English DEsepuatsñcohl FItralniaçnaois Nederlands Svenska Play and.... For FM/AM: Moves to the previous or next strong radio station. For TV, cable, or satellite: Selects the channel of recorded music or video. For CD: Selects a track. For FM/AM: Selects a preset radio station. For MP3: Holding down the button displays or dismisses artist and ...
Owner's guide
Page 44
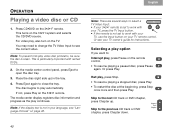
...Eject to play , also turn on the 3•2•1® remote. Or see your TV, use the Input button on page 48. For video play automatically. This is clean. Or press Play. Skip to work with your TV owner's guide for instructions. The disc begins to open the ... a play , press Pause on the remote control. • To resume playing a paused disc, press Pause again. You may need to change the TV Video Input to : Interrupt play option If you want to see "Language choices" on your TV remote control. The media center display registers disc information and...
...Eject to play , also turn on the 3•2•1® remote. Or see your TV, use the Input button on page 48. For video play automatically. This is clean. Or press Play. Skip to work with your TV owner's guide for instructions. The disc begins to open the ... a play , press Pause on the remote control. • To resume playing a paused disc, press Pause again. You may need to change the TV Video Input to : Interrupt play option If you want to see "Language choices" on your TV remote control. The media center display registers disc information and...
Owner's guide
Page 46
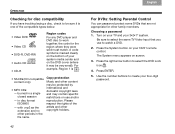
...ñcohl English OPERATION Checking for disc compatibility If you use and/or reproduction. Please respect the rights of the compatible types below. • Video DVD • Video CD • DVD-R, DVD-RW • Audio CD • CD-R Region codes For any DVD player and DVD disc to create your 3&#...password protect some DVDs that you have trouble playing a disc, check to select the DVD Lock icon . 4. Be sure to select the same TV Video Input that are not appropriate for the region where they were sold must match. The System menu appears on your TV and your four-digit...
...ñcohl English OPERATION Checking for disc compatibility If you use and/or reproduction. Please respect the rights of the compatible types below. • Video DVD • Video CD • DVD-R, DVD-RW • Audio CD • CD-R Region codes For any DVD player and DVD disc to create your 3&#...password protect some DVDs that you have trouble playing a disc, check to select the DVD Lock icon . 4. Be sure to select the same TV Video Input that are not appropriate for the region where they were sold must match. The System menu appears on your TV and your four-digit...

Owner's guide
Page 48
.... The Settings menu appears on the 3•2•1 system: 1. Move down to the selected source. 2. If the 3•2•1 remote is a video component. For example, you see if this timing, use the audio delay setting on screen. 2. Adjusting for the source AUX (CBL•SAT or ...change. 44 and press 3. This turns on the TV. Each selection makes a minute timing adjustment. Choose the proper Video Input on your component and, if it is a video source, turn on the 3•2•1® system to the audio delay icon ENTER. Press the button for audio delay...
.... The Settings menu appears on the 3•2•1 system: 1. Move down to the selected source. 2. If the 3•2•1 remote is a video component. For example, you see if this timing, use the audio delay setting on screen. 2. Adjusting for the source AUX (CBL•SAT or ...change. 44 and press 3. This turns on the TV. Each selection makes a minute timing adjustment. Choose the proper Video Input on your component and, if it is a video source, turn on the 3•2•1® system to the audio delay icon ENTER. Press the button for audio delay...
Owner's guide
Page 49
... specific needs. Press Exit to the Media Center icon ENTER. Display the 3•2•1® system menu on -screen menu to make changes to the video image. and press 3. For example you can: • Set a countdown time for a different component: 1. For a full list and description of speakers playing. Move right to...
... specific needs. Press Exit to the Media Center icon ENTER. Display the 3•2•1® system menu on -screen menu to make changes to the video image. and press 3. For example you can: • Set a countdown time for a different component: 1. For a full list and description of speakers playing. Move right to...


