Installation Instructions
Page 2
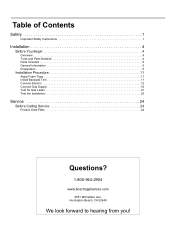
Huntington Beach, CA 92649 We look forward to hearing from you! Table of Contents Safety 1 Important Safety Instructions 1 Installation 4 Before You Begin 4 Overview 4 Tools and Parts Needed 4 Parts Included 5 General Information 5 Preparation 5 Installation Procedure 11 Apply Foam Tape 11 Install Backwall Trim 11 Connect Electric 12 Connect Gas Supply 16 Test for Gas Leaks 21 Test the Installation 22 Service 24 Before Calling Service 24 Product Data Plate 24 Questions? 1-800-944-2904 www.boschappliances.com 5551 McFadden Ave.
Huntington Beach, CA 92649 We look forward to hearing from you! Table of Contents Safety 1 Important Safety Instructions 1 Installation 4 Before You Begin 4 Overview 4 Tools and Parts Needed 4 Parts Included 5 General Information 5 Preparation 5 Installation Procedure 11 Apply Foam Tape 11 Install Backwall Trim 11 Connect Electric 12 Connect Gas Supply 16 Test for Gas Leaks 21 Test the Installation 22 Service 24 Before Calling Service 24 Product Data Plate 24 Questions? 1-800-944-2904 www.boschappliances.com 5551 McFadden Ave.
Installation Instructions
Page 3
... caution when reaching behind or under appliance. • This appliance complies with range. Remove the door for guidance. See instructions in the manuals. Injury to play with packaging material. • Never modify or alter the construction of the appliance. Install anti-tip device packaged with one or more of the following Standards: •...
... caution when reaching behind or under appliance. • This appliance complies with range. Remove the door for guidance. See instructions in the manuals. Injury to play with packaging material. • Never modify or alter the construction of the appliance. Install anti-tip device packaged with one or more of the following Standards: •...
Installation Instructions
Page 4
...It is the responsibility of the owner and the installer to determine if additional requirements and/or standards apply to specific installations. • Installation must conform with local codes or, in the absence of local codes, with the National Fuel Gas Code, ANSI Z223.1/NFPA 54. •... inspector's use with ranges" shall be sure all controls are in the OFF position. • For appliances equipped with all applicable codes. • Install a gas shutoff valve near the appliance. show the owner the location of the circuit breaker or fuse. Save these instructions for easy reference. ...
...It is the responsibility of the owner and the installer to determine if additional requirements and/or standards apply to specific installations. • Installation must conform with local codes or, in the absence of local codes, with the National Fuel Gas Code, ANSI Z223.1/NFPA 54. •... inspector's use with ranges" shall be sure all controls are in the OFF position. • For appliances equipped with all applicable codes. • Install a gas shutoff valve near the appliance. show the owner the location of the circuit breaker or fuse. Save these instructions for easy reference. ...
Installation Instructions
Page 5
...plumber or gas fitter qualified or licensed by a qualified installer, authorized service agency or the gas supplier. Propane Gas Installation Safety • The maximum supply pressure must do the conversion. Follow the gas supplier's instructions. • If you cannot reach your gas supplier ...the factory for use with propane the appliance must be converted per the LP conversion instructions. • For Massachusetts installations: • Installation must not be longer than 36 inches. • Installer - It must be performed by the state, province or region where this or ...
...plumber or gas fitter qualified or licensed by a qualified installer, authorized service agency or the gas supplier. Propane Gas Installation Safety • The maximum supply pressure must do the conversion. Follow the gas supplier's instructions. • If you cannot reach your gas supplier ...the factory for use with propane the appliance must be converted per the LP conversion instructions. • For Massachusetts installations: • Installation must not be longer than 36 inches. • Installer - It must be performed by the state, province or region where this or ...
Installation Instructions
Page 6
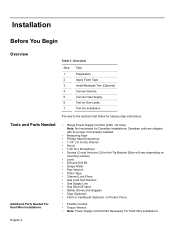
...; Torque Wrench • Note: Power Supply Cord Kit Not Necessary For Hard Wire Installations English 4 Tools and Parts Needed Additional Parts Needed For Hard Wire Installations • Range Power Supply Cord Kit (240V -30 Amp) Note: Not necessary for Gas Leaks...Canadian installations; Connect Gas Supply 6. Canadian units are shipped with the power cord already installed. • Measuring Tape • Phillips Head Screwdriver • 1-1/4" (31.8 mm) Wrench • Pencil • T-20 Torx Screwdriver • Screws (2) and Anchors (2) for step-by-step instructions. Installation ...
...; Torque Wrench • Note: Power Supply Cord Kit Not Necessary For Hard Wire Installations English 4 Tools and Parts Needed Additional Parts Needed For Hard Wire Installations • Range Power Supply Cord Kit (240V -30 Amp) Note: Not necessary for Gas Leaks...Canadian installations; Connect Gas Supply 6. Canadian units are shipped with the power cord already installed. • Measuring Tape • Phillips Head Screwdriver • 1-1/4" (31.8 mm) Wrench • Pencil • T-20 Torx Screwdriver • Screws (2) and Anchors (2) for step-by-step instructions. Installation ...
Installation Instructions
Page 11
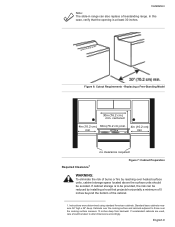
Instructions were determined using standard American cabinets. Replacing a Free-Standing Model 30in (76.2 ...located above the surface units should be taken to be provided, the risk can also replace a freestanding range. English 9 Installation Note: The slide-in range can be avoided. centered 4in (10.2 cm ) 30in (76.2 cm) min. 4in (10...In this case, verify that projects horizontally a minimum of 5 inches beyond the bottom of burns or fire by installing a hood that the opening is to alter dimensions accordingly. If nonstandard cabinets are used, care should be reduced by...
Instructions were determined using standard American cabinets. Replacing a Free-Standing Model 30in (76.2 ...located above the surface units should be taken to be provided, the risk can also replace a freestanding range. English 9 Installation Note: The slide-in range can be avoided. centered 4in (10.2 cm ) 30in (76.2 cm) min. 4in (10...In this case, verify that projects horizontally a minimum of 5 inches beyond the bottom of burns or fire by installing a hood that the opening is to alter dimensions accordingly. If nonstandard cabinets are used, care should be reduced by...

Installation Instructions
Page 12
... Recommendations Figure 8: Anti-Tip Bracket We strongly recommend the installation of not less than 300 CFM is protected by safety standards, particularly self-cleaning ovens; This is required from unit walls to adjacent vertical walls must be at least 4". From range walls to instructions furnished with 2 screws adequate for mounting surface (i.e., for wood...
... Recommendations Figure 8: Anti-Tip Bracket We strongly recommend the installation of not less than 300 CFM is protected by safety standards, particularly self-cleaning ovens; This is required from unit walls to adjacent vertical walls must be at least 4". From range walls to instructions furnished with 2 screws adequate for mounting surface (i.e., for wood...
Installation Instructions
Page 14
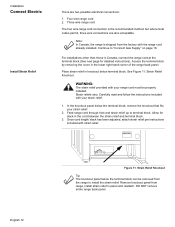
...connections: 1. DO NOT remove entire range back panel. Installation Connect Electric Install Strain Relief There are also acceptable. Four wire range cord 2. Feed range cord through hole and strain relief up to "Connect Gas Supply" on page 16. Allow for detailed instructions). Continue to terminal block. See ...Figure 11: Strain Relief Knockout. For installations other than those in Canada, connect the range cord at the terminal block (See next page for slack in panel ...
...connections: 1. DO NOT remove entire range back panel. Installation Connect Electric Install Strain Relief There are also acceptable. Four wire range cord 2. Feed range cord through hole and strain relief up to "Connect Gas Supply" on page 16. Allow for detailed instructions). Continue to terminal block. See ...Figure 11: Strain Relief Knockout. For installations other than those in Canada, connect the range cord at the terminal block (See next page for slack in panel ...
Installation Instructions
Page 15
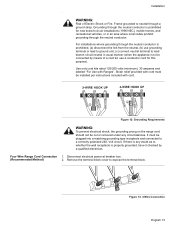
... the neutral conductor is prohibited, (a) disconnect the link from the neutral, (b) use 4-conductor cord for new branch-circuit installations (1996 NEC), mobile homes, and recreational vehicles, or in usual manner (when the appliance is properly grounded, have it...amperes and labeled "For Use with cord. Four Wire Range Cord Connection 1. Remove the terminal block cover to be installed per instructions included with Ranges". Figure 12: Grounding Requirements WARNING: To prevent electrical shock, the grounding prong on the range cord should not be plugged into a matching grounding ...
... the neutral conductor is prohibited, (a) disconnect the link from the neutral, (b) use 4-conductor cord for new branch-circuit installations (1996 NEC), mobile homes, and recreational vehicles, or in usual manner (when the appliance is properly grounded, have it...amperes and labeled "For Use with cord. Four Wire Range Cord Connection 1. Remove the terminal block cover to be installed per instructions included with Ranges". Figure 12: Grounding Requirements WARNING: To prevent electrical shock, the grounding prong on the range cord should not be plugged into a matching grounding ...
Installation Instructions
Page 18
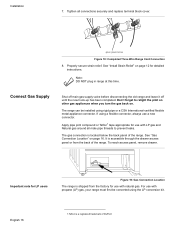
... DuPont Important note for LP users Figure 19: Gas Connection Location The range is accessible through the drawer access panel or from the factory for detailed instructions. Properly secure strain relief. Don't forget to prevent leaks. It is... shipped from the back of the range. To reach access panel, remove drawer. English 16 1.Teflon is located below the back panel of the range. If using a flexible connector, always use with propane (LP) gas, your range must first be installed...
... DuPont Important note for LP users Figure 19: Gas Connection Location The range is accessible through the drawer access panel or from the factory for detailed instructions. Properly secure strain relief. Don't forget to prevent leaks. It is... shipped from the back of the range. To reach access panel, remove drawer. English 16 1.Teflon is located below the back panel of the range. If using a flexible connector, always use with propane (LP) gas, your range must first be installed...

Installation Instructions
Page 23
This could result in damage to the instructions given in this section. Verify that anti-tip bracket engages and pre- Carefully tip range forward to ensure that both back legs are not resting solidly on page 21. Connect pipe to range at supply line shutoff valve and ... countertop and the appliance. 3. Include all the way around fittings and connections indicate a leak. 4. Push range back into position ensuring that the range is level and plumb. 4. Inspect for Proper Installation 1. If a leak appears, turn off all leaks are resting solidly on the floor. 3. CAUTION: Never...
This could result in damage to the instructions given in this section. Verify that anti-tip bracket engages and pre- Carefully tip range forward to ensure that both back legs are not resting solidly on page 21. Connect pipe to range at supply line shutoff valve and ... countertop and the appliance. 3. Include all the way around fittings and connections indicate a leak. 4. Push range back into position ensuring that the range is level and plumb. 4. Inspect for Proper Installation 1. If a leak appears, turn off all leaks are resting solidly on the floor. 3. CAUTION: Never...


