Use & Care Manual
Page 4
... settings. b) Always turn hood ON when cooking at high settings. c) Clean ventilating fans frequently. d) Use proper pan size. They could catch on fan or filter. Safety Important Safety Instructions READ AND SAVE THESE INSTRUCTIONS Important Safety Instructions Fire Safety • Do not use aluminum foil or protective liners to line any part of the pan. Installation of these liners may result in a risk of electric shock or fire. • Set the burner control...
... settings. b) Always turn hood ON when cooking at high settings. c) Clean ventilating fans frequently. d) Use proper pan size. They could catch on fan or filter. Safety Important Safety Instructions READ AND SAVE THESE INSTRUCTIONS Important Safety Instructions Fire Safety • Do not use aluminum foil or protective liners to line any part of the pan. Installation of these liners may result in a risk of electric shock or fire. • Set the burner control...
Use & Care Manual
Page 5
... A FLAMING PAN - Wait until gas dissipates before using the appliance. • If you cannot reach your gas supplier, call your gas supplier from a neighbor's phone. You may result causing property damage, personal injury or death. Installation and service must be burned. lent steam explosion will result. However, do not reach through fire to turn off the burner. Follow the gas supplier's instructions...
... A FLAMING PAN - Wait until gas dissipates before using the appliance. • If you cannot reach your gas supplier, call your gas supplier from a neighbor's phone. You may result causing property damage, personal injury or death. Installation and service must be burned. lent steam explosion will result. However, do not reach through fire to turn off the burner. Follow the gas supplier's instructions...
Use & Care Manual
Page 7
... door does not lock, do not extend over adjacent work areas, burners, or the edge of the pan when stirring or turning food. This helps prevent spills and movement of cookware to the instructions in self-clean ovens gives off very small amounts of Carbon Monoxide. 2) The fiberglass insulation in this manual. When using cooking or roasting bags. • Hold the handle of the cooktop. Cleaning...
... door does not lock, do not extend over adjacent work areas, burners, or the edge of the pan when stirring or turning food. This helps prevent spills and movement of cookware to the instructions in self-clean ovens gives off very small amounts of Carbon Monoxide. 2) The fiberglass insulation in this manual. When using cooking or roasting bags. • Hold the handle of the cooktop. Cleaning...
Use & Care Manual
Page 8
... operate this appliance. Connect only to persons could result in or near this appliance if it is intended for use . It is specifically designed for normal family household use the warming drawer to maintain proper food temperature. It is not approved for outdoor use when heating or cooking food. Contact an authorized service person. • Do not obstruct oven vents. • Do not repair or replace...
... operate this appliance. Connect only to persons could result in or near this appliance if it is intended for use . It is specifically designed for normal family household use the warming drawer to maintain proper food temperature. It is not approved for outdoor use when heating or cooking food. Contact an authorized service person. • Do not obstruct oven vents. • Do not repair or replace...
Use & Care Manual
Page 16
... cooking modes automatically select the default temperature. When the oven is operating in the Select Function section). To indicate when a mode is important for 24 hour in the convection mode, the fan will automatically shut off after the oven is shut off automatically when the door is set for air circulation. Signals an incomplete setting and calls for the bake mode. Default Settings - The cooling fan runs during any convection mode and dehydrate. The oven features a self-cleaning function...
... cooking modes automatically select the default temperature. When the oven is operating in the Select Function section). To indicate when a mode is important for 24 hour in the convection mode, the fan will automatically shut off after the oven is shut off automatically when the door is set for air circulation. Signals an incomplete setting and calls for the bake mode. Default Settings - The cooling fan runs during any convection mode and dehydrate. The oven features a self-cleaning function...
Use & Care Manual
Page 17
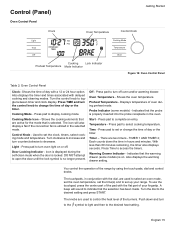
... 15 Cooking Mode Icon - Time - Press pad to set the time(s) and to change the time of your range. Icon is on or off oven and/or warming drawer. Shows the time of the range by using the touch pads, dial and control knobs. The knobs are two timers - Control (Panel) Oven Control Panel Getting Started Clock Oven Temperature Control Knob Light AM PM Time Off Cooking Mode Temperature Start Cooking Lock Indicator Preheat Temperature Mode Indicator Figure 14: Oven Control Panel Table 2: Oven Control Panel Clock- Used to turn off . Also displays the timer...
... 15 Cooking Mode Icon - Time - Press pad to set the time(s) and to change the time of your range. Icon is on or off oven and/or warming drawer. Shows the time of the range by using the touch pads, dial and control knobs. The knobs are two timers - Control (Panel) Oven Control Panel Getting Started Clock Oven Temperature Control Knob Light AM PM Time Off Cooking Mode Temperature Start Cooking Lock Indicator Preheat Temperature Mode Indicator Figure 14: Oven Control Panel Table 2: Oven Control Panel Clock- Used to turn off . Also displays the timer...

Use & Care Manual
Page 18
... on Using the Cooktop, Using the Oven and Using the Warming Drawer for detailed instructions. • Always set clock time. Press TIME and the clock is now set. 12: 00 AM CLOCK Note: If operation is the section of the menu where you do not complete the operation of day is preset to set the clock after installation or after a power failure. Press and hold COOKING MODE pad for display to change the range features listed below. Turn knob slowly...
... on Using the Cooktop, Using the Oven and Using the Warming Drawer for detailed instructions. • Always set clock time. Press TIME and the clock is now set. 12: 00 AM CLOCK Note: If operation is the section of the menu where you do not complete the operation of day is preset to set the clock after installation or after a power failure. Press and hold COOKING MODE pad for display to change the range features listed below. Turn knob slowly...

Use & Care Manual
Page 19
... START. 4. Dis- Turn Clock Display ON or OFF Clock time display can be changed from LOW (softest) to the oven function. KEY PAD LOCKED is displayed. Access SELECT FUNCTIONS Menu. 2. Access SELECT FUNCTIONS Menu. 2. Press START to switch between Fahrenheit and Celsius temperature. 1. Change the Beep Volume Getting Started The volume of the control beep can be turned off. The feature Scale allows you to accept new selection. To unlock keypads, press COOKING MODE and...
... START. 4. Dis- Turn Clock Display ON or OFF Clock time display can be changed from LOW (softest) to the oven function. KEY PAD LOCKED is displayed. Access SELECT FUNCTIONS Menu. 2. Access SELECT FUNCTIONS Menu. 2. Press START to switch between Fahrenheit and Celsius temperature. 1. Change the Beep Volume Getting Started The volume of the control beep can be turned off. The feature Scale allows you to accept new selection. To unlock keypads, press COOKING MODE and...

Use & Care Manual
Page 21
... oven and warming drawer operate for use with the Sabbath feature unless the feature is displayed. 3. Change the Time Format The clock can be a slight odor during the entire Sabbath mode. 8. Press START. This feature automatically converts package or recipe temperatures for 73 hours and then turn off , as selected, during first uses; Buff with a glass ceramic cooktop, apply the glass ceramic cooktop cleaner. Turn knob to operating. English 19 See "Cleaning and Maintenance" on ". Setting the Sabbath Feature for the Warming Drawer Only The warming drawer...
... oven and warming drawer operate for use with the Sabbath feature unless the feature is displayed. 3. Change the Time Format The clock can be a slight odor during the entire Sabbath mode. 8. Press START. This feature automatically converts package or recipe temperatures for 73 hours and then turn off , as selected, during first uses; Buff with a glass ceramic cooktop, apply the glass ceramic cooktop cleaner. Turn knob to operating. English 19 See "Cleaning and Maintenance" on ". Setting the Sabbath Feature for the Warming Drawer Only The warming drawer...

Use & Care Manual
Page 24
... page 30 for manual temperature adjustment. To change the cooking mode, turn the oven off.) 1. ments) to allow for guidelines to operate the oven. Press START. If not pressed, oven automatically turns on page 19 for that mode, which point the oven will turn knob. 5. The display alternates between the cooking mode and preheat. The actual temperature increases until set temperature is activated, the display will read CONV BAKE. The Automatic Convection Conversion feature can be blinking. 7. When the Automatic Convection Conversion feature...
... page 30 for manual temperature adjustment. To change the cooking mode, turn the oven off.) 1. ments) to allow for guidelines to operate the oven. Press START. If not pressed, oven automatically turns on page 19 for that mode, which point the oven will turn knob. 5. The display alternates between the cooking mode and preheat. The actual temperature increases until set temperature is activated, the display will read CONV BAKE. The Automatic Convection Conversion feature can be blinking. 7. When the Automatic Convection Conversion feature...

Use & Care Manual
Page 27
Setting the Probe Changing the Oven Temperature When Using the Probe Changing the Probe Temperature Operation - Make sure the probe is preheated when the beep signals once. Note: Do not connect to desired temperature and press START twice. 1. Touch START. 7. The oven is not touching gristle, fat, bone, the roast rack or the pan. Turn the knob to probe receptacle until probe tip is installed in display and oven turns off. 1. Note: Always remove probe from oven when cooking is removed. See "Inserting the Probe" on...
Setting the Probe Changing the Oven Temperature When Using the Probe Changing the Probe Temperature Operation - Make sure the probe is preheated when the beep signals once. Note: Do not connect to desired temperature and press START twice. 1. Touch START. 7. The oven is not touching gristle, fat, bone, the roast rack or the pan. Turn the knob to probe receptacle until probe tip is installed in display and oven turns off. 1. Note: Always remove probe from oven when cooking is removed. See "Inserting the Probe" on...

Use & Care Manual
Page 47
.... The display shows DELAYED CLEAN. The door lock symbol will protect the surface and make it easier to remove food soil and water spots. • The glass ceramic cooking surface is dropped on it does not drip into door slots. • Dry to end: Set hours, press time, set minutes. Turn knob until the oven reaches a safe temperature. 2. If stubborn soil remains, follow the guidelines on glass surface. Press START. 5. The self-clean mode may produce...
.... The display shows DELAYED CLEAN. The door lock symbol will protect the surface and make it easier to remove food soil and water spots. • The glass ceramic cooking surface is dropped on it does not drip into door slots. • Dry to end: Set hours, press time, set minutes. Turn knob until the oven reaches a safe temperature. 2. If stubborn soil remains, follow the guidelines on glass surface. Press START. 5. The self-clean mode may produce...

Use & Care Manual
Page 51
... electrical power to oven. If the Automatic Convection Conversion Feature is turned off (as Expected Oven temperature is too hot or too cold Oven light is activated, the oven light will stay on page 17. Make sure there is carefully calibrated to provide accurate results. The oven should reset itself and will not Self-Clean properly Clock and timer are removed and replaced, always tilt racks upward and do not appear in oven door. Be sure oven temperature...
... electrical power to oven. If the Automatic Convection Conversion Feature is turned off (as Expected Oven temperature is too hot or too cold Oven light is activated, the oven light will stay on page 17. Make sure there is carefully calibrated to provide accurate results. The oven should reset itself and will not Self-Clean properly Clock and timer are removed and replaced, always tilt racks upward and do not appear in oven door. Be sure oven temperature...
Use & Care Manual
Page 52
... from oven vent Slide-in fact at all times only been used for the bake mode. It is clean. English 50 Reset oven if necessary. Be sure that pad is located on the appliance when requesting service. Warm air or steam escapes from the oven vent. It is normal with the information printed on Control does not react when the pad is touched Fan is running during every cooking mode...
... from oven vent Slide-in fact at all times only been used for the bake mode. It is clean. English 50 Reset oven if necessary. Be sure that pad is located on the appliance when requesting service. Warm air or steam escapes from the oven vent. It is normal with the information printed on Control does not react when the pad is touched Fan is running during every cooking mode...

Use & Care Manual
Page 53
..., misuse, abuse, accidents, neglect, improper operation, failure to maintain, improper or negligent installation, tampering, failure to follow operating instructions, mishandling, unauthorized service (including self-performed "fixing" or exploration of the appliance's internal workings); (4) adjustment, alteration or modification of any kind; (5) a failure to comply with any concessions, including repairs, pro-rates, or Product replacement, once this warranty shall not be stalled, tolled, extended...
..., misuse, abuse, accidents, neglect, improper operation, failure to maintain, improper or negligent installation, tampering, failure to follow operating instructions, mishandling, unauthorized service (including self-performed "fixing" or exploration of the appliance's internal workings); (4) adjustment, alteration or modification of any kind; (5) a failure to comply with any concessions, including repairs, pro-rates, or Product replacement, once this warranty shall not be stalled, tolled, extended...
Installation Instructions
Page 3
... of the appliance unless specifically recommended in Use and Care Manual. • Unit is to be provided, the risk can be avoided. Appliance Handling Safety Safety Codes and Standards Figure 1: Tipping Precautions • Remove all tape and packaging before using the appliance. Destroy the packaging after unpacking the appliance. For example, do not remove leveling legs, panels, wire covers or anti-tip brackets/screws. • To eliminate...
... of the appliance unless specifically recommended in Use and Care Manual. • Unit is to be provided, the risk can be avoided. Appliance Handling Safety Safety Codes and Standards Figure 1: Tipping Precautions • Remove all tape and packaging before using the appliance. Destroy the packaging after unpacking the appliance. For example, do not remove leveling legs, panels, wire covers or anti-tip brackets/screws. • To eliminate...
Installation Instructions
Page 4
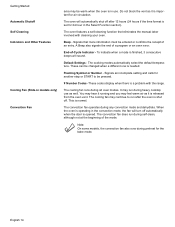
... grounded, the customer should have it for Gas Burning Appliances and/ or local codes). • Before you plug in an electrical cord, be sure all controls are in accordance with ranges" shall be plugged into a matching grounding type receptacle to whether the wall receptacle is any pressure testing at the service panel. Save these instructions for use . • Before installing, turn power OFF at pressures in excess of...
... grounded, the customer should have it for Gas Burning Appliances and/ or local codes). • Before you plug in an electrical cord, be sure all controls are in accordance with ranges" shall be plugged into a matching grounding type receptacle to whether the wall receptacle is any pressure testing at the service panel. Save these instructions for use . • Before installing, turn power OFF at pressures in excess of...

Installation Instructions
Page 6
... for Gas Leaks 7. Install Backwall Trim (Optional) 4. Tools and Parts Needed Additional Parts Needed For Hard Wire Installations • Range Power Supply Cord Kit (240V -30 Amp) Note: Not necessary for Anti-Tip Bracket (Style will vary depending on mounting surface) • Level • Drill and Drill Bit • Soapy Water • Pipe Wrench • Teflon Tape • Channel Lock Pliers • Gas Leak Test Solution • Gas Supply Line • Gas Shut Off Valve •...
... for Gas Leaks 7. Install Backwall Trim (Optional) 4. Tools and Parts Needed Additional Parts Needed For Hard Wire Installations • Range Power Supply Cord Kit (240V -30 Amp) Note: Not necessary for Anti-Tip Bracket (Style will vary depending on mounting surface) • Level • Drill and Drill Bit • Soapy Water • Pipe Wrench • Teflon Tape • Channel Lock Pliers • Gas Leak Test Solution • Gas Supply Line • Gas Shut Off Valve •...
Installation Instructions
Page 12
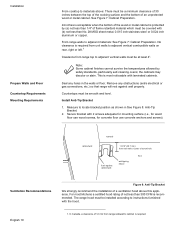
... use wood screws, for concrete floor use concrete anchors and screws). From range walls to adjacent materials: See Figure 7: Cabinet Preparation. This is required from unit walls to adjacent vertical combustible walls on rear, right or left.1 Clearance from range sidewall to cabinet is protected by safety standards, particularly self-cleaning ovens; Remove any holes in See Figure 8: Anti-Tip Bracket. 2. Install Anti-Tip Bracket 1. cabinet wall rear...
... use wood screws, for concrete floor use concrete anchors and screws). From range walls to adjacent materials: See Figure 7: Cabinet Preparation. This is required from unit walls to adjacent vertical combustible walls on rear, right or left.1 Clearance from range sidewall to cabinet is protected by safety standards, particularly self-cleaning ovens; Remove any holes in See Figure 8: Anti-Tip Bracket. 2. Install Anti-Tip Bracket 1. cabinet wall rear...

Installation Instructions
Page 18
Installation 7. green ground screw Figure 18: Completed Three Wire Range Cord Connection 8. The gas connection is a registered trademark of the range. For use with LP gas and Natural gas around all connections securely and replace terminal block cover. Tighten all male pipe threads to prevent leaks. Note: DO NOT plug in range at this time. Connect Gas Supply Shut off main gas supply valve before disconnecting the old range and leave it off until the new hook...
Installation 7. green ground screw Figure 18: Completed Three Wire Range Cord Connection 8. The gas connection is a registered trademark of the range. For use with LP gas and Natural gas around all connections securely and replace terminal block cover. Tighten all male pipe threads to prevent leaks. Note: DO NOT plug in range at this time. Connect Gas Supply Shut off main gas supply valve before disconnecting the old range and leave it off until the new hook...


