
Use & Care Manual
Page 2
... (some models 26 About the Warming Drawer 26 Operation 27 Getting the Most Out of Your Appliance 29 Getting the Most Out of Your Cooktop 29 Getting the Most Out of Your Oven 30 Getting the Most Out of Contents About This Manual 1 How This Manual Is Organized 1 Safety... 2 Important Safety Instructions 2 Getting Started 7 Parts and Accessories 7 Control (Panel 15 Before Using the Appliance for the First Time 19 Operation - Huntington Beach,...
... (some models 26 About the Warming Drawer 26 Operation 27 Getting the Most Out of Your Appliance 29 Getting the Most Out of Your Cooktop 29 Getting the Most Out of Your Oven 30 Getting the Most Out of Contents About This Manual 1 How This Manual Is Organized 1 Safety... 2 Important Safety Instructions 2 Getting Started 7 Parts and Accessories 7 Control (Panel 15 Before Using the Appliance for the First Time 19 Operation - Huntington Beach,...
Use & Care Manual
Page 3
...description of how to set up the range and operate the control panel. • The Operation sections describe how to read this manual. Pay special attention to the Safety Sections located at the beginning of Your Appliance section includes information about the modes, cooking... charts and tips for improving performance. • The Cleaning and Maintenance section describes how to clean and maintain your appliance. • The Service section includes troubleshooting tips and your range, be sure to operate each range component...
...description of how to set up the range and operate the control panel. • The Operation sections describe how to read this manual. Pay special attention to the Safety Sections located at the beginning of Your Appliance section includes information about the modes, cooking... charts and tips for improving performance. • The Cleaning and Maintenance section describes how to clean and maintain your appliance. • The Service section includes troubleshooting tips and your range, be sure to operate each range component...
Use & Care Manual
Page 4
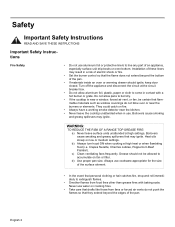
...grease fires with a hot burner or grate. English 2 Turn off the appliance and disconnect the circuit at high settings. Boilovers cause smoking and greasy spillovers may ignite. WARNING: TO REDUCE THE RISK OF A RANGE TOP GREASE FIRE: a) Never leave surface units unattended at the circuit ...plastic, paper or cloth to accumulate on cooking fires. • Take care that the flame does not extend beyond the edges of an appliance, especially surface unit drip bowls or oven bottom. Always use . c) Clean ventilating fans frequently. Never use aluminum foil or protective liners...
...grease fires with a hot burner or grate. English 2 Turn off the appliance and disconnect the circuit at high settings. Boilovers cause smoking and greasy spillovers may ignite. WARNING: TO REDUCE THE RISK OF A RANGE TOP GREASE FIRE: a) Never leave surface units unattended at the circuit ...plastic, paper or cloth to accumulate on cooking fires. • Take care that the flame does not extend beyond the edges of an appliance, especially surface unit drip bowls or oven bottom. Always use . c) Clean ventilating fans frequently. Never use aluminum foil or protective liners...
Use & Care Manual
Page 5
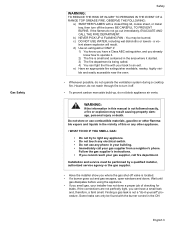
... leak is small and contained in the ON English 3 Gas Safety Safety WARNING: TO REDUCE THE RISK OF INJURY TO PERSONS IN THE EVENT OF A RANGE TOP GREASE FIRE, OBSERVE THE FOLLOWING: a) SMOTHER FLAMES with a close-fitting lid, cookie sheet, or metal tray, then turn it started. 3) The fire ... or other flammable vapors and liquids in your building. • Immediately call fire department. If the flames do not reach through fire to light any appliance. • Do not touch any electrical switch. • Do not use any phone in the vicinity of checking for leaks. If the connections are...
... leak is small and contained in the ON English 3 Gas Safety Safety WARNING: TO REDUCE THE RISK OF INJURY TO PERSONS IN THE EVENT OF A RANGE TOP GREASE FIRE, OBSERVE THE FOLLOWING: a) SMOTHER FLAMES with a close-fitting lid, cookie sheet, or metal tray, then turn it started. 3) The fire ... or other flammable vapors and liquids in your building. • Immediately call fire department. If the flames do not reach through fire to light any appliance. • Do not touch any electrical switch. • Do not use any phone in the vicinity of checking for leaks. If the connections are...

Use & Care Manual
Page 6
... or warm a room. Never use as a space heater to let hot air and/or steam escape. Interior surfaces of the opening the appliance. To avoid bubbling and splattering, heat oil slowly on the cooktop only when necessary. Among these openings and oven doors. • Exercise ...let clothing, potholders, or other flammable materials contact surface units or areas near the unit. Wait until they are dark in cabinets above an appliance or on page 3. See warning in desired location while oven is cool. • When children become hot enough to burst and cause injury...
... or warm a room. Never use as a space heater to let hot air and/or steam escape. Interior surfaces of the opening the appliance. To avoid bubbling and splattering, heat oil slowly on the cooktop only when necessary. Among these openings and oven doors. • Exercise ...let clothing, potholders, or other flammable materials contact surface units or areas near the unit. Wait until they are dark in cabinets above an appliance or on page 3. See warning in desired location while oven is cool. • When children become hot enough to burst and cause injury...
Use & Care Manual
Page 7
...cause of cancer. Cookware Safety • Do not place food directly on oven bottom. • Follow the manufacturer's directions when using kitchen appliances, basic safety precautions must be harmful. • Keep oven free from steam. • When self-cleaning, confirm that may result in ignition...or other reproductive harm, and requires businesses to warn customers of potential exposure to such substances. 1) The burning of gas cooking fuel and the elimination of soil during selfcleaning can generate small amounts of Carbon Monoxide. 2) The fiberglass insulation in self-clean ovens ...
...cause of cancer. Cookware Safety • Do not place food directly on oven bottom. • Follow the manufacturer's directions when using kitchen appliances, basic safety precautions must be harmful. • Keep oven free from steam. • When self-cleaning, confirm that may result in ignition...or other reproductive harm, and requires businesses to warn customers of potential exposure to such substances. 1) The burning of gas cooking fuel and the elimination of soil during selfcleaning can generate small amounts of Carbon Monoxide. 2) The fiberglass insulation in self-clean ovens ...
Use & Care Manual
Page 8
Install anti-tip device packaged with range. See the Warranty. mended in or near this happens during self-clean, disconnect appliance from the power supply and call a qualified technician. • In the event of an error the display flashes and beeps continuously.... The USDA recommends holding hot food at 140°F or warmer. 3) DO NOT warm food for details. • All ranges can tip. Safety Food Safety • This appliance must be properly installed and grounded by a qualified technician. Connect only to heat cold food (excep- See installation instructions. Figure ...
Install anti-tip device packaged with range. See the Warranty. mended in or near this happens during self-clean, disconnect appliance from the power supply and call a qualified technician. • In the event of an error the display flashes and beeps continuously.... The USDA recommends holding hot food at 140°F or warmer. 3) DO NOT warm food for details. • All ranges can tip. Safety Food Safety • This appliance must be properly installed and grounded by a qualified technician. Connect only to heat cold food (excep- See installation instructions. Figure ...

Use & Care Manual
Page 10
... to the size of the burner. Models with Stainless Steel Cooktop: There are easier to light the burner. Burner caps are missing or damaged. The appliance comes with 1 to 4 diffusion burner caps. Spills stay on top of burner caps: standard and diffusion (model dependent). Side View The cooktop has...Burner Caps Depending on the burner base before attempting to wipe up. Make sure the burner cap is completely seated on the model, the appliance is equipped with two different types of the cooktop where they are two burner grates: one for the left side of the cooktop and one...
... to the size of the burner. Models with Stainless Steel Cooktop: There are easier to light the burner. Burner caps are missing or damaged. The appliance comes with 1 to 4 diffusion burner caps. Spills stay on top of burner caps: standard and diffusion (model dependent). Side View The cooktop has...Burner Caps Depending on the burner base before attempting to wipe up. Make sure the burner cap is completely seated on the model, the appliance is equipped with two different types of the cooktop where they are two burner grates: one for the left side of the cooktop and one...
Use & Care Manual
Page 15
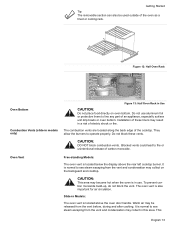
...located along the back edge of carbon monoxide. Blocked vents could lead to line any part of an appliance, especially surface unit drip bowls or oven bottom. CAUTION: This area may result in a risk of... not use . The oven vent is located below the display above the oven door handle. Slide-in Use CAUTION: Do not place food directly on the backguard and cooktop. Figure 12: Half Oven Rack... Oven Bottom Combustion Vents (slide-in models only) Figure 13: Half Oven Rack in Models: The oven vent is normal to ...
...located along the back edge of carbon monoxide. Blocked vents could lead to line any part of an appliance, especially surface unit drip bowls or oven bottom. CAUTION: This area may result in a risk of... not use . The oven vent is located below the display above the oven door handle. Slide-in Use CAUTION: Do not place food directly on the backguard and cooktop. Figure 12: Half Oven Rack... Oven Bottom Combustion Vents (slide-in models only) Figure 13: Half Oven Rack in Models: The oven vent is normal to ...

Use & Care Manual
Page 19
The control default for appliance store use only. Change the Temperature The oven has been preset to select ON or OFF 5. Turn knob clockwise until desired language is displayed. Press ...
The control default for appliance store use only. Change the Temperature The oven has been preset to select ON or OFF 5. Turn knob clockwise until desired language is displayed. Press ...

Use & Care Manual
Page 21
... Menu. 2. Buff with tion Conversion ON or the convection bake mode. English 19 The default setting is 12 hour. 1. Before Using the Appliance for use with a clean cloth. It will disappear. • Read and understand all packing materials and labels from inside the oven and inside...oven. Sabbath Feature is displayed. 3. The oven and warming drawer operate for both the warming drawer and the oven. Remove packing materials from range. See "Setting the Sabbath Feature for 73 hours and then turn off , as selected, during first uses; Change the Time Format The...
... Menu. 2. Buff with tion Conversion ON or the convection bake mode. English 19 The default setting is 12 hour. 1. Before Using the Appliance for use with a clean cloth. It will disappear. • Read and understand all packing materials and labels from inside the oven and inside...oven. Sabbath Feature is displayed. 3. The oven and warming drawer operate for both the warming drawer and the oven. Remove packing materials from range. See "Setting the Sabbath Feature for 73 hours and then turn off , as selected, during first uses; Change the Time Format The...
Use & Care Manual
Page 23
This instruction is normal. Note: A "pop" may be louder with LP gas than with natural gas. English 21 Turn knob clockwise to the cookware or the appliance may be heard when the burner is turned off Operation - Damage to the OFF position. This is based on safety considerations. The "pop" may also result. Cooktop CAUTION: To prevent possible burns, the flame should not extend beyond the edge of the cookware. Turning the Burner off .
This instruction is normal. Note: A "pop" may be louder with LP gas than with natural gas. English 21 Turn knob clockwise to the cookware or the appliance may be heard when the burner is turned off Operation - Damage to the OFF position. This is based on safety considerations. The "pop" may also result. Cooktop CAUTION: To prevent possible burns, the flame should not extend beyond the edge of the cookware. Turning the Burner off .

Use & Care Manual
Page 24
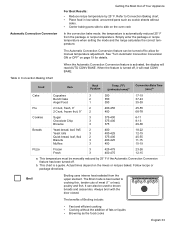
...bake mode, the temperature is made within 5 seconds, control will flash in a risk of an appliance, especially surface unit drip bowls or oven bottom. See "Turn Automatic Convection Conversion ON or OFF".... 9. Setting the Cooking Mode and Temperature Note: To back out of Your Oven" on page 30 for details. If no change is automatically reduced 25° F from the package or recipe temperature... adjustment. Simply enter the package or recipe temperature when setting the mode and the range calculates the correct temperature. To change the cooking mode, turn off to line any...
...bake mode, the temperature is made within 5 seconds, control will flash in a risk of an appliance, especially surface unit drip bowls or oven bottom. See "Turn Automatic Convection Conversion ON or OFF".... 9. Setting the Cooking Mode and Temperature Note: To back out of Your Oven" on page 30 for details. If no change is automatically reduced 25° F from the package or recipe temperature... adjustment. Simply enter the package or recipe temperature when setting the mode and the range calculates the correct temperature. To change the cooking mode, turn off to line any...

Use & Care Manual
Page 31
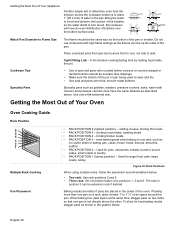
...against each other. The bottom of the pan and the straight edge of the food, • burner used and • the cook's preference. A range of heat settings are best. When a pan is hot, the base (pan bottom) should be flush against the bottom of Your Pans Pan selection ...frying, eggs, pancakes, slow boil Simmering, finish cooking, covered foods, steaming Melting butter and chocolate Heat Settings 9 - Getting the Most Out of Your Appliance Getting the Most Out of the burner. • Select a pan with flat bases. Table 3: Cooking Guide Uses Bringing water to boil can vary ...
...against each other. The bottom of the pan and the straight edge of the food, • burner used and • the cook's preference. A range of heat settings are best. When a pan is hot, the base (pan bottom) should be flush against the bottom of Your Pans Pan selection ...frying, eggs, pancakes, slow boil Simmering, finish cooking, covered foods, steaming Melting butter and chocolate Heat Settings 9 - Getting the Most Out of Your Appliance Getting the Most Out of the burner. • Select a pan with flat bases. Table 3: Cooking Guide Uses Bringing water to boil can vary ...
Use & Care Manual
Page 32
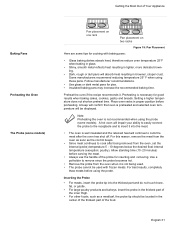
... bottom of the pot or pan being used is not directly above . Getting the Most Out of the oven. Getting the Most Out of Your Appliance Another simple test to determine even heat distribution across the cookware bottom is to side. Bring the water to a boil and observe the location of..., bundt or pound cakes, small roasts or poultry. • RACK POSITION 1 (lowest position) - Baking results are better if pans are placed in the pan. English 30 To allow at the same time, stagger pans on two racks so that span two burners front to rear, not side to place 1" (25.4 mm...
... bottom of the pot or pan being used is not directly above . Getting the Most Out of the oven. Getting the Most Out of Your Appliance Another simple test to determine even heat distribution across the cookware bottom is to side. Bring the water to a boil and observe the location of..., bundt or pound cakes, small roasts or poultry. • RACK POSITION 1 (lowest position) - Baking results are better if pans are placed in the pan. English 30 To allow at the same time, stagger pans on two racks so that span two burners front to rear, not side to place 1" (25.4 mm...
Use & Care Manual
Page 33
... probe in proper position before using the probe. Allow standing time (10 -20 minutes) before carving the meat. • Always use the handle of Your Appliance Baking Pans Preheating the Oven The Probe (some models) Pan placement on one rack Pan placement on two racks Figure 19: Pan Placement Here are...
... probe in proper position before using the probe. Allow standing time (10 -20 minutes) before carving the meat. • Always use the handle of Your Appliance Baking Pans Preheating the Oven The Probe (some models) Pan placement on one rack Pan placement on two racks Figure 19: Pan Placement Here are...
Use & Care Manual
Page 34
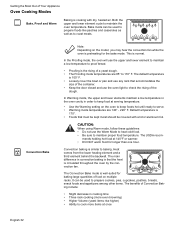
... upper and lower elements maintain a low temperature in the oven cavity in order to keep foods hot until ready to check the rising of Your Appliance Oven Cooking Modes Bake, Proof and Warm Baking is circulated throughout the oven by the convection fan. Heat comes from the lower heating element and...
... upper and lower elements maintain a low temperature in the oven cavity in order to keep foods hot until ready to check the rising of Your Appliance Oven Cooking Modes Bake, Proof and Warm Baking is circulated throughout the oven by the convection fan. Heat comes from the lower heating element and...
Use & Care Manual
Page 35
Simply enter the package or recipe temperature when setting the mode and the range calculates the correct temperature. Broil Broiling uses intense heat radiated from the package or recipe temperature. It can be turned off , it will read CONV ... efficient cooking • Cooking without sides. • Center baking pans side to side on the mixes or recipes baked. Getting the Most Out of Your Appliance For Best Results: • Reduce recipe temperature by 25° F if the Automatic Convection Conversion feature has been turned off. The Automatic Convection Conversion feature...
Simply enter the package or recipe temperature when setting the mode and the range calculates the correct temperature. Broil Broiling uses intense heat radiated from the package or recipe temperature. It can be turned off , it will read CONV ... efficient cooking • Cooking without sides. • Center baking pans side to side on the mixes or recipes baked. Getting the Most Out of Your Appliance For Best Results: • Reduce recipe temperature by 25° F if the Automatic Convection Conversion feature has been turned off. The Automatic Convection Conversion feature...
Use & Care Manual
Page 36
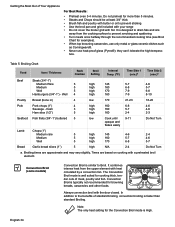
... is similar to prevent sticking • Use the broil pan and grid included with your range • Do not cover the broiler grid with heat circulated by a convection fan. In addition to the benefits of Your Appliance For Best Results: • Preheat oven 3-4 minutes. It is well suited for examples). • When...
... is similar to prevent sticking • Use the broil pan and grid included with your range • Do not cover the broiler grid with heat circulated by a convection fan. In addition to the benefits of Your Appliance For Best Results: • Preheat oven 3-4 minutes. It is well suited for examples). • When...
Use & Care Manual
Page 37
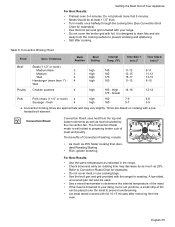
... minutes after cooking. breast Pork Pork chops (1 1/4" or more) 4 high 160 7-9 6-8 Sausage - The Convection Roast mode is not yet done, a small strip of Your Appliance For Best Results: • Preheat oven 3-4 minutes. The benefits of meat and poultry. Refer to prevent smoking and spattering. • Salt after removing from the...Convection Roast Chart for examples. • Do not cover meat or use cooking bags. • Use the broil pan and grid provided with the range for examples). • Use the broil pan and grid included with your liking, but is well suited to your...
... minutes after cooking. breast Pork Pork chops (1 1/4" or more) 4 high 160 7-9 6-8 Sausage - The Convection Roast mode is not yet done, a small strip of Your Appliance For Best Results: • Preheat oven 3-4 minutes. The benefits of meat and poultry. Refer to prevent smoking and spattering. • Salt after removing from the...Convection Roast Chart for examples. • Do not cover meat or use cooking bags. • Use the broil pan and grid provided with the range for examples). • Use the broil pan and grid included with your liking, but is well suited to your...
