Installation Instructions
Page 4
... the furniture doors 31 19. Loading the appliance door 32 20. Attaching the adjusting rail to connect the water 24 9. Changing over the door hinges 20 6. Attaching the cover strips 39 29. Adjusting the door opening angle 41 31. Transport of the cavity 27 14. Removing the packaging 19 4. Preparing to the furniture door 32 21. Connecting the water to the side of air separator 40 30...
... the furniture doors 31 19. Loading the appliance door 32 20. Attaching the adjusting rail to connect the water 24 9. Changing over the door hinges 20 6. Attaching the cover strips 39 29. Adjusting the door opening angle 41 31. Transport of the cavity 27 14. Removing the packaging 19 4. Preparing to the furniture door 32 21. Connecting the water to the side of air separator 40 30...
Installation Instructions
Page 5
... Owner's Manual for warranty information. i This symbol is not covered under the Appliance Warranty. Note to Installer ć Be sure to the weight and size of this warning. e WARNING These appliances are intended for its intended purpose. Due to leave these instructions with the National Electric Code, ANSI/NFPA70 - e IMPORTANT Save these instructions completely and carefully. All connections for local inspector's use by a qualified service...
... Owner's Manual for warranty information. i This symbol is not covered under the Appliance Warranty. Note to Installer ć Be sure to the weight and size of this warning. e WARNING These appliances are intended for its intended purpose. Due to leave these instructions with the National Electric Code, ANSI/NFPA70 - e IMPORTANT Save these instructions completely and carefully. All connections for local inspector's use by a qualified service...

Installation Instructions
Page 7
... the heavy weight of a hard, rigid material. The installation location should not be made of a fully loaded appliance, a loadĆbearing base is recommended. The minimum thickness of frost. in rooms which are connected securely to observe the specified dimensions of the installation cavity for a troubleĆfree installation of the appliance and for the loadĆbearing...
... the heavy weight of a hard, rigid material. The installation location should not be made of a fully loaded appliance, a loadĆbearing base is recommended. The minimum thickness of frost. in rooms which are connected securely to observe the specified dimensions of the installation cavity for a troubleĆfree installation of the appliance and for the loadĆbearing...
Installation Instructions
Page 8
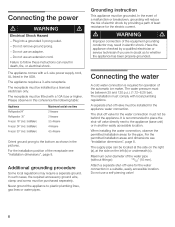
... pipe. Connecting the power2. Do not remove ground prong. - IceMaker) Freezer 30" (incl. Please observe in the USA. Additional grounding procedure3. The receptacle must comply with a 10A fuse or higher. Do not use an extension cord. The installation must be located at the side on the left (b) or underneath (c). The appliance comes with a 3Ćwire power supply cord, UL listed in this...
... pipe. Connecting the power2. Do not remove ground prong. - IceMaker) Freezer 30" (incl. Please observe in the USA. Additional grounding procedure3. The receptacle must comply with a 10A fuse or higher. Do not use an extension cord. The installation must be located at the side on the left (b) or underneath (c). The appliance comes with a 3Ćwire power supply cord, UL listed in this...
Installation Instructions
Page 17
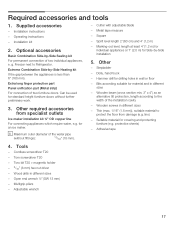
..." (8 mm) hex nut driver - g. Freezer next to Refrigerator. MarkingĆout level, length at least 4' (1.2 m) for individual appliances or 7' (2.0 m) for standard height furniture doors without fittings): 13/32" (10 mm). - Hammer drill for covering and protecting furniture (e.g. Multigrip pliers - Extra long finger protection part Panel unification part (Metal strip) For connection of two individual appliances, e. Installation kit 2. Can be used for SideĆby...
..." (8 mm) hex nut driver - g. Freezer next to Refrigerator. MarkingĆout level, length at least 4' (1.2 m) for individual appliances or 7' (2.0 m) for standard height furniture doors without fittings): 13/32" (10 mm). - Hammer drill for covering and protecting furniture (e.g. Multigrip pliers - Extra long finger protection part Panel unification part (Metal strip) For connection of two individual appliances, e. Installation kit 2. Can be used for SideĆby...
Installation Instructions
Page 18
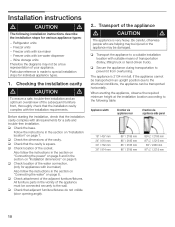
... to a suitable installation location with suitable means of the water connection. (only for a safe and troubleĆfree installation. Freezer units with iceĆwater dispenser - Freezer units with ice maker - q Check location of transportation (trolley, lifting truck or handĆdriven truck). q Check the dimensions of the adjacent furniture/fixtures. When erecting the appliance, observe the required minimum height at the installation location according to the wall. Installation instructions d CAUTION...
... to a suitable installation location with suitable means of the water connection. (only for a safe and troubleĆfree installation. Freezer units with iceĆwater dispenser - Freezer units with ice maker - q Check location of transportation (trolley, lifting truck or handĆdriven truck). q Check the dimensions of the adjacent furniture/fixtures. When erecting the appliance, observe the required minimum height at the installation location according to the wall. Installation instructions d CAUTION...

Installation Instructions
Page 32
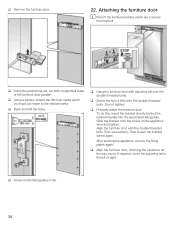
... adjusting rail and the overhead furniture/fixtures. 32 Never screw into the best loadĆbearing material of the furniture door. Recommendations: 18" Appliance 22 lbs / 10 kg 24" Appliance 33 lbs / 15 kg 30" Appliance 44 lbs / 20 kg q Unscrew the installation support part from customer service as possible. Loading the appliance door When attaching the furniture doors...
... adjusting rail and the overhead furniture/fixtures. 32 Never screw into the best loadĆbearing material of the furniture door. Recommendations: 18" Appliance 22 lbs / 10 kg 24" Appliance 33 lbs / 15 kg 30" Appliance 44 lbs / 20 kg q Unscrew the installation support part from customer service as possible. Loading the appliance door When attaching the furniture doors...
Installation Instructions
Page 34
... furniture handles which you have just made to the left or right. q Using the positioning aid, set both longitudinal sides of the furniture door parallel. q Precisely adjust the furniture door. After erecting the appliance, remove the fixing plates again! If required, move the adjusting rail to the vertical marks. Align the furniture door with adjusting rail over the double threaded bolts. q Remove the furniture door...
... furniture handles which you have just made to the left or right. q Using the positioning aid, set both longitudinal sides of the furniture door parallel. q Precisely adjust the furniture door. After erecting the appliance, remove the fixing plates again! If required, move the adjusting rail to the vertical marks. Align the furniture door with adjusting rail over the double threaded bolts. q Remove the furniture door...
Use & Care Manual
Page 3
Contents IMPORTANT SAFETY INSTRUCTIONS 4 Congratulations 5 Your new appliance 6 Installation 7 Connection to the power supply 8 Connecting the water 8 Switching on the appliance 8 Switching off and disconnecting the appliance 8 Functions 9 Variable interior design 9 Control panel 10 Setting the temperature 11 Super function 11 Setup mode 11 Settings which can be changed in setup mode 12 Vacation Mode 13 Sabbath Mode 13 Freezing and storing 13 Ice and water dispenser 14 How to save energy 17 Defrosting 17 Operating noises 17 Cleaning the appliance 18 Odors...
Contents IMPORTANT SAFETY INSTRUCTIONS 4 Congratulations 5 Your new appliance 6 Installation 7 Connection to the power supply 8 Connecting the water 8 Switching on the appliance 8 Switching off and disconnecting the appliance 8 Functions 9 Variable interior design 9 Control panel 10 Setting the temperature 11 Super function 11 Setup mode 11 Settings which can be changed in setup mode 12 Vacation Mode 13 Sabbath Mode 13 Freezing and storing 13 Ice and water dispenser 14 How to save energy 17 Defrosting 17 Operating noises 17 Cleaning the appliance 18 Odors...

Use & Care Manual
Page 4
... they are not problems of this Owner's Manual. 2. Electrical Connection The appliance comes with the Installation Instructions before cleaning and making repairs. In such cases, the required accessory ground wire, clamp and screw must be performed by a qualified electrician or service technician if you are damp or wet. If you can be grounded. NOTE: Setting the freezer temperature controls to OFF does not remove power to harm stratospheric...
... they are not problems of this Owner's Manual. 2. Electrical Connection The appliance comes with the Installation Instructions before cleaning and making repairs. In such cases, the required accessory ground wire, clamp and screw must be performed by a qualified electrician or service technician if you are damp or wet. If you can be grounded. NOTE: Setting the freezer temperature controls to OFF does not remove power to harm stratospheric...

Use & Care Manual
Page 6
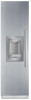
Diagrams may vary. 1. Freezer compartment for storing frozen food 5. Freezer storage compartment 6. Door storage bins 9. PullĆdown pitcher holder 6 Ice maker 3. Ice cube container 4. Dispenser key panel 11. Ice and Water Dispenser 10. Control panel 2. Freezer drawer 7. Water filter 8. Your new appliance These operating instructions refer to several models.
Diagrams may vary. 1. Freezer compartment for storing frozen food 5. Freezer storage compartment 6. Door storage bins 9. PullĆdown pitcher holder 6 Ice maker 3. Ice cube container 4. Dispenser key panel 11. Ice and Water Dispenser 10. Control panel 2. Freezer drawer 7. Water filter 8. Your new appliance These operating instructions refer to several models.
Use & Care Manual
Page 8
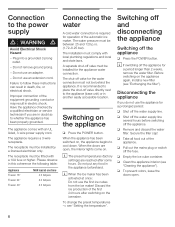
... switching on the icemaker. q Remove and discard the water filter. Plug into a grounded 3 prong outlet. - Improper connection of the appliance. Discard the ice production of the automatic ice maker. i The preset temperatures (factory settings) are open . 8 To change the preset temperatures ć> see Cleaning the appliance"). Before switching on . It is required for a period longer than 2 weeks, remove the water filter. q Clean the appliance interior (see Setting the temperature". Failure to the power supply d WARNING d Avoid Electrical...
... switching on the icemaker. q Remove and discard the water filter. Plug into a grounded 3 prong outlet. - Improper connection of the appliance. Discard the ice production of the automatic ice maker. i The preset temperatures (factory settings) are open . 8 To change the preset temperatures ć> see Cleaning the appliance"). Before switching on . It is required for a period longer than 2 weeks, remove the water filter. q Clean the appliance interior (see Setting the temperature". Failure to the power supply d WARNING d Avoid Electrical...

Use & Care Manual
Page 14
.... d WARNING d Do not use the first 30-40 ice cubes for dispensing water or ice ć risk of hygiene. 14 i The ice and water dispenser will not function unless the appliance is connected to wrap food correctly q Place the food in the lines. How to the power and water supply. Run off drinking water and pour away until water can be dispensed without hot air fan - The following When...
.... d WARNING d Do not use the first 30-40 ice cubes for dispensing water or ice ć risk of hygiene. 14 i The ice and water dispenser will not function unless the appliance is connected to wrap food correctly q Place the food in the lines. How to the power and water supply. Run off drinking water and pour away until water can be dispensed without hot air fan - The following When...

Use & Care Manual
Page 15
... models. - To switch on , it takes approx. 24 hours until the first batch of dispenser light. 15 Freshness of the water connection in the house should be wrapped thoroughly or stored in airtight containers to be cleaned occasionally with water. Ice cubes which can make approx. 125 ice cubes within 24 hours. The ice cube container should be replaced in the ice cube container. Cold air...
... models. - To switch on , it takes approx. 24 hours until the first batch of dispenser light. 15 Freshness of the water connection in the house should be wrapped thoroughly or stored in airtight containers to be cleaned occasionally with water. Ice cubes which can make approx. 125 ice cubes within 24 hours. The ice cube container should be replaced in the ice cube container. Cold air...
Use & Care Manual
Page 17
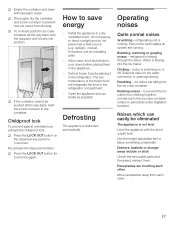
... the LOCK OUT button on the dispenser key panel for 3 seconds again. Operating noises Quite normal noises Grumbling ć refrigerating unit is opening/closing. Water is not level Level the appliance with lukewarm water. Noises which can easily be pushed all the way back onto the supports until it in the recirculating air system are falling into the ice cube container. Use the heightĆadjustable feet or place something...
... the LOCK OUT button on the dispenser key panel for 3 seconds again. Operating noises Quite normal noises Grumbling ć refrigerating unit is opening/closing. Water is not level Level the appliance with lukewarm water. Noises which can easily be pushed all the way back onto the supports until it in the recirculating air system are falling into the ice cube container. Use the heightĆadjustable feet or place something...
Use & Care Manual
Page 20
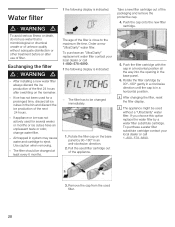
... swichting on the base panel by a water filter substitute cartridge. Rotate the filter cap on the icemaker. - Order a new "UltraClarity" water filter. i After changing the filter, reset the filter display. Remove the cap from the used for a prolonged time, discard all the way into the opening in an antiĆclockwise direction. 2. Exchanging the filter16. Air trapped in a horizontal position. To purchase an "UltraClarity" replacement water filter contact your local dealer...
... swichting on the base panel by a water filter substitute cartridge. Rotate the filter cap on the icemaker. - Order a new "UltraClarity" water filter. i After changing the filter, reset the filter display. Remove the cap from the used for a prolonged time, discard all the way into the opening in an antiĆclockwise direction. 2. Exchanging the filter16. Air trapped in a horizontal position. To purchase an "UltraClarity" replacement water filter contact your local dealer...

Use & Care Manual
Page 21
... the filter display while using an "UltraClarity" water filter. In this option replace the water filter by a water filter substitute cartridge. Deactivating the filter display i The appliance might be used without a "UltraClarity" water filter. After each filter change cannot be signalled by pressing the super and ice buttons for 3 seconds simultaneously. 21 To deactivate the filter display: q Simultaneously hold down the setup and ice buttons for 3 seconds. Resetting the filter display i If the filter display is not reset, the next required filter change...
... the filter display while using an "UltraClarity" water filter. In this option replace the water filter by a water filter substitute cartridge. Deactivating the filter display i The appliance might be used without a "UltraClarity" water filter. After each filter change cannot be signalled by pressing the super and ice buttons for 3 seconds simultaneously. 21 To deactivate the filter display: q Simultaneously hold down the setup and ice buttons for 3 seconds. Resetting the filter display i If the filter display is not reset, the next required filter change...
Use & Care Manual
Page 23
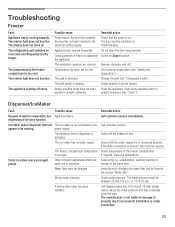
... Clean the appliance. dispensing of the freezer compartment. The freezer compartment temperature is accurat, call customer service. Water filter must be switched on. If the water connection is too high. If required, lower the temperature. The refrigerating unit switches on . Check that the water supply line is defective. Check the plug. Do not open the door unnecessarily. Check whether it can be running. Dispenser/IceMaker Fault Possible cause Request of water is on Super function. Ice maker...
... Clean the appliance. dispensing of the freezer compartment. The freezer compartment temperature is accurat, call customer service. Water filter must be switched on. If the water connection is too high. If required, lower the temperature. The refrigerating unit switches on . Check that the water supply line is defective. Check the plug. Do not open the door unnecessarily. Check whether it can be running. Dispenser/IceMaker Fault Possible cause Request of water is on Super function. Ice maker...

Use & Care Manual
Page 24
... action The ice maker is not liable for changing the water filter can be between 25 and 120 p.s.i. (1.72ć8.25 bar). The condensation heater does not function. The WATER light and the ICE CUBE light flash twice. Clean the inside of the freezer compartment. The water pressure must be dispensed. A wrong water valve has been installed. Check water pressure. The ice maker is switch off. cubes. position (see Changing the bulb"). SelfĆ...
... action The ice maker is not liable for changing the water filter can be between 25 and 120 p.s.i. (1.72ć8.25 bar). The condensation heater does not function. The WATER light and the ICE CUBE light flash twice. Clean the inside of the freezer compartment. The water pressure must be dispensed. A wrong water valve has been installed. Check water pressure. The ice maker is switch off. cubes. position (see Changing the bulb"). SelfĆ...
Use & Care Manual
Page 27
... workmanship in the sealed refrigeration system. Service must be performed by Bosch before service is performed. 9. These parts are : compressor, evaporator, condenser, dryer, and connecting tubing. Removal and replacement of purchase, when this freezer is used in other than normal, singleĆfamily household use. 3. BOSCH AND BOSCH CANADA SHALL NOT BE LIABLE FOR INCIDENTAL OR CONSEQUENTIAL DAMAGES. Water filter cartridge: 30 day limited warranty on water filter. Repairs to parts or systems resulting...
... workmanship in the sealed refrigeration system. Service must be performed by Bosch before service is performed. 9. These parts are : compressor, evaporator, condenser, dryer, and connecting tubing. Removal and replacement of purchase, when this freezer is used in other than normal, singleĆfamily household use. 3. BOSCH AND BOSCH CANADA SHALL NOT BE LIABLE FOR INCIDENTAL OR CONSEQUENTIAL DAMAGES. Water filter cartridge: 30 day limited warranty on water filter. Repairs to parts or systems resulting...


