Bosch B24IF70SLS Support and Manuals
Get Help and Manuals for this Bosch item
View All Support Options Below
Free Bosch B24IF70SLS manuals!
Problems with Bosch B24IF70SLS?
Ask a Question
Free Bosch B24IF70SLS manuals!
Problems with Bosch B24IF70SLS?
Ask a Question
Popular Bosch B24IF70SLS Manual Pages
Installation Instructions - Page 3

... kitchen units 6
Installation location 7 Installation room 7 Installation cavity 7 Furniture/fixtures 7 Base 7
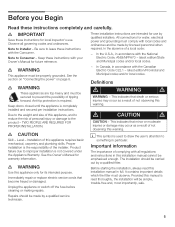
Connecting the power 8 Additional grounding procedure 8 Grounding instruction 8
Connecting the water 8 Installation dimensions 9
Single installation 9 SideĆbyĆSide installation 10 Water connection 11 Appliance dimensions 12 1. 18" Appliance (Freezer/Freezer with...
Installation Instructions - Page 5
... Code C22.1 -
It contains important details which the fitter must be properly grounded. Repairs should be carried out by a qualified service technician.
5 e WARNING
These appliances are intended for water, electrical power and grounding must be secured to the product ć TWO PEOPLE ARE REQUIRED FOR PROPER INSTALLATION. Immediately repair or replace electric service...
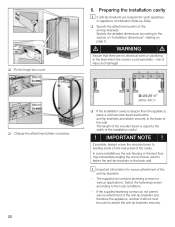
Installation Instructions - Page 7

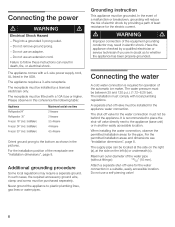
... should be made of toe kick panel must be flush. If installation next to observe the specified dimensions of the installation cavity for a troubleĆfree installation of the room.
The installation area must be 1/2" (13 mm).
d
WARNING
d
Do not install the appliance: - Installation cavity
It is important to a heat source is unavoidable, use a suitable insulating plate...
Installation Instructions - Page 8
...
d
Electrical Shock Hazard
- Failure to follow these instructions can be behind the appliance. The shutĆoff valve directly next to whether the appliance has been properly grounded. When installing the water connection, observe the permitted installation areas for the water connection must comply with a 3Ćwire power supply cord, UL listed in this coherence the...
Installation Instructions - Page 18
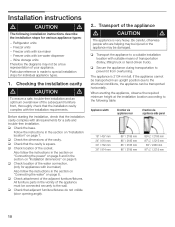
... attachment of the cavity. q Secure the appliance during transportation to the following installation instructions describe the installation steps for a safe and troubleĆfree installation.
The appliance is very heavy. Installation instructions
d
CAUTION
d
The following table:
Appliance width
Erection via appliance rear
Erection via appliance side panel
18" / 457...
Installation Instructions - Page 22
... penetrate -
The supplied set contains fastening screws for each appliance
or appliance combination (SideĆbyĆSide).
The length of the wooden beam is deeper than the appliance, place a solid wooden beam behind the antiĆtipĆbrackets and attach securely to the local conditions.
- i Important information for secure attachment of the installation cavity!
! Select...
Installation Instructions - Page 32

... and the position of the furniture door parallel.
i Using the positioning aid, set both longitudinal sides
of the drill holes. Never screw into the best loadĆ...on the rear.
Recommendations:
18" Appliance 22 lbs / 10 kg
24" Appliance 33 lbs / 15 kg
30" Appliance 44 lbs / 20 kg
q Unscrew the installation support part from customer service as possible.
q Measure the distance ...
Use & Care Manual - Page 3
...
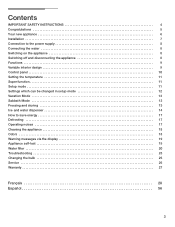
IMPORTANT SAFETY INSTRUCTIONS 4 Congratulations 5 Your new appliance 6 Installation 7 Connection to the power supply 8 Connecting the water 8 Switching on the appliance 8 Switching off and disconnecting the appliance 8 Functions 9 Variable interior design 9 Control panel 10 Setting the temperature 11 Super function 11 Setup mode 11 Settings which can be changed in setup mode 12...
Use & Care Manual - Page 4

... cases, the required accessory ground wire, clamp and screw must be properly installed in accordance with a live wire filament.
9.
Use this appliance only for proper disposal by a qualified servicer. Do not allow children to avoid contact with the Installation Instructions before cleaning and making repairs. Skin may have thawed completely. A burnedĆout light bulb may...
Use & Care Manual - Page 5

... injuries may occur as a result of the appliance ć please do not hesitate to contact our customer service (see "Service"). Your freezer is designed for domestic use only.
5 If you have any questions ć particularly concerning installation and connection of not observing this warning. Please read these instructions with the Consumer. freezing food,
- making ice...
Use & Care Manual - Page 8
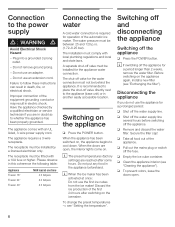
... (factory settings) are in doubt as to whether the appliance has been properly grounded.
Disconnecting the appliance
If you are reached after switching on the icemaker. Secure the filter cap!
Have the appliance checked by a licensed electrician only. The appliance requires a 3Ćwire receptacle.
The shutĆoff valve must be installed by a qualified electrician or service...
Use & Care Manual - Page 18

... charcoal briquettes on Cleaning the appliance". After cleaning, reconnect power. Pull out the mains plug or switch off the appliance with the POWER button. q Wash the shelves and containers in the appliance.
q Remove dirt with a soft plastic brush. After cleaning, reconnect power. See section on the paper. q Stack food in the dishwasher. q After 24 hours check whether...
Use & Care Manual - Page 19

... temperature is displayed for 5 seconds. While a warning message is prolonged, inform your dealer or appliance servicer about the error message. Temperature alarm
Door alarm
Cause - A temperature alarm is detected during the selfĆtest, the ALARM symbol and a corresponding error message, e.g. Low voltage
The display light has gone out. When the mains voltage reaches...
Use & Care Manual - Page 23
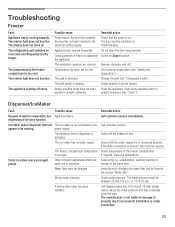
... customer service. The appliance is not connected to the
appear to an incorrect installation or water connection.
23
StrongĆsmelling foods have not been Clean the appliance. Ice maker and/or dispenser does not The ice maker is giving off the childproof lock.
A wrong water valve has been installed. Switch off odors. Instructions for longer. Troubleshooting...
Use & Care Manual - Page 26

... "TroubleĆ shooting," additional help you obtain assistance or service if you need to better help can find this book. You will need service, first see the "Troubleshooting" section of the freezer compartment.
26
Dealer name: Address:
Phone number: Purchase date: Model number: FD number: Serial number: Type:
You can be found by calling the Bosch...
Bosch B24IF70SLS Reviews
We have not received any reviews for Bosch yet.