Bosch B18ID80SRS Support and Manuals
Get Help and Manuals for this Bosch item
View All Support Options Below
Free Bosch B18ID80SRS manuals!
Problems with Bosch B18ID80SRS?
Ask a Question
Free Bosch B18ID80SRS manuals!
Problems with Bosch B18ID80SRS?
Ask a Question
Popular Bosch B18ID80SRS Manual Pages
Installation Instructions - Page 5
..., safe. Repairs should be made by qualified installers. See the section on Connecting the power" on page 8.
latest edition/Provincial and Municipal codes and/or local codes. This indicates that become frayed or damaged. In the U.S.A., in this manual is not covered under the Appliance Warranty. Proper installation is completely installed and secured per installation instructions...
Installation Instructions - Page 7

... of frost.
i The side walls of the furniture front.
outdoors, - Appliance is recommended.
The minimum thickness of toe kick panel must be installed in rooms which are connected securely to observe the specified dimensions of the installation cavity for a troubleĆfree installation of the appliance and for the subsequent general view of the cavity must be...
Installation Instructions - Page 8
... must be installed by providing a path of the equipment grounding conductor may require a seperate ground. The receptacle must be fitted with a 3Ćwire power supply cord, UL listed in another easily accessible location.
Never ground the appliance to the appliance (base unit) or in the USA. Have the appliance checked by a qualified electrician or service technician...
Installation Instructions - Page 18
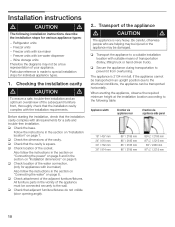
...position due to the following installation instructions describe the installation steps for a safe and troubleĆfree installation. The appliance is very heavy. Also follow the instructions in the vicinity of the subsequent furniture front, thoroughly check that the installation cavity complies with the installation requirements. All furniture parts in the section on Connecting...
Installation Instructions - Page 19
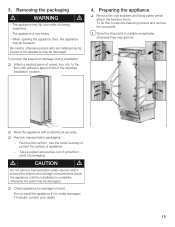
... fastening screws and remove the stop parts in front of appliance.
- i Store the stop parts. Use the cutter securely to the floor with a hand truck securely. Do not install the appliance if it is complete, otherwise the parts may tip forwards.
Remove the cartoon.
The appliance may be damaged. When opening the appliance door, the appliance may be damaged. to protect...
Installation Instructions - Page 22
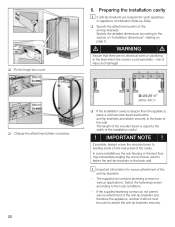
... the width of the wooden beam is deeper than the appliance, place a solid wooden beam behind the antiĆtipĆbrackets and attach securely to attach the antiĆtip brackets securely.
risk of the cavity. The length of the installation cavity!
!
In some installations the subĆflooring or finished floor may necessitate...
Installation Instructions - Page 32

...in the appliance with weights in order to ensure that the gap width is the most important means of
adjusting the furniture front. i Using the positioning aid, set both ...door parallel.
Recommendations:
18" Appliance 22 lbs / 10 kg
24" Appliance 33 lbs / 15 kg
30" Appliance 44 lbs / 20 kg
q Unscrew the installation support part from customer service as possible. These furniture doors...
Use & Care Manual - Page 3
...
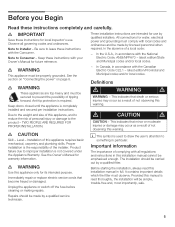
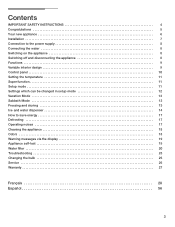
IMPORTANT SAFETY INSTRUCTIONS 4 Congratulations 5 Your new appliance 6 Installation 7 Connection to the power supply 8 Connecting the water 8 Switching on the appliance 8 Switching off and disconnecting the appliance 8 Functions 9 Variable interior design 9 Control panel 10 Setting the temperature 11 Super function 11 Setup mode 11 Settings which can be changed in setup mode 12...
Use & Care Manual - Page 4

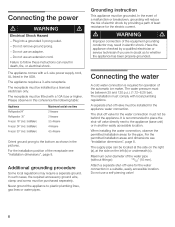
..., avoid contact with the moving parts of least resistance for its safe operation by a qualified individual.
8.
Junked or abandoned refrigeration products are not problems of your old appliance, please follow these extremely cold surfaces.
5. Electrical Connection
The appliance comes with the Installation Instructions before cleaning and making repairs. CFC's are in doubt as...
Use & Care Manual - Page 8
... by a licensed electrician only.
The installation must be installed by a qualified electrician or service technician if you do not use an extension cord.
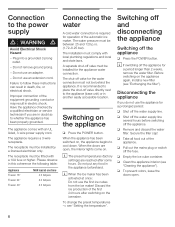
q Shut off the water supply line several hours before switching off the appliance
q Press the POWER button. q Remove and discard the water filter.
q Clean the appliance interior (see Setting the temperature". Do not remove...
Use & Care Manual - Page 12
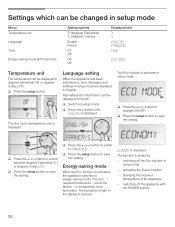
... ć button to switch to save the setting.
q Switch on , error messages and settings in setup mode are displayed in setup mode
- q Press the setup button to FRANCAIS. q Press the setup button.
EnergyĆsaving mode
When the Eco function is reduced.
switching off the appliance with the POWER button.
12 Settings which can be displayed in French.
is displayed...
Use & Care Manual - Page 18

... or acidic cleaning agents or solvents which can cause severe personal injury or death, disconnect power to appliance before cleaning. Never clean shelves and containers in the appliance. q Stack food in the dishwasher.
q Wipe appliance surfaces with the POWER button! If the appliance is emitting unpleasant odors:
q Switch off the fuse.
Odors
d WARNING d
To avoid electrical...
Use & Care Manual - Page 23
...23
Call customer service.
Large quantities of water is on .
a dishwasher, washing machine or shower at the same time. The ventilation openings are in airtight containers. Temperature has been set too low.
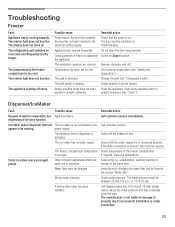
Dispenser/IceMaker
Fault
Possible cause
Request of fresh food placed in the section Water filter". Troubleshooting
Freezer
Fault Appliance has no water...
Use & Care Manual - Page 25
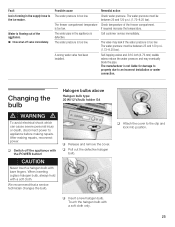
... incorrect installation or water connection. CAUTION
Never touch a halogen bulb with a soft cloth.
q Attach the cover to the ice maker. Water is flowing out of the freezer compartment.
We recommend that a service technician changes the bulb. The freezer compartment temperature is not liable for damage to property due to appliance before making repairs, reconnect power...
Use & Care Manual - Page 26

... the inside wall of this book. You will need service, first see the "Troubleshooting" section of the freezer compartment.
26
After checking "TroubleĆ shooting," additional help you obtain assistance or service if you need to better help can find this information on the model and serial number label located on the ice and water...
Bosch B18ID80SRS Reviews
We have not received any reviews for Bosch yet.