
User Guide
Page 2
... a knowledgeable, dedicated Consumer Services department, so, should you ever have a problem, you purchased a BISSELL OptiClean vacuum. Today, BISSELL is well made, and we know about floor care went into the design and construction of us at BISSELL. Mark J. Thanks for buying a BISSELL OptiClean® Vacuum We're glad you 'll receive fast, considerate assistance. My great-grandfather invented...
... a knowledgeable, dedicated Consumer Services department, so, should you ever have a problem, you purchased a BISSELL OptiClean vacuum. Today, BISSELL is well made, and we know about floor care went into the design and construction of us at BISSELL. Mark J. Thanks for buying a BISSELL OptiClean® Vacuum We're glad you 'll receive fast, considerate assistance. My great-grandfather invented...
User Guide
Page 3
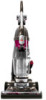
... body away from heated surfaces. ■ Do not unplug by pulling on cord, or pull cord around sharp edges or corners. www.bissell.com This model is for any object into water, have it should be observed, including the following: Read all instructions before attaching the...If it is running. ■ Brush may reduce air flow. ■ Keep hair, loose clothing, fingers, and all controls before plugging or unplugging vacuum cleaner. ■ Use extra care when cleaning stairs. ■ Unplug before using an electrical appliance, basic precautions should , has been dropped, damaged,...
... body away from heated surfaces. ■ Do not unplug by pulling on cord, or pull cord around sharp edges or corners. www.bissell.com This model is for any object into water, have it should be observed, including the following: Read all instructions before attaching the...If it is running. ■ Brush may reduce air flow. ■ Keep hair, loose clothing, fingers, and all controls before plugging or unplugging vacuum cleaner. ■ Use extra care when cleaning stairs. ■ Unplug before using an electrical appliance, basic precautions should , has been dropped, damaged,...
User Guide
Page 5
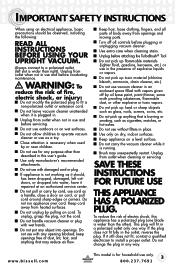
...last screw, insert screw into place. 4a 4b. Attach Twist 'n Snap™ hose by placing the tabbed end of the hose into the grooves at the top of the vacuum (when viewing from the back). NOTE: The vacuum will not operate effectively unless the hose is firmly attached to the...that the handle is firmly attached. Turn the hose to the right to vacuum 1. Remove the screw packet from the screw packet. If there are familiar with the front of the vacuum body. With a screwdriver, tighten screw completely. 3. www.bissell.com 2 3 4b 5 800.237.7691 Locate the bag that contains...
...last screw, insert screw into place. 4a 4b. Attach Twist 'n Snap™ hose by placing the tabbed end of the hose into the grooves at the top of the vacuum (when viewing from the back). NOTE: The vacuum will not operate effectively unless the hose is firmly attached to the...that the handle is firmly attached. Turn the hose to the right to vacuum 1. Remove the screw packet from the screw packet. If there are familiar with the front of the vacuum body. With a screwdriver, tighten screw completely. 3. www.bissell.com 2 3 4b 5 800.237.7691 Locate the bag that contains...
User Guide
Page 6
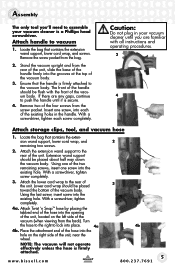
... of the upper cord wrap. Power Cord To store power cord, wrap cord around the upper cord wrap and lower extension wand support. www.bissell.com TurboBrush® Tool Stretch Hose Crevice Tool Extension Wand Dusting/ Upholstery Tool 1 2 Caution: Before using the carry handle on the end ...of the handle arch. Do not operate your vacuum, Make sure both filters (pre-motor and post-motor) are in place. 6. Place the TurboBrush Tool in the reclined position and the brush 6...
... of the upper cord wrap. Power Cord To store power cord, wrap cord around the upper cord wrap and lower extension wand support. www.bissell.com TurboBrush® Tool Stretch Hose Crevice Tool Extension Wand Dusting/ Upholstery Tool 1 2 Caution: Before using the carry handle on the end ...of the handle arch. Do not operate your vacuum, Make sure both filters (pre-motor and post-motor) are in place. 6. Place the TurboBrush Tool in the reclined position and the brush 6...
User Guide
Page 7
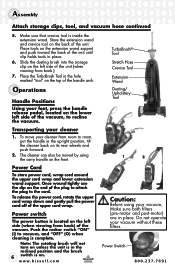
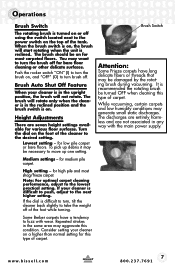
...for bare floor cleaning or other delicate surfaces. Repeated strokes in any way with wear. The brush should be damaged by the rotating brush during vacuuming. Medium settings - High setting - for medium pile carpet. Note: For optimal carpet cleaning performance, adjust to the desired setting. If your ...in the reclined position and the brush switch is difficult to move up debris it may aggravate this type of the foot while turning. www.bissell.com 7 800.237.7691 When the brush switch is on for this condition. To pick up one setting. If the dial is on...
...for bare floor cleaning or other delicate surfaces. Repeated strokes in any way with wear. The brush should be damaged by the rotating brush during vacuuming. Medium settings - High setting - for medium pile carpet. Note: For optimal carpet cleaning performance, adjust to the desired setting. If your ...in the reclined position and the brush switch is difficult to move up debris it may aggravate this type of the foot while turning. www.bissell.com 7 800.237.7691 When the brush switch is on for this condition. To pick up one setting. If the dial is on...

User Guide
Page 8
...remove "tabbed" end of the stairs. 8 www.bissell.com 800.237.7691 b. 2d. and pull towards you in any direction. NOTE: Model 30C7T comes with desired attachment for above floor cleaning surfaces or hard to reach areas. 1. Pet Contour Tool® (Included with 30C7T only): ...furniture. The tool can be e. a. 2b. Crevice Tool: Use in upright posi- Extension Wand: Use with the Pet TurboBrush® Tool and fol- Remove Hose: With vacuum in tight narrow spaces 2c. nected to stop rotating. Press gently down c. flipped to dust furniture, blinds, lamps, ...
...remove "tabbed" end of the stairs. 8 www.bissell.com 800.237.7691 b. 2d. and pull towards you in any direction. NOTE: Model 30C7T comes with desired attachment for above floor cleaning surfaces or hard to reach areas. 1. Pet Contour Tool® (Included with 30C7T only): ...furniture. The tool can be e. a. 2b. Crevice Tool: Use in upright posi- Extension Wand: Use with the Pet TurboBrush® Tool and fol- Remove Hose: With vacuum in tight narrow spaces 2c. nected to stop rotating. Press gently down c. flipped to dust furniture, blinds, lamps, ...
User Guide
Page 9
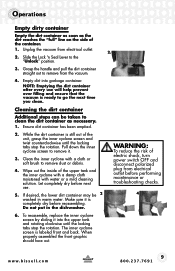
...the dirt reaches the "full" line on the side of the upper tank and the inner cyclone with a damp cloth moistened with a cloth or soft brush to remove from the vacuum. 4. www.bissell.com 9 800.237.7691 NOTE: Emptying the dirt container after every use . 5. Pull down... the inner cyclone screen to the "Unlock" position. 3. Let completely dry before performing maintenance or troubleshooting checks. 4 6. ...
...the dirt reaches the "full" line on the side of the upper tank and the inner cyclone with a damp cloth moistened with a cloth or soft brush to remove from the vacuum. 4. www.bissell.com 9 800.237.7691 NOTE: Emptying the dirt container after every use . 5. Pull down... the inner cyclone screen to the "Unlock" position. 3. Let completely dry before performing maintenance or troubleshooting checks. 4 6. ...
User Guide
Page 10
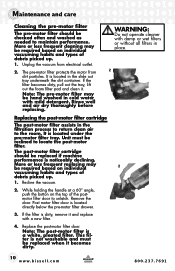
...air dry thoroughly before replacing. Unit must be checked often and washed as needed to the room. Recline the vacuum. 2. If the filter is not washable and must be required based on individual 2 vacuuming habits and types of debris picked up . 1. This filter is dirty, remove it . Unplug the...the dirt container. It is a white, pleated filter. The post-motor filter cartridge should be replaced when it becomes dirty. 10 www.bissell.com 800.237.7691 More or less frequent cleaning may be reclined to unlatch. Maintenance and care Cleaning the pre-motor filter The pre-motor...
...air dry thoroughly before replacing. Unit must be checked often and washed as needed to the room. Recline the vacuum. 2. If the filter is not washable and must be required based on individual 2 vacuuming habits and types of debris picked up . 1. This filter is dirty, remove it . Unplug the...the dirt container. It is a white, pleated filter. The post-motor filter cartridge should be replaced when it becomes dirty. 10 www.bissell.com 800.237.7691 More or less frequent cleaning may be reclined to unlatch. Maintenance and care Cleaning the pre-motor filter The pre-motor...
User Guide
Page 11
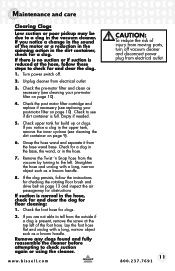
... base, the wand, or in the hose. 7. Check for build up or clogs. www.bissell.com CAUTION: To reduce the risk of injury from moving parts, turn off . 2. Turn power switch off vacuum cleaner and disconnect power plug from electrical outlet. 3. Unplug cleaner from electrical outlet. 11 800..... Empty if needed. 5. Remove any clogs found and fully reassemble the cleaner before attempting to a clog in the upper tank, remove the inner cyclone (see cleaning your post-motor filter on page 10). 4. Check the pre-motor filter and clean as necessary (see cleaning the dirt container on ...
... base, the wand, or in the hose. 7. Check for build up or clogs. www.bissell.com CAUTION: To reduce the risk of injury from moving parts, turn off . 2. Turn power switch off vacuum cleaner and disconnect power plug from electrical outlet. 3. Unplug cleaner from electrical outlet. 11 800..... Empty if needed. 5. Remove any clogs found and fully reassemble the cleaner before attempting to a clog in the upper tank, remove the inner cyclone (see cleaning your post-motor filter on page 10). 4. Check the pre-motor filter and clean as necessary (see cleaning the dirt container on ...
User Guide
Page 12
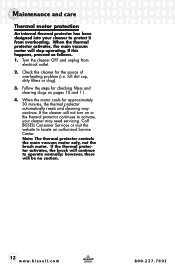
... problem (i.e. If the thermal protector activates, the brush will be no suction. 12 www.bissell.com 800.237.7691 however, there will continue to operate normally; Call BISSELL Consumer Services or visit the website to protect it from electrical outlet. 2. Turn the cleaner... OFF and unplug from overheating. Note: The thermal protector controls the main vacuum motor only, not the brush motor. Maintenance ...
... problem (i.e. If the thermal protector activates, the brush will be no suction. 12 www.bissell.com 800.237.7691 however, there will continue to operate normally; Call BISSELL Consumer Services or visit the website to protect it from electrical outlet. 2. Turn the cleaner... OFF and unplug from overheating. Note: The thermal protector controls the main vacuum motor only, not the brush motor. Maintenance ...
User Guide
Page 13
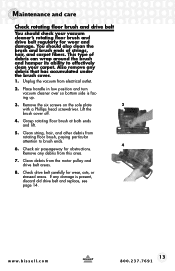
...debris from rotating floor brush, paying particular attention to effectively clean your vacuum cleaner's rotating floor brush and drive belt regularly for wear and damage. Grasp rotating floor brush at both ends and lift. 5. www.bissell.com 13 800.237.7691 Also remove any damage is facing up. .... 7. Check air passageway for wear, cuts, or stressed areas. Clean debris from electrical outlet. 2. Place handle in low position and turn vacuum cleaner over so bottom side is present, discard old drive belt and replace, see page 14. This type of strings, hair, and carpet ...
...debris from rotating floor brush, paying particular attention to effectively clean your vacuum cleaner's rotating floor brush and drive belt regularly for wear and damage. Grasp rotating floor brush at both ends and lift. 5. www.bissell.com 13 800.237.7691 Also remove any damage is facing up. .... 7. Check air passageway for wear, cuts, or stressed areas. Clean debris from electrical outlet. 2. Place handle in low position and turn vacuum cleaner over so bottom side is present, discard old drive belt and replace, see page 14. This type of strings, hair, and carpet ...
User Guide
Page 14
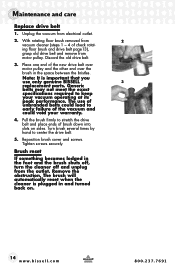
... the cleaner is important that you use of brush down into slots on . 14 www.bissell.com 800.237.7691 Turn brush several times by hand to early failure of the vacuum and could lead to center the drive belt. 5. Brush reset If something becomes lodged in...between the bristles. Reposition brush cover and screws. Remove the obstruction. Discard the old drive belt. 3. The use only genuine BISSELL 3 replacement parts. Unplug the vacuum from the outlet. Place one end of check rotat- Tighten screws securely. Generic belts may not meet the exact specifications required to...
... the cleaner is important that you use of brush down into slots on . 14 www.bissell.com 800.237.7691 Turn brush several times by hand to early failure of the vacuum and could lead to center the drive belt. 5. Brush reset If something becomes lodged in...between the bristles. Reposition brush cover and screws. Remove the obstruction. Discard the old drive belt. 3. The use only genuine BISSELL 3 replacement parts. Unplug the vacuum from the outlet. Place one end of check rotat- Tighten screws securely. Generic belts may not meet the exact specifications required to...
User Guide
Page 15
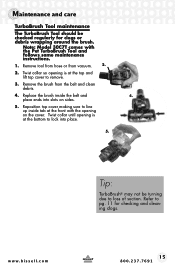
...Twist collar so opening is at the top and lift top cover to remove. 3. Twist collar until opening is at the front with the Pet TurboBrush Tool and follows same maintenance instructions. 1. Maintenance and care TurboBrush Tool maintenance The TurboBrush Tool should be turning due to loss of ... inside the belt and 4. Reposition top cover making sure to pg. 11 for clogs or debris wrapping around the brush. Remove the brush from vacuum. 2. 2. Note: Model 30C7T comes with the opening on sides. 5. Replace the brush inside tab at the bottom to lock into slots on...
...Twist collar so opening is at the top and lift top cover to remove. 3. Twist collar until opening is at the front with the Pet TurboBrush Tool and follows same maintenance instructions. 1. Maintenance and care TurboBrush Tool maintenance The TurboBrush Tool should be turning due to loss of ... inside the belt and 4. Reposition top cover making sure to pg. 11 for clogs or debris wrapping around the brush. Remove the brush from vacuum. 2. 2. Note: Model 30C7T comes with the opening on sides. 5. Replace the brush inside tab at the bottom to lock into slots on...
User Guide
Page 16
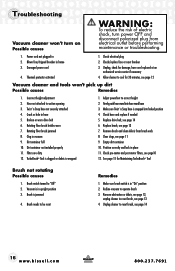
... electrical outlet before performing Rmeaminetednieasnce or troubleshooting. 1. Brush switch turned to correct height 2. Brush is snapped into hose wand base 3. Troubleshooting Vacuum cleaner won 't pick up dirt Possible causes Remedies 1. Twist 'n Snap hose not securely attached 4. Filters are dirty 12. Empty dirt ...electric shock, turn power OFF and disconnect polarized plug from brush ends 8. Allow cleaner to reset brush, see page 14 16 www.bissell.com 800.237.7691 Broken or worn drive belt 6. Dirt container full 10. Make sure Twist 'n Snap hose is jammed 3....
... electrical outlet before performing Rmeaminetednieasnce or troubleshooting. 1. Brush switch turned to correct height 2. Brush is snapped into hose wand base 3. Troubleshooting Vacuum cleaner won 't pick up dirt Possible causes Remedies 1. Twist 'n Snap hose not securely attached 4. Filters are dirty 12. Empty dirt ...electric shock, turn power OFF and disconnect polarized plug from brush ends 8. Allow cleaner to reset brush, see page 14 16 www.bissell.com 800.237.7691 Broken or worn drive belt 6. Dirt container full 10. Make sure Twist 'n Snap hose is jammed 3....
User Guide
Page 17
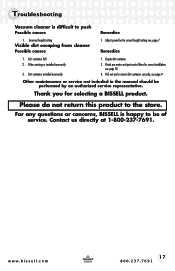
... 800.237.7691 Dirt container installed incorrectly 3. Empty dirt container 2. Check pre-motor and post-motor filters for selecting a BISSELL product. Pull out and re-insert dirt container correctly, see page 9 Other maintenance or service not included in the manual... should be of service. Contact us directly at 1-800-237-7691. Troubleshooting Vacuum cleaner is happy to be performed by an authorized service representative. Incorrect height setting Visible dirt escaping from cleaner Possible causes 1. Filters ...
... 800.237.7691 Dirt container installed incorrectly 3. Empty dirt container 2. Check pre-motor and post-motor filters for selecting a BISSELL product. Pull out and re-insert dirt container correctly, see page 9 Other maintenance or service not included in the manual... should be of service. Contact us directly at 1-800-237-7691. Troubleshooting Vacuum cleaner is happy to be performed by an authorized service representative. Incorrect height setting Visible dirt escaping from cleaner Possible causes 1. Filters ...
User Guide
Page 18
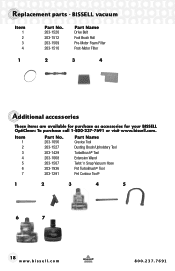
... for your BISSELL OptiClean: To purchase call 1-800-237-7691 or visit www.bissell.com. Item 1 Part No. 203-1056 Part Name Crevice Tool 2 203-1527 Dusting Brush/Upholstery Tool 3 203-1429 TurboBrush® Tool 4 203-1068 Extension Wand 5 203-1507 Twist 'n Snap Vacuum Hose 6 203-7936 Pet TurboBrush® Tool 7 203-1291 Pet Contour Tool...
... for your BISSELL OptiClean: To purchase call 1-800-237-7691 or visit www.bissell.com. Item 1 Part No. 203-1056 Part Name Crevice Tool 2 203-1527 Dusting Brush/Upholstery Tool 3 203-1429 TurboBrush® Tool 4 203-1068 Extension Wand 5 203-1507 Twist 'n Snap Vacuum Hose 6 203-7936 Pet TurboBrush® Tool 7 203-1291 Pet Contour Tool...
User Guide
Page 19
...DATE OF PURCHASE AS DESCRIBED ABOVE. will repair or replace (with the User's Guide is not covered. Website or E-mail: www.bissell.com Use the "Customer Support" tab. Some states do not allow the exclusion or limitation of incidental or consequential damages, so ...mail, telephone, or regular mail as filters, belts, or brushes. www.bissell.com 19 800.237.7691 ET Saturday 9 a.m. - 8 p.m. Some states do not allow limitations on "If your BISSELL product should require service". BISSELL OptiClean® Vacuum This warranty gives you specific legal rights, and you . *EXCEPTIONS AND ...
...DATE OF PURCHASE AS DESCRIBED ABOVE. will repair or replace (with the User's Guide is not covered. Website or E-mail: www.bissell.com Use the "Customer Support" tab. Some states do not allow the exclusion or limitation of incidental or consequential damages, so ...mail, telephone, or regular mail as filters, belts, or brushes. www.bissell.com 19 800.237.7691 ET Saturday 9 a.m. - 8 p.m. Some states do not allow limitations on "If your BISSELL product should require service". BISSELL OptiClean® Vacuum This warranty gives you specific legal rights, and you . *EXCEPTIONS AND ...


