User Guide
Page 1
See details on back page USER'S GUIDE 30C7 SERIES 2 Thank You 3 Safety Instructions 4 Product View 5-6 Assembly 6-9 Operations 10-15 Maintenance and Care 16-17 Troubleshooting 18 Replacement Parts 18 Accessories 19 Warranty 20 Product Registration 20 Consumer Services Register your product today! Earn BISSELL Rewards!
See details on back page USER'S GUIDE 30C7 SERIES 2 Thank You 3 Safety Instructions 4 Product View 5-6 Assembly 6-9 Operations 10-15 Maintenance and Care 16-17 Troubleshooting 18 Replacement Parts 18 Accessories 19 Warranty 20 Product Registration 20 Consumer Services Register your product today! Earn BISSELL Rewards!

User Guide
Page 2
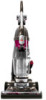
My great-grandfather invented the floor sweeper in the design, manufacture, and service of high quality homecare products like your BISSELL vacuum. Thanks again, from all of this complete, high-tech home cleaning system. Everything we back it with a limited three year warranty. Bissell Chairman, President & CEO 2 www.bissell.com 800.237.7691 Thanks for buying a BISSELL OptiClean® Vacuum We're glad you 'll...
My great-grandfather invented the floor sweeper in the design, manufacture, and service of high quality homecare products like your BISSELL vacuum. Thanks again, from all of this complete, high-tech home cleaning system. Everything we back it with a limited three year warranty. Bissell Chairman, President & CEO 2 www.bissell.com 800.237.7691 Thanks for buying a BISSELL OptiClean® Vacuum We're glad you 'll...
User Guide
Page 3
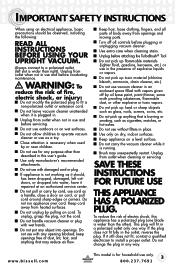
... SAFETY INSTRUCTIONS When using your Upright VACUUM. To unplug, grasp the plug, not the cord. ■ Do not handle vacuum cleaner or plug with vapors given off all controls before plugging or unplugging vacuum cleaner. ■ Use extra care when cleaning stairs. ■ Unplug before attaching the TurboBrush® Tool ■ Do not pick up flammable materials (lighter fluid, gasoline, kerosene, etc.) or use in use and before conducting maintenance. keep openings free of dust...
... SAFETY INSTRUCTIONS When using your Upright VACUUM. To unplug, grasp the plug, not the cord. ■ Do not handle vacuum cleaner or plug with vapors given off all controls before plugging or unplugging vacuum cleaner. ■ Use extra care when cleaning stairs. ■ Unplug before attaching the TurboBrush® Tool ■ Do not pick up flammable materials (lighter fluid, gasoline, kerosene, etc.) or use in use and before conducting maintenance. keep openings free of dust...
User Guide
Page 4
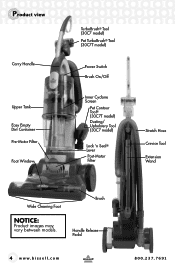
Product view Carry Handle Upper Tank Easy Empty Dirt Container Pre-Motor Filter Foot Window TurboBrush® Tool (30C7 model) Pet TurboBrush® Tool (30C7T model) Power Switch Brush On/Off Inner Cyclone Screen Pet Contour Tool® (30C7T model) Dusting/ Upholstery Tool (30C7 model) Lock 'n Seal® Lever Post-Motor Filter Stretch Hose Crevice Tool Extension Wand Wide Cleaning Foot NOTICE: Product images may vary between models. Brush Handle Release Pedal 4 www.bissell.com 800.237.7691
Product view Carry Handle Upper Tank Easy Empty Dirt Container Pre-Motor Filter Foot Window TurboBrush® Tool (30C7 model) Pet TurboBrush® Tool (30C7T model) Power Switch Brush On/Off Inner Cyclone Screen Pet Contour Tool® (30C7T model) Dusting/ Upholstery Tool (30C7 model) Lock 'n Seal® Lever Post-Motor Filter Stretch Hose Crevice Tool Extension Wand Wide Cleaning Foot NOTICE: Product images may vary between models. Brush Handle Release Pedal 4 www.bissell.com 800.237.7691
User Guide
Page 5
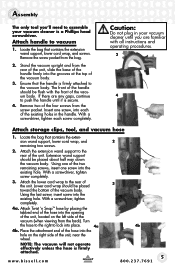
... the handle until you 'll need to assemble your vacuum cleaner is a Phillips head screwdriver. www.bissell.com 2 3 4b 5 800.237.7691 Remove two of the hose into place. 4a 4b. Extension wand support should be flush with all instructions and operating procedures. 2 4 Attach storage clips, tool, and vacuum hose 1. With a screwdriver, tighten screw completely. 3. Place the attachment end of the four screws from the bag. 2. Attach Twist 'n Snap™ hose by...
... the handle until you 'll need to assemble your vacuum cleaner is a Phillips head screwdriver. www.bissell.com 2 3 4b 5 800.237.7691 Remove two of the hose into place. 4a 4b. Extension wand support should be flush with all instructions and operating procedures. 2 4 Attach storage clips, tool, and vacuum hose 1. With a screwdriver, tighten screw completely. 3. Place the attachment end of the four screws from the bag. 2. Attach Twist 'n Snap™ hose by...
User Guide
Page 6
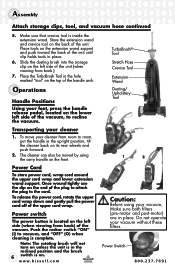
... the handle in place. Power switch The power button is on its rear wheels and push forward. 2. To move your cleaner from back.) 7. To release the power cord, rotate the upper cord wrap down and gently pull the power cord off of the plug to attach the plug to vacuum, and "OFF" (O) when cleaning is inside the extension wand. Operations Handle Positions Using your vacuum without these filters. Make sure that crevice tool is complete...
... the handle in place. Power switch The power button is on its rear wheels and push forward. 2. To move your cleaner from back.) 7. To release the power cord, rotate the upper cord wrap down and gently pull the power cord off of the plug to attach the plug to vacuum, and "OFF" (O) when cleaning is inside the extension wand. Operations Handle Positions Using your vacuum without these filters. Make sure that crevice tool is complete...
User Guide
Page 7
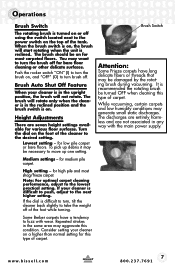
... it may be turned OFF when cleaning this condition. You may generate small static discharges. Brush Auto Shut Off Feature When your cleaner on , and "OFF" (O) to turn the brush off of the tank. Operations Brush Switch The rotating brush is turned on or off using the switch located next to the power switch on for most shag/frieze carpet. When the brush switch is on, the brush will not...
... it may be turned OFF when cleaning this condition. You may generate small static discharges. Brush Auto Shut Off Feature When your cleaner on , and "OFF" (O) to turn the brush off of the tank. Operations Brush Switch The rotating brush is turned on or off using the switch located next to the power switch on for most shag/frieze carpet. When the brush switch is on, the brush will not...

User Guide
Page 8
... Tool® (Included with the Pet TurboBrush® Tool and fol- Dusting brush: Use brush side to the clear tank. 2. TurboBrush® Tool: Use rotation brush action for longer reach. lows same operation instructions. 2e. tion, remove hose end from falling when cleaning stairs, always place it at the bottom of the stairs. 8 www.bissell.com 800.237.7691 d. The tool can be e. Attach tools by the wheel. Extension Wand: Use with desired attachment...
... Tool® (Included with the Pet TurboBrush® Tool and fol- Dusting brush: Use brush side to the clear tank. 2. TurboBrush® Tool: Use rotation brush action for longer reach. lows same operation instructions. 2e. tion, remove hose end from falling when cleaning stairs, always place it at the bottom of the stairs. 8 www.bissell.com 800.237.7691 d. The tool can be e. Attach tools by the wheel. Extension Wand: Use with desired attachment...
User Guide
Page 9
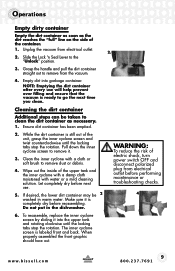
.... 1. NOTE: Emptying the dirt container after every use . 5. Unplug the vacuum from the vacuum. 4. Wipe out the inside of electric shock, turn power switch OFF and disconnect polarized plug from electrical outlet before next use will help prevent over filling and ensure that the vacuum is still out of the container. 1. To reassemble, replace the inner cyclone screen by sliding it . 3. Cleaning the dirt container Additional steps...
.... 1. NOTE: Emptying the dirt container after every use . 5. Unplug the vacuum from the vacuum. 4. Wipe out the inside of electric shock, turn power switch OFF and disconnect polarized plug from electrical outlet before next use will help prevent over filling and ensure that the vacuum is still out of the container. 1. To reassemble, replace the inner cyclone screen by sliding it . 3. Cleaning the dirt container Additional steps...
User Guide
Page 10
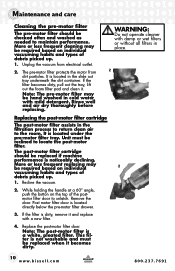
... clean it and replace with a new filter. 4. WARNING: Do not operate cleaner with mild detergent. While holding the handle at a 60° angle, push the button on individual vacuuming habits and types of debris picked up . 1. Post motor filter door is located under the pre-motor filter tray. The pre-motor filter protects the motor from electrical outlet. 2. Rinse well and air dry thoroughly before replacing. It is located directly below the pre-motor filter drawer. 3. This filter...
... clean it and replace with a new filter. 4. WARNING: Do not operate cleaner with mild detergent. While holding the handle at a 60° angle, push the button on individual vacuuming habits and types of debris picked up . 1. Post motor filter door is located under the pre-motor filter tray. The pre-motor filter protects the motor from electrical outlet. 2. Rinse well and air dry thoroughly before replacing. It is located directly below the pre-motor filter drawer. 3. This filter...
User Guide
Page 11
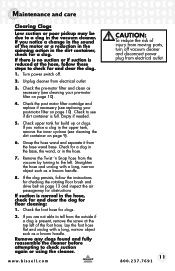
Turn power switch off vacuum cleaner and disconnect power plug from electrical outlet. 3. Check the post motor filter cartridge and replace if necessary (see cleaning the dirt container on page 10). 4. Check upper tank for clogs. 2. Check for a clog in the base, the wand, or in the upper tank, remove the inner cyclone (see replacing your pre-motor filter on page 9). 6. Lay the foot hose flat and unclog with a long, narrow object such as a broom handle. 8. Check to...
Turn power switch off vacuum cleaner and disconnect power plug from electrical outlet. 3. Check the post motor filter cartridge and replace if necessary (see cleaning the dirt container on page 10). 4. Check upper tank for clogs. 2. Check for a clog in the base, the wand, or in the upper tank, remove the inner cyclone (see replacing your pre-motor filter on page 9). 6. Lay the foot hose flat and unclog with a long, narrow object such as a broom handle. 8. Check to...
User Guide
Page 12
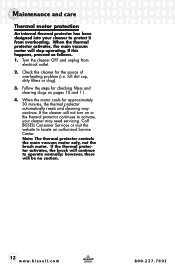
... from overheating. however, there will stop operating. full dirt cup, dirty filters or clog). 3. If the cleaner will continue to activate, your cleaner to locate an authorized Service Center. If the thermal protector activates, the brush will not turn on pages 10 and 11. 4. Call BISSELL Consumer Services or visit the website to protect it from electrical outlet. 2. When the thermal protector activates, the main vacuum motor will be no suction. 12 www.bissell...
... from overheating. however, there will stop operating. full dirt cup, dirty filters or clog). 3. If the cleaner will continue to activate, your cleaner to locate an authorized Service Center. If the thermal protector activates, the brush will not turn on pages 10 and 11. 4. Call BISSELL Consumer Services or visit the website to protect it from electrical outlet. 2. When the thermal protector activates, the main vacuum motor will be no suction. 12 www.bissell...
User Guide
Page 13
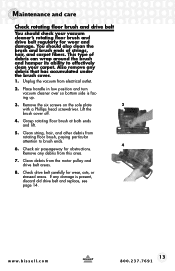
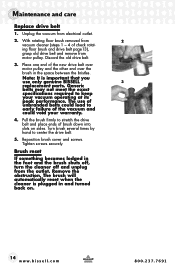
.... 7. You should check your carpet. Check drive belt carefully for obstructions. Maintenance and care Check rotating floor brush and drive belt You should also clean the brush and brush ends of debris can wrap around the brush and hamper its ability to brush ends. 4 6. Check air passageway for wear, cuts, or stressed areas. Place handle in low position and turn vacuum cleaner over so bottom side is present, discard old drive belt and replace, see page...
.... 7. You should check your carpet. Check drive belt carefully for obstructions. Maintenance and care Check rotating floor brush and drive belt You should also clean the brush and brush ends of debris can wrap around the brush and hamper its ability to brush ends. 4 6. Check air passageway for wear, cuts, or stressed areas. Place handle in low position and turn vacuum cleaner over so bottom side is present, discard old drive belt and replace, see page...
User Guide
Page 14
... drive belt. 3. Generic belts may not meet the exact specifications required to center the drive belt. 5. Brush reset If something becomes lodged in and turned back on sides. ing floor brush and drive belt page13), grasp old drive belt and remove from electrical outlet. 2. Maintenance and care Replace drive belt 1. Unplug the vacuum from motor pulley. Place one end of brush down into slots on . 14 www.bissell.com 800.237.7691 Note: It is plugged...
... drive belt. 3. Generic belts may not meet the exact specifications required to center the drive belt. 5. Brush reset If something becomes lodged in and turned back on sides. ing floor brush and drive belt page13), grasp old drive belt and remove from electrical outlet. 2. Maintenance and care Replace drive belt 1. Unplug the vacuum from motor pulley. Place one end of brush down into slots on . 14 www.bissell.com 800.237.7691 Note: It is plugged...
User Guide
Page 15
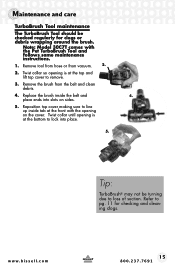
.... 5. Remove the brush from vacuum. 2. 2. Note: Model 30C7T comes with the opening is at the bottom to lock into slots on the cover. www.bissell.com Tip: TurboBrush® may not be checked regularly for checking and cleaning clogs. 15 800.237.7691 Replace the brush inside tab at the front with the Pet TurboBrush Tool and follows same maintenance instructions. 1. Maintenance and care TurboBrush Tool maintenance The TurboBrush Tool...
.... 5. Remove the brush from vacuum. 2. 2. Note: Model 30C7T comes with the opening is at the bottom to lock into slots on the cover. www.bissell.com Tip: TurboBrush® may not be checked regularly for checking and cleaning clogs. 15 800.237.7691 Replace the brush inside tab at the front with the Pet TurboBrush Tool and follows same maintenance instructions. 1. Maintenance and care TurboBrush Tool maintenance The TurboBrush Tool...
User Guide
Page 16
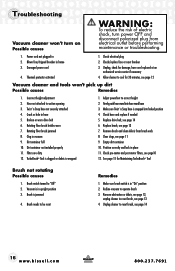
... 1. Rotating floor brush bristles worn 7. Check pre-motor and post-motor filters, see page 13 4. Vacuum is in place 11. Remove obstruction or debris, see page 13, unplug cleaner to reset brush, see page 14 6. Check electrical plug 2. Hose not attached to operate brush 3. Broken or worn drive belt 6. Dirt container not installed properly 11. TurboBrush® Tool is clogged or debris is snapped into hose wand base 3. Position correctly and lock in upright position 2. Recline vacuum to suction opening 3. Brush needs to...
... 1. Rotating floor brush bristles worn 7. Check pre-motor and post-motor filters, see page 13 4. Vacuum is in place 11. Remove obstruction or debris, see page 13, unplug cleaner to reset brush, see page 14 6. Check electrical plug 2. Hose not attached to operate brush 3. Broken or worn drive belt 6. Dirt container not installed properly 11. TurboBrush® Tool is clogged or debris is snapped into hose wand base 3. Position correctly and lock in upright position 2. Recline vacuum to suction opening 3. Brush needs to...
User Guide
Page 17
Troubleshooting Vacuum cleaner is happy to correct height setting see, page 7 Remedies 1. Empty dirt container 2. www.bissell.com 17 800.237.7691 Check pre-motor and post-motor filters for selecting a BISSELL product. Dirt container installed incorrectly 3. Please do not return this product to push Possible causes Remedies 1. Dirt container full 1. For any questions or concerns, BISSELL is difficult to the store. Filters missing or installed incorrectly 2. Pull out and...
Troubleshooting Vacuum cleaner is happy to correct height setting see, page 7 Remedies 1. Empty dirt container 2. www.bissell.com 17 800.237.7691 Check pre-motor and post-motor filters for selecting a BISSELL product. Dirt container installed incorrectly 3. Please do not return this product to push Possible causes Remedies 1. Dirt container full 1. For any questions or concerns, BISSELL is difficult to the store. Filters missing or installed incorrectly 2. Pull out and...
User Guide
Page 18
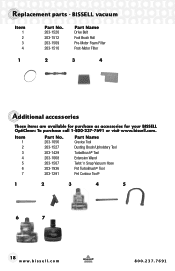
...® Tool 4 203-1068 Extension Wand 5 203-1507 Twist 'n Snap Vacuum Hose 6 203-7936 Pet TurboBrush® Tool 7 203-1291 Pet Contour Tool® 1 2 3 4 5 6 7 18 www.bissell.com 800.237.7691 Replacement parts - BISSELL vacuum Item 1 2 3 4 Part No. 203-1520 203-1512 203-1509 203-1510 Part Name Drive Belt Foot Brush Roll Pre-Motor Foam Filter Post-Motor Filter 1 2 3 4 Additional accessories These items are available for purchase as accessories for your BISSELL OptiClean: To...
...® Tool 4 203-1068 Extension Wand 5 203-1507 Twist 'n Snap Vacuum Hose 6 203-7936 Pet TurboBrush® Tool 7 203-1291 Pet Contour Tool® 1 2 3 4 5 6 7 18 www.bissell.com 800.237.7691 Replacement parts - BISSELL vacuum Item 1 2 3 4 Part No. 203-1520 203-1512 203-1509 203-1510 Part Name Drive Belt Foot Brush Roll Pre-Motor Foam Filter Post-Motor Filter 1 2 3 4 Additional accessories These items are available for purchase as accessories for your BISSELL OptiClean: To...
User Guide
Page 19
... identified below . If you need additional instruction regarding what it may also have other use not in your BISSELL product should require service: Contact BISSELL Consumer Services to state. BISSELL OptiClean® Vacuum This warranty gives you specific legal rights, and you have questions regarding this warranty or have questions about repairs or replacement parts, or if you may cover, please contact BISSELL Consumer Services by negligence, abuse, neglect...
... identified below . If you need additional instruction regarding what it may also have other use not in your BISSELL product should require service: Contact BISSELL Consumer Services to state. BISSELL OptiClean® Vacuum This warranty gives you specific legal rights, and you have questions regarding this warranty or have questions about repairs or replacement parts, or if you may cover, please contact BISSELL Consumer Services by negligence, abuse, neglect...
User Guide
Page 20
... contact us with any important product maintenance reminders and alerts. Special Promotions Optional: Register your warranty, call: BISSELL Consumer Services 1-800-237-7691 Monday - Please record your Model Number Please record your Purchase Date NOTE: Please keep your product. See Warranty on future purchases. You'll receive: BISSELL Rewards Points Automatically earn points for discounts and free shipping on page 19 for...
... contact us with any important product maintenance reminders and alerts. Special Promotions Optional: Register your warranty, call: BISSELL Consumer Services 1-800-237-7691 Monday - Please record your Model Number Please record your Purchase Date NOTE: Please keep your product. See Warranty on future purchases. You'll receive: BISSELL Rewards Points Automatically earn points for discounts and free shipping on page 19 for...

