Update Manual
Page 3
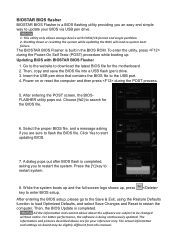
...start updating BIOS. 7. All the information and content above are subject to be slightly different from this manual. Choose [fs0] to enter BIOS setup. This utility only allows storage device with BIOSTAR BIOS Flasher 1. Select the proper BIOS file, and a message asking if you to restart the system.... Then, the BIOS Update is being continuously updated. BIOSTAR BIOS flasher BIOSTAR BIOS Flasher is a BIOS flashing utility providing you an easy and simple way to update your reference only. While the system boots...
...start updating BIOS. 7. All the information and content above are subject to be slightly different from this manual. Choose [fs0] to enter BIOS setup. This utility only allows storage device with BIOSTAR BIOS Flasher 1. Select the proper BIOS file, and a message asking if you to restart the system.... Then, the BIOS Update is being continuously updated. BIOSTAR BIOS flasher BIOSTAR BIOS Flasher is a BIOS flashing utility providing you an easy and simple way to update your reference only. While the system boots...

Setup Manual
Page 1
The content of this user's manual is no representations or warranties with the instructions, may cause harmful interference to Part 15 of the FCC Rules. This equipment generates, uses, and can ... respective companies. These limits are trademarks of a Class B digital device, pursuant to radio communications. TZ77B/TZ75B/T77 Setup Manual FCC Information and Copyright This equipment has been tested and found in this user's manual. The vendor makes no guarantee that interference will not be applied Dichiarazione di conformità sintetica Ai sensi...
The content of this user's manual is no representations or warranties with the instructions, may cause harmful interference to Part 15 of the FCC Rules. This equipment generates, uses, and can ... respective companies. These limits are trademarks of a Class B digital device, pursuant to radio communications. TZ77B/TZ75B/T77 Setup Manual FCC Information and Copyright This equipment has been tested and found in this user's manual. The vendor makes no guarantee that interference will not be applied Dichiarazione di conformità sintetica Ai sensi...

Setup Manual
Page 3
... a dry and stable working environment with sufficient lighting. „ Always disconnect the computer from power outlet before operation. „ Before you for ATX Case X 1 User's Manual X 1 Fully Setup Driver DVD X 1 Note: The package contents may damage the equipment. „ Keep the computer from anti-static bag, ground yourself properly by touching...
... a dry and stable working environment with sufficient lighting. „ Always disconnect the computer from power outlet before operation. „ Before you for ATX Case X 1 User's Manual X 1 Fully Setup Driver DVD X 1 Note: The package contents may damage the equipment. „ Keep the computer from anti-static bag, ground yourself properly by touching...

Setup Manual
Page 4
... 1 SATA3 devices Each connector supports 1 SATA2 devices Supports front panel facilities Supports front panel audio function CPU Fan power supply (with Smart Fan function) 2 Motherboard Manual 1.3 MOTHERBOARD FEATURES SPEC Supports Execute Disable Bit / Enhanced Intel Socket 1155 SpeedStep® / Intel Architecture-64 / Extended CPU Intel Core i7 / i5 / i3 / Pentium / Celeron...
... 1 SATA3 devices Each connector supports 1 SATA2 devices Supports front panel facilities Supports front panel audio function CPU Fan power supply (with Smart Fan function) 2 Motherboard Manual 1.3 MOTHERBOARD FEATURES SPEC Supports Execute Disable Bit / Enhanced Intel Socket 1155 SpeedStep® / Intel Architecture-64 / Extended CPU Intel Core i7 / i5 / i3 / Pentium / Celeron...

Setup Manual
Page 6
Motherboard Manual 1.4 REAR PANEL CONNECTORS PS/2 Keyboard VGA LAN USB2.0X2 HDMI DVI-D USB3.0X2 USB2.0X2 Center Rear Side Line In Line Out Mic In NOTE: ...
Motherboard Manual 1.4 REAR PANEL CONNECTORS PS/2 Keyboard VGA LAN USB2.0X2 HDMI DVI-D USB3.0X2 USB2.0X2 Center Rear Side Line In Line Out Mic In NOTE: ...

Setup Manual
Page 8
Motherboard Manual CHAPTER 2: HARDWARE INSTALLATION 2.1 INSTALLING CENTRAL PROCESSING UNIT (CPU) Notice: 1. Please refer below instruction to ensure pin legs won't be damaged. 2. The motherboard might equip with two different types of pin cap. Step 1: Pull the socket locking lever out from the socket and then raise the lever up. Remove Pin Cap before installation, and make good preservation for future use. When the CPU is removed, cover the Pin Cap on the empty socket to remove the pin cap. Step 2: Remove the Pin Cap. 6
Motherboard Manual CHAPTER 2: HARDWARE INSTALLATION 2.1 INSTALLING CENTRAL PROCESSING UNIT (CPU) Notice: 1. Please refer below instruction to ensure pin legs won't be damaged. 2. The motherboard might equip with two different types of pin cap. Step 1: Pull the socket locking lever out from the socket and then raise the lever up. Remove Pin Cap before installation, and make good preservation for future use. When the CPU is removed, cover the Pin Cap on the empty socket to remove the pin cap. Step 2: Remove the Pin Cap. 6

Setup Manual
Page 10
... Headers Pin 1 2 S YS _FA N2 3 Assignment Ground +12V FAN RPM rate sense 13 S YS _FA N1 Note: The SYS_FAN1/SYS_FAN2 support 3-pin head connectors; Motherboard Manual 2.2 FAN HEADERS These fan headers support cooling-fans built in the computer.
... Headers Pin 1 2 S YS _FA N2 3 Assignment Ground +12V FAN RPM rate sense 13 S YS _FA N1 Note: The SYS_FAN1/SYS_FAN2 support 3-pin head connectors; Motherboard Manual 2.2 FAN HEADERS These fan headers support cooling-fans built in the computer.

Setup Manual
Page 12
... to the following requirements to activate Dual Channel function: Install memory module of the memory module must be the same (x8 or x16) 10 Motherboard Manual B.
... to the following requirements to activate Dual Channel function: Install memory module of the memory module must be the same (x8 or x16) 10 Motherboard Manual B.

Setup Manual
Page 14
PEX16_2: PCI-Express Gen2 x4 Slot - PCI-Express 2.0 compliant. - PCI-Express 2.0 compliant. - Motherboard Manual PEX16_1: PCI-Express Gen3 x16 Slot - PEX16_1 PEX1_1 PEX16_2 PEX1_2 12 PCI-E 3.0 is supported by Core i7-3xxx / i5-3xxx CPU. PEX1_1/PEX1_2: PCI-Express ...
PEX16_2: PCI-Express Gen2 x4 Slot - PCI-Express 2.0 compliant. - PCI-Express 2.0 compliant. - Motherboard Manual PEX16_1: PCI-Express Gen3 x16 Slot - PEX16_1 PEX1_1 PEX16_2 PEX1_2 12 PCI-E 3.0 is supported by Core i7-3xxx / i5-3xxx CPU. PEX1_1/PEX1_2: PCI-Express ...

Setup Manual
Page 16
Motherboard Manual ATXPWR1: ATX Power Source Connector This connector allows user to connect 24-pin power connector on the ATX power supply. 12 24 1 13 Pin Assignment Pin Assignment 13 +3.3V 14 -12V 15 Ground 16 PS_ON 17 Ground 18 Ground 19 Ground 20 NC 21 +5V 22 +5V 23 +5V 24 Ground 1 +3.3V 2 +3.3V 3 Ground 4 +5V 5 Ground 6 +5V 7 Ground 8 PW_OK 9 Standby Voltage+5V 10 +12V 11 +12V 12 +3.3V Note: Before you power on the system, please make sure that ATXPWR1 and ATXPWR2 connectors have been well plugged-in. 14
Motherboard Manual ATXPWR1: ATX Power Source Connector This connector allows user to connect 24-pin power connector on the ATX power supply. 12 24 1 13 Pin Assignment Pin Assignment 13 +3.3V 14 -12V 15 Ground 16 PS_ON 17 Ground 18 Ground 19 Ground 20 NC 21 +5V 22 +5V 23 +5V 24 Ground 1 +3.3V 2 +3.3V 3 Ground 4 +5V 5 Ground 6 +5V 7 Ground 8 PW_OK 9 Standby Voltage+5V 10 +12V 11 +12V 12 +3.3V Note: Before you power on the system, please make sure that ATXPWR1 and ATXPWR2 connectors have been well plugged-in. 14

Setup Manual
Page 18
Motherboard Manual F_USB1/F_USB2: Headers for USB 3.0 Ports at Front Panel These headers allow user to connect additional USB cable on the PC front panel, and also ...
Motherboard Manual F_USB1/F_USB2: Headers for USB 3.0 Ports at Front Panel These headers allow user to connect additional USB cable on the PC front panel, and also ...
Setup Manual
Page 20
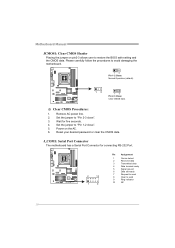
Set the jumper to "Pin 1-2 close ". 3. Motherboard Manual JCMOS1: Clear CMOS Header Placing the jumper on the AC. 6. Wait for connecting RS-232 Port. 2 10 1 9 Pin Assignment 1 Carrier detect 2 Received data 3 Transmitted data 4 ...
Set the jumper to "Pin 1-2 close ". 3. Motherboard Manual JCMOS1: Clear CMOS Header Placing the jumper on the AC. 6. Wait for connecting RS-232 Port. 2 10 1 9 Pin Assignment 1 Carrier detect 2 Received data 3 Transmitted data 4 ...
Setup Manual
Page 22
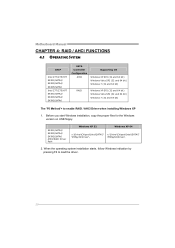
Motherboard Manual CHAPTER 4: RAID / AHCI FUNCTIONS 4.1 OPERATING SYSTEM CHIP Intel Z77/Z75/H77 SATA1/SATA2/ SATA3/SATA4/ SATA5/SATA6 Intel Z77/Z75/H77 SATA1/SATA2/ SATA3/SATA4/ ...
Motherboard Manual CHAPTER 4: RAID / AHCI FUNCTIONS 4.1 OPERATING SYSTEM CHIP Intel Z77/Z75/H77 SATA1/SATA2/ SATA3/SATA4/ SATA5/SATA6 Intel Z77/Z75/H77 SATA1/SATA2/ SATA3/SATA4/ ...

Setup Manual
Page 24
...-critical data requiring high data throughput, or any drive in a RAID 0 array system. This technique reduces overall disk access time and offers high bandwidth. Motherboard Manual 4.3 HOW RAID WORKS RAID 0: The controller "stripes" data across multiple drives in parallel. Depending on the system environment. If any environment that does not require...
...-critical data requiring high data throughput, or any drive in a RAID 0 array system. This technique reduces overall disk access time and offers high bandwidth. Motherboard Manual 4.3 HOW RAID WORKS RAID 0: The controller "stripes" data across multiple drives in parallel. Depending on the system environment. If any environment that does not require...

Setup Manual
Page 25
... a hardware failure. The mirrored (backup) copy of the data can be applied for high-availability solutions, or as a form of automatic backup that eliminates tedious manual backups to the other drive. Drawbacks: Requires 2 drives for small databases or any other application that requires fault tolerance and minimal capacity. Benefits...
... a hardware failure. The mirrored (backup) copy of the data can be applied for high-availability solutions, or as a form of automatic backup that eliminates tedious manual backups to the other drive. Drawbacks: Requires 2 drives for small databases or any other application that requires fault tolerance and minimal capacity. Benefits...

Setup Manual
Page 26
... the platform. Benefits: Optimizes for both fault tolerance and performance, allowing for data redundancy, the same as RAID level 1. Fault Tolerance: Yes. Motherboard Manual RAID 10: RAID 1 drives can be simultaneously used with other RAID levels in a RAID 10 solution for improved resiliency, performance and rebuild performance. Block 1 Block...
... the platform. Benefits: Optimizes for both fault tolerance and performance, allowing for data redundancy, the same as RAID level 1. Fault Tolerance: Yes. Motherboard Manual RAID 10: RAID 1 drives can be simultaneously used with other RAID levels in a RAID 10 solution for improved resiliency, performance and rebuild performance. Block 1 Block...

Setup Manual
Page 28
... Setup DVD to open the main windows. 5. After all drivers (including Intel(R) Smart Response Technology Driver). This function is only for TZ77B and T77. Motherboard Manual 4.4 INTEL SMART RESPONSE TECHNOLOGY With Intel(R) Smart Response Technology, the performance of accelerated device has been enabled accelerated. 26 Select "Accelerate" page, and make sure...
... Setup DVD to open the main windows. 5. After all drivers (including Intel(R) Smart Response Technology Driver). This function is only for TZ77B and T77. Motherboard Manual 4.4 INTEL SMART RESPONSE TECHNOLOGY With Intel(R) Smart Response Technology, the performance of accelerated device has been enabled accelerated. 26 Select "Accelerate" page, and make sure...

Setup Manual
Page 29
... BIOS Features Overclocking Navigator Engine (O.N.E.) Self Recovery System (S.R.S) Smart Fan Function BIO-Flasher: Update UEFI BIOS file from this manual is being continuously updated. Notice: Not all types of setting up the UEFI BIOS, please refer to customize personal overclock settings...: Manual CPU System, Manual Memory System, Manual PWM System, and Manual Voltage System. WARNING !! For better system performance, the UEFI BIOS firmware is for your reference only and ...
... BIOS Features Overclocking Navigator Engine (O.N.E.) Self Recovery System (S.R.S) Smart Fan Function BIO-Flasher: Update UEFI BIOS file from this manual is being continuously updated. Notice: Not all types of setting up the UEFI BIOS, please refer to customize personal overclock settings...: Manual CPU System, Manual Memory System, Manual PWM System, and Manual Voltage System. WARNING !! For better system performance, the UEFI BIOS firmware is for your reference only and ...

Setup Manual
Page 30
...; 28 This is a brilliant feature to inappropriate overclock actions. When enabling Smart Fan function, Fan speed is always on whenever the system starts up , S.R.S. Motherboard Manual NOTE Overclock is not recommended for any overclocking performance. When the system hangs up . Smart Fan Function Smart Fan Function is under UEFI BIOS setup...
...; 28 This is a brilliant feature to inappropriate overclock actions. When enabling Smart Fan function, Fan speed is always on whenever the system starts up , S.R.S. Motherboard Manual NOTE Overclock is not recommended for any overclocking performance. When the system hangs up . Smart Fan Function Smart Fan Function is under UEFI BIOS setup...

Setup Manual
Page 32
... then click on -screen instructions to the H77 chipset limitation, the most overclocking functions will see the software icon showing on CPU and Memory. Motherboard Manual 5.2 T-SERIES SOFTWARE Installing T-Series Software 1. Launching T-Series Software After the installation process is for monitoring system status. Due to complete the installation. Double-click the...
... then click on -screen instructions to the H77 chipset limitation, the most overclocking functions will see the software icon showing on CPU and Memory. Motherboard Manual 5.2 T-SERIES SOFTWARE Installing T-Series Software 1. Launching T-Series Software After the installation process is for monitoring system status. Due to complete the installation. Double-click the...

