Setup Manual
Page 2
Table of Contents Chapter 1: Introduction 1 1.1 Before You Start 1 1.2 Package Checklist 1 1.3 Motherboard Features 2 1.4 Rear Panel Connectors 3 1.5 Motherboard Layout 4 Chapter 2: Hardware Installation 5 2.1 Installing Central Processing Unit (CPU 5 2.2 FAN Headers 7 2.3 Installing...T-Series UEFI BIOS & Software........... 24 6.1 T-Series UEFI BIOS 24 6.2 T-Series Software 27 Chapter 7: Useful Help 37 7.1 Driver Installation Note 37 7.2 Extra Information 38 7.3 AMI BIOS Beep Code 39 7.4 Troubleshooting 40 Appendix: SPEC In Other Languages 42 ...
Table of Contents Chapter 1: Introduction 1 1.1 Before You Start 1 1.2 Package Checklist 1 1.3 Motherboard Features 2 1.4 Rear Panel Connectors 3 1.5 Motherboard Layout 4 Chapter 2: Hardware Installation 5 2.1 Installing Central Processing Unit (CPU 5 2.2 FAN Headers 7 2.3 Installing...T-Series UEFI BIOS & Software........... 24 6.1 T-Series UEFI BIOS 24 6.2 T-Series Software 27 Chapter 7: Useful Help 37 7.1 Driver Installation Note 37 7.2 Extra Information 38 7.3 AMI BIOS Beep Code 39 7.4 Troubleshooting 40 Appendix: SPEC In Other Languages 42 ...

Setup Manual
Page 3
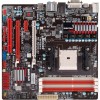
Loose parts will cause short circuits which may be 0 to area or your motherboard version. 1 CHAPTER 1: INTRODUCTION TA75M 1.1 BEFORE YOU START Thank you take the motherboard out from dangerous area, such as heat source, humid air and water. „ The operating temperatures of the board unless ... „ Always disconnect the computer from power outlet before operation. „ Before you for ATX Case X1 User's Manual X1 Fully Setup Driver DVD X1 Note: The package contents may damage the equipment. „ Keep the computer from anti-static bag, ground yourself properly by touching...
Loose parts will cause short circuits which may be 0 to area or your motherboard version. 1 CHAPTER 1: INTRODUCTION TA75M 1.1 BEFORE YOU START Thank you take the motherboard out from dangerous area, such as heat source, humid air and water. „ The operating temperatures of the board unless ... „ Always disconnect the computer from power outlet before operation. „ Before you for ATX Case X1 User's Manual X1 Fully Setup Driver DVD X1 Note: The package contents may damage the equipment. „ Keep the computer from anti-static bag, ground yourself properly by touching...
Setup Manual
Page 22
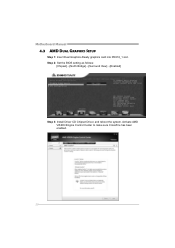
Step 2: Set the BIOS setting as follows: [Chipset]→[North Bridge]→[Surround View]→[Enabled] Step 3: Install Driver CD Chipset Driver, and reboot the system. Activate AMD VISION Engine Control Center to make sure CrossFire has been enabled. 20 Motherboard Manual 4.3 AMD DUAL GRAPHICS SETUP Step 1: Insert Dual Graphics-Ready graphics card into PEX16_1 slot.
Step 2: Set the BIOS setting as follows: [Chipset]→[North Bridge]→[Surround View]→[Enabled] Step 3: Install Driver CD Chipset Driver, and reboot the system. Activate AMD VISION Engine Control Center to make sure CrossFire has been enabled. 20 Motherboard Manual 4.3 AMD DUAL GRAPHICS SETUP Step 1: Insert Dual Graphics-Ready graphics card into PEX16_1 slot.
Setup Manual
Page 39
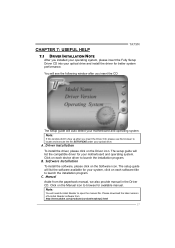
... locate and execute the file SETUP.EXE under your optical drive. B. CHAPTER 7: USEFUL HELP TA75M 7.1 DRIVER INSTALLATION NOTE After you insert the CD The setup guide will auto detect your motherboard and operating system. A. Click on the Software icon. C. Software Installation To install the software, please click on each software...open the manual file. Note: If this window didn't show up after you installed your operating system, please insert the Fully Setup Driver CD into your motherboard and operating system. Note: You will see the following window after you insert the...
... locate and execute the file SETUP.EXE under your optical drive. B. CHAPTER 7: USEFUL HELP TA75M 7.1 DRIVER INSTALLATION NOTE After you insert the CD The setup guide will auto detect your motherboard and operating system. A. Click on the Software icon. C. Software Installation To install the software, please click on each software...open the manual file. Note: If this window didn't show up after you installed your operating system, please insert the Fully Setup Driver CD into your motherboard and operating system. Note: You will see the following window after you insert the...


