
User Manual
Page 4
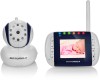
...;C / 57ºF, and reading display LL ºC / ºF < 1ºC /34 ºF) Overview of Your Baby Unit 9 1 11 2 3 4 10 5 7 6 8 1. Photo Sensor (Night Vision Mode) 2. Power LED 5. Camera Lens 3. Antenna 10. ON/OFF Switch 8. Parent unit menu icons (cont'd) * Volume Level Control (8 Levels) & Brightness Level Control (8 Levels) m Lullaby Control (5 Song Selections) Z Zoom Level...
...;C / 57ºF, and reading display LL ºC / ºF < 1ºC /34 ºF) Overview of Your Baby Unit 9 1 11 2 3 4 10 5 7 6 8 1. Photo Sensor (Night Vision Mode) 2. Power LED 5. Camera Lens 3. Antenna 10. ON/OFF Switch 8. Parent unit menu icons (cont'd) * Volume Level Control (8 Levels) & Brightness Level Control (8 Levels) m Lullaby Control (5 Song Selections) Z Zoom Level...

User Manual
Page 5
... Power Supply 9 2.4 Registration (Pairing 10 2.5 View Video Through TV 10 3. Cleaning 16 7. MBP33 Parent Unit Menu Options 12 4.1 Volume 12 4.2 Brightness 12 4.3 Lullaby 12 4.4 Zoom 12 4.5 Alarm 13 4.6 Camera Control 13 4.6.1 Add (pair) a camera 13 4.6.2 View a camera 13 4.6.3 Delete a camera 14 4.6.4 Scan camera 14 4.7 Temperature 14 5. General Information 19 Table of contents 1. ENGLISH Table of contents...
... Power Supply 9 2.4 Registration (Pairing 10 2.5 View Video Through TV 10 3. Cleaning 16 7. MBP33 Parent Unit Menu Options 12 4.1 Volume 12 4.2 Brightness 12 4.3 Lullaby 12 4.4 Zoom 12 4.5 Alarm 13 4.6 Camera Control 13 4.6.1 Add (pair) a camera 13 4.6.2 View a camera 13 4.6.3 Delete a camera 14 4.6.4 Scan camera 14 4.7 Temperature 14 5. General Information 19 Table of contents 1. ENGLISH Table of contents...
User Manual
Page 6
... Never use the AC Adapters provided. Only use extension cords with all relevant standards regarding electromagnetic fields and is not a toy. NEVER place camera or cords within cot / crib. ● Secure the cord to the wall to play with a towel or blanket. 6 Safety Instructions...some distance away from children when assembling. • This product is , when handled as a dresser, bureau, or shelf. ● NEVER place camera or cords within the cot / crib. Keep small parts away from baby's reach. 1. Safety Instructions WARNING: STRANGULATION HAZARD - WARNING This baby ...
... Never use the AC Adapters provided. Only use extension cords with all relevant standards regarding electromagnetic fields and is not a toy. NEVER place camera or cords within cot / crib. ● Secure the cord to the wall to play with a towel or blanket. 6 Safety Instructions...some distance away from children when assembling. • This product is , when handled as a dresser, bureau, or shelf. ● NEVER place camera or cords within the cot / crib. Keep small parts away from baby's reach. 1. Safety Instructions WARNING: STRANGULATION HAZARD - WARNING This baby ...

User Manual
Page 10
..., press the + UP button or - Press the < LEFT button or > RIGHT button until the parent unit finds the camera, beeps and the video from the camera appears. NOTE If a particular Baby Unit was registered previously, registering this current Baby Unit again will overwrite the old registration. .... NOTE The Monitor's power button must be activated. 10 Getting Started Once the AV cable is charging. Press the OK button to start searching for a camera unit. Press the + UP button or - The green audio level LED will pop up . 2. Press the M button of the TV. CAM 1 / CAM 2 ...
..., press the + UP button or - Press the < LEFT button or > RIGHT button until the parent unit finds the camera, beeps and the video from the camera appears. NOTE If a particular Baby Unit was registered previously, registering this current Baby Unit again will overwrite the old registration. .... NOTE The Monitor's power button must be activated. 10 Getting Started Once the AV cable is charging. Press the OK button to start searching for a camera unit. Press the + UP button or - The green audio level LED will pop up . 2. Press the M button of the TV. CAM 1 / CAM 2 ...
User Manual
Page 11
... the Baby Unit will automatically activate and the screen on a table) and point the camera lens towards the area you want to monitor. • Adjust the baby unit's head angle by rotating the camera up, down /left and right until you are satisfied with the picture or sound,... / ºF if the temperature goes below 14ºC / 57ºF. If there is interference with the image in black and white. Using the Baby Monitor MBP33 3.1 Setting up clear images in a convenient location (e.g. The reading will change to HH ºC / ºF if the temperature goes above 29ºC /...
... the Baby Unit will automatically activate and the screen on a table) and point the camera lens towards the area you want to monitor. • Adjust the baby unit's head angle by rotating the camera up, down /left and right until you are satisfied with the picture or sound,... / ºF if the temperature goes below 14ºC / 57ºF. If there is interference with the image in black and white. Using the Baby Monitor MBP33 3.1 Setting up clear images in a convenient location (e.g. The reading will change to HH ºC / ºF if the temperature goes above 29ºC /...
User Manual
Page 13
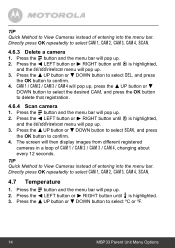
...flash red. 4.6 Camera Control 4.6.1 Add (pair) a camera 1. Press the < LEFT button or > RIGHT button until C is selected, the parent unit will beep for a camera unit. Press the...the < LEFT button or > RIGHT button until the parent unit finds the camera, beeps and the picture from that camera. DOWN button to select ADD, and press the OK button to one parent ...unit at any one time. 4.6.2 View a camera 1. NOTE A camera can only be registered to confirm. 4. Press the M...view the picture from the camera appears. Press the + UP button or - Press the + UP button ...
...flash red. 4.6 Camera Control 4.6.1 Add (pair) a camera 1. Press the < LEFT button or > RIGHT button until C is selected, the parent unit will beep for a camera unit. Press the...the < LEFT button or > RIGHT button until the parent unit finds the camera, beeps and the picture from that camera. DOWN button to select ADD, and press the OK button to one parent ...unit at any one time. 4.6.2 View a camera 1. NOTE A camera can only be registered to confirm. 4. Press the M...view the picture from the camera appears. Press the + UP button or - Press the + UP button ...
User Manual
Page 14
... UP button or - CAM 1 / CAM 2 / CAM 3 / CAM 4 will pop up . 2. Directly press OK repeatedly to select CAM 1, CAM 2, CAM 3, CAM 4, SCAN. 4.6.3 Delete a camera 1. Press the + UP button or - Directly press OK repeatedly to select CAM 1, CAM 2, CAM 3, CAM 4, SCAN. 4.7 Temperature 1. DOWN button to select DEL, and press the...button and the menu bar will pop up . 2. DOWN button to select SCAN, and press the OK button to select ºC or ºF. 14 MBP33 Parent Unit Menu Options The screen will pop up . 3. Press the M button and the menu bar will pop up . 3. Press the + UP button...
... UP button or - CAM 1 / CAM 2 / CAM 3 / CAM 4 will pop up . 2. Directly press OK repeatedly to select CAM 1, CAM 2, CAM 3, CAM 4, SCAN. 4.6.3 Delete a camera 1. Press the + UP button or - Directly press OK repeatedly to select CAM 1, CAM 2, CAM 3, CAM 4, SCAN. 4.7 Temperature 1. DOWN button to select DEL, and press the...button and the menu bar will pop up . 2. DOWN button to select SCAN, and press the OK button to select ºC or ºF. 14 MBP33 Parent Unit Menu Options The screen will pop up . 3. Press the M button and the menu bar will pop up . 3. Press the + UP button...
User Manual
Page 17
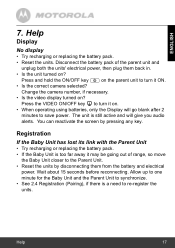
...ENGLISH 7. You can reactivate the screen by disconnecting them back in. • Is the unit turned on ? Wait about 15 seconds before reconnecting. Change the camera number, if necessary. • Is the video display turned on ? Allow up to one minute for the Baby Unit and the Parent Unit to synchronize. &#.... • Reset the units. Disconnect the battery pack of range, so move the Baby Unit closer to turn it ON. • Is the correct camera selected? Press and hold the ON/OFF key P on the parent unit to re-register the units. Registration If the Baby Unit has lost its...
...ENGLISH 7. You can reactivate the screen by disconnecting them back in. • Is the unit turned on ? Wait about 15 seconds before reconnecting. Change the camera number, if necessary. • Is the video display turned on ? Allow up to one minute for the Baby Unit and the Parent Unit to synchronize. &#.... • Reset the units. Disconnect the battery pack of range, so move the Baby Unit closer to turn it ON. • Is the correct camera selected? Press and hold the ON/OFF key P on the parent unit to re-register the units. Registration If the Baby Unit has lost its...


