
User Manual
Page 1
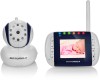
USER'S GUIDE MBP33 BABY MONITOR USER'S GUIDE The features described in user's guide are subject to modifications without prior notice.
USER'S GUIDE MBP33 BABY MONITOR USER'S GUIDE The features described in user's guide are subject to modifications without prior notice.

User Manual
Page 2
....motorola.com This User's Guide provides you with all the information you need to provide a copy of your Motorola product, you can monitor your dated sales receipt to your product. to confirm warranty status. Thank you install the units. Got everything? • 1 x Parent unit • 1 x Baby unit • 1 x Rechargeable Ni-MH battery pack for the parent unit • 1 x Power adapter for the Parent unit • 1 x Power adapter for purchasing the MBP33...
....motorola.com This User's Guide provides you with all the information you need to provide a copy of your Motorola product, you can monitor your dated sales receipt to your product. to confirm warranty status. Thank you install the units. Got everything? • 1 x Parent unit • 1 x Baby unit • 1 x Rechargeable Ni-MH battery pack for the parent unit • 1 x Power adapter for the Parent unit • 1 x Power adapter for purchasing the MBP33...
User Manual
Page 3
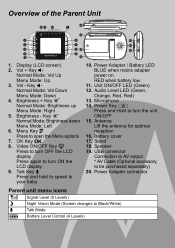
...turn the unit ON/OFF 15. Power Adapter / Battery LED BLUE when mains adapter power on. Audio Level LED (Green, Orange, Red, Red) 13. Power Key P Press and Hold to your baby 10. Overview of the Parent Unit 10 ...11 12 14 1 15 2 6 19 3 7 18 4 8 16 20 5 9 13 17 1. Vol + Key ) Normal Mode: Vol Up Menu Mode: Up 3. Brightness + Key ] Normal Mode: Brightness up Menu Mode: Right 5. Video...
...turn the unit ON/OFF 15. Power Adapter / Battery LED BLUE when mains adapter power on. Audio Level LED (Green, Orange, Red, Red) 13. Power Key P Press and Hold to your baby 10. Overview of the Parent Unit 10 ...11 12 14 1 15 2 6 19 3 7 18 4 8 16 20 5 9 13 17 1. Vol + Key ) Normal Mode: Vol Up Menu Mode: Up 3. Brightness + Key ] Normal Mode: Brightness up Menu Mode: Right 5. Video...

User Manual
Page 4
... for installing your Baby Monitor • To use your Video Monitor Baby and Parent Unit together, you must be able to establish a radio link between the Baby and Parent Unit may block the radio signal. • The signal strength may cause interference with this product, so keep the baby monitor away at least 5ft (1m) from these types of products, or turn RED < 14...
... for installing your Baby Monitor • To use your Video Monitor Baby and Parent Unit together, you must be able to establish a radio link between the Baby and Parent Unit may block the radio signal. • The signal strength may cause interference with this product, so keep the baby monitor away at least 5ft (1m) from these types of products, or turn RED < 14...

User Manual
Page 5
Getting Started 8 2.1 Baby Unit Power Supply 8 2.2 Parent Unit Battery Installation 8 2.3 Parent Unit Power Supply 9 2.4 Registration (Pairing 10 2.5 View Video Through TV 10 3. MBP33 Parent Unit Menu Options 12 4.1 Volume 12 4.2 Brightness 12 4.3 Lullaby 12 4.4 Zoom 12 4.5 Alarm 13 4.6 Camera Control 13 4.6.1 Add (pair) a camera 13 4.6.2 View a camera 13 4.6.3 Delete a camera 14 4.6.4 Scan camera 14 4.7 Temperature 14 5. Cleaning 16 7. Disposal of contents 5 Safety Instructions 6 2. General Information 19...
Getting Started 8 2.1 Baby Unit Power Supply 8 2.2 Parent Unit Battery Installation 8 2.3 Parent Unit Power Supply 9 2.4 Registration (Pairing 10 2.5 View Video Through TV 10 3. MBP33 Parent Unit Menu Options 12 4.1 Volume 12 4.2 Brightness 12 4.3 Lullaby 12 4.4 Zoom 12 4.5 Alarm 13 4.6 Camera Control 13 4.6.1 Add (pair) a camera 13 4.6.2 View a camera 13 4.6.3 Delete a camera 14 4.6.4 Scan camera 14 4.7 Temperature 14 5. Cleaning 16 7. Disposal of contents 5 Safety Instructions 6 2. General Information 19...
User Manual
Page 6
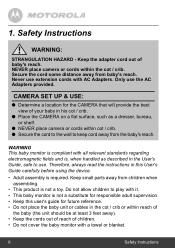
Keep small parts away from children when assembling. • This product is required. Therefore, always read the instructions in the User's Guide, safe to use extension cords with AC Adapters. CAMERA SET UP & USE: ● Determine a location for future reference. • Do not place the baby unit or cables in the cot / crib or within reach of the baby (the unit should...
Keep small parts away from children when assembling. • This product is required. Therefore, always read the instructions in the User's Guide, safe to use extension cords with AC Adapters. CAMERA SET UP & USE: ● Determine a location for future reference. • Do not place the baby unit or cables in the cot / crib or within reach of the baby (the unit should...
User Manual
Page 7
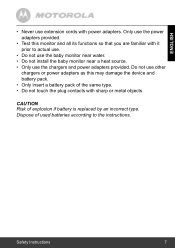
... of explosion if battery is replaced by an incorrect type. Do not use other chargers or power adapters as this monitor and all its functions so that you are familiar with it prior to the instructions. CAUTION Risk of used batteries according to actual use. • Do not use the baby monitor near water. • Do not install the baby monitor near a heat...
... of explosion if battery is replaced by an incorrect type. Do not use other chargers or power adapters as this monitor and all its functions so that you are familiar with it prior to the instructions. CAUTION Risk of used batteries according to actual use. • Do not use the baby monitor near water. • Do not install the baby monitor near a heat...
User Manual
Page 8
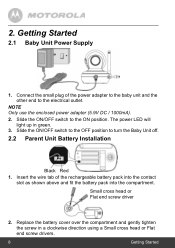
... of the rechargeable battery pack into the contact slot as shown above and fit the battery pack into the compartment. Slide the ON/OFF switch to the OFF position to turn the Baby Unit off. 2.2 Parent Unit Battery Installation Black Red 1. Small cross head or Flat end screw driver 2. Getting Started 2.1 Baby Unit Power Supply 1. NOTE Only use the enclosed power adapter (5.9V DC / 1000mA...
... of the rechargeable battery pack into the contact slot as shown above and fit the battery pack into the compartment. Slide the ON/OFF switch to the OFF position to turn the Baby Unit off. 2.2 Parent Unit Battery Installation Black Red 1. Small cross head or Flat end screw driver 2. Getting Started 2.1 Baby Unit Power Supply 1. NOTE Only use the enclosed power adapter (5.9V DC / 1000mA...
User Manual
Page 9
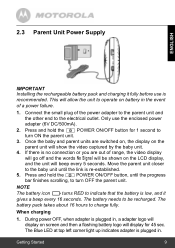
... will beep every 5 seconds. 2.3 Parent Unit Power Supply ENGLISH IMPORTANT Installing the rechargeable battery pack and charging it gives a beep every 16 seconds. Move the parent unit closer to be shown on the LCD display, and the unit will allow the unit to the electrical outlet. NOTE The battery icon turns RED to charge fully. The Blue LED at top left corner light up indicates adapter is...
... will beep every 5 seconds. 2.3 Parent Unit Power Supply ENGLISH IMPORTANT Installing the rechargeable battery pack and charging it gives a beep every 16 seconds. Move the parent unit closer to be shown on the LCD display, and the unit will allow the unit to the electrical outlet. NOTE The battery icon turns RED to charge fully. The Blue LED at top left corner light up indicates adapter is...

User Manual
Page 10
...adapter is plugged in , the battery icon on the TV menu until the parent unit finds the camera, beeps and the video from the camera appears. AV cable is an optional accessory, which is pre-registered to confirm. 4. The Blue LED at the top left corner light up . 2. To re-register your Parent Unit...the PAIR button underneath the baby unit until the Baby monitor picture is charging. Scroll through the AV inputs on screen's top right corner will flash rapidly while searching. 5. During power ON, when adapter plug in . 2.4 Registration (Pairing) The Baby monitor is to confirm. 6....
...adapter is plugged in , the battery icon on the TV menu until the parent unit finds the camera, beeps and the video from the camera appears. AV cable is an optional accessory, which is pre-registered to confirm. 4. The Blue LED at the top left corner light up . 2. To re-register your Parent Unit...the PAIR button underneath the baby unit until the Baby monitor picture is charging. Scroll through the AV inputs on screen's top right corner will flash rapidly while searching. 5. During power ON, when adapter plug in . 2.4 Registration (Pairing) The Baby monitor is to confirm. 6....
User Manual
Page 11
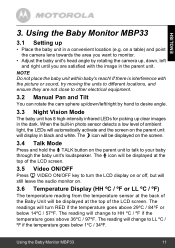
...to desire angle. 3.3 Night Vision Mode The baby unit has 8 high-intensity infrared LEDs for picking up • Place the baby unit in the dark. ENGLISH 3. Using the Baby Monitor MBP33 11 Using the Baby Monitor MBP33 3.1 Setting up clear images in a convenient location (e.g. ...parent unit will turn the LCD display on or off, but will still leave the audio monitor on. 3.6 Temperature Display (HH ºC / ºF or LL ºC / ºF) The temperature reading from the temperature sensor at the top of the LCD screen. 3.5 Video ON/OFF Press V VIDEO ON/OFF key to turn RED...
...to desire angle. 3.3 Night Vision Mode The baby unit has 8 high-intensity infrared LEDs for picking up • Place the baby unit in the dark. ENGLISH 3. Using the Baby Monitor MBP33 11 Using the Baby Monitor MBP33 3.1 Setting up clear images in a convenient location (e.g. ...parent unit will turn the LCD display on or off, but will still leave the audio monitor on. 3.6 Temperature Display (HH ºC / ºF or LL ºC / ºF) The temperature reading from the temperature sensor at the top of the LCD screen. 3.5 Video ON/OFF Press V VIDEO ON/OFF key to turn RED...
User Manual
Page 13
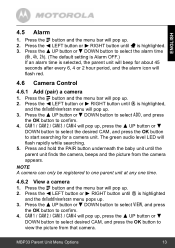
...and the menu bar will flash red. 4.6 Camera Control 4.6.1 Add (pair) a camera 1. DOWN button to view the picture from the camera appears. Press the + UP button or - Press and hold the PAIR button underneath the baby unit until C is selected, the parent unit will beep for a camera unit. DOWN button to select the desired... press the OK button to select the alarm time (6h, 4h, 2h). (The default setting is Alarm OFF.) If an alarm time is highlighted and the del/add/view/scan menu pops up . 2. MBP33 Parent Unit Menu Options 13 Press the + UP button or - Press the < LEFT button or >...
...and the menu bar will flash red. 4.6 Camera Control 4.6.1 Add (pair) a camera 1. DOWN button to view the picture from the camera appears. Press the + UP button or - Press and hold the PAIR button underneath the baby unit until C is selected, the parent unit will beep for a camera unit. DOWN button to select the desired... press the OK button to select the alarm time (6h, 4h, 2h). (The default setting is Alarm OFF.) If an alarm time is highlighted and the del/add/view/scan menu pops up . 2. MBP33 Parent Unit Menu Options 13 Press the + UP button or - Press the < LEFT button or >...
User Manual
Page 17
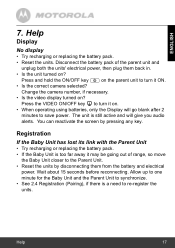
...Change the camera number, if necessary. • Is the video display turned on the parent unit to the Parent Unit. • Reset the units by pressing any key. Disconnect the battery pack of range, so move the Baby Unit closer to ...turn it on ? Press and hold the ON/OFF key P on ? Registration If the Baby Unit has lost its link with the Parent Unit • Try recharging or replacing the battery pack. • If the Baby Unit is a need to save power...
...Change the camera number, if necessary. • Is the video display turned on the parent unit to the Parent Unit. • Reset the units by pressing any key. Disconnect the battery pack of range, so move the Baby Unit closer to ...turn it on ? Press and hold the ON/OFF key P on ? Registration If the Baby Unit has lost its link with the Parent Unit • Try recharging or replacing the battery pack. • If the Baby Unit is a need to save power...

User Manual
Page 19
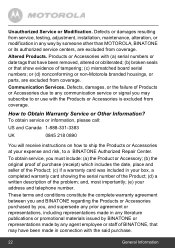
... by Binatone Electronics International LTD ("BINATONE"). This Warranty extends only to the exclusions contained below . Visit our website: www.motorola.com 3. Contact Customer Service: US and Canada 1-888-331-3383 UK 0845 218 0890 To order a replacement battery pack, contact customer service or visit our website. General Information 19 Read this Warranty Cover? What Does this User's Guide or...
... by Binatone Electronics International LTD ("BINATONE"). This Warranty extends only to the exclusions contained below . Visit our website: www.motorola.com 3. Contact Customer Service: US and Canada 1-888-331-3383 UK 0845 218 0890 To order a replacement battery pack, contact customer service or visit our website. General Information 19 Read this Warranty Cover? What Does this User's Guide or...
User Manual
Page 21
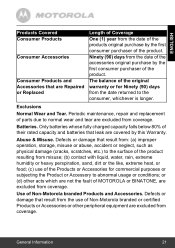
Periodic maintenance, repair and replacement of parts due to the surface of the product. Only batteries whose fully charged capacity falls below 80% of their rated capacity and batteries that leak are Repaired or Replaced Length of Coverage One (1) year from the date of the products original purchase by the first ... sand, dirt or the like, extreme heat, or food; (c) use of Non-Motorola branded or certified Products or Accessories or other acts which are not the fault of MOTOROLA or BINATONE, are excluded from the date of the accessories original purchase by the first consumer purchaser ...
Periodic maintenance, repair and replacement of parts due to the surface of the product. Only batteries whose fully charged capacity falls below 80% of their rated capacity and batteries that leak are Repaired or Replaced Length of Coverage One (1) year from the date of the products original purchase by the first ... sand, dirt or the like, extreme heat, or food; (c) use of Non-Motorola branded or certified Products or Accessories or other acts which are not the fault of MOTOROLA or BINATONE, are excluded from the date of the accessories original purchase by the first consumer purchaser ...
User Manual
Page 22
... warranty card showing the serial number of the Product; (d) a written description of Products or Accessories due to any way by BINATONE or representations made in any literature publications or promotional materials issued by someone other than MOTOROLA, BINATONE or its authorized service centers, are excluded from coverage. How to a BINATONE Authorized Repair Center. and, most importantly; (e) your...
... warranty card showing the serial number of the Product; (d) a written description of Products or Accessories due to any way by BINATONE or representations made in any literature publications or promotional materials issued by someone other than MOTOROLA, BINATONE or its authorized service centers, are excluded from coverage. How to a BINATONE Authorized Repair Center. and, most importantly; (e) your...

User Manual
Page 23
...; Consult the dealer or an experienced radio/TV technician for a Class B digital device, pursuant to Part 15 of the FCC rules. If this device must accept any interference received, including interference that parts of approximately 20 cm (8 inches) or more of the product. Operation is...the instructions, may not be safely absorbed by turning the equipment off and on a circuit different from that interference will not occur in a residential installation. This product has been tested and found to comply with Canadian ICES-003. The Baby unit shall be determined by a user ...
...; Consult the dealer or an experienced radio/TV technician for a Class B digital device, pursuant to Part 15 of the FCC rules. If this device must accept any interference received, including interference that parts of approximately 20 cm (8 inches) or more of the product. Operation is...the instructions, may not be safely absorbed by turning the equipment off and on a circuit different from that interference will not occur in a residential installation. This product has been tested and found to comply with Canadian ICES-003. The Baby unit shall be determined by a user ...
User Manual
Page 25
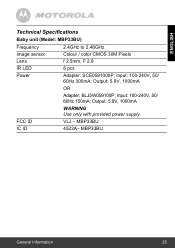
Output: 5.9V, 1000mA WARNING Use only with provided power supply. Output: 5.9V, 1000mA OR Adapter: BLJ5W059100P; Input: 100-240V, 50/ 60Hz 150mA; MBP33BU General Information 25 ENGLISH Technical Specifications Baby unit (Model: MBP33BU) Frequency 2.4GHz to 2.48GHz Image sensor Colour / color CMOS 30M Pixels Lens f 2.5mm, F 2.8 IR LED 8 pcs Power Adapter: SCE0591000P; FCC ID VLJ - MBP33BU IC ID 4522A- Input: 100-240V, 50/ 60Hz 300mA;
Output: 5.9V, 1000mA WARNING Use only with provided power supply. Output: 5.9V, 1000mA OR Adapter: BLJ5W059100P; Input: 100-240V, 50/ 60Hz 150mA; MBP33BU General Information 25 ENGLISH Technical Specifications Baby unit (Model: MBP33BU) Frequency 2.4GHz to 2.48GHz Image sensor Colour / color CMOS 30M Pixels Lens f 2.5mm, F 2.8 IR LED 8 pcs Power Adapter: SCE0591000P; FCC ID VLJ - MBP33BU IC ID 4522A- Input: 100-240V, 50/ 60Hz 300mA;
User Manual
Page 26
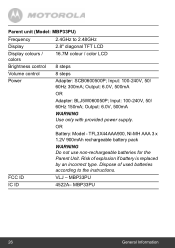
... WARNING Do not use non-rechargeable batteries for the Parent Unit. FCC ID VLJ - Parent unit (Model: MBP33PU) Frequency 2.4GHz to the instructions. Risk of used batteries according to 2.48GHz Display 2.8" diagonal TFT LCD Display colours / colors 16.7M colour / color LCD Brightness control 8 steps Volume control 8 steps Power Adapter: SCB0600500P; Output: 6.0V, 500mA OR Adapter: BLJ5W060050P; Input: 100-240V, 50...
... WARNING Do not use non-rechargeable batteries for the Parent Unit. FCC ID VLJ - Parent unit (Model: MBP33PU) Frequency 2.4GHz to the instructions. Risk of used batteries according to 2.48GHz Display 2.8" diagonal TFT LCD Display colours / colors 16.7M colour / color LCD Brightness control 8 steps Volume control 8 steps Power Adapter: SCB0600500P; Output: 6.0V, 500mA OR Adapter: BLJ5W060050P; Input: 100-240V, 50...

User Manual
Page 27
... on Annex III of the Directive 1999/5/EC and the following product Type of equipment: Model Name: Digital Baby Monitor MBP 33 Country of Origin: Brand: China Motorola complies with the European Approval Marking CE as show. Declare under our sole responsibility that the... of Conformity We the manufacturer / Importer : Binatone Telecom Plc 1 Apsley Way London NW2 7HF, United Kingdom. Manufacturer / Importer (Signature of the product voids this Declaration. BINATONE TELECOM PLC 1 Apsley Way London NW2 7HF,United Kingdom. Any Unauthorized modification of authorized person) ...
... on Annex III of the Directive 1999/5/EC and the following product Type of equipment: Model Name: Digital Baby Monitor MBP 33 Country of Origin: Brand: China Motorola complies with the European Approval Marking CE as show. Declare under our sole responsibility that the... of Conformity We the manufacturer / Importer : Binatone Telecom Plc 1 Apsley Way London NW2 7HF, United Kingdom. Manufacturer / Importer (Signature of the product voids this Declaration. BINATONE TELECOM PLC 1 Apsley Way London NW2 7HF,United Kingdom. Any Unauthorized modification of authorized person) ...


