Quick Guide
Page 1
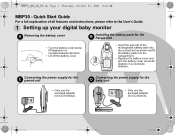
...the battery cover and turn the battery cover screw 90 degrees in a clockwise direction. MBP30_QSG_EN_PE.fm Page 1 Thursday, October 22, 2009 9:42 AM MBP30 - C Connecting the power supply for the parent unit D Connecting the power supply for the Parent unit 90° MAX • Turn the ...battery cover. • Insert the wire tab of all features and instructions, please refer to the User's Guide. 1 Setting up your digital baby monitor A Removing the battery cover B Installing the battery pack for the baby unit • Only use the enclosed adapter (5V DC/1000mA). •...
...the battery cover and turn the battery cover screw 90 degrees in a clockwise direction. MBP30_QSG_EN_PE.fm Page 1 Thursday, October 22, 2009 9:42 AM MBP30 - C Connecting the power supply for the parent unit D Connecting the power supply for the Parent unit 90° MAX • Turn the ...battery cover. • Insert the wire tab of all features and instructions, please refer to the User's Guide. 1 Setting up your digital baby monitor A Removing the battery cover B Installing the battery pack for the baby unit • Only use the enclosed adapter (5V DC/1000mA). •...
User Manual
Page 1
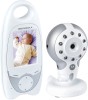
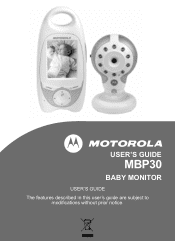
USER'S GUIDE MBP30 BABY MONITOR USER'S GUIDE The features described in this user's guide are subject to modifications without prior notice.
USER'S GUIDE MBP30 BABY MONITOR USER'S GUIDE The features described in this user's guide are subject to modifications without prior notice.

User Manual
Page 2
Before you can use the baby monitor, we recommend you insert and fully charge the battery in the Parent unit, so that it continues to work if you install the units. Please ... your dated sales receipt to carry it from your older children in the other room or you for your new Motorola Baby Monitor! Please retain your original dated sales receipt for purchasing the MBP30. Now you can monitor your product. Welcome... Thank you can see and hear your baby sleeping in their playroom.
Before you can use the baby monitor, we recommend you insert and fully charge the battery in the Parent unit, so that it continues to work if you install the units. Please ... your dated sales receipt to carry it from your older children in the other room or you for your new Motorola Baby Monitor! Please retain your original dated sales receipt for purchasing the MBP30. Now you can monitor your product. Welcome... Thank you can see and hear your baby sleeping in their playroom.

User Manual
Page 4
Microphone 5. Power LED 2. Camera lens 6. Light sensor 4. On/Off switch 7. Infrared LEDs 3. Speaker Important guidelines for installing your Baby Monitor • To use your video monitor baby and parent unit together, you must be able to establish a radio link between them off if they appear to be causing interference. • If ...; Use of other 2.4GHz products, such as wireless networks, Bluetooth® systems or microwave ovens may cause interference with this product, so keep the baby monitor away from these types of your Baby unit 1 5 2 7 6 4 3 1.
Microphone 5. Power LED 2. Camera lens 6. Light sensor 4. On/Off switch 7. Infrared LEDs 3. Speaker Important guidelines for installing your Baby Monitor • To use your video monitor baby and parent unit together, you must be able to establish a radio link between them off if they appear to be causing interference. • If ...; Use of other 2.4GHz products, such as wireless networks, Bluetooth® systems or microwave ovens may cause interference with this product, so keep the baby monitor away from these types of your Baby unit 1 5 2 7 6 4 3 1.
User Manual
Page 5
Using the Baby Monitor MBP30 11 3.1 Setting up 11 3.2 Selecting camera channel (for multi-pack only 12 3.3 Pairing camera channels 12 3.4 Night vision 12 3.5 Talk function 12 3.6 Adjusting the volume of the device (environment 15 6. MBP30 Parent Unit Menu Options 13 4.1 Brightness 13 4.2 Night Vision 13 4.3 Voice Activation 14 5. Cleaning 15 7. Help 16 8. Safety...
Using the Baby Monitor MBP30 11 3.1 Setting up 11 3.2 Selecting camera channel (for multi-pack only 12 3.3 Pairing camera channels 12 3.4 Night vision 12 3.5 Talk function 12 3.6 Adjusting the volume of the device (environment 15 6. MBP30 Parent Unit Menu Options 13 4.1 Brightness 13 4.2 Night Vision 13 4.3 Voice Activation 14 5. Cleaning 15 7. Help 16 8. Safety...

User Manual
Page 6
... adapters. Keep small parts away from children when assembling. • This product is required. Become familiar with it. • This baby monitor is replaced by an incorrect type. Therefore, always read the instructions in the User's Guide, safe to use. CAUTION Risk of used batteries...• Keep this may damage the device and battery pack. • Only insert battery pack of children. • Do not cover the baby monitor with a towel or blanket. • Never use the chargers and power adapters provided. Do not allow children to the instructions. 6 Safety Instructions...
... adapters. Keep small parts away from children when assembling. • This product is required. Become familiar with it. • This baby monitor is replaced by an incorrect type. Therefore, always read the instructions in the User's Guide, safe to use. CAUTION Risk of used batteries...• Keep this may damage the device and battery pack. • Only insert battery pack of children. • Do not cover the baby monitor with a towel or blanket. • Never use the chargers and power adapters provided. Do not allow children to the instructions. 6 Safety Instructions...
User Manual
Page 10
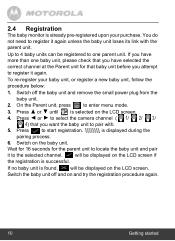
... no baby unit is selected on and try the registration procedure again. 10 Getting started Up to register it to start registration. 2.4 Registration The baby monitor is already pre-registered upon your baby unit, or register a new baby unit, follow the procedure below: 1. You do not need to 4 baby units can...
... no baby unit is selected on and try the registration procedure again. 10 Getting started Up to register it to start registration. 2.4 Registration The baby monitor is already pre-registered upon your baby unit, or register a new baby unit, follow the procedure below: 1. You do not need to 4 baby units can...

User Manual
Page 11
...ensure they are satisfied with the image in a convenient location (e.g. NOTE Do not place the baby unit within baby's reach! Using the Baby Monitor MBP30 11 Using the Baby Monitor MBP30 3.1 Setting up • Place the baby unit in the parent unit. • To wall mount your baby unit, see section "9. ...If there is interference on a table) and point the camera lens towards the area you are not close to monitor. • Adjust the baby ...
...ensure they are satisfied with the image in a convenient location (e.g. NOTE Do not place the baby unit within baby's reach! Using the Baby Monitor MBP30 11 Using the Baby Monitor MBP30 3.1 Setting up • Place the baby unit in the parent unit. • To wall mount your baby unit, see section "9. ...If there is interference on a table) and point the camera lens towards the area you are not close to monitor. • Adjust the baby ...
User Manual
Page 12
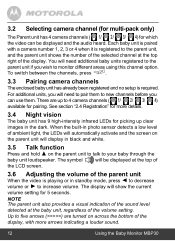
... only) The Parent unit has 4 camera channels ( 1/ 2/ 3/ 4) for which the video can use them to new channels before you wish to monitor different areas using this channel option. You will need additional baby units registered to 4 camera channels ( 1/ 2/ 3/ 4) available for picking up to the... will be displayed and the audio heard. See section "2.4 Registration" for more arrows indicating a louder sound. 12 Using the Baby Monitor MBP30 To switch between the channels, press . 3.3 Pairing camera channels The enclosed baby unit has already been registered and no setup is ...
... only) The Parent unit has 4 camera channels ( 1/ 2/ 3/ 4) for which the video can use them to new channels before you wish to monitor different areas using this channel option. You will need additional baby units registered to 4 camera channels ( 1/ 2/ 3/ 4) available for picking up to the... will be displayed and the audio heard. See section "2.4 Registration" for more arrows indicating a louder sound. 12 Using the Baby Monitor MBP30 To switch between the channels, press . 3.3 Pairing camera channels The enclosed baby unit has already been registered and no setup is ...
User Manual
Page 14
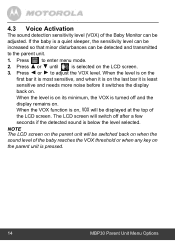
Press + - 3. NOTE The LCD screen on the parent unit is pressed. 14 MBP30 Parent Unit Menu Options When the VOX function is least sensitive and needs more noise before it switches the display back on the LCD screen. ... level of the baby reaches the VOX threshold or when any key on the parent unit will be displayed at the top of the Baby Monitor can be adjusted. The LCD screen will switch off and the display remains on its minimum, the VOX is turned off after a few seconds if...
Press + - 3. NOTE The LCD screen on the parent unit is pressed. 14 MBP30 Parent Unit Menu Options When the VOX function is least sensitive and needs more noise before it switches the display back on the LCD screen. ... level of the baby reaches the VOX threshold or when any key on the parent unit will be displayed at the top of the Baby Monitor can be adjusted. The LCD screen will switch off and the display remains on its minimum, the VOX is turned off after a few seconds if...

User Manual
Page 25
Adjust the baby unit until you want to monitor. Point the camera lens towards the area you are satisfied with the screws and push it down. 3. Then, align your baby unit with the image in the parent unit. Wall mounting instructions 25 ENGLISH 2. Insert 4mm head screws (not supplied) into the holes and tighten the screws.
Adjust the baby unit until you want to monitor. Point the camera lens towards the area you are satisfied with the screws and push it down. 3. Then, align your baby unit with the image in the parent unit. Wall mounting instructions 25 ENGLISH 2. Insert 4mm head screws (not supplied) into the holes and tighten the screws.


