Quick Guide
Page 1
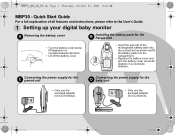
.... • Replace the battery cover and turn the battery cover screw 90 degrees in a clockwise direction. MBP30_QSG_EN_PE.fm Page 1 Thursday, October 22, 2009 9:42 AM MBP30 - Quick Start Guide For a full explanation of all features and instructions, please refer to the User's Guide. 1 Setting up your digital baby monitor A Removing the battery cover B Installing the battery pack for the baby unit • Only use the enclosed adapter (5V...
.... • Replace the battery cover and turn the battery cover screw 90 degrees in a clockwise direction. MBP30_QSG_EN_PE.fm Page 1 Thursday, October 22, 2009 9:42 AM MBP30 - Quick Start Guide For a full explanation of all features and instructions, please refer to the User's Guide. 1 Setting up your digital baby monitor A Removing the battery cover B Installing the battery pack for the baby unit • Only use the enclosed adapter (5V...
Quick Guide
Page 2
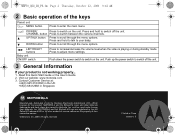
...fm Page 2 Thursday, October 22, 2009 9:42 AM 2 Basic operation of their respective owners. © Motorola, Inc. 2009. and are registered in the US Patent & Trademark Office. All rights ...Baby unit ON/OFF switch Push down the power switch to switch off the unit. Visit our website: www.motorola.com 3. Press and hold to adjust menu settings. MOTOROLA and the Stylized M Logo, and other product or service names are owned by Binatone Electronics International LTD., official licensee for this Quick Start Guide or the User's Guide. 2. All other Motorola...
...fm Page 2 Thursday, October 22, 2009 9:42 AM 2 Basic operation of their respective owners. © Motorola, Inc. 2009. and are registered in the US Patent & Trademark Office. All rights ...Baby unit ON/OFF switch Push down the power switch to switch off the unit. Visit our website: www.motorola.com 3. Press and hold to adjust menu settings. MOTOROLA and the Stylized M Logo, and other product or service names are owned by Binatone Electronics International LTD., official licensee for this Quick Start Guide or the User's Guide. 2. All other Motorola...
User Manual
Page 1
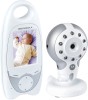
USER'S GUIDE MBP30 BABY MONITOR USER'S GUIDE The features described in this user's guide are subject to modifications without prior notice.
USER'S GUIDE MBP30 BABY MONITOR USER'S GUIDE The features described in this user's guide are subject to modifications without prior notice.

User Manual
Page 2
Thank you install the units. Please read the Safety Instructions on page 6 before you for your new Motorola Baby Monitor! Got everything? • 1 x Parent unit • 1 x Baby unit • 1 x Rechargeable Ni-MH battery pack for the Parent unit • 1 x Power adapter for the Parent unit • 1 x Power adapter for warranty coverage. Now you can see and hear your baby sleeping in the other room or you will need to get the...
Thank you install the units. Please read the Safety Instructions on page 6 before you for your new Motorola Baby Monitor! Got everything? • 1 x Parent unit • 1 x Baby unit • 1 x Rechargeable Ni-MH battery pack for the Parent unit • 1 x Power adapter for the Parent unit • 1 x Power adapter for warranty coverage. Now you can see and hear your baby sleeping in the other room or you will need to get the...

User Manual
Page 4
Light sensor 4. Infrared LEDs 3. Camera lens 6. Microphone 5. Overview of your video monitor baby and parent unit together, you must be able to establish a radio link between them, and the range will be affected by environmental conditions. • Any large metal object, like a refrigerator, a mirror, a filing cabinet, metallic doors or reinforced concrete, between the baby and parent unit may block the radio signal...
Light sensor 4. Infrared LEDs 3. Camera lens 6. Microphone 5. Overview of your video monitor baby and parent unit together, you must be able to establish a radio link between them, and the range will be affected by environmental conditions. • Any large metal object, like a refrigerator, a mirror, a filing cabinet, metallic doors or reinforced concrete, between the baby and parent unit may block the radio signal...
User Manual
Page 5
Safety Instructions 6 2. General Information 17 9. Using the Baby Monitor MBP30 11 3.1 Setting up 11 3.2 Selecting camera channel (for multi-pack only 12 3.3 Pairing camera channels 12 3.4 Night vision 12 3.5 Talk function 12 3.6 Adjusting the volume of the device (environment 15 6. MBP30 Parent Unit Menu Options 13 4.1 Brightness 13 4.2 Night Vision 13 4.3 Voice Activation 14 5. Getting started 7 2.1 Baby unit power supply 7 2.2 Parent unit battery Installation 8 2.3 Parent unit power supply 9 2.4 Registration...
Safety Instructions 6 2. General Information 17 9. Using the Baby Monitor MBP30 11 3.1 Setting up 11 3.2 Selecting camera channel (for multi-pack only 12 3.3 Pairing camera channels 12 3.4 Night vision 12 3.5 Talk function 12 3.6 Adjusting the volume of the device (environment 15 6. MBP30 Parent Unit Menu Options 13 4.1 Brightness 13 4.2 Night Vision 13 4.3 Voice Activation 14 5. Getting started 7 2.1 Baby unit power supply 7 2.2 Parent unit battery Installation 8 2.3 Parent unit power supply 9 2.4 Registration...

User Manual
Page 6
... future reference. • Do not place the baby unit or cables in the User's Guide, safe to use. CAUTION Risk of used batteries according to play with it. • This baby monitor is not a toy. Dispose of explosion if battery is required. Only use the chargers and power adapters provided. 1. Safety Instructions WARNING This baby monitor is , when handled as this may damage the...
... future reference. • Do not place the baby unit or cables in the User's Guide, safe to use. CAUTION Risk of used batteries according to play with it. • This baby monitor is not a toy. Dispose of explosion if battery is required. Only use the chargers and power adapters provided. 1. Safety Instructions WARNING This baby monitor is , when handled as this may damage the...
User Manual
Page 7
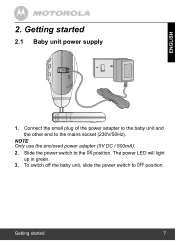
Slide the power switch to OFF position. Getting started 2.1 Baby unit power supply 1. NOTE Only use the enclosed power adapter (5V DC / 500mA). 2. To switch off the baby unit, slide the power switch to the ON position. Connect the small plug of the power adapter to the baby unit and the other end to the mains socket (230V/50Hz). ENGLISH 2. The power LED will light up in green. 3. Getting started 7
Slide the power switch to OFF position. Getting started 2.1 Baby unit power supply 1. NOTE Only use the enclosed power adapter (5V DC / 500mA). 2. To switch off the baby unit, slide the power switch to the ON position. Connect the small plug of the power adapter to the baby unit and the other end to the mains socket (230V/50Hz). ENGLISH 2. The power LED will light up in green. 3. Getting started 7
User Manual
Page 8
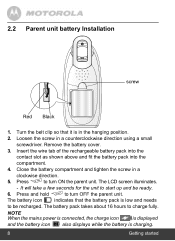
.... F - NOTE When the mains power is connected, the charge icon is displayed and the battery icon also displays while the battery is low and needs to turn OFF the parent unit. Press to be ready. 6. The battery pack takes about 16 hours to start...battery pack into the compartment. 4. The LCD screen illuminates. The battery icon indicates that it is in the hanging position. 2. 2.2 Parent unit battery Installation screw Red Black 1. Turn the belt clip so that the battery pack is charging. 8 Getting started It will take a few seconds for the unit to charge...
.... F - NOTE When the mains power is connected, the charge icon is displayed and the battery icon also displays while the battery is low and needs to turn OFF the parent unit. Press to be ready. 6. The battery pack takes about 16 hours to start...battery pack into the compartment. 4. The LCD screen illuminates. The battery icon indicates that it is in the hanging position. 2. 2.2 Parent unit battery Installation screw Red Black 1. Turn the belt clip so that the battery pack is charging. 8 Getting started It will take a few seconds for the unit to charge...
User Manual
Page 9
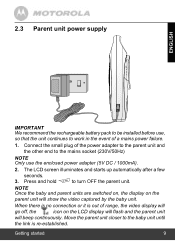
... power adapter to the parent unit and the other end to the baby unit until the link is out of a mains power failure. 1. Press and hold to work in the event of range, the video display will go off, the icon on the parent unit will beep continuously. 2.3 Parent unit power supply ENGLISH IMPORTANT We recommend the rechargeable battery pack to be installed before use the enclosed power adapter...
... power adapter to the parent unit and the other end to the baby unit until the link is out of a mains power failure. 1. Press and hold to work in the event of range, the video display will go off, the icon on the parent unit will beep continuously. 2.3 Parent unit power supply ENGLISH IMPORTANT We recommend the rechargeable battery pack to be installed before use the enclosed power adapter...

User Manual
Page 11
... point the camera lens towards the area you want to monitor. • Adjust the baby unit until you are not close to different locations, and ensure they are satisfied with the image in a convenient location (e.g. Using the Baby Monitor MBP30 11 Using the Baby Monitor MBP30 3.1 Setting up • Place the baby unit in the parent unit. • To wall mount your baby unit, see section "9.
... point the camera lens towards the area you want to monitor. • Adjust the baby unit until you are not close to different locations, and ensure they are satisfied with the image in a convenient location (e.g. Using the Baby Monitor MBP30 11 Using the Baby Monitor MBP30 3.1 Setting up • Place the baby unit in the parent unit. • To wall mount your baby unit, see section "9.
User Manual
Page 12
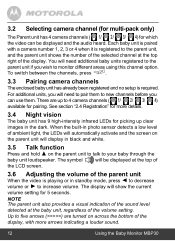
... ssrhseo+nwttthuoendceiutcrrreeanste volume setting for picking up to 4 camera channels ( 1/ 2/ 3/ 4) available for which the video can use them to monitor different areas using this channel option. Up to your baby through the baby unit loudspeaker. NOTE The parent unit also provides a visual indication of the sound level detected at the baby unit, regardless of the display, with a camera number 1, 2, 3 or 4 when it...
... ssrhseo+nwttthuoendceiutcrrreeanste volume setting for picking up to 4 camera channels ( 1/ 2/ 3/ 4) available for which the video can use them to monitor different areas using this channel option. Up to your baby through the baby unit loudspeaker. NOTE The parent unit also provides a visual indication of the sound level detected at the baby unit, regardless of the display, with a camera number 1, 2, 3 or 4 when it...
User Manual
Page 14
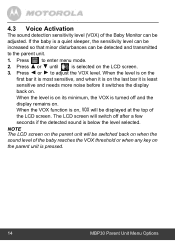
...Press to adjust the VOX level. When the level is on its minimum, the VOX is selected on . When the VOX function is pressed. 14 MBP30 Parent Unit Menu Options When the level is on the first bar it is most sensitive, and when it is on the last bar it is least... the display back on the parent unit is on, VOX will be switched back on when the sound level of the baby reaches the VOX threshold or when any key on . 4.3 Voice Activation The sound detection sensitivity level (VOX) of the Baby Monitor can be detected and transmitted to the parent unit. 1. The LCD screen will...
...Press to adjust the VOX level. When the level is on its minimum, the VOX is selected on . When the VOX function is pressed. 14 MBP30 Parent Unit Menu Options When the level is on the first bar it is most sensitive, and when it is on the last bar it is least... the display back on the parent unit is on, VOX will be switched back on when the sound level of the baby reaches the VOX threshold or when any key on . 4.3 Voice Activation The sound detection sensitivity level (VOX) of the Baby Monitor can be detected and transmitted to the parent unit. 1. The LCD screen will...
User Manual
Page 16
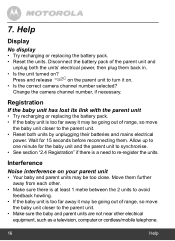
... Help Registration If the baby unit has lost its link with the parent unit • Try recharging or replacing the battery pack. • If the baby unit is a need to synchronise. • See section "2.4 Registration" if there is too far away it on your parent unit • Your baby and parent units may be going out of range, so move the baby unit closer to one...
... Help Registration If the baby unit has lost its link with the parent unit • Try recharging or replacing the battery pack. • If the baby unit is a need to synchronise. • See section "2.4 Registration" if there is too far away it on your parent unit • Your baby and parent units may be going out of range, so move the baby unit closer to one...
User Manual
Page 17
... manufactures ("Products") and the Motorola branded or certified accessories sold for the period(s) outlined below , Binatone Electronics International LTD. Contact Customer Service at: +44(0) 845 218 0890 in the UK +65(0) 68412668 in the United Kingdom and Singapore. Subject to the exclusions and limitations contained below . ENGLISH 8. What Does this User's Guide or the Quick Start...
... manufactures ("Products") and the Motorola branded or certified accessories sold for the period(s) outlined below , Binatone Electronics International LTD. Contact Customer Service at: +44(0) 845 218 0890 in the UK +65(0) 68412668 in the United Kingdom and Singapore. Subject to the exclusions and limitations contained below . ENGLISH 8. What Does this User's Guide or the Quick Start...

User Manual
Page 20
...numbers; Defects or damages resulting from service, testing, adjustment, installation, maintenance, alteration, or modification in any communication service or signal you may subscribe to abnormal usage or conditions; Communication Services. Unauthorised Service or Modification. Altered Products. Defects, damages, or the failure of Non-Motorola...the user instructions that show evidence of Motorola or Binatone Electronics International LTD., are excluded from coverage. or (d) nonconforming or non-Motorola branded housings, or parts, are excluded from the use of Non-Motorola ...
...numbers; Defects or damages resulting from service, testing, adjustment, installation, maintenance, alteration, or modification in any communication service or signal you may subscribe to abnormal usage or conditions; Communication Services. Unauthorised Service or Modification. Altered Products. Defects, damages, or the failure of Non-Motorola...the user instructions that show evidence of Motorola or Binatone Electronics International LTD., are excluded from coverage. or (d) nonconforming or non-Motorola branded housings, or parts, are excluded from the use of Non-Motorola ...
User Manual
Page 21
...BINATONE ELECTRONICS INTERNATIONAL LTD. or representations made in connection with the said purchase. To obtain service or information, please call: +44(0) 845 218 0890 in the UK +65(0) 68412668 in any literature publications or promotional materials issued by any prior agreement or representations, including representations made in Singapore You will receive instructions... supersede any agent employee or staff of the problem; General Information 21 regarding the Products or Accessories purchased by you and BINATONE ELECTRONICS INTERNATIONAL LTD. ENGLISH How to ship the...
...BINATONE ELECTRONICS INTERNATIONAL LTD. or representations made in connection with the said purchase. To obtain service or information, please call: +44(0) 845 218 0890 in the UK +65(0) 68412668 in any literature publications or promotional materials issued by any prior agreement or representations, including representations made in Singapore You will receive instructions... supersede any agent employee or staff of the problem; General Information 21 regarding the Products or Accessories purchased by you and BINATONE ELECTRONICS INTERNATIONAL LTD. ENGLISH How to ship the...
User Manual
Page 22
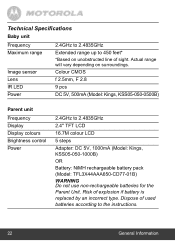
Technical Specifications Baby unit Frequency Maximum range Image sensor Lens IR LED Power 2.4GHz to 2.4835GHz Extended range up to 450 feet* *Based on surroundings. Colour CMOS f 2.5mm, F 2.8 9 pcs DC 5V, 500mA (Model: Kings, KSS05-050-0500B) Parent unit Frequency Display Display colours Brightness control Power 2.4GHz to the instructions. 22 General Information Dispose of sight. Risk of explosion if battery is replaced by an...
Technical Specifications Baby unit Frequency Maximum range Image sensor Lens IR LED Power 2.4GHz to 2.4835GHz Extended range up to 450 feet* *Based on surroundings. Colour CMOS f 2.5mm, F 2.8 9 pcs DC 5V, 500mA (Model: Kings, KSS05-050-0500B) Parent unit Frequency Display Display colours Brightness control Power 2.4GHz to the instructions. 22 General Information Dispose of sight. Risk of explosion if battery is replaced by an...

User Manual
Page 25
Adjust the baby unit until you want to monitor. Wall mounting instructions 25 Point the camera lens towards the area you are satisfied with the screws and push it down. 3. Insert 4mm head screws (not supplied) into the holes and tighten the screws. Then, align your baby unit with the image in the parent unit. ENGLISH 2.
Adjust the baby unit until you want to monitor. Wall mounting instructions 25 Point the camera lens towards the area you are satisfied with the screws and push it down. 3. Insert 4mm head screws (not supplied) into the holes and tighten the screws. Then, align your baby unit with the image in the parent unit. ENGLISH 2.

User Manual
Page 27
and are registered in China Version 1.0 Printed in the US Patent & Trademark Office. MOTOROLA and the Stylized M Logo, and other product or service names are owned by Binatone Electronics International LTD., official licensee for this product. All other Motorola trademarks and trade dress are the property of their respective owners. © Motorola, Inc. 2009. MOTOROLA and the Stylized M Logo are used under license from Motorola, Inc. All rights reserved. Manufactured, distributed or sold by Motorola, Inc.
and are registered in China Version 1.0 Printed in the US Patent & Trademark Office. MOTOROLA and the Stylized M Logo, and other product or service names are owned by Binatone Electronics International LTD., official licensee for this product. All other Motorola trademarks and trade dress are the property of their respective owners. © Motorola, Inc. 2009. MOTOROLA and the Stylized M Logo are used under license from Motorola, Inc. All rights reserved. Manufactured, distributed or sold by Motorola, Inc.


