
User Guide
Page 2
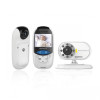
... carry it to your records. Got everything? • 1 x Parent Unit • 1 x Baby Unit (camera) • 1 x Rechargeable Ni-MH battery pack for the Parent Unit • 1 x Power adapter for the Parent Unit • 1 x Power adapter for purchasing the MBP27T, MBP27T/2, MBP27T/3, MBP27T/4. Welcome... Thank you disconnect it from your older children in Europe Email: motorola-mbp...
... carry it to your records. Got everything? • 1 x Parent Unit • 1 x Baby Unit (camera) • 1 x Rechargeable Ni-MH battery pack for the Parent Unit • 1 x Power adapter for the Parent Unit • 1 x Power adapter for purchasing the MBP27T, MBP27T/2, MBP27T/3, MBP27T/4. Welcome... Thank you disconnect it from your older children in Europe Email: motorola-mbp...

User Guide
Page 3
...to confirm a selection. 17. Battery cover 7. Speaker Press to pan left in digital pan/tilt mode. 18. Press to switch camera units (if paired with In monitor mode, press to turn the Unit Press to return to measure the body 11. Forehead temperature ... Level Indication (4 Levels) * Volume Level Control (8 Levels) Brightness Level Control (8 Levels) Alarm Setting (6h, 4h, 2h, OFF) Camera setting Add Camera Delete Camera Select Camera Digital Pan/Tilt mode On Camera scan mode set Forehead Temperature Record Select C/F Power Adapter Socket Press to measure the liquid...
...to confirm a selection. 17. Battery cover 7. Speaker Press to pan left in digital pan/tilt mode. 18. Press to switch camera units (if paired with In monitor mode, press to turn the Unit Press to return to measure the body 11. Forehead temperature ... Level Indication (4 Levels) * Volume Level Control (8 Levels) Brightness Level Control (8 Levels) Alarm Setting (6h, 4h, 2h, OFF) Camera setting Add Camera Delete Camera Select Camera Digital Pan/Tilt mode On Camera scan mode set Forehead Temperature Record Select C/F Power Adapter Socket Press to measure the liquid...

User Guide
Page 4
... is weak, try moving the Parent and/or the Baby Unit to 4.5 feet) away from these types of Your Baby Unit 1 5 7 8 2 9 4 3 6 1. Power Adapter Socket 7. Microphone 9. Camera Lens 3. Infrared LEDs 4. ON/OFF Switch 6. Pair Key 8. Power LED 5. Overview of products, or turn them off if they appear to be reduced by other...
... is weak, try moving the Parent and/or the Baby Unit to 4.5 feet) away from these types of Your Baby Unit 1 5 7 8 2 9 4 3 6 1. Power Adapter Socket 7. Microphone 9. Camera Lens 3. Infrared LEDs 4. ON/OFF Switch 6. Pair Key 8. Power LED 5. Overview of products, or turn them off if they appear to be reduced by other...

User Guide
Page 5
... Temperature Mode 13 4. Parent Unit Menu Options 14 4.1 Volume...14 4.2 Brightness 14 4.3 Digital Pan and Tilt 14 4.4 Alarm...14 4.5 Camera Control 15 4.5.1 Add (pair) a camera 15 4.5.2 View a camera 15 4.5.3 Delete a camera 16 4.5.4 Scan the cameras 16 4.6 Body Temperature Measurement Review 17 4.7 Change of The Device (environment 18 6. Disposal of Measurement Scale 17 5. ENGLISH Table of...
... Temperature Mode 13 4. Parent Unit Menu Options 14 4.1 Volume...14 4.2 Brightness 14 4.3 Digital Pan and Tilt 14 4.4 Alarm...14 4.5 Camera Control 15 4.5.1 Add (pair) a camera 15 4.5.2 View a camera 15 4.5.3 Delete a camera 16 4.5.4 Scan the cameras 16 4.6 Body Temperature Measurement Review 17 4.7 Change of The Device (environment 18 6. Disposal of Measurement Scale 17 5. ENGLISH Table of...

User Guide
Page 6
... that will provide the best view of baby's reach. Do not allow children to a wall securely using the device. • Adult assembly is not a toy. CAMERA SET UP & USE: ● Determine a location for future reference. • Keep the cords out of reach of children. • Do not cover the Baby ...baby in his/her cot. ● Place the BABY UNIT on a flat surface, such as described in the User's Guide, safe to use. NEVER place camera or cords within reach of the baby (the unit and cords should be more than 1 meter away). Safety Instructions WARNING: STRANGULATION HAZARD - 1.
... that will provide the best view of baby's reach. Do not allow children to a wall securely using the device. • Adult assembly is not a toy. CAMERA SET UP & USE: ● Determine a location for future reference. • Keep the cords out of reach of children. • Do not cover the Baby ...baby in his/her cot. ● Place the BABY UNIT on a flat surface, such as described in the User's Guide, safe to use. NEVER place camera or cords within reach of the baby (the unit and cords should be more than 1 meter away). Safety Instructions WARNING: STRANGULATION HAZARD - 1.

User Guide
Page 8
.... 3. The power LED will light up in the Parent Unit before first time use the enclosed power adapter (6V DC / 500mA) with the camera. Slide the ON/OFF switch to the OFF position to turn the Baby Unit off. 2.2 Parent Unit Battery Installation The supplied rechargeable battery pack should... the Parent Unit can be moved without losing the link with the slightly larger DC plug. 2. Slide the ON/OFF switch to the Baby Unit (camera) and the other end into the compartment. 8 Getting Started 2. Insert the plug of the power adapter to the ON position. Getting Started 2.1 Baby...
.... 3. The power LED will light up in the Parent Unit before first time use the enclosed power adapter (6V DC / 500mA) with the camera. Slide the ON/OFF switch to the OFF position to turn the Baby Unit off. 2.2 Parent Unit Battery Installation The supplied rechargeable battery pack should... the Parent Unit can be moved without losing the link with the slightly larger DC plug. 2. Slide the ON/OFF switch to the Baby Unit (camera) and the other end into the compartment. 8 Getting Started 2. Insert the plug of the power adapter to the ON position. Getting Started 2.1 Baby...

User Guide
Page 11
... the PAIR button under the bottom left edge of the Parent Unit and then press the - Getting Started 11 DOWN button to select the desired Camera identification number and press the button to enter. The Green Audio Level LED turns on will pop up, press the + UP button or - You do... this current Baby Unit again will return to its link with the Parent Unit. DOWN button to select the Camera setting icon , and press the button to start searching for a Camera Unit. If a Camera Unit is pre-registered to your Baby Unit, or register a new Baby Unit, follow the procedure below: 1. To re...
... the PAIR button under the bottom left edge of the Parent Unit and then press the - Getting Started 11 DOWN button to select the desired Camera identification number and press the button to enter. The Green Audio Level LED turns on will pop up, press the + UP button or - You do... this current Baby Unit again will return to its link with the Parent Unit. DOWN button to select the Camera setting icon , and press the button to start searching for a Camera Unit. If a Camera Unit is pre-registered to your Baby Unit, or register a new Baby Unit, follow the procedure below: 1. To re...

User Guide
Page 12
... LCD display on or off, but still leave the audio monitor on. 3.4 Talk Mode Press and hold the T TALK button on a table) and point the camera lens towards the area you want to monitor. • Adjust the Baby Unit's head angle by rotating the...
... LCD display on or off, but still leave the audio monitor on. 3.4 Talk Mode Press and hold the T TALK button on a table) and point the camera lens towards the area you want to monitor. • Adjust the Baby Unit's head angle by rotating the...

User Guide
Page 15
... any one time. 4.5.2 View a camera 1. Press the - NOTE A camera can only be registered to enter. DOWN button to select the desired Camera unit, and press the button to view the picture from the camera appears. Directly press repeatedly to View Cameras instead of using the menu. Parent... PAIR button underneath the Baby Unit until the Parent Unit finds the camera, beeps and the picture from that camera. Press the - TIP Quick Method to select 1 / 2 / 3 / 4 or . DOWN button to select the desired Camera Unit identification number, and press the button to enter. Press the ...
... any one time. 4.5.2 View a camera 1. Press the - NOTE A camera can only be registered to enter. DOWN button to select the desired Camera unit, and press the button to view the picture from the camera appears. Directly press repeatedly to View Cameras instead of using the menu. Parent... PAIR button underneath the Baby Unit until the Parent Unit finds the camera, beeps and the picture from that camera. Press the - TIP Quick Method to select 1 / 2 / 3 / 4 or . DOWN button to select the desired Camera Unit identification number, and press the button to enter. Press the ...

User Guide
Page 16
...the DELETE CAM icon . 4. icon while emitting a warning beep every 8 seconds. Press the - DOWN button to select DELETE CAMERA icon and press the button to select 1 / 2 / 3 / 4 or . Directly press repeatedly to confirm. 3. 1 / 2 / 3 / ...4 will then display images from each registered camera in the system. 4.5.4 Scan the cameras 1. 4.5.3 Delete a camera 1. Press the button. 2. NOTE You cannot delete the camera if it is turned off or out of using that camera, delete the camera (see 4.5.3 Delete a camera) and start the scan again. 16 Parent ...
...the DELETE CAM icon . 4. icon while emitting a warning beep every 8 seconds. Press the - DOWN button to select DELETE CAMERA icon and press the button to select 1 / 2 / 3 / 4 or . Directly press repeatedly to confirm. 3. 1 / 2 / 3 / ...4 will then display images from each registered camera in the system. 4.5.4 Scan the cameras 1. 4.5.3 Delete a camera 1. Press the button. 2. NOTE You cannot delete the camera if it is turned off or out of using that camera, delete the camera (see 4.5.3 Delete a camera) and start the scan again. 16 Parent ...

User Guide
Page 20
Change the camera number, if necessary. • Is the video display turned on the Parent Unit to save power. You can reactivate the screen by disconnecting them back ... to synchronise. • See 2.4 Registration (Pairing), if there is still active and will go blank after 4 minutes to turn it ON. • Is the correct camera selected? Disconnect the battery pack of range, move the Baby Unit closer to re-register the units. 20 Help
Change the camera number, if necessary. • Is the video display turned on the Parent Unit to save power. You can reactivate the screen by disconnecting them back ... to synchronise. • See 2.4 Registration (Pairing), if there is still active and will go blank after 4 minutes to turn it ON. • Is the correct camera selected? Disconnect the battery pack of range, move the Baby Unit closer to re-register the units. 20 Help


