User Guide
Page 1
User's Guide Digital Audio Baby Monitor Models: MBP160, MBP160-2 The features described in this User's Guide are subject to modifications without prior notice.
User's Guide Digital Audio Baby Monitor Models: MBP160, MBP160-2 The features described in this User's Guide are subject to modifications without prior notice.
User Guide
Page 2
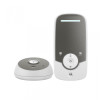
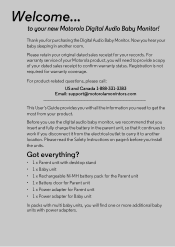
... charge the battery in another location. Got everything? • 1 x Parent unit with power adapters. Please retain your dated sales receipt to your product. Registration is not required for purchasing the Digital Audio Baby Monitor. to confirm warranty status. Welcome... For product-related questions, please call: US and Canada 1-888-331-3383 Email: support@motorolamonintors.com This User's Guide provides you with multi baby units...
... charge the battery in another location. Got everything? • 1 x Parent unit with power adapters. Please retain your dated sales receipt to your product. Registration is not required for purchasing the Digital Audio Baby Monitor. to confirm warranty status. Welcome... For product-related questions, please call: US and Canada 1-888-331-3383 Email: support@motorolamonintors.com This User's Guide provides you with multi baby units...
User Guide
Page 3
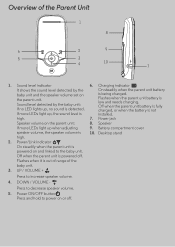
... when the parent unit is out of range of the Parent Unit 1 8 6 2 9 5 3 4 10 7 1. Power/Link indicator On steadily when the parent unit is detected. Overview of the baby unit. 3. Speaker If more LEDs light up , no LED lights up , the sound level is On steadily when the parent unit battery is low and needs charging. Flashes when the parent unit battery is being charged. Press to power on the parent unit. Power ON/OFF button...
... when the parent unit is out of range of the Parent Unit 1 8 6 2 9 5 3 4 10 7 1. Power/Link indicator On steadily when the parent unit is detected. Overview of the baby unit. 3. Speaker If more LEDs light up , no LED lights up , the sound level is On steadily when the parent unit battery is low and needs charging. Flashes when the parent unit battery is being charged. Press to power on the parent unit. Power ON/OFF button...
User Guide
Page 4
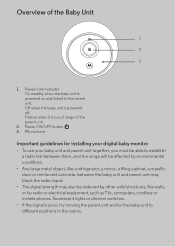
... the parent unit. 2. Microphone Important guidelines for installing your digital baby monitor • To use your baby unit and parent unit together, you must be able to establish a radio link between them, and the range will be affected by environmental conditions. • Any large metal object, like a refrigerator, a mirror, a filing cabinet, a metallic door or reinforced concrete, between the baby unit and parent unit may block...
... the parent unit. 2. Microphone Important guidelines for installing your digital baby monitor • To use your baby unit and parent unit together, you must be able to establish a radio link between them, and the range will be affected by environmental conditions. • Any large metal object, like a refrigerator, a mirror, a filing cabinet, a metallic door or reinforced concrete, between the baby unit and parent unit may block...
User Guide
Page 5
Safety Instructions 6 2. Cleaning 14 6. General Information 17 8. Disposal of contents 5 Troubleshooting 15 7. Getting Started 9 2.1 Baby unit power supply 9 2.2 Parent unit battery installation and power supply 10 2.3 Desktop stand on or off the parent unit 12 3.3 Adjust speaker volume of contents 1. Using Your Digital Audio Baby Monitor 12 3.1 Power on or off the baby unit 12 3.2 Power on parent unit 11 3. Technical Specifications 22 Table of the Device (Environment 13 5. ENGLISH Table of the parent unit 12 4.
Safety Instructions 6 2. Cleaning 14 6. General Information 17 8. Disposal of contents 5 Troubleshooting 15 7. Getting Started 9 2.1 Baby unit power supply 9 2.2 Parent unit battery installation and power supply 10 2.3 Desktop stand on or off the parent unit 12 3.3 Adjust speaker volume of contents 1. Using Your Digital Audio Baby Monitor 12 3.1 Power on or off the baby unit 12 3.2 Power on parent unit 11 3. Technical Specifications 22 Table of the Device (Environment 13 5. ENGLISH Table of the parent unit 12 4.
User Guide
Page 6
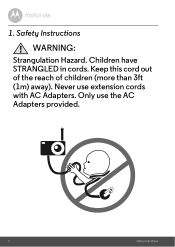
Only use extension cords with AC Adapters. 1. Children have STRANGLED in cords. Safety Instructions WARNING: Strangulation Hazard. Never use the AC Adapters provided. 6 Safety Instructions Keep this cord out of the reach of children (more than 3ft (1m) away).
Only use extension cords with AC Adapters. 1. Children have STRANGLED in cords. Safety Instructions WARNING: Strangulation Hazard. Never use the AC Adapters provided. 6 Safety Instructions Keep this cord out of the reach of children (more than 3ft (1m) away).
User Guide
Page 7
... water. • Do not install the Digital Audio Baby Monitor in the User's Guide, safe to use other chargers or power adapters as this may damage the device and battery pack. • Only insert a battery pack of the same type. • Do not touch the plug contacts with it . • This Digital Audio Baby Monitor is required. Keep small parts away from children when assembling...
... water. • Do not install the Digital Audio Baby Monitor in the User's Guide, safe to use other chargers or power adapters as this may damage the device and battery pack. • Only insert a battery pack of the same type. • Do not touch the plug contacts with it . • This Digital Audio Baby Monitor is required. Keep small parts away from children when assembling...
User Guide
Page 8
Dispose of explosion if the battery is replaced by an incorrect type. Use only rechargeable battery pack with rating: 2.4V 400mAh 8 Safety Instructions CAUTION There is a risk of used batteries according to the instructions.
Dispose of explosion if the battery is replaced by an incorrect type. Use only rechargeable battery pack with rating: 2.4V 400mAh 8 Safety Instructions CAUTION There is a risk of used batteries according to the instructions.
User Guide
Page 9
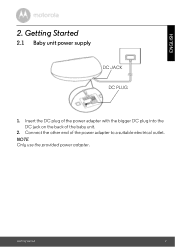
ENGLISH 2. Getting Started 2.1 Baby unit power supply DC JACK DC PLUG 1. Insert the DC plug of the power adapter with the bigger DC plug into the DC jack on the back of the power adapter to a suitable electrical outlet. Connect the other end of the baby unit. 2. Getting Started 9 NOTE Only use the provided power adapter.
ENGLISH 2. Getting Started 2.1 Baby unit power supply DC JACK DC PLUG 1. Insert the DC plug of the power adapter with the bigger DC plug into the DC jack on the back of the power adapter to a suitable electrical outlet. Connect the other end of the baby unit. 2. Getting Started 9 NOTE Only use the provided power adapter.
User Guide
Page 10
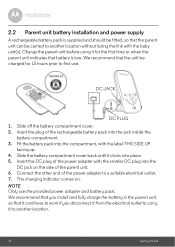
... . Connect the other end of the power adapter with the baby unit(s). Insert the DC plug of the power adapter to first use the provided power adapter and battery pack. Charge the parent unit before using it to another location. 10 Getting Started DC JACK DC PLUG 1. We recommend that you install and fully charge the battery in the parent unit, so that it continues to work...
... . Connect the other end of the power adapter with the baby unit(s). Insert the DC plug of the power adapter to first use the provided power adapter and battery pack. Charge the parent unit before using it to another location. 10 Getting Started DC JACK DC PLUG 1. We recommend that you install and fully charge the battery in the parent unit, so that it continues to work...
User Guide
Page 12
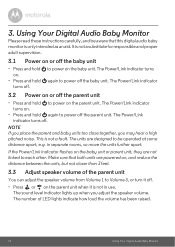
... baby unit. NOTE If you place the parent and baby units too close together, you adjust the speaker volume. If the Power/Link indicator flashes on the baby unit or parent unit, they are designed to be aware that both units are powered on the parent unit. The sound level indicator lights up when you may hear a high pitched noise. Using Your Digital Audio Baby Monitor Please read these instructions...
... baby unit. NOTE If you place the parent and baby units too close together, you adjust the speaker volume. If the Power/Link indicator flashes on the baby unit or parent unit, they are designed to be aware that both units are powered on the parent unit. The sound level indicator lights up when you may hear a high pitched noise. Using Your Digital Audio Baby Monitor Please read these instructions...
User Guide
Page 14
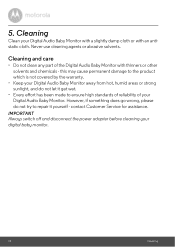
... disconnect the power adapter before cleaning your Digital Audio Baby Monitor. However, if something does go wrong, please do not let it yourself - Cleaning Clean your Digital Audio Baby Monitor with a slightly damp cloth or with thinners or other solvents and chemicals - Cleaning and care • Do not clean any part of your digital baby monitor. 14 Cleaning contact Customer Service for assistance...
... disconnect the power adapter before cleaning your Digital Audio Baby Monitor. However, if something does go wrong, please do not let it yourself - Cleaning Clean your Digital Audio Baby Monitor with a slightly damp cloth or with thinners or other solvents and chemicals - Cleaning and care • Do not clean any part of your digital baby monitor. 14 Cleaning contact Customer Service for assistance...
User Guide
Page 15
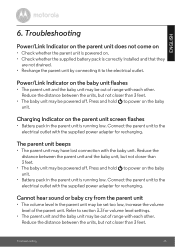
... parent unit and the baby unit may be set too low, increase the volume level of the parent unit. Connect the parent unit to the electrical outlet with the supplied power adapter for recharging. Troubleshooting 15 The parent unit beeps • The parent unit may be out of range with each other . Reduce the distance between the units, but not closer than 3 feet. Power/Link Indicator on the baby unit. • Battery pack...
... parent unit and the baby unit may be set too low, increase the volume level of the parent unit. Connect the parent unit to the electrical outlet with the supplied power adapter for recharging. Troubleshooting 15 The parent unit beeps • The parent unit may be out of range with each other . Reduce the distance between the units, but not closer than 3 feet. Power/Link Indicator on the baby unit. • Battery pack...
User Guide
Page 16
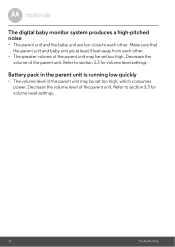
... of the parent unit. Refer to section 3.3 for volume level settings. Battery pack in the parent unit is running low quickly • The volume level of the parent unit may be set too high, which consumes power. Refer to section 3.3 for volume level settings. 16 Troubleshooting Decrease the volume of the parent unit. The digital baby monitor system produces a high-pitched noise • The parent unit and the baby unit are...
... of the parent unit. Refer to section 3.3 for volume level settings. Battery pack in the parent unit is running low quickly • The volume level of the parent unit may be set too high, which consumes power. Refer to section 3.3 for volume level settings. 16 Troubleshooting Decrease the volume of the parent unit. The digital baby monitor system produces a high-pitched noise • The parent unit and the baby unit are...
User Guide
Page 17
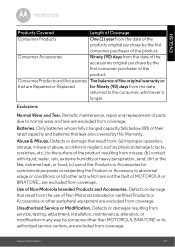
... parts. This Warranty is your product is not transferable. Who is not transferable. BINATONE or its authorized distributor at its option and within a commercially reasonable time, will BINATONE do? We may use with this product that it manufactured to this Warranty Cover? Contact Customer Service at no charge repair or replace any Products or Accessories that this User's Guide...
... parts. This Warranty is your product is not transferable. Who is not transferable. BINATONE or its authorized distributor at its option and within a commercially reasonable time, will BINATONE do? We may use with this product that it manufactured to this Warranty Cover? Contact Customer Service at no charge repair or replace any Products or Accessories that this User's Guide...
User Guide
Page 19
...date of the accessories original purchase by this Warranty. Periodic maintenance, repair and replacement of parts due to abnormal usage or conditions; Defects or damages resulting from service, testing, adjustment, installation, maintenance, alteration, or modification in any way by the first ...than MOTOROLA, BINATONE or its authorized service centers, are excluded from coverage. Defects or damage that are Repaired or Replaced for commercial purposes or subjecting the Product or Accessory to normal wear and tear are excluded from coverage. Only batteries whose fully charged ...
...date of the accessories original purchase by this Warranty. Periodic maintenance, repair and replacement of parts due to abnormal usage or conditions; Defects or damages resulting from service, testing, adjustment, installation, maintenance, alteration, or modification in any way by the first ...than MOTOROLA, BINATONE or its authorized service centers, are excluded from coverage. Defects or damage that are Repaired or Replaced for commercial purposes or subjecting the Product or Accessory to normal wear and tear are excluded from coverage. Only batteries whose fully charged ...
User Guide
Page 20
...BINATONE. or representations made in your box, a completed warranty card showing the serial number of the Product; (d) a written description of the problem; or (d) nonconforming or non-Motorola branded housings, or parts, are excluded from coverage. Communication Services. Altered Products. To obtain service or information, please call: US and Canada 1-888-331-3383 Email: support...tampering; (c) mismatched board serial numbers; Defects, damages, or the failure of Products or Accessories due to a BINATONE Authorized Repair Center. To obtain service, you may have been ...
...BINATONE. or representations made in your box, a completed warranty card showing the serial number of the Product; (d) a written description of the problem; or (d) nonconforming or non-Motorola branded housings, or parts, are excluded from coverage. Communication Services. Altered Products. To obtain service or information, please call: US and Canada 1-888-331-3383 Email: support...tampering; (c) mismatched board serial numbers; Defects, damages, or the failure of Products or Accessories due to a BINATONE Authorized Repair Center. To obtain service, you may have been ...
User Guide
Page 21
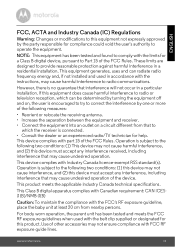
...the user's ...part 15 of the FCC Rules. For body worn operation, the parent unit has been tested and meets the FCC RF exposure guidelines when used in accordance with the instructions, may not ensure compliance with FCC RF exposure guide lines. General Information 21 This device complies with Industry Canada licence-exempt RSS standard(s). This Class B digital...baby unit at least 20 cm from that to which can radiate radio frequency energy and, if not installed and used with the limits for this product. This product meets the applicable Industry Canada technical specifications...
...the user's ...part 15 of the FCC Rules. For body worn operation, the parent unit has been tested and meets the FCC RF exposure guidelines when used in accordance with the instructions, may not ensure compliance with FCC RF exposure guide lines. General Information 21 This device complies with Industry Canada licence-exempt RSS standard(s). This Class B digital...baby unit at least 20 cm from that to which can radiate radio frequency energy and, if not installed and used with the limits for this product. This product meets the applicable Industry Canada technical specifications...
User Guide
Page 22
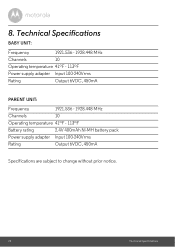
Technical Specifications BABY UNIT: Frequency 1921.536 - 1928.448 MHz Channels 10 Operating temperature 41ºF - 113ºF Power supply adapter Input 100-240Vrms Rating Output 6VDC, 450mA PARENT UNIT: Frequency 1921.536 - 1928.448 MHz Channels 10 Operating temperature 41ºF - 113ºF Battery rating 2.4V 400mAh Ni-MH battery pack Power supply adapter Input 100-240Vrms Rating Output 6VDC, 450mA Specifications are subject to change without prior notice. 22 Technical Specifications 8.
Technical Specifications BABY UNIT: Frequency 1921.536 - 1928.448 MHz Channels 10 Operating temperature 41ºF - 113ºF Power supply adapter Input 100-240Vrms Rating Output 6VDC, 450mA PARENT UNIT: Frequency 1921.536 - 1928.448 MHz Channels 10 Operating temperature 41ºF - 113ºF Battery rating 2.4V 400mAh Ni-MH battery pack Power supply adapter Input 100-240Vrms Rating Output 6VDC, 450mA Specifications are subject to change without prior notice. 22 Technical Specifications 8.
User Guide
Page 23
Manufactured, distributed or sold by Binatone Electronics International LTD., official licensee for this product. All other trademarks are the property of Motorola Trademark Holdings, LLC. MOTOROLA and the Stylized M Logo, are used under license. and are trademarks or registered trademarks of their respective owners. © 2014 Motorola Mobility LLC. All rights reserved. US_EN Version 4.0 Printed in China
Manufactured, distributed or sold by Binatone Electronics International LTD., official licensee for this product. All other trademarks are the property of Motorola Trademark Holdings, LLC. MOTOROLA and the Stylized M Logo, are used under license. and are trademarks or registered trademarks of their respective owners. © 2014 Motorola Mobility LLC. All rights reserved. US_EN Version 4.0 Printed in China


