User Guide
Page 1
User's Guide Digital Video Baby Monitor Models: MBP854HD, MBP854HD-2, MBP854HD-3, MBP854HD-4 The features described in this User's Guide are subject to modifications without prior notice.
User's Guide Digital Video Baby Monitor Models: MBP854HD, MBP854HD-2, MBP854HD-3, MBP854HD-4 The features described in this User's Guide are subject to modifications without prior notice.
User Guide
Page 2
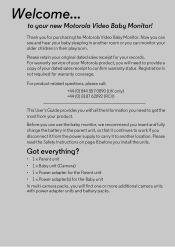
...of your records. Please read the Safety Instructions on page 8 before you disconnect it from your older children in another location. Now you can monitor your product. For product related questions, please call: +44 (0) 844 557 0890 (UK only) +44 (0) 8187 62092 (ROI) This ...• 1 x Power adapter for the Parent unit • 1 x Power adapter(s) for purchasing the Motorola Video Baby Monitor. Welcome... For warranty service of your new Motorola Video Baby Monitor! Thank you for the Baby unit In multi-camera packs, you will find one or more additional camera units with...
...of your records. Please read the Safety Instructions on page 8 before you disconnect it from your older children in another location. Now you can monitor your product. For product related questions, please call: +44 (0) 844 557 0890 (UK only) +44 (0) 8187 62092 (ROI) This ...• 1 x Power adapter for the Parent unit • 1 x Power adapter(s) for purchasing the Motorola Video Baby Monitor. Welcome... For warranty service of your new Motorola Video Baby Monitor! Thank you for the Baby unit In multi-camera packs, you will find one or more additional camera units with...
User Guide
Page 5
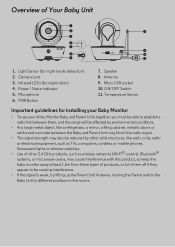
.../ Status indicator 5. Infrared LEDs (for night mode detection) 2. Speaker 8. Camera Lens 3. Temperature Sensor Important guidelines for installing your Baby Monitor • To use your Video Monitor Baby and Parent Units together, you must be able to different positions in the rooms. ON/OFF Switch 11. Antenna 9. Overview of products... networks (Wi-Fi® routers), Bluetooth® systems, or microwave ovens, may cause interference with this product, so keep the baby monitor away at least 1.5m from these types of Your Baby Unit 1 2 8 3 4 5 9 6 ON OFF 10 7 11 1.
.../ Status indicator 5. Infrared LEDs (for night mode detection) 2. Speaker 8. Camera Lens 3. Temperature Sensor Important guidelines for installing your Baby Monitor • To use your Video Monitor Baby and Parent Units together, you must be able to different positions in the rooms. ON/OFF Switch 11. Antenna 9. Overview of products... networks (Wi-Fi® routers), Bluetooth® systems, or microwave ovens, may cause interference with this product, so keep the baby monitor away at least 1.5m from these types of Your Baby Unit 1 2 8 3 4 5 9 6 ON OFF 10 7 11 1.
User Guide
Page 6
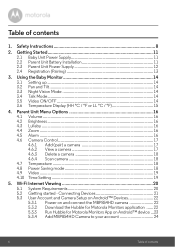
... 18 4.7 Temperature 18 4.8 Power Saving mode 18 4.9 Video ...19 4.10 Time Setting 19 5. Safety Instructions 8 2. Table of contents Using the Baby Monitor 14 3.1 Setting up 14 3.2 Pan and Tilt 14 3.3 Night Vision Mode 14 3.4 Talk Mode 14 3.5 Video ON/OFF 14 3.6 Temperature Display (HH... Android™ Devices 22 5.3.1 Power on and connect the MBP854HD camera 22 5.3.2 Download the Hubble for Motorola Monitors application ...... 22 5.3.3 Run Hubble for Motorola Monitors App on Android™ device ...23 5.3.4 Add MBP854HD Camera to your account 24 6 Table of contents 1....
... 18 4.7 Temperature 18 4.8 Power Saving mode 18 4.9 Video ...19 4.10 Time Setting 19 5. Safety Instructions 8 2. Table of contents Using the Baby Monitor 14 3.1 Setting up 14 3.2 Pan and Tilt 14 3.3 Night Vision Mode 14 3.4 Talk Mode 14 3.5 Video ON/OFF 14 3.6 Temperature Display (HH... Android™ Devices 22 5.3.1 Power on and connect the MBP854HD camera 22 5.3.2 Download the Hubble for Motorola Monitors application ...... 22 5.3.3 Run Hubble for Motorola Monitors App on Android™ device ...23 5.3.4 Add MBP854HD Camera to your account 24 6 Table of contents 1....
User Guide
Page 7
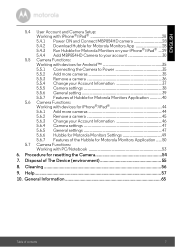
...Working with iPhone®/iPad 28 5.4.1 Power ON and Connect MBP854HD camera 28 5.4.2 Download Hubble for Motorola Monitors App 28 5.4.3 Run Hubble for Motorola Monitors on your iPhone®/iPad® ... 29 5.4.4 Add MBP854HD Camera to your account 30 5.5 Camera Functions... 5.5.3 Remove a camera 36 5.5.4 Change your Account Information 37 5.5.5 Camera settings 38 5.5.6 General setting 39 5.5.7 Features of Hubble for Motorola Monitors Application ...........40 5.6 Camera Functions: Working with devices for iPhone®/iPad 44 5.6.1 Add more cameras 44 5.6.2 Remove a camera 45 5.6.3 ...
...Working with iPhone®/iPad 28 5.4.1 Power ON and Connect MBP854HD camera 28 5.4.2 Download Hubble for Motorola Monitors App 28 5.4.3 Run Hubble for Motorola Monitors on your iPhone®/iPad® ... 29 5.4.4 Add MBP854HD Camera to your account 30 5.5 Camera Functions... 5.5.3 Remove a camera 36 5.5.4 Change your Account Information 37 5.5.5 Camera settings 38 5.5.6 General setting 39 5.5.7 Features of Hubble for Motorola Monitors Application ...........40 5.6 Camera Functions: Working with devices for iPhone®/iPad 44 5.6.1 Add more cameras 44 5.6.2 Remove a camera 45 5.6.3 ...
User Guide
Page 9
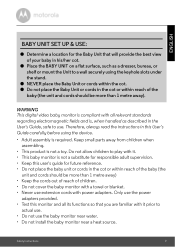
... ● Do not place the Baby Unit or cords in the cot or within reach of children. • Do not cover the baby monitor with a towel or blanket. • Never use extension cords with power adapters. Safety Instructions 9 Only use the power adapters provided. • Test ...this monitor and all relevant standards regarding electromagnetic fields and is, when handled as a dresser, bureau, or shelf or mount the Unit to actual use. &#...
... ● Do not place the Baby Unit or cords in the cot or within reach of children. • Do not cover the baby monitor with a towel or blanket. • Never use extension cords with power adapters. Safety Instructions 9 Only use the power adapters provided. • Test ...this monitor and all relevant standards regarding electromagnetic fields and is, when handled as a dresser, bureau, or shelf or mount the Unit to actual use. &#...
User Guide
Page 13
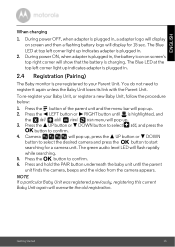
The Blue LED at top left corner light up indicates adapter is plugged in. 2.4 Registration (Pairing) The Baby monitor is plugged in , a adapter logo will display on screen's top right corner will display for a camera unit. You do not need to confirm. 4. Press the + ...
The Blue LED at top left corner light up indicates adapter is plugged in. 2.4 Registration (Pairing) The Baby monitor is plugged in , a adapter logo will display on screen's top right corner will display for a camera unit. You do not need to confirm. 4. Press the + ...
User Guide
Page 14
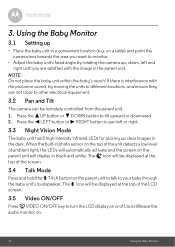
...Night Vision Mode The baby unit has 8 high-intensity infrared LEDs for picking up • Place the baby unit in a convenient location (e.g. Using the Baby Monitor 3.1 Setting up clear images in black and white. If there is interference with the picture or sound, try moving the units to other electrical equipment... T icon will automatically activate and the screen on the parent unit to talk to tilt upward or downward. 2. on . 14 Using the Baby Monitor DOWN button to your baby through the baby unit's loudspeaker. NOTE Do not place the baby unit within the baby's reach! 3.
...Night Vision Mode The baby unit has 8 high-intensity infrared LEDs for picking up • Place the baby unit in a convenient location (e.g. Using the Baby Monitor 3.1 Setting up clear images in black and white. If there is interference with the picture or sound, try moving the units to other electrical equipment... T icon will automatically activate and the screen on the parent unit to talk to tilt upward or downward. 2. on . 14 Using the Baby Monitor DOWN button to your baby through the baby unit's loudspeaker. NOTE Do not place the baby unit within the baby's reach! 3.
User Guide
Page 15
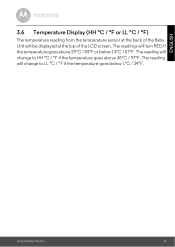
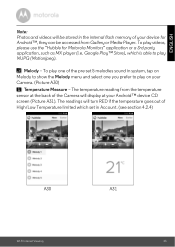
Using the Baby Monitor 15 The reading will change to LL °C / °F if the temperature goes below 14°C / 57°F. The reading will change to HH °C / °F if the temperature goes above 29°C / 84°F or below 1°C / 34°F. ENGLISH 3.6 Temperature Display (HH °C / °F or LL °C / °F) The temperature reading from the temperature sensor at the back of the LCD screen. The readings will be displayed at the top of the Baby Unit will turn RED if the temperature goes above 36°C / 97°F.
Using the Baby Monitor 15 The reading will change to LL °C / °F if the temperature goes below 14°C / 57°F. The reading will change to HH °C / °F if the temperature goes above 29°C / 84°F or below 1°C / 34°F. ENGLISH 3.6 Temperature Display (HH °C / °F or LL °C / °F) The temperature reading from the temperature sensor at the back of the LCD screen. The readings will be displayed at the top of the Baby Unit will turn RED if the temperature goes above 36°C / 97°F.
User Guide
Page 22
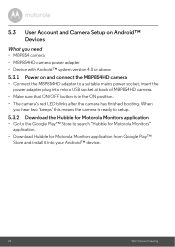
... or above 5.3.1 Power on and connect the MBP854HD camera • Connect the MBP854HD adapter to search "Hubble for Motorola Monitors" application. • Download Hubble for Motorola Monitors application from Google Play™ Store and install it into micro USB socket at back of MBP854HD camera. • Make... sure that ON/OFF button is ready to setup. 5.3.2 Download the Hubble for Motorola Monitors application • Go to the Google Play™ Store to a suitable mains power socket, insert the power adapter plug into your Android&#...
... or above 5.3.1 Power on and connect the MBP854HD camera • Connect the MBP854HD adapter to search "Hubble for Motorola Monitors" application. • Download Hubble for Motorola Monitors application from Google Play™ Store and install it into micro USB socket at back of MBP854HD camera. • Make... sure that ON/OFF button is ready to setup. 5.3.2 Download the Hubble for Motorola Monitors application • Go to the Google Play™ Store to a suitable mains power socket, insert the power adapter plug into your Android&#...
User Guide
Page 23
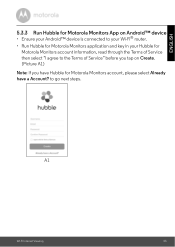
to the Terms of Service" before you tap on Android™ device • Ensure your Android™ device is connected to your Wi-Fi® router. • Run Hubble for Motorola Monitors application and key in your Hubble for Motorola Monitors account information, read through the Terms of Service then select "I agree to go next steps. A1 Wi-Fi Internet Viewing 23 ENGLISH 5.3.3 Run Hubble for Motorola Monitors App on Create. (Picture A1) Note: If you have Hubble for Motorola Monitors account, please select Already have a Account?
to the Terms of Service" before you tap on Android™ device • Ensure your Android™ device is connected to your Wi-Fi® router. • Run Hubble for Motorola Monitors application and key in your Hubble for Motorola Monitors account information, read through the Terms of Service then select "I agree to go next steps. A1 Wi-Fi Internet Viewing 23 ENGLISH 5.3.3 Run Hubble for Motorola Monitors App on Create. (Picture A1) Note: If you have Hubble for Motorola Monitors account, please select Already have a Account?
User Guide
Page 28
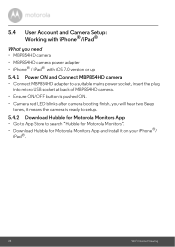
... finish, you will hear two Beep tones, it means the camera is ready to setup. 5.4.2 Download Hubble for Motorola Monitors App • Go to App Store to search "Hubble for Motorola Monitors". • Download Hubble for Motorola Monitors App and install it on your iPhone®/ iPad®. 28 Wi-Fi Internet Viewing
... finish, you will hear two Beep tones, it means the camera is ready to setup. 5.4.2 Download Hubble for Motorola Monitors App • Go to App Store to search "Hubble for Motorola Monitors". • Download Hubble for Motorola Monitors App and install it on your iPhone®/ iPad®. 28 Wi-Fi Internet Viewing
User Guide
Page 29
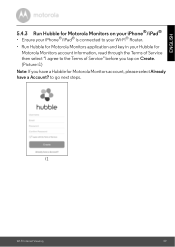
ENGLISH 5.4.3 Run Hubble for Motorola Monitors on Create. (Picture i1) Note: If you have a Hubble for Motorola Monitors account information, read through the Terms of Service then select "I agree to go next steps. i1 Wi-Fi Internet Viewing 29 to the Terms of Service" before you tap on your iPhone®/iPad® • Ensure your iPhone®/iPad® is connected to your Wi-Fi® Router. • Run Hubble for Motorola Monitors application and key in your Hubble for Motorola Monitors account, please select Already have a Account?
ENGLISH 5.4.3 Run Hubble for Motorola Monitors on Create. (Picture i1) Note: If you have a Hubble for Motorola Monitors account information, read through the Terms of Service then select "I agree to go next steps. i1 Wi-Fi Internet Viewing 29 to the Terms of Service" before you tap on your iPhone®/iPad® • Ensure your iPhone®/iPad® is connected to your Wi-Fi® Router. • Run Hubble for Motorola Monitors application and key in your Hubble for Motorola Monitors account, please select Already have a Account?
User Guide
Page 35
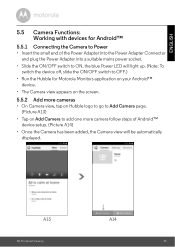
... blue Power LED will light up. (Note: To switch the device off, slide the ON/OFF switch to OFF.) • Run the Hubble for Motorola Monitors application on your Android™ device. • The Camera view appears on the screen. 5.5.2 Add more cameras • On Camera view, tap on Hubble logo...
... blue Power LED will light up. (Note: To switch the device off, slide the ON/OFF switch to OFF.) • Run the Hubble for Motorola Monitors application on your Android™ device. • The Camera view appears on the screen. 5.5.2 Add more cameras • On Camera view, tap on Hubble logo...
User Guide
Page 37
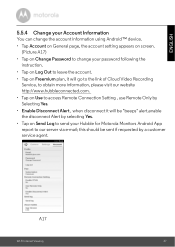
.... • Tap Account on General page, the account setting appears on screen. (Picture A17) • Tap on Change Password to change your Hubble for Motorola Monitors Android App report to our server via e-mail;
.... • Tap Account on General page, the account setting appears on screen. (Picture A17) • Tap on Change Password to change your Hubble for Motorola Monitors Android App report to our server via e-mail;
User Guide
Page 40
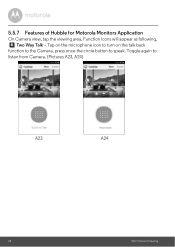
Toggle again to speak. 5.5.7 Features of Hubble for Motorola Monitors Application On Camera view, tap the viewing area, Function Icons will appear as following, Two Way Talk - Tap on the microphone icon to turn on the talk back function to the Camera, press once the circle button to listen from Camera. (Pictures A23, A24) A23 A24 40 Wi-Fi Internet Viewing
Toggle again to speak. 5.5.7 Features of Hubble for Motorola Monitors Application On Camera view, tap the viewing area, Function Icons will appear as following, Two Way Talk - Tap on the microphone icon to turn on the talk back function to the Camera, press once the circle button to listen from Camera. (Pictures A23, A24) A23 A24 40 Wi-Fi Internet Viewing
User Guide
Page 43
... Android™ device CD screen (Picture A31). ENGLISH Note: Photos and videos will be stored in the internal flash memory of your device for Motorola Monitors" application or a 3rd party application, such as MX player (i.e. The temperature reading from Gallery or Media Player. Google Play™ Store), which set in system...
... Android™ device CD screen (Picture A31). ENGLISH Note: Photos and videos will be stored in the internal flash memory of your device for Motorola Monitors" application or a 3rd party application, such as MX player (i.e. The temperature reading from Gallery or Media Player. Google Play™ Store), which set in system...
User Guide
Page 44
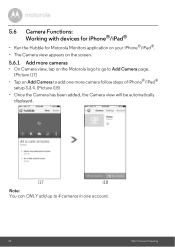
5.6 Camera Functions: Working with devices for iPhone®/iPad® • Run the Hubble for Motorola Monitors application on your iPhone®/iPad®. • The Camera view appears on the screen. 5.6.1 Add more cameras • On Camera view, tap on the ...
5.6 Camera Functions: Working with devices for iPhone®/iPad® • Run the Hubble for Motorola Monitors application on your iPhone®/iPad®. • The Camera view appears on the screen. 5.6.1 Add more cameras • On Camera view, tap on the ...
User Guide
Page 46
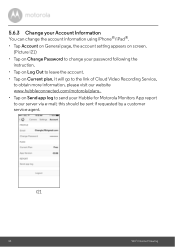
..., to obtain more information, please visit our website www.hubbleconnected.com/motorola/plans. • Tap on Send app log to send your Hubble for Motorola Monitors App report to our server via e-mail; this should be sent if requested by a customer service agent. i21 46 Wi-Fi Internet Viewing
..., to obtain more information, please visit our website www.hubbleconnected.com/motorola/plans. • Tap on Send app log to send your Hubble for Motorola Monitors App report to our server via e-mail; this should be sent if requested by a customer service agent. i21 46 Wi-Fi Internet Viewing
User Guide
Page 49
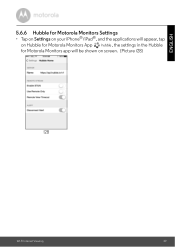
ENGLISH 5.6.6 Hubble for Motorola Monitors Settings • Tap on Settings on your iPhone®/iPad®, and the applications will appear, tap on Hubble for Motorola Monitors App , the settings in the Hubble for Motorola Monitors app will be shown on screen. (Picture i28) i28 Wi-Fi Internet Viewing 49
ENGLISH 5.6.6 Hubble for Motorola Monitors Settings • Tap on Settings on your iPhone®/iPad®, and the applications will appear, tap on Hubble for Motorola Monitors App , the settings in the Hubble for Motorola Monitors app will be shown on screen. (Picture i28) i28 Wi-Fi Internet Viewing 49


