User Guide
Page 1
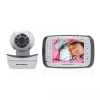
USER'S GUIDE Models: MBP43, MBP43/2, MBP43/3, MBP43/4 Digital Video Baby Monitor USER'S GUIDE The features described in user's guide are subject to modifications without prior notice.
USER'S GUIDE Models: MBP43, MBP43/2, MBP43/3, MBP43/4 Digital Video Baby Monitor USER'S GUIDE The features described in user's guide are subject to modifications without prior notice.
User Guide
Page 2
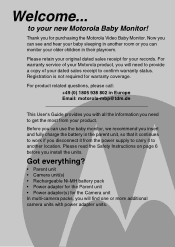
... • Power adapter for the Parent unit • Power adapter(s) for purchasing the Motorola Video Baby Monitor. Before you can monitor your original dated sales receipt for warranty coverage. Please retain your older children in Europe Email: motorola-mbp@tdm.de This User's Guide provides you with all the information you will find one...
... • Power adapter for the Parent unit • Power adapter(s) for purchasing the Motorola Video Baby Monitor. Before you can monitor your original dated sales receipt for warranty coverage. Please retain your older children in Europe Email: motorola-mbp@tdm.de This User's Guide provides you with all the information you will find one...
User Guide
Page 3
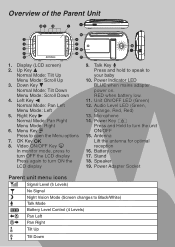
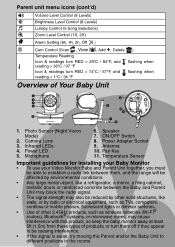
... 6 3 7 18 4 8 16 19 5 9 13 17 1. Up Key + Normal Mode: Tilt Up Menu Mode: Scroll Up 3. Down Key - OK Key O 8. Video ON/OFF Key V In monitor mode, press to turn OFF the LCD display Press again to turn ON the LCD display 9. Battery cover 17. Left Key < Normal Mode: Pan Left.... Power Key P Press and Hold to turn the unit ON/OFF 15. Antenna Lift the antenna for optimal reception 16. Menu Key M Press to your baby 10. Talk Key T Press and hold to speak to open the Menu options 7. Power Adapter Socket Parent unit menu icons 1 Signal Level (5 Levels) B N T C C...
... 6 3 7 18 4 8 16 19 5 9 13 17 1. Up Key + Normal Mode: Tilt Up Menu Mode: Scroll Up 3. Down Key - OK Key O 8. Video ON/OFF Key V In monitor mode, press to turn OFF the LCD display Press again to turn ON the LCD display 9. Battery cover 17. Left Key < Normal Mode: Pan Left.... Power Key P Press and Hold to turn the unit ON/OFF 15. Antenna Lift the antenna for optimal reception 16. Menu Key M Press to your baby 10. Talk Key T Press and hold to speak to open the Menu options 7. Power Adapter Socket Parent unit menu icons 1 Signal Level (5 Levels) B N T C C...
User Guide
Page 4
Power LED 5. Power Adapter Socket 9. Antenna 10. Pair Key 11. Camera Lens 3. ON/OFF Switch 8. Temperature Sensor Important guidelines for installing your Baby Monitor • To use your Video Monitor Baby and Parent Unit together, you must be able to different positions in the rooms. Speaker 7. Photo Sensor (Night Vision Mode) 2. Microphone 6. Parent ...products, such as wireless networks (Wi-Fi® routers), Bluetooth® systems, or microwave ovens, may cause interference with this product, so keep the baby monitor away at least 5ft (1.5m) from these types of Your...
Power LED 5. Power Adapter Socket 9. Antenna 10. Pair Key 11. Camera Lens 3. ON/OFF Switch 8. Temperature Sensor Important guidelines for installing your Baby Monitor • To use your Video Monitor Baby and Parent Unit together, you must be able to different positions in the rooms. Speaker 7. Photo Sensor (Night Vision Mode) 2. Microphone 6. Parent ...products, such as wireless networks (Wi-Fi® routers), Bluetooth® systems, or microwave ovens, may cause interference with this product, so keep the baby monitor away at least 5ft (1.5m) from these types of Your...
User Guide
Page 5
... 14 4.6.3 Delete a camera 15 4.6.4 Scan the cameras 15 4.7 Temperature 15 5. Disposal of contents 5 Help 18 8. Getting Started 8 2.1 Baby Unit Power Supply 8 2.2 Parent Unit Battery Installation 8 2.3 Parent Unit Power Supply 9 2.4 Registration (Pairing 10 3. Using the Baby Monitor 11 3.1 Setting up 11 3.2 Pan and Tilt 11 3.3 Night Vision Mode 11 3.4 Talk Mode 11 3.5 Video ON...
... 14 4.6.3 Delete a camera 15 4.6.4 Scan the cameras 15 4.7 Temperature 15 5. Disposal of contents 5 Help 18 8. Getting Started 8 2.1 Baby Unit Power Supply 8 2.2 Parent Unit Battery Installation 8 2.3 Parent Unit Power Supply 9 2.4 Registration (Pairing 10 3. Using the Baby Monitor 11 3.1 Setting up 11 3.2 Pan and Tilt 11 3.3 Night Vision Mode 11 3.4 Talk Mode 11 3.5 Video ON...
User Guide
Page 6
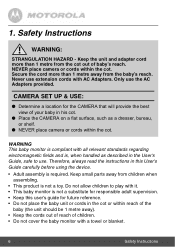
... children to use. Safety Instructions WARNING: STRANGULATION HAZARD - Only use extension cords with it. • This baby monitor is required. Never use the AC Adapters provided. WARNING This baby monitor is compliant with a towel or blanket. 6 Safety Instructions Keep the unit and adapter cord more than 1 ...metre from the baby's reach. NEVER place camera or cords within reach of the baby (the unit should be 1 metre away). • Keep the cords out of reach of children. • Do not cover the baby monitor with all relevant standards regarding electromagnetic ...
... children to use. Safety Instructions WARNING: STRANGULATION HAZARD - Only use extension cords with it. • This baby monitor is required. Never use the AC Adapters provided. WARNING This baby monitor is compliant with a towel or blanket. 6 Safety Instructions Keep the unit and adapter cord more than 1 ...metre from the baby's reach. NEVER place camera or cords within reach of the baby (the unit should be 1 metre away). • Keep the cords out of reach of children. • Do not cover the baby monitor with all relevant standards regarding electromagnetic ...
User Guide
Page 7
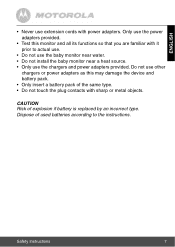
...with it prior to the instructions. CAUTION Risk of used batteries according to actual use. • Do not use the baby monitor near water. • Do not install the baby monitor near a heat source. • Only use the chargers and power adapters provided. Dispose of explosion if battery is ...replaced by an incorrect type. Only use other chargers or power adapters as this monitor and all its functions so that you ...
...with it prior to the instructions. CAUTION Risk of used batteries according to actual use. • Do not use the baby monitor near water. • Do not install the baby monitor near a heat source. • Only use the chargers and power adapters provided. Dispose of explosion if battery is ...replaced by an incorrect type. Only use other chargers or power adapters as this monitor and all its functions so that you ...
User Guide
Page 10
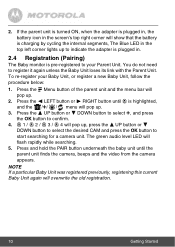
...pop up . 2. Press and hold the PAIR button underneath the baby unit until C is highlighted, and the /+/ / menu will show that the battery is charging by cycling the internal segments, The Blue LED in . 2.4 Registration (Pairing) The Baby monitor is plugged in the top left corner lights up . 3. C... 1 / C 2 / C 3 / C 4 will flash rapidly while searching. 5. NOTE If a particular Baby Unit was registered previously, registering this current Baby Unit again will pop up , press the +...
...pop up . 2. Press and hold the PAIR button underneath the baby unit until C is highlighted, and the /+/ / menu will show that the battery is charging by cycling the internal segments, The Blue LED in . 2.4 Registration (Pairing) The Baby monitor is plugged in the top left corner lights up . 3. C... 1 / C 2 / C 3 / C 4 will flash rapidly while searching. 5. NOTE If a particular Baby Unit was registered previously, registering this current Baby Unit again will pop up , press the +...
User Guide
Page 11
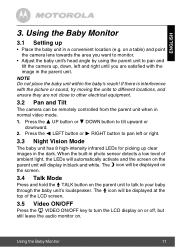
... (e.g. ENGLISH 3. Press the < LEFT button or > RIGHT button to pan left and right until you want to monitor. • Adjust the baby unit's head angle by using the parent unit to your baby through the baby unit's loudspeaker. DOWN button to turn the LCD display on or off, but still leave the audio... in photo sensor detects a low level of ambient light, the LEDs will be remotely controlled from the parent unit when in the dark. Using the Baby Monitor 11 The N icon will be displayed on the screen. 3.4 Talk Mode Press and hold the T TALK button on a table) and point the camera lens...
... (e.g. ENGLISH 3. Press the < LEFT button or > RIGHT button to pan left and right until you want to monitor. • Adjust the baby unit's head angle by using the parent unit to your baby through the baby unit's loudspeaker. DOWN button to turn the LCD display on or off, but still leave the audio... in photo sensor detects a low level of ambient light, the LEDs will be remotely controlled from the parent unit when in the dark. Using the Baby Monitor 11 The N icon will be displayed on the screen. 3.4 Talk Mode Press and hold the T TALK button on a table) and point the camera lens...
User Guide
Page 12
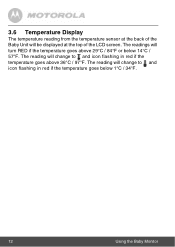
The reading will change to and icon flashing in red if the temperature goes below 14°C / 57°F. 3.6 Temperature Display The temperature reading from the temperature sensor at the top of the LCD screen. The reading will change to and icon flashing in red if the temperature goes above 29°C / 84°F or below 1°C / 34°F. 12 Using the Baby Monitor The readings will be displayed at the back of the Baby Unit will turn RED if the temperature goes above 36°C / 97°F.
The reading will change to and icon flashing in red if the temperature goes below 14°C / 57°F. 3.6 Temperature Display The temperature reading from the temperature sensor at the top of the LCD screen. The reading will change to and icon flashing in red if the temperature goes above 29°C / 84°F or below 1°C / 34°F. 12 Using the Baby Monitor The readings will be displayed at the back of the Baby Unit will turn RED if the temperature goes above 36°C / 97°F.
User Guide
Page 15
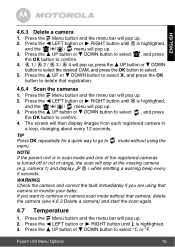
... will pop up . 2. camera 1) and display C 3 while emitting a warning beep every 5 seconds. WARNING Check the camera and correct the fault immediately if you want to monitor your baby. Press the + UP button or - Press the + UP button or - DOWN button to select X, and press the OK button to select. 5. C 1 / C 2 / C 3 / C 4 will then display...
... will pop up . 2. camera 1) and display C 3 while emitting a warning beep every 5 seconds. WARNING Check the camera and correct the fault immediately if you want to monitor your baby. Press the + UP button or - Press the + UP button or - DOWN button to select X, and press the OK button to select. 5. C 1 / C 2 / C 3 / C 4 will then display...
User Guide
Page 17
... a slightly damp cloth or with thinners or other solvents and chemicals -- Never use cleaning agents or abrasive solvents. contact Customer Service for your baby monitor away from hot, humid areas or strong sunlight, and don't let it yourself -- Cleaning and care • Do not clean any part of reliability for ... try to repair it get wet. • Every effort has been made to the product which is not covered by the warranty. • Keep your baby monitor.
... a slightly damp cloth or with thinners or other solvents and chemicals -- Never use cleaning agents or abrasive solvents. contact Customer Service for your baby monitor away from hot, humid areas or strong sunlight, and don't let it yourself -- Cleaning and care • Do not clean any part of reliability for ... try to repair it get wet. • Every effort has been made to the product which is not covered by the warranty. • Keep your baby monitor.

User Guide
Page 19
Move them farther apart. • Make sure there is at least 1 to 2 metres between the 2 units to avoid audio feedback. • lf the baby unit is too far away it may be out of other 2.4GHz products, such as wireless networks (Wi-Fi® routers), Bluetooth® systems, or ... closer to different positions in the rooms. Help 19 ENGLISH Interference Noise interference on your parent unit • Your baby and parent units may cause interference with this product, so keep the baby monitor away at least 5ft (1.5m) from these types of products, or turn them off if they appear to be...
Move them farther apart. • Make sure there is at least 1 to 2 metres between the 2 units to avoid audio feedback. • lf the baby unit is too far away it may be out of other 2.4GHz products, such as wireless networks (Wi-Fi® routers), Bluetooth® systems, or ... closer to different positions in the rooms. Help 19 ENGLISH Interference Noise interference on your parent unit • Your baby and parent units may cause interference with this product, so keep the baby monitor away at least 5ft (1.5m) from these types of products, or turn them off if they appear to be...
User Guide
Page 26
[email protected] EC Declaration of the product voids this Declaration. Any Unauthorized modification of Conformity We the manufacturer / Importer : Binatone Telecom Plc 1 Apsley Way London NW2 7HF,United Kingdom. Assessment of compliance of the product with the requirements relating to the... of equipment: Model Name: Country of Origin: Brand: Digital Baby Monitor MBP43, MBP43 Twin, MBP43 Triple, MBP43 Quad MBP43/2, MBP43/3, MBP43/4 China Motorola complies with the European Approval Marking CE as show. BINATONE TELECOM PLC 1 Apsley Way London NW2 7HF,United Kingdom. Declare...
[email protected] EC Declaration of the product voids this Declaration. Any Unauthorized modification of Conformity We the manufacturer / Importer : Binatone Telecom Plc 1 Apsley Way London NW2 7HF,United Kingdom. Assessment of compliance of the product with the requirements relating to the... of equipment: Model Name: Country of Origin: Brand: Digital Baby Monitor MBP43, MBP43 Twin, MBP43 Triple, MBP43 Quad MBP43/2, MBP43/3, MBP43/4 China Motorola complies with the European Approval Marking CE as show. BINATONE TELECOM PLC 1 Apsley Way London NW2 7HF,United Kingdom. Declare...

