User Guide
Page 4
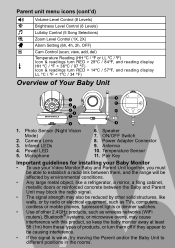
...Temperature Sensor 11. Infared LEDs 4. Microphone 6. Power Adapter Connector 9. Power LED 5. Pair Key Important guidelines for installing your Baby Monitor • To use your Video Monitor Baby and Parent Unit together, you must be able to different positions in the rooms. Speaker 7. Camera Lens 3. Antenna 10. ...or LL ºC / ºF) t Icon & readings turn RED > 29ºC / 84ºF, and reading display HH ºC / ºF > 36ºC / 97 ºF) Icon & readings turn them off if they appear to be causing interference. • If the signal is weak, try moving the ...
...Temperature Sensor 11. Infared LEDs 4. Microphone 6. Power Adapter Connector 9. Power LED 5. Pair Key Important guidelines for installing your Baby Monitor • To use your Video Monitor Baby and Parent Unit together, you must be able to different positions in the rooms. Speaker 7. Camera Lens 3. Antenna 10. ...or LL ºC / ºF) t Icon & readings turn RED > 29ºC / 84ºF, and reading display HH ºC / ºF > 36ºC / 97 ºF) Icon & readings turn them off if they appear to be causing interference. • If the signal is weak, try moving the ...
User Guide
Page 5
Getting Started 8 2.1 Baby Unit Power Supply 8 2.2 Parent Unit Battery Installation 8 2.3 Parent Unit Power Supply 9 2.4 Registration (Pairing 10 2.5 View Video Through TV 10 3. General Information 19 Table of contents 1. ENGLISH Table of contents 5 MBP36 Parent Unit Menu... camera 13 4.6.3 Delete a camera 14 4.6.4 Scan camera 14 4.7 Temperature 14 5. Cleaning 16 7. Using the Baby Monitor MBP36 11 3.1 Setting up 11 3.2 Pan and Tilt 11 3.3 Night Vision Mode 11 3.4 Talk Mode 11 3.5 Video ON/OFF 11 3.6 Temperature Display (HH ºC / ºF or LL ºC / ºF 11...
Getting Started 8 2.1 Baby Unit Power Supply 8 2.2 Parent Unit Battery Installation 8 2.3 Parent Unit Power Supply 9 2.4 Registration (Pairing 10 2.5 View Video Through TV 10 3. General Information 19 Table of contents 1. ENGLISH Table of contents 5 MBP36 Parent Unit Menu... camera 13 4.6.3 Delete a camera 14 4.6.4 Scan camera 14 4.7 Temperature 14 5. Cleaning 16 7. Using the Baby Monitor MBP36 11 3.1 Setting up 11 3.2 Pan and Tilt 11 3.3 Night Vision Mode 11 3.4 Talk Mode 11 3.5 Video ON/OFF 11 3.6 Temperature Display (HH ºC / ºF or LL ºC / ºF 11...
User Guide
Page 10
... input of the parent unit and the menu bar will show that the battery is visible. Press the < LEFT button or > RIGHT button until the Baby monitor picture is charging. DOWN button to select ADD, and press the OK button to register it again unless the... corner will pop up . 3. Press and hold the PAIR button underneath the baby unit until the parent unit finds the camera, beeps and the video from the camera appears. During power ON, when adapter is plugged in . 2.4 Registration (Pairing) The Baby monitor is pre-registered to be purchased separately. The Blue LED at the...
... input of the parent unit and the menu bar will show that the battery is visible. Press the < LEFT button or > RIGHT button until the Baby monitor picture is charging. DOWN button to select ADD, and press the OK button to register it again unless the... corner will pop up . 3. Press and hold the PAIR button underneath the baby unit until the parent unit finds the camera, beeps and the video from the camera appears. During power ON, when adapter is plugged in . 2.4 Registration (Pairing) The Baby monitor is pre-registered to be purchased separately. The Blue LED at the...
User Guide
Page 11
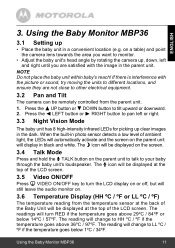
...sensor at the back of the Baby Unit will be displayed at the top of the LCD screen. 3.5 Video ON/OFF Press V VIDEO ON/OFF key to turn RED if the temperature goes above 36ºC / 97ºF. Using the Baby Monitor MBP36 11 Using the Baby Monitor MBP36 3.1 Setting up clear ...images in a convenient location (e.g. NOTE Do not place the baby unit within baby's reach! The N icon...
...sensor at the back of the Baby Unit will be displayed at the top of the LCD screen. 3.5 Video ON/OFF Press V VIDEO ON/OFF key to turn RED if the temperature goes above 36ºC / 97ºF. Using the Baby Monitor MBP36 11 Using the Baby Monitor MBP36 3.1 Setting up clear ...images in a convenient location (e.g. NOTE Do not place the baby unit within baby's reach! The N icon...

