
User Guide
Page 2
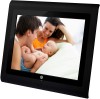
.... Follow the simple instructions in Singapore On the Web: www.motorola.com This User's Guide provides you with all the information you need to provide a copy of your Motorola product, you will need to your digital photo frame. z 1 x Digital Photo Frame z 1 x Stand z 1 x Power adapter z 1 x Remote control z 1 x Quick Start Guide z 1 x User's Guide Key features z 3 view modes: Clock/Calendar mode, slideshow mode and thumbnail mode z 5 slideshow transition effects z Date and Time settings z Programmable On/Off Time z Supports flash drive, SD, SDHC and MMC memory cards. to get the...
.... Follow the simple instructions in Singapore On the Web: www.motorola.com This User's Guide provides you with all the information you need to provide a copy of your Motorola product, you will need to your digital photo frame. z 1 x Digital Photo Frame z 1 x Stand z 1 x Power adapter z 1 x Remote control z 1 x Quick Start Guide z 1 x User's Guide Key features z 3 view modes: Clock/Calendar mode, slideshow mode and thumbnail mode z 5 slideshow transition effects z Date and Time settings z Programmable On/Off Time z Supports flash drive, SD, SDHC and MMC memory cards. to get the...

User Guide
Page 3
Loudspeakers 8. Memory card slot for inserting an SD, SDHC, MMC memory card that contains the photos or music you want to play. 10. Power jack 3 Navigation and buttons 2. ON/OFF button 4. Stand locking slot 7. Earphone jack for inserting a USB flash drive that contains the photos or music you want to play . 11. Hanging slot (Portrait position) 5. EXIT button 3. USB port for connecting to an earphone/headset or external speaker to play the audio. 9. Hanging slot (Landscape position) 6. Getting started Frame Overview 1.
Loudspeakers 8. Memory card slot for inserting an SD, SDHC, MMC memory card that contains the photos or music you want to play. 10. Power jack 3 Navigation and buttons 2. ON/OFF button 4. Stand locking slot 7. Earphone jack for inserting a USB flash drive that contains the photos or music you want to play . 11. Hanging slot (Portrait position) 5. EXIT button 3. USB port for connecting to an earphone/headset or external speaker to play the audio. 9. Hanging slot (Landscape position) 6. Getting started Frame Overview 1.

User Guide
Page 4
... Deleting one or all music files 21 3.4 Using the Calendar menu 21 3.5 Using the Settings menu 22 3.5.1 Setting an alarm 25 3.5.2 Enabling auto on/off 26 4. Using the photo frame 10 2.1 Using the control buttons 10 2.2 Using the remote control 13 3. Technical specifications 33 6. Table of Contents 1. Getting started Wall mounting instructions 35 4 Getting started 5 1.1 Installing the stand 6 1.1.1 Landscape position 6 1.1.2 Portrait position 7 1.2 Connecting to power 8 1.3 Inserting a memory card or a USB flash drive 8 1.4 Replacing the remote...
... Deleting one or all music files 21 3.4 Using the Calendar menu 21 3.5 Using the Settings menu 22 3.5.1 Setting an alarm 25 3.5.2 Enabling auto on/off 26 4. Using the photo frame 10 2.1 Using the control buttons 10 2.2 Using the remote control 13 3. Technical specifications 33 6. Table of Contents 1. Getting started Wall mounting instructions 35 4 Getting started 5 1.1 Installing the stand 6 1.1.1 Landscape position 6 1.1.2 Portrait position 7 1.2 Connecting to power 8 1.3 Inserting a memory card or a USB flash drive 8 1.4 Replacing the remote...
User Guide
Page 5
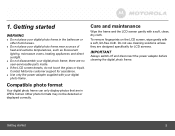
.... Do not use cleaning solutions unless they are designed specifically for assistance. z Do not disassemble your digital photo frame in JPEG format. Compatible photo format Your digital photo frame can only display photos that are no user-serviceable parts inside. IMPORTANT Always switch off and disconnect the power adapter before cleaning the digital photo frame. Contact Motorola customer support for LCD screens. Care and maintenance Wipe the frame and the LCD screen gently with a soft, lint-free cloth. Getting started 5
.... Do not use cleaning solutions unless they are designed specifically for assistance. z Do not disassemble your digital photo frame in JPEG format. Compatible photo format Your digital photo frame can only display photos that are no user-serviceable parts inside. IMPORTANT Always switch off and disconnect the power adapter before cleaning the digital photo frame. Contact Motorola customer support for LCD screens. Care and maintenance Wipe the frame and the LCD screen gently with a soft, lint-free cloth. Getting started 5

User Guide
Page 8
... the power jack on the back of the AC power adapter to show on the power. 1. The supported audio file format is MP3 (*.mp3). 1.2 Connecting to power Follow the steps below to connect the photo frame to a power outlet to display photos in slideshow mode. Plug one end of the photo frame. 2. Place the photo frame in landscape or portrait position on the photo frame. On the top of the photo frame, you can play audio and image files on...
... the power jack on the back of the AC power adapter to show on the power. 1. The supported audio file format is MP3 (*.mp3). 1.2 Connecting to power Follow the steps below to connect the photo frame to a power outlet to display photos in slideshow mode. Plug one end of the photo frame. 2. Place the photo frame in landscape or portrait position on the photo frame. On the top of the photo frame, you can play audio and image files on...

User Guide
Page 9
.... 1.4 Replacing the remote control battery The supplied remote control comes installed with the positive pole facing upwards in the illustrated position. 2. When you need to the right. 3. Slide the locking tab to replace the battery, follow the steps below. 1. The battery must be placed with a CR2025 lithium battery. z Failure to the battery. z Use only the approved specified batteries. z If the battery is completely drained or the remote control is...
.... 1.4 Replacing the remote control battery The supplied remote control comes installed with the positive pole facing upwards in the illustrated position. 2. When you need to the right. 3. Slide the locking tab to replace the battery, follow the steps below. 1. The battery must be placed with a CR2025 lithium battery. z Failure to the battery. z Use only the approved specified batteries. z If the battery is completely drained or the remote control is...

User Guide
Page 10
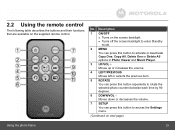
.... d. LEFT: moves left. z Turns off the screen backlight to the previous page. Description 1 Navigation and buttons a. b. e. : Enters/confirms the selection, or starts/pauses the playback. 2 EXIT button z Returns to the Main Menu. Using the photo frame 2. Using the photo frame To operate the photo frame, you can: z Use the control buttons on the screen backlight. z Stops the playback. 3 ON/OFF button z Turns on the back of the photo frame Or z Use the supplied remote control 2.1 Using the control buttons 10 No.
.... d. LEFT: moves left. z Turns off the screen backlight to the previous page. Description 1 Navigation and buttons a. b. e. : Enters/confirms the selection, or starts/pauses the playback. 2 EXIT button z Returns to the Main Menu. Using the photo frame 2. Using the photo frame To operate the photo frame, you can: z Use the control buttons on the screen backlight. z Stops the playback. 3 ON/OFF button z Turns on the back of the photo frame Or z Use the supplied remote control 2.1 Using the control buttons 10 No.

User Guide
Page 11
...Selects Photo, Music, Calendar or Settings menu. When using the Main Menu Button Function UP/VOLЀ Selects Internal Memory, USB or Memory Card. Enters sub-pages of Photo, Music, Calendar or Settings menu. When using the Music menu Before playing music / When music is paused Button Function UP/VOLЀ Selects the previous track. DOWN/VOLЁ Selects Internal Memory, USB or Memory Card. RIGHT Selects Photo, Music, Calendar or Settings menu. DOWN/VOLЁ LEFT RIGHT Moves down. Using the photo frame When playing a slideshow Button Function Starts...
...Selects Photo, Music, Calendar or Settings menu. When using the Main Menu Button Function UP/VOLЀ Selects Internal Memory, USB or Memory Card. Enters sub-pages of Photo, Music, Calendar or Settings menu. When using the Music menu Before playing music / When music is paused Button Function UP/VOLЀ Selects the previous track. DOWN/VOLЁ Selects Internal Memory, USB or Memory Card. RIGHT Selects Photo, Music, Calendar or Settings menu. DOWN/VOLЁ LEFT RIGHT Moves down. Using the photo frame When playing a slideshow Button Function Starts...
User Guide
Page 13
... screen backlight. No. z Turns off the screen backlight to enter Standby mode. 2 MENU You can press this button to activate or deactivate Copy One, Copy All, Delete One or Delete All options in Photo Viewer and Music Player. 3 UP/VOLЀ Moves up or increases the volume. 4 LEFT/PREVIOUS Moves left or selects the previous item. 5 ROTATE You can press this button repeatedly to rotate the selected photo counterclockwise each time...
... screen backlight. No. z Turns off the screen backlight to enter Standby mode. 2 MENU You can press this button to activate or deactivate Copy One, Copy All, Delete One or Delete All options in Photo Viewer and Music Player. 3 UP/VOLЀ Moves up or increases the volume. 4 LEFT/PREVIOUS Moves left or selects the previous item. 5 ROTATE You can press this button repeatedly to rotate the selected photo counterclockwise each time...
User Guide
Page 15
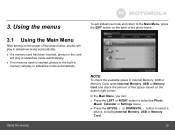
... card will play in slideshow mode automatically. z Press the UP/VOLЀ or DOWN/VOLЁ button to the Main Menu, press the EXIT button on the back of the photo frame. 3.1 Using the Main Menu After turning on the power of free space shown on the bottom right corner. In the Main Menu, you can: z Press the LEFT or RIGHT button to select the Photo, Music, Calendar or Settings menu...
... card will play in slideshow mode automatically. z Press the UP/VOLЀ or DOWN/VOLЁ button to the Main Menu, press the EXIT button on the back of the photo frame. 3.1 Using the Main Menu After turning on the power of free space shown on the bottom right corner. In the Main Menu, you can: z Press the LEFT or RIGHT button to select the Photo, Music, Calendar or Settings menu...
User Guide
Page 16
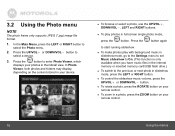
... enter Photo Viewer, which displays your remote control. z To play with background music in slideshow mode, go to the Settings menu to set Music slideshow to On. (This function is only available when you have music files in the internal memory or inserted memory card/USB flash drive.) z To switch to start running slideshow. 3.2 Using the Photo menu NOTE The photo frame only supports JPEG (*.jpg) image file format. 1. z To browse or select a photo, use the UP/VOLЀ, DOWN/VOLЁ, LEFT and RIGHT buttons. z To make photos play photos...
... enter Photo Viewer, which displays your remote control. z To play with background music in slideshow mode, go to the Settings menu to set Music slideshow to On. (This function is only available when you have music files in the internal memory or inserted memory card/USB flash drive.) z To switch to start running slideshow. 3.2 Using the Photo menu NOTE The photo frame only supports JPEG (*.jpg) image file format. 1. z To browse or select a photo, use the UP/VOLЀ, DOWN/VOLЁ, LEFT and RIGHT buttons. z To make photos play photos...

User Guide
Page 17
.... In Photo Viewer, press the MENU button on the screen. 2. Press the LEFT or RIGHT button to confirm. Press the LEFT or RIGHT button to select the destination (USB, Memory Card or Internal Memory), and then press the button to select Yes, and then press the button. 4. z Use the supplied remote control for this operation. 1. Once the copy process starts, do not remove your memory card or USB flash drive first. Copy One, Copy All, Delete One and Delete All options...
.... In Photo Viewer, press the MENU button on the screen. 2. Press the LEFT or RIGHT button to confirm. Press the LEFT or RIGHT button to select the destination (USB, Memory Card or Internal Memory), and then press the button to select Yes, and then press the button. 4. z Use the supplied remote control for this operation. 1. Once the copy process starts, do not remove your memory card or USB flash drive first. Copy One, Copy All, Delete One and Delete All options...

User Guide
Page 18
... or RIGHT button to select Yes, and then press the button to confirm. 3.2.3 Auto rotation The photo frame has a built-in tilt sensor that allows the photo frame to determine its own orientation relative to gravity and thereby automatically switch from displaying photos in landscape view. 18 Using the menus In Photo Viewer, press the MENU button on the screen. 2. 3.2.2 Deleting one or all photos NOTE Use the supplied remote control for this operation. 1.
... or RIGHT button to select Yes, and then press the button to confirm. 3.2.3 Auto rotation The photo frame has a built-in tilt sensor that allows the photo frame to determine its own orientation relative to gravity and thereby automatically switch from displaying photos in landscape view. 18 Using the menus In Photo Viewer, press the MENU button on the screen. 2. 3.2.2 Deleting one or all photos NOTE Use the supplied remote control for this operation. 1.

User Guide
Page 19
.../VOLЁ or RIGHT button. z To play the selected track, press the button. Using the menus 19 3.3 Using the Music menu NOTE The photo frame only supports MP3 (*.mp3) audio file format. 1. z To select the previous track, press the UP/VOLЀ or LEFT button. In the Main Menu, press the LEFT or RIGHT button to enter Music Player. Press the button to select the Music menu. 2. z During music playing, volume bar shows...
.../VOLЁ or RIGHT button. z To play the selected track, press the button. Using the menus 19 3.3 Using the Music menu NOTE The photo frame only supports MP3 (*.mp3) audio file format. 1. z To select the previous track, press the UP/VOLЀ or LEFT button. In the Main Menu, press the LEFT or RIGHT button to enter Music Player. Press the button to select the Music menu. 2. z During music playing, volume bar shows...

User Guide
Page 20
... memory card or USB to select Yes, and then press the button. 4. Press the LEFT or RIGHT button to confirm. In Music Player, press the MENU button on the screen. 2. Press the LEFT or RIGHT button to the internal memory, please insert your memory card or USB flash drive first. 3.3.1 Copying one or all music files NOTE z To copy music files from the photo frame before the "Complete" message appears. 20 Using the menus z Use the supplied remote control for this operation...
... memory card or USB to select Yes, and then press the button. 4. Press the LEFT or RIGHT button to confirm. In Music Player, press the MENU button on the screen. 2. Press the LEFT or RIGHT button to the internal memory, please insert your memory card or USB flash drive first. 3.3.1 Copying one or all music files NOTE z To copy music files from the photo frame before the "Complete" message appears. 20 Using the menus z Use the supplied remote control for this operation...

User Guide
Page 21
... button. 3.3.2 Deleting one specific still photo or enter slideshow mode. NOTE If you can press the button to display one or all music files NOTE Use the supplied remote control for this operation. 1. Copy One, Copy All, Delete One and Delete All options will show on the remote control. For details about alarm settings, refer to enter full screen mode in the Calendar menu. Press the button to enter the Calendar preview screen, and then press the button again to "3.5.1 Setting an alarm". Using...
... button. 3.3.2 Deleting one specific still photo or enter slideshow mode. NOTE If you can press the button to display one or all music files NOTE Use the supplied remote control for this operation. 1. Copy One, Copy All, Delete One and Delete All options will show on the remote control. For details about alarm settings, refer to enter full screen mode in the Calendar menu. Press the button to enter the Calendar preview screen, and then press the button again to "3.5.1 Setting an alarm". Using...
User Guide
Page 22
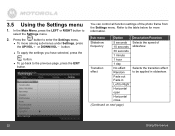
... to enter the Settings menu. You can control all function settings of slideshow. Sub-menu Option Slideshow frequency 5 seconds 10 seconds 30 seconds 1 minute 1 hour 1 day Transition effect No effect Random Fade out Fade in slideshow. 22 Using the menus Press the button to Right Horizontal open Horizontal close (Continued on next page) Description/Function Selects the speed of the photo frame from the Settings menu.
... to enter the Settings menu. You can control all function settings of slideshow. Sub-menu Option Slideshow frequency 5 seconds 10 seconds 30 seconds 1 minute 1 hour 1 day Transition effect No effect Random Fade out Fade in slideshow. 22 Using the menus Press the button to Right Horizontal open Horizontal close (Continued on next page) Description/Function Selects the speed of the photo frame from the Settings menu.
User Guide
Page 24
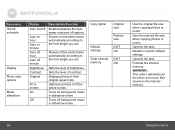
... will delete all the photo and music files stored on background music in slideshow mode. Sets the level of contrast. Turns off options. Cancels the task. Copy option Default settings Clear internal memory Original size Reduce size EXIT OK EXIT OK Use the original file size when copying photos or music. Powers off the photo frame automatically according to the time length you set . Cancels the task. Sub-menu On/Off schedule Display Photo view options Music slideshow Option Auto On/Off Auto on hour Auto...
... will delete all the photo and music files stored on background music in slideshow mode. Sets the level of contrast. Turns off options. Cancels the task. Copy option Default settings Clear internal memory Original size Reduce size EXIT OK EXIT OK Use the original file size when copying photos or music. Powers off the photo frame automatically according to the time length you set . Cancels the task. Sub-menu On/Off schedule Display Photo view options Music slideshow Option Auto On/Off Auto on hour Auto...
User Guide
Page 29
..., Binatone Electronics International LTD. Unauthorized Service or Modification. or its authorized service centers, are excluded from coverage. Use of the original warranty or for commercial purposes or subjecting the Product or Accessory to abnormal usage or conditions; General information 29 Defects or damages resulting from service, testing, adjustment, installation, maintenance, alteration, or modification in the user instructions that are Repaired or Replaced...
..., Binatone Electronics International LTD. Unauthorized Service or Modification. or its authorized service centers, are excluded from coverage. Use of the original warranty or for commercial purposes or subjecting the Product or Accessory to abnormal usage or conditions; General information 29 Defects or damages resulting from service, testing, adjustment, installation, maintenance, alteration, or modification in the user instructions that are Repaired or Replaced...

User Guide
Page 31
...used in a residential installation. These limits are designed to radio communications. z Consult the dealer or an experienced radio/TV technician for a Class B digital device, pursuant to comply with the instructions, may cause harmful interference to provide reasonable protection against harmful interference in accordance with the limits for help...22:2006 Class B. Operation is connected. General information 31 However, there is in a particular installation. This equipment has been tested and found to Part 15 Subpart B of the FCC Rules. If this device must accept any ...
...used in a residential installation. These limits are designed to radio communications. z Consult the dealer or an experienced radio/TV technician for a Class B digital device, pursuant to comply with the instructions, may cause harmful interference to provide reasonable protection against harmful interference in accordance with the limits for help...22:2006 Class B. Operation is connected. General information 31 However, there is in a particular installation. This equipment has been tested and found to Part 15 Subpart B of the FCC Rules. If this device must accept any ...