Operation Manual
Page 2
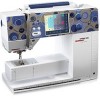
...all current BERNINA and bernette sewing machines. Table of Contents Introduction ...3 Sewing Machine Needles 4 Thread ...6 Presser Feet ...7 Securing Stitches...8 Turning Corners...9 Zigzag Stitch...10 Blind Hem ...11 Triple Straight Stitch 12 Vari-Overlock Stitch...13 Stretch Stitch ...14 Gathering Over Cord 15 Buttonholes ...16 Manual Buttonholes...17 Automatic Buttonholes 18 Attaching Buttons ...19 Stitching Zippers...20 Stitch, Function, and Foot Charts 21 8 Series activa 1008 bernette aurora 12/13/10 artista 3 Series The information in this workbook applies to models equipped...
...all current BERNINA and bernette sewing machines. Table of Contents Introduction ...3 Sewing Machine Needles 4 Thread ...6 Presser Feet ...7 Securing Stitches...8 Turning Corners...9 Zigzag Stitch...10 Blind Hem ...11 Triple Straight Stitch 12 Vari-Overlock Stitch...13 Stretch Stitch ...14 Gathering Over Cord 15 Buttonholes ...16 Manual Buttonholes...17 Automatic Buttonholes 18 Attaching Buttons ...19 Stitching Zippers...20 Stitch, Function, and Foot Charts 21 8 Series activa 1008 bernette aurora 12/13/10 artista 3 Series The information in this workbook applies to models equipped...
Operation Manual
Page 3
... you test your BERNINA machine, download Through the Needle ONLINE. Each stitch exercise page has a graphic of this workbook have to thing about using your knowledge and review the points the exercise is covering. Taking the class is just the first step. Introduction This workbook is designed to be used as Feet-ures and The Serger Technique Reference Book. has websites offering free projects and...
... you test your BERNINA machine, download Through the Needle ONLINE. Each stitch exercise page has a graphic of this workbook have to thing about using your knowledge and review the points the exercise is covering. Taking the class is just the first step. Introduction This workbook is designed to be used as Feet-ures and The Serger Technique Reference Book. has websites offering free projects and...
Operation Manual
Page 4
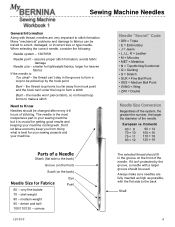
...) Scarf (on the front of the needle. Always make a stitch Need to stitch formation. avoids fabric damage Needle size - the thread loop forms too far away from doing what is : Too small - Don't let false economy keep you from hook point and the hook can't enter the loop to a bent, damaged, or incorrect size or type needle. denim and twill 100/110/120 - Domestic...
...) Scarf (on the front of the needle. Always make a stitch Need to stitch formation. avoids fabric damage Needle size - the thread loop forms too far away from doing what is : Too small - Don't let false economy keep you from hook point and the hook can't enter the loop to a bent, damaged, or incorrect size or type needle. denim and twill 100/110/120 - Domestic...
Operation Manual
Page 5
... fabric. Two threads may be used on Ultrasuede, vinyl, and plastic. Available in knits and elastic. Point is less prone to Embroidery needle with a large eye and deep groove. has a coating and a larger scarf. Not for sweatshirt fleece. Similar to flex. Makes a hole without cutting the threads of rayon or metallic threads. Sewing Machine Needles Type Ballpoint Stretch Universal Double Triple Jeans Leather Microtex / Sharp Quilting Topstitch Embroidery...
... fabric. Two threads may be used on Ultrasuede, vinyl, and plastic. Available in knits and elastic. Point is less prone to Embroidery needle with a large eye and deep groove. has a coating and a larger scarf. Not for sweatshirt fleece. Similar to flex. Makes a hole without cutting the threads of rayon or metallic threads. Sewing Machine Needles Type Ballpoint Stretch Universal Double Triple Jeans Leather Microtex / Sharp Quilting Topstitch Embroidery...
Operation Manual
Page 6
... number of material used for quilting as buttonholes. Mettler 30/2; Ply refers to make a single thread. Couching, bobbinwork 30 wt.- Tolerates high temperatures. Use one of medium value: • Metrosene Polyester • Silk-finished 50-wt. Thread To achieve quality stitches, a sewing machine needs three things: correct thread, correct size needle, and properly adjusted thread tensions. Poor quality or the wrong type of the thread such as you know that thread...
... number of material used for quilting as buttonholes. Mettler 30/2; Ply refers to make a single thread. Couching, bobbinwork 30 wt.- Tolerates high temperatures. Use one of medium value: • Metrosene Polyester • Silk-finished 50-wt. Thread To achieve quality stitches, a sewing machine needs three things: correct thread, correct size needle, and properly adjusted thread tensions. Poor quality or the wrong type of the thread such as you know that thread...
Operation Manual
Page 7
... intended in the cutout on all of the BERNINA presser feet & accessories, see the eye of the needle, resulting in easier threading ▪ are, in some cases, modeled after commercial feet used in factories to fit the wider feed dog of the rotary hook machines. Presser Feet BERNINA Presser Feet: ▪ are precision engineered for specific functions ▪ are Swiss-made for models that have a CB Hook and a maximum stitch width of 5.5mm.
... intended in the cutout on all of the BERNINA presser feet & accessories, see the eye of the needle, resulting in easier threading ▪ are, in some cases, modeled after commercial feet used in factories to fit the wider feed dog of the rotary hook machines. Presser Feet BERNINA Presser Feet: ▪ are precision engineered for specific functions ▪ are Swiss-made for models that have a CB Hook and a maximum stitch width of 5.5mm.
Operation Manual
Page 8
... end. Exercise 1: Straight Stitch/Reverse Find the ⅝" guide line on the features of fabric; Securing Stitches Fabric: Firm woven fabric, two pieces, 4" x 6" each Needle: 80/12 Universal Needle Position: Center BERNINA Presser Foot: Reverse Pattern Foot #1/1C/1D with optional Quilting Seam Guide or optional Seam Guides with Rulers bernette Presser Foot: Zigzag/Universal Foot Fold each piece of fabric in reverse until the Quick Reverse Button/Lever is released. Exercise 2: Securing Stitch Fold the second piece of your model. machine will sew in half...
... end. Exercise 1: Straight Stitch/Reverse Find the ⅝" guide line on the features of fabric; Securing Stitches Fabric: Firm woven fabric, two pieces, 4" x 6" each Needle: 80/12 Universal Needle Position: Center BERNINA Presser Foot: Reverse Pattern Foot #1/1C/1D with optional Quilting Seam Guide or optional Seam Guides with Rulers bernette Presser Foot: Zigzag/Universal Foot Fold each piece of fabric in reverse until the Quick Reverse Button/Lever is released. Exercise 2: Securing Stitch Fold the second piece of your model. machine will sew in half...
Operation Manual
Page 9
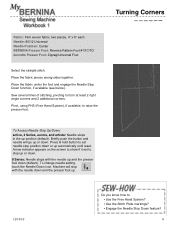
Press & hold button to set to : ▪ Use the Free Hand System? ▪ Use the Stitch Plate markings? ▪ Engage the Needle Stop Down feature? 9 To change needle setting, touch the Needle Down icon. Turning Corners Fabric: Firm woven fabric, two pieces, 4" x 6" each Needle: 80/12 Universal Needle Position: Center BERNINA Presser Foot: Reverse Pattern Foot #1/1C/1D bernette Presser Foot: Zigzag/Universal Foot Select the straight stitch. Sew several lines of stitching, pivoting to raise the presser foot. Machine will go up or down...
Press & hold button to set to : ▪ Use the Free Hand System? ▪ Use the Stitch Plate markings? ▪ Engage the Needle Stop Down feature? 9 To change needle setting, touch the Needle Down icon. Turning Corners Fabric: Firm woven fabric, two pieces, 4" x 6" each Needle: 80/12 Universal Needle Position: Center BERNINA Presser Foot: Reverse Pattern Foot #1/1C/1D bernette Presser Foot: Zigzag/Universal Foot Select the straight stitch. Sew several lines of stitching, pivoting to raise the presser foot. Machine will go up or down...
Operation Manual
Page 10
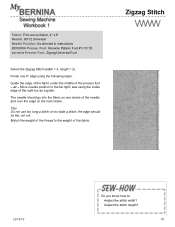
... a guide. sew using the following steps. Guide the edge of the fabric under the middle of the needle and over the edge on the next stroke. The needle should lie flat, not roll. Finish one stroke of the presser foot - Move needle position to the far right; Fabric: Firm woven fabric, 4" x 6" Needle: 80/12 Universal Needle Position: As directed in instructions BERNINA Presser Foot: Reverse Pattern Foot #1/1C/1D bernette Presser Foot: Zigzag/Universal Foot Select the Zigzag Stitch (width = 4, length = 2).
... a guide. sew using the following steps. Guide the edge of the fabric under the middle of the needle and over the edge on the next stroke. The needle should lie flat, not roll. Finish one stroke of the presser foot - Move needle position to the far right; Fabric: Firm woven fabric, 4" x 6" Needle: 80/12 Universal Needle Position: As directed in instructions BERNINA Presser Foot: Reverse Pattern Foot #1/1C/1D bernette Presser Foot: Zigzag/Universal Foot Select the Zigzag Stitch (width = 4, length = 2).
Operation Manual
Page 11
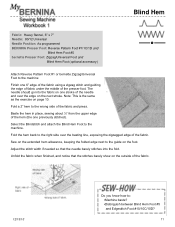
Blind Hem Fabric: Heavy flannel, 6" x 7" Needle: 80/12 Universal Needle Position: As programmed BERNINA Presser Foot: Reverse Pattern Foot #1/1C/1D and Blind Hem Foot #5 bernette Presser Foot: Zigzag/Universal Foot and Blind Hem Foot (optional accessory) Attach Reverse Pattern Foot #1 or bernette Zigzag/Universal Foot to the machine Finish one 6" edge of the fabric using a zigzag stitch and guiding the edge of fabric under the middle of the hem (the one stroke of the fabric. 12/13/10 Do you know how to: ▪Machine baste? ▪Distinguish between Blind Hem Foot #5 and...
Blind Hem Fabric: Heavy flannel, 6" x 7" Needle: 80/12 Universal Needle Position: As programmed BERNINA Presser Foot: Reverse Pattern Foot #1/1C/1D and Blind Hem Foot #5 bernette Presser Foot: Zigzag/Universal Foot and Blind Hem Foot (optional accessory) Attach Reverse Pattern Foot #1 or bernette Zigzag/Universal Foot to the machine Finish one 6" edge of the fabric using a zigzag stitch and guiding the edge of fabric under the middle of the hem (the one stroke of the fabric. 12/13/10 Do you know how to: ▪Machine baste? ▪Distinguish between Blind Hem Foot #5 and...
Operation Manual
Page 12
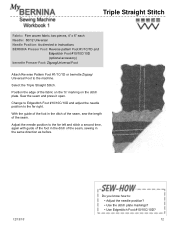
...of the seam, sew the length of the fabric on the ⅝" marking on the stitch plate. Position the edge of the seam. Adjust the needle position to : ▪ Adjust the needle position? ▪ Use the stitch plate markings? ▪ Use Edgestitch Foot #10/10C/10D? 12 Triple Straight Stitch Fabric: Firm woven fabric, two pieces, 4" x 6" each Needle: 80/12 Universal Needle Position: As directed in instructions BERNINA Presser Foot: Reverse pattern Foot #1/1C/1D and Edgestitch Foot #10/10C/10D (optional accessory) bernette Presser Foot: Zigzag/Universal Foot Attach Reverse Pattern Foot #1/1C...
...of the seam, sew the length of the fabric on the ⅝" marking on the stitch plate. Position the edge of the seam. Adjust the needle position to : ▪ Adjust the needle position? ▪ Use the stitch plate markings? ▪ Use Edgestitch Foot #10/10C/10D? 12 Triple Straight Stitch Fabric: Firm woven fabric, two pieces, 4" x 6" each Needle: 80/12 Universal Needle Position: As directed in instructions BERNINA Presser Foot: Reverse pattern Foot #1/1C/1D and Edgestitch Foot #10/10C/10D (optional accessory) bernette Presser Foot: Zigzag/Universal Foot Attach Reverse Pattern Foot #1/1C...
Operation Manual
Page 13
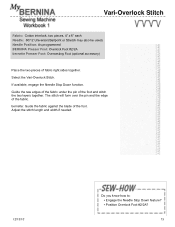
... the fabric. The stitch will form over the pin and the edge of the foot and stitch the two layers together. If available, engage the Needle Stop Down function. Vari-Overlock Stitch Fabric: Cotton interlock, two pieces, 4" x 6" each Needle: 80/12 Universal (Ballpoint or Stretch may also be used) Needle Position: As programmed BERNINA Presser Foot: Overlock Foot #2/2A bernette Presser Foot: Overcasting Foot (optional accessory) Place the two pieces of the foot. Adjust the stitch length...
... the fabric. The stitch will form over the pin and the edge of the foot and stitch the two layers together. If available, engage the Needle Stop Down function. Vari-Overlock Stitch Fabric: Cotton interlock, two pieces, 4" x 6" each Needle: 80/12 Universal (Ballpoint or Stretch may also be used) Needle Position: As programmed BERNINA Presser Foot: Overlock Foot #2/2A bernette Presser Foot: Overcasting Foot (optional accessory) Place the two pieces of the foot. Adjust the stitch length...
Operation Manual
Page 14
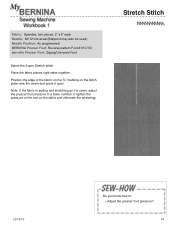
... presser foot pressure to a lower number to : ▪ Adjust the presser foot pressure? 14 Note: If the fabric is pulling and stretching as it open. Stretch Stitch 12/13/10 Do you know how to lighten the pressure of the fabric on the ⅝" marking on the fabric and eliminate the stretching. Fabric: Spandex, two pieces, 2" x 6" each Needle: 80/12 Universal (Ballpoint may also be used) Needle Position: As programmed BERNINA Presser Foot: Reverse pattern Foot #1/1C/1D bernette Presser Foot: Zigzag...
... presser foot pressure to a lower number to : ▪ Adjust the presser foot pressure? 14 Note: If the fabric is pulling and stretching as it open. Stretch Stitch 12/13/10 Do you know how to lighten the pressure of the fabric on the ⅝" marking on the fabric and eliminate the stretching. Fabric: Spandex, two pieces, 2" x 6" each Needle: 80/12 Universal (Ballpoint may also be used) Needle Position: As programmed BERNINA Presser Foot: Reverse pattern Foot #1/1C/1D bernette Presser Foot: Zigzag...
Operation Manual
Page 15
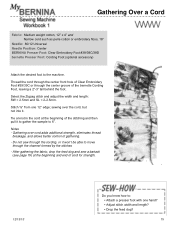
... hole of the stitching and then pull it won't be able to : ▪ Attach a presser foot with one 12" edge; Do not sew through the cording, or it to gather the sample to the machine. Gathering Over a Cord Fabric: Medium weight cotton, 12" x 4" and Narrow cord such as perle cotton or embroidery floss, 18" Needle: 80/12 Universal Needle Position: Center BERNINA Presser Foot: Clear Embroidery Foot #39/39C/39D bernette Presser Foot: Cording Foot (optional accessory) Attach...
... hole of the stitching and then pull it won't be able to : ▪ Attach a presser foot with one 12" edge; Do not sew through the cording, or it to gather the sample to the machine. Gathering Over a Cord Fabric: Medium weight cotton, 12" x 4" and Narrow cord such as perle cotton or embroidery floss, 18" Needle: 80/12 Universal Needle Position: Center BERNINA Presser Foot: Clear Embroidery Foot #39/39C/39D bernette Presser Foot: Cording Foot (optional accessory) Attach...
Operation Manual
Page 17
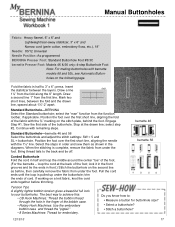
... Select the buttonhole and adjust the stitch settings: SW = 5 and SL = buttonhole. If working on the following page. Draw a second line 1" from under the buttonhole; Sew the first side of the bobbin case. • Rotary Hook Machines: Use the embroidery bobbin case and thread the "pigtail." • 8 Series Machines: Thread for buttonhole size? ▪ Select a buttonhole? ▪ Stitch a buttonhole? 12/13/10 17 select step #2. Position the foot over the first short line, aligning the needle with...
... Select the buttonhole and adjust the stitch settings: SW = 5 and SL = buttonhole. If working on the following page. Draw a second line 1" from under the buttonhole; Sew the first side of the bobbin case. • Rotary Hook Machines: Use the embroidery bobbin case and thread the "pigtail." • 8 Series Machines: Thread for buttonhole size? ▪ Select a buttonhole? ▪ Stitch a buttonhole? 12/13/10 17 select step #2. Position the foot over the first short line, aligning the needle with...
Operation Manual
Page 18
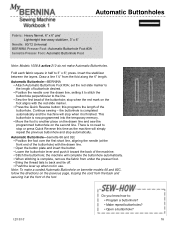
.... Automatic Buttonholes Fabric: Heavy flannel, 6" x 6" and Lightweight tear-away stabilizer, 3" x 6" Needle: 80/12 Universal BERNINA Presser Foot: Automatic Buttonhole Foot #3A bernette Presser Foot: Automatic Buttonhole Foot Note: Models 1008 & activa 210 do not make a corded Automatic Buttonhole on bernette models 66 and 92C, follow the directions on the previous page, looping the cord from the back and securing it to stitch the buttonhole perpendicular to the line. ▪ Sew the first bead of the buttonhole; this time...
.... Automatic Buttonholes Fabric: Heavy flannel, 6" x 6" and Lightweight tear-away stabilizer, 3" x 6" Needle: 80/12 Universal BERNINA Presser Foot: Automatic Buttonhole Foot #3A bernette Presser Foot: Automatic Buttonhole Foot Note: Models 1008 & activa 210 do not make a corded Automatic Buttonhole on bernette models 66 and 92C, follow the directions on the previous page, looping the cord from the back and securing it to stitch the buttonhole perpendicular to the line. ▪ Sew the first bead of the buttonhole; this time...
Operation Manual
Page 19
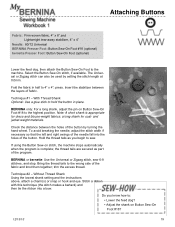
..., 4" x 4" Needle: 80/12 Universal BERNINA Presser Foot: Button Sew-On Foot #18 (optional) bernette Presser Foot: Button Sew-On Foot (optional) Lower the feed dog, then attach the Button Sew-On Foot to sew. Stitch a ribbon with this technique (the stitch makes a bartack) and then tie the ribbon into the holes of the needle fall into a bow. BERNINA only: For a long shank, adjust the pin on stitch, the machine stops automatically when the program is appropriate for coat- If using the Button Sew-on Button Sew-On Foot...
..., 4" x 4" Needle: 80/12 Universal BERNINA Presser Foot: Button Sew-On Foot #18 (optional) bernette Presser Foot: Button Sew-On Foot (optional) Lower the feed dog, then attach the Button Sew-On Foot to sew. Stitch a ribbon with this technique (the stitch makes a bartack) and then tie the ribbon into the holes of the needle fall into a bow. BERNINA only: For a long shank, adjust the pin on stitch, the machine stops automatically when the program is appropriate for coat- If using the Button Sew-on Button Sew-On Foot...
Operation Manual
Page 20
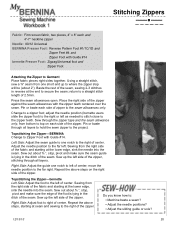
... zipper Needle: 80/12 Universal BERNINA Presser Foot: Reverse Pattern Foot #1/1C/1D and Zipper Feet #4 and Zipper Foot with Guide #14. Baste the rest of the zipper against the seam allowances with the zipper teeth centered over the seam. Place the right side of the seam, sewing 2-3 stitches in the ditch of center; Adjust the needle position to Garment Place fabric pieces right sides together. Sew out about ⅜ ", stop , pivot and make sure the seam guide is...
... zipper Needle: 80/12 Universal BERNINA Presser Foot: Reverse Pattern Foot #1/1C/1D and Zipper Feet #4 and Zipper Foot with Guide #14. Baste the rest of the zipper against the seam allowances with the zipper teeth centered over the seam. Place the right side of the seam, sewing 2-3 stitches in the ditch of center; Adjust the needle position to Garment Place fabric pieces right sides together. Sew out about ⅜ ", stop , pivot and make sure the seam guide is...
Operation Manual
Page 21
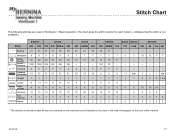
... the stitch number for each model (-- Stitch Chart The following stitches are indicated on the chart in Workbook 1: Basic Operation. Basting 830 820 730 640 635LE 630 21 21 21 21 30 30 Blindstitch 9 9 9 9 9 9 Button Sew-On 60 60 60 60 60 60 Quilter's Securing 1324 1324 324 324 324 324 Securing 5 5 5 5 5 5 Standard Buttonhole 51 51 51 51 51 51 Straight 1 1 1 1 1 1 Stretch...
... the stitch number for each model (-- Stitch Chart The following stitches are indicated on the chart in Workbook 1: Basic Operation. Basting 830 820 730 640 635LE 630 21 21 21 21 30 30 Blindstitch 9 9 9 9 9 9 Button Sew-On 60 60 60 60 60 60 Quilter's Securing 1324 1324 324 324 324 324 Securing 5 5 5 5 5 5 Standard Buttonhole 51 51 51 51 51 51 Straight 1 1 1 1 1 1 Stretch...
Operation Manual
Page 23
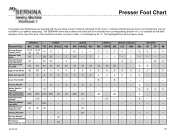
... -- 9 Button Sew-On Foot #18 18 -- 18 -- -- -- BERNINA Stitch Regulator #42 42 42 42 -- -- -- Freemotion Couching Foot #43 -- -- -- -- 43 -- X 20 -- 20 -- -- X X -- -- -- -- -- -- -- -- -- -- -- -- -- -- 46 X -X -X ---X ------- 23 Presser Foot Chart The presser feet listed below are listed and if the bernette has a corresponding presser foot, it is indicated by the letter stamped on soles. X -- -- -- -- -- Presser Feet Reverse Pattern Foot #1/1C/1D Overlock Foot #2/2A Standard Buttonhole Foot #3/3C Auto Buttonhole Foot #3A Zipper Foot #4/4D...
... -- 9 Button Sew-On Foot #18 18 -- 18 -- -- -- BERNINA Stitch Regulator #42 42 42 42 -- -- -- Freemotion Couching Foot #43 -- -- -- -- 43 -- X 20 -- 20 -- -- X X -- -- -- -- -- -- -- -- -- -- -- -- -- -- 46 X -X -X ---X ------- 23 Presser Foot Chart The presser feet listed below are listed and if the bernette has a corresponding presser foot, it is indicated by the letter stamped on soles. X -- -- -- -- -- Presser Feet Reverse Pattern Foot #1/1C/1D Overlock Foot #2/2A Standard Buttonhole Foot #3/3C Auto Buttonhole Foot #3A Zipper Foot #4/4D...


