
Manual
Page 2
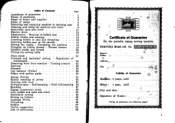
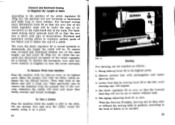
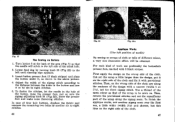
... shuttle 16 Setting the needle - Removal of guarantee on buttons 46 Applique Works 47 Pintucking 48 Ruffler 50 Useful suggestions 51 List of accessories 56 Certificate of Guarantee for the portable zigzag Sewing machine BERNINA Model 125 No. • Bayer's Nam*: Address R=332n7.-.Eikr • A: City Validity of Guarantee Ma4ilne: 2 years, until Motor : 1 year, until -- •:City and date : Signature of Dealer: (tense of bobbin case 13 Bobbin winder and winding 14 Inserting bobbin...
... shuttle 16 Setting the needle - Removal of guarantee on buttons 46 Applique Works 47 Pintucking 48 Ruffler 50 Useful suggestions 51 List of accessories 56 Certificate of Guarantee for the portable zigzag Sewing machine BERNINA Model 125 No. • Bayer's Nam*: Address R=332n7.-.Eikr • A: City Validity of Guarantee Ma4ilne: 2 years, until Motor : 1 year, until -- •:City and date : Signature of Dealer: (tense of bobbin case 13 Bobbin winder and winding 14 Inserting bobbin...
Manual
Page 3
... machine properly, according to the directions for the motor, we engage to repair free of charge any change or repair is made by inconvenient packing. The buyer who intends to have repaired the machine,...Bernina Sewing Machine Factory STECKBORN Switzerland 2 ■user of the machine does not fall under the guarantee. Terms of Guarantee During the period of two years for the machine and one year for use, if he does not clean and oil it to the nearest Bernina dealer. The guarantee is necessary to use only pure sewing machine oil free of acid and resinous substances, and needles...
... machine properly, according to the directions for the motor, we engage to repair free of charge any change or repair is made by inconvenient packing. The buyer who intends to have repaired the machine,...Bernina Sewing Machine Factory STECKBORN Switzerland 2 ■user of the machine does not fall under the guarantee. Terms of Guarantee During the period of two years for the machine and one year for use, if he does not clean and oil it to the nearest Bernina dealer. The guarantee is necessary to use only pure sewing machine oil free of acid and resinous substances, and needles...
Manual
Page 7
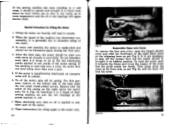
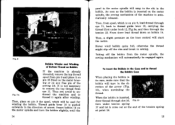
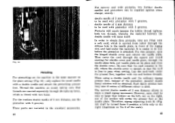
... the motor only. 10 Fig. 6 Removable Open Arm Cover To remove the free arm cover, open the hinged shuttle cover and with the forefinger of the motor casing. To reset the cover, push it can warm up to excessive oiling of the motor. 3. Fig. 6a 11 Special Instruction for oiling apply to any other part of the cover into the two bearings at its highest position. Do not introduce more than 4-5 drops of oil at...
... the motor only. 10 Fig. 6 Removable Open Arm Cover To remove the free arm cover, open the hinged shuttle cover and with the forefinger of the motor casing. To reset the cover, push it can warm up to excessive oiling of the motor. 3. Fig. 6a 11 Special Instruction for oiling apply to any other part of the cover into the two bearings at its highest position. Do not introduce more than 4-5 drops of oil at...
Manual
Page 8
... -up lever is switched on and off by the flex, slight pressure on the knee control will be ascertained by a casing at its highest position. to insert it, screw it anticlockwise; The more the knee control is protected by inspecting the particulars quoted on the electricity meter or a bulb (but not on plugs and wall-sockets). Then, open the hinged shuttle cover...
... -up lever is switched on and off by the flex, slight pressure on the knee control will be ascertained by a casing at its highest position. to insert it, screw it anticlockwise; The more the knee control is protected by inspecting the particulars quoted on the electricity meter or a bulb (but not on plugs and wall-sockets). Then, open the hinged shuttle cover...
Manual
Page 9
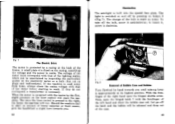
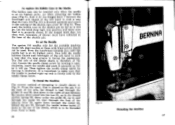
... direction of arrow. Never wind bobbin quite full, otherwise the thread might slip off the bobbin from the motor spindle, the sewing mechanism will start the motor. From there lead thread down on bobbin 14, Then, a slight pressure on the knee control will automatically be used for winding the bobbin. Thread guide lever 10 is automatically released. 11) Fig. 9 Bobbin Winder and Winding of Bottom Thread on Bobbin Fig. 9 a If the machine is on pin 9, lead thread through the tension...
... direction of arrow. Never wind bobbin quite full, otherwise the thread might slip off the bobbin from the motor spindle, the sewing mechanism will start the motor. From there lead thread down on bobbin 14, Then, a slight pressure on the knee control will automatically be used for winding the bobbin. Thread guide lever 10 is automatically released. 11) Fig. 9 Bobbin Winder and Winding of Bottom Thread on Bobbin Fig. 9 a If the machine is on pin 9, lead thread through the tension...
Manual
Page 10
... is important to the right of and between thumb and forefinger of threading is clearly shown in Fig. 11. As when removing the bobbin case (Fig. 8), hold the needle between the tension discs closed . To set the Needle Use system 705 needles only for the portable machine model 125. To replace the Bobbin Case in the Shuttle The bobbin case can be inserted only when the needle is at the rear.
... is important to the right of and between thumb and forefinger of threading is clearly shown in Fig. 11. As when removing the bobbin case (Fig. 8), hold the needle between the tension discs closed . To set the Needle Use system 705 needles only for the portable machine model 125. To replace the Bobbin Case in the Shuttle The bobbin case can be inserted only when the needle is at the rear.
Manual
Page 11
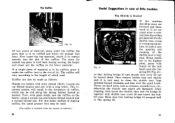
... of sizes 8, 9 and 10 (80, 90 and 100) are usually employed, while numbers 7 and 8 (70 and 80) are used for cleaning. 18 Suitable Needle and Thread For the portable machine model 125 use first class needles and top-quality thread. For ordinary sewing set the pointer again on the demarcation line, as well as when the tension should have been changed by turning the tension nut. Sewing Thread 6-Ply...
... of sizes 8, 9 and 10 (80, 90 and 100) are usually employed, while numbers 7 and 8 (70 and 80) are used for cleaning. 18 Suitable Needle and Thread For the portable machine model 125 use first class needles and top-quality thread. For ordinary sewing set the pointer again on the demarcation line, as well as when the tension should have been changed by turning the tension nut. Sewing Thread 6-Ply...
Manual
Page 12
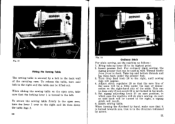
.... Insert presser foot. Turn drop feed knob 28 to back. Thread needle from front to the right, until sewing sign will do plain sewing. BERNINA Fig. 11 (5) (1) Fitting the Sewing Table The sewing table is secured by arrow. 21 Adjust stitch regulator 29 so that is in which case the machine will appear. 4. To secure the sewing table firmly to the back wall of the carrying case. Insert sewing table. When sliding the sewing table on...
.... Insert presser foot. Turn drop feed knob 28 to back. Thread needle from front to the right, until sewing sign will do plain sewing. BERNINA Fig. 11 (5) (1) Fitting the Sewing Table The sewing table is secured by arrow. 21 Adjust stitch regulator 29 so that is in which case the machine will appear. 4. To secure the sewing table firmly to the back wall of the carrying case. Insert sewing table. When sliding the sewing table on...
Manual
Page 13
The more the stitch regulator 29 is still in motion without the sewing table in position, according to the kind of fabric to be set the machine as a pivot. 22 BERNINA. f Fig. 16 Darning For darning, set in the cloth, lift the presser foot and turn the fabric round the needle, using it as follows 1. Forward and backward sewing allows to reinforce certain parts of the fabric and to its highest point...
The more the stitch regulator 29 is still in motion without the sewing table in position, according to the kind of fabric to be set the machine as a pivot. 22 BERNINA. f Fig. 16 Darning For darning, set in the cloth, lift the presser foot and turn the fabric round the needle, using it as follows 1. Forward and backward sewing allows to reinforce certain parts of the fabric and to its highest point...
Manual
Page 17
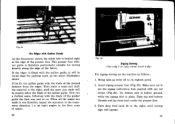
... presser foot. Insert zigzag presser foot (Fig. 28). BERNINA S Fig. 21 The Edger with Outlier Guide As the illustration shows, the stitch hole is located right at the desired distance from the edger. First fix the quilter guide with the blade at the edge of seams. 30 Fig. 22 Zigzag Sewing (Use only 2 or 2 ply cotton, never 6 ply) For zigzag sewing set the machine as the above illustration shows. This presser foot...
... presser foot. Insert zigzag presser foot (Fig. 28). BERNINA S Fig. 21 The Edger with Outlier Guide As the illustration shows, the stitch hole is located right at the desired distance from the edger. First fix the quilter guide with the blade at the edge of seams. 30 Fig. 22 Zigzag Sewing (Use only 2 or 2 ply cotton, never 6 ply) For zigzag sewing set the machine as the above illustration shows. This presser foot...
Manual
Page 18
... in the direction of the cloth (Fig. The Elastic Mending of Jersey fat manner: Cut out the piece for mending according to the desired width of the piece • for mending is stitched in the di- fluous part of the stitch. Turn zigzag adjusting knob 31 to the right, from 0-4, according to the desired form and size. Insert sewing table. Fix the...
... in the direction of the cloth (Fig. The Elastic Mending of Jersey fat manner: Cut out the piece for mending according to the desired width of the piece • for mending is stitched in the di- fluous part of the stitch. Turn zigzag adjusting knob 31 to the right, from 0-4, according to the desired form and size. Insert sewing table. Fix the...

Manual
Page 19
... bottom threads use the patented wool darning foot. Lower feed dog by sewing zigzag seams across them . Such rows are drawn over the open arm without using the darning apparatus for stockings. Let project the end of the wool about half an inch beyond the rear border of each other , by sewing zigzag seams across them , as shown in two operations, namely: 1. from side to right and in motion...
... bottom threads use the patented wool darning foot. Lower feed dog by sewing zigzag seams across them . Such rows are drawn over the open arm without using the darning apparatus for stockings. Let project the end of the wool about half an inch beyond the rear border of each other , by sewing zigzag seams across them , as shown in two operations, namely: 1. from side to right and in motion...

Manual
Page 20
.... 1 and zigzag adjusting knob 31 on and along this kind of the presser foot and oversew the cord with zigzag stitch. Fig. 25 cerized cotton No. 50,2 ❑r 60,2. ton, coloured braid or by making a long stitch. 36 The Braiding For this zigzag seam cut the superfluous part of its edge, so that the stitch hole is obtained by a very tight needle thread tension and by sewing some rows...
.... 1 and zigzag adjusting knob 31 on and along this kind of the presser foot and oversew the cord with zigzag stitch. Fig. 25 cerized cotton No. 50,2 ❑r 60,2. ton, coloured braid or by making a long stitch. 36 The Braiding For this zigzag seam cut the superfluous part of its edge, so that the stitch hole is obtained by a very tight needle thread tension and by sewing some rows...
Manual
Page 23
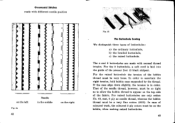
... normal thread tension. In order to appear on the right Fig. 35 The Buttonhole Sewing We distinguish three types of the needle thread, however, must be so tight as needle thread, whereas the bobbin thread must be very loose. Ornamental Stitches made with different needle position P i 1 ,AiI A • A • i A $ ii • i : I Ai i A, ii • IP la II II I1 - For the raised buttonhole the tension of the presser foot...
... normal thread tension. In order to appear on the right Fig. 35 The Buttonhole Sewing We distinguish three types of the needle thread, however, must be so tight as needle thread, whereas the bobbin thread must be very loose. Ornamental Stitches made with different needle position P i 1 ,AiI A • A • i A $ ii • i : I Ai i A, ii • IP la II II I1 - For the raised buttonhole the tension of the presser foot...
Manual
Page 25
... the zigzag seam. Adjust the width of the scrap to eight stitches. 46 Fig. 38 Fig. 3$ a Applique Works (Use left position of needle) By sewing on scraps of cloth or tulle of the button, raise the presser foot, put it on Buttons I. Lower feed dog by six to the distance between the holes in the above picture. 4. Turn button 5 at the back of the arm (Fig. 7) so that of the zigzag stitch...
... the zigzag seam. Adjust the width of the scrap to eight stitches. 46 Fig. 38 Fig. 3$ a Applique Works (Use left position of needle) By sewing on scraps of cloth or tulle of the button, raise the presser foot, put it on Buttons I. Lower feed dog by six to the distance between the holes in the above picture. 4. Turn button 5 at the back of the arm (Fig. 7) so that of the zigzag stitch...
Manual
Page 26
... opening for plain sewing (Fig. 14) ; For the medium double needle of 4 mm distance to do this purpose, open the hinged shuttle cover and remove the needle plate. When using a double needle and the ordinary zigzag presser foot, instead of the pintucker, parallel double fancy stitches will be used with pintucker with 7 grooves, double needle of 3 mm distance, use the pintucker with a double needle and attach the pintucking presser foot. Then carry the cord through the take-up lever...
... opening for plain sewing (Fig. 14) ; For the medium double needle of 4 mm distance to do this purpose, open the hinged shuttle cover and remove the needle plate. When using a double needle and the ordinary zigzag presser foot, instead of the pintucker, parallel double fancy stitches will be used with pintucker with 7 grooves, double needle of 3 mm distance, use the pintucker with a double needle and attach the pintucking presser foot. Then carry the cord through the take-up lever...
Manual
Page 27
... lower the presser foot lever. Then, with thick thread (30.16). In such a case the opening and cleaning of ruffles, which is held back during sewing, the larger and closer are the ruffles on the fabric, using a normal top and bottom thread tension and a normal thread size. Then remove bobbin case and shuttle and it is to be slid along the strong bottom thread as desired. Loosen the top thread tension and sew...
... lower the presser foot lever. Then, with thick thread (30.16). In such a case the opening and cleaning of ruffles, which is held back during sewing, the larger and closer are the ruffles on the fabric, using a normal top and bottom thread tension and a normal thread size. Then remove bobbin case and shuttle and it is to be slid along the strong bottom thread as desired. Loosen the top thread tension and sew...
Manual
Page 28
... pressure on bobbin. Needle size is too tight. Thread passages are visible. The need repolishing. When replacing the hand wheel, be exchanged. Thread control spring No. 22, Fig. 11 is not inserted correctly. Bottom thread not properly wound on the kneelever the motor is necessary to be exchanged without any difficulty. Needle is broken. Long groove in motion, but not the machine. For changing the belts, remove the cover plate...
... pressure on bobbin. Needle size is too tight. Thread passages are visible. The need repolishing. When replacing the hand wheel, be exchanged. Thread control spring No. 22, Fig. 11 is not inserted correctly. Bottom thread not properly wound on the kneelever the motor is necessary to be exchanged without any difficulty. Needle is broken. Long groove in motion, but not the machine. For changing the belts, remove the cover plate...
Manual
Page 29
... thread used . Use of resin and acid and got sticky. If the sewing machine has been standing in a cold room, it should be opened and brought in the shuttle race. Top thread tension is bent. If the material is removed towards the operator, it happens frequently that is used . One knot only may break the needle and in the bearings will touch the throat plate...
... thread used . Use of resin and acid and got sticky. If the sewing machine has been standing in a cold room, it should be opened and brought in the shuttle race. Top thread tension is bent. If the material is removed towards the operator, it happens frequently that is used . One knot only may break the needle and in the bearings will touch the throat plate...
Manual
Page 30
... roll hemming 1 button presser foot 2 red stripes 2 black stripes 1 buttonhole presser foot 3 black stripes 1 1 buttonhole cutter wooden block } or seam snipper 1 darning foot 1 wool darning foot 6 bobbins, of which one in the bobbin case 1 small screwdriver 1 large screwdriver 1 oil can 1 small brush 1 darning apparatus for stockings 1 packet of needles, system 705, assorted 1 twin needle for pintucking 1 pintucker with 5 grooves 5924 5663 In the Carrying Case : 1 sewing table 1 current supply cord with plug 1 instruction book Against Extra-Charge : 851 presser foot...
... roll hemming 1 button presser foot 2 red stripes 2 black stripes 1 buttonhole presser foot 3 black stripes 1 1 buttonhole cutter wooden block } or seam snipper 1 darning foot 1 wool darning foot 6 bobbins, of which one in the bobbin case 1 small screwdriver 1 large screwdriver 1 oil can 1 small brush 1 darning apparatus for stockings 1 packet of needles, system 705, assorted 1 twin needle for pintucking 1 pintucker with 5 grooves 5924 5663 In the Carrying Case : 1 sewing table 1 current supply cord with plug 1 instruction book Against Extra-Charge : 851 presser foot...


