
Manual
Page 1
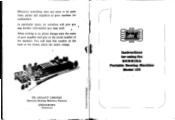
When writing to be quite clear, please ask suppliers of your supplier and give you any further information you may need. GEGAUF LIMITED Bernina Sewing Machine Factory STECKBORN Switzerland I Instructions for explanation. In particular cases, we ourselves will find this number at the back of the frame, above the motor casing. %It FR. You will give us , please always state the name of your machine for using the BERNINA Portable Sewing Machine Model 125 Whenever something does not seem to us the serial number of the machine.
When writing to be quite clear, please ask suppliers of your supplier and give you any further information you may need. GEGAUF LIMITED Bernina Sewing Machine Factory STECKBORN Switzerland I Instructions for explanation. In particular cases, we ourselves will find this number at the back of the frame, above the motor casing. %It FR. You will give us , please always state the name of your machine for using the BERNINA Portable Sewing Machine Model 125 Whenever something does not seem to us the serial number of the machine.
Manual
Page 2
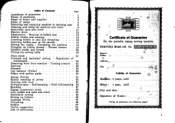
... buttons 46 Applique Works 47 Pintucking 48 Ruffler 50 Useful suggestions 51 List of accessories 56 Certificate of Guarantee for the portable zigzag Sewing machine BERNINA Model 125 No. • Bayer's Nam*: Address R=332n7.-.Eikr • A: City Validity of Guarantee Ma4ilne: 2 years, until Motor : 1 year, until -- •:City and date : Signature of Dealer: (...
... buttons 46 Applique Works 47 Pintucking 48 Ruffler 50 Useful suggestions 51 List of accessories 56 Certificate of Guarantee for the portable zigzag Sewing machine BERNINA Model 125 No. • Bayer's Nam*: Address R=332n7.-.Eikr • A: City Validity of Guarantee Ma4ilne: 2 years, until Motor : 1 year, until -- •:City and date : Signature of Dealer: (...
Manual
Page 3
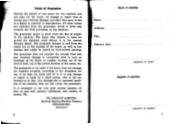
... expense of the buyer, as well as breakage of the flexes or needles, burning out of the electric bulb, use only pure sewing machine oil free of acid and resinous substances, and needles of system 705. The guarantee is not valid if the buyer does not manage the.... Name: Address: City: Delivery date: (signature of supplier) The buyer who is not authorized to use of the carbon brushes of machine ! GEGAUF LIMITED Bernina Sewing Machine Factory STECKBORN Switzerland 2 ■user of the motor, etc. The guarantee does not consider the normal wear and any eventual damage in connection...
... expense of the buyer, as well as breakage of the flexes or needles, burning out of the electric bulb, use only pure sewing machine oil free of acid and resinous substances, and needles of system 705. The guarantee is not valid if the buyer does not manage the.... Name: Address: City: Delivery date: (signature of supplier) The buyer who is not authorized to use of the carbon brushes of machine ! GEGAUF LIMITED Bernina Sewing Machine Factory STECKBORN Switzerland 2 ■user of the motor, etc. The guarantee does not consider the normal wear and any eventual damage in connection...
Manual
Page 4
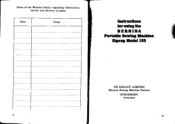
GEGAUF LIMITED Bernina Sewing Machine Factory STECKBORN Switzerland 4 5 Notes of the Bernina Dealer regarding instructions, service and delivery of parts Date Notes Instructions forusing the BERNINA Portable Sewing Machine Zigzag Model 125 FR.
GEGAUF LIMITED Bernina Sewing Machine Factory STECKBORN Switzerland 4 5 Notes of the Bernina Dealer regarding instructions, service and delivery of parts Date Notes Instructions forusing the BERNINA Portable Sewing Machine Zigzag Model 125 FR.
Manual
Page 6
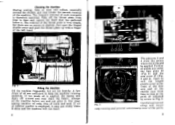
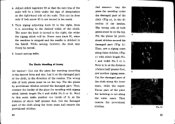
Take off unused and may stain the fabric. Use clear sewing machine oil only, free of the left hand. Further oil points are sufficient to slacken. Open as well the hinged shuttle cover at the point 49 ... may hinder the smooth running of the free arm and oil the shuttle race from time to time at the front of the machine. If oil of the parts. 9 b. Fig. Cleaning the Machine During sewing, lints or dust will collect, especially around the shuttle, arid may get sticky when it dries and the...
Take off unused and may stain the fabric. Use clear sewing machine oil only, free of the left hand. Further oil points are sufficient to slacken. Open as well the hinged shuttle cover at the point 49 ... may hinder the smooth running of the free arm and oil the shuttle race from time to time at the front of the machine. If oil of the parts. 9 b. Fig. Cleaning the Machine During sewing, lints or dust will collect, especially around the shuttle, arid may get sticky when it dries and the...
Manual
Page 7
If the sewing machine has been standing in a cold room, it should be opened and brought in a...room temperature and the oil in its casing. When the speed of the machine has diminished considerably, it is generally due to excessive oiling of clear sewing machine oil into the guide inside of the base plate the two small nickel-plated... Motor 1. Do not introduce more than 4-5 drops of oil at the two lubrication points marked in red. 7. If the machine is insufficiently lubricated, an excessive noise will lock the cover. For this purpose, remove on the releasing lever as per Fig....
If the sewing machine has been standing in a cold room, it should be opened and brought in a...room temperature and the oil in its casing. When the speed of the machine has diminished considerably, it is generally due to excessive oiling of clear sewing machine oil into the guide inside of the base plate the two small nickel-plated... Motor 1. Do not introduce more than 4-5 drops of oil at the two lubrication points marked in red. 7. If the machine is insufficiently lubricated, an excessive noise will lock the cover. For this purpose, remove on the releasing lever as per Fig....
Manual
Page 8
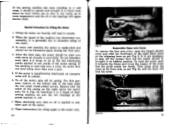
... voltage with that of the lighting mains, which can be released and drop out of the case. 13 If the machine is protected by a casing at its highest position. Should the machine fail to work. to insert it, screw it anticlockwise; Then, open the hinged shuttle cover. When the motor is built... the forefinger of the right hand open the hinged latch 7 with the forefinger of the left hand and draw the bobbin case out. ) Illumination The sew-light is connected with the mains by the flex, slight pressure on the knee control will start on account of heavy material or thick seams...
... voltage with that of the lighting mains, which can be released and drop out of the case. 13 If the machine is protected by a casing at its highest position. Should the machine fail to work. to insert it, screw it anticlockwise; Then, open the hinged shuttle cover. When the motor is built... the forefinger of the right hand open the hinged latch 7 with the forefinger of the left hand and draw the bobbin case out. ) Illumination The sew-light is connected with the mains by the flex, slight pressure on the knee control will start on account of heavy material or thick seams...
Manual
Page 9
... motor. Insert bobbin 14 on the motor spindle and turn in the bobbin. As soon as the bobbin is inserted on the motor spindle, the sewing mechanism of the tension spring at point 18. 15 Taking off the rim and break in the direction of arrow. When the bobbin is inserted... then through slot 16, Fig. 10 then under tension spring 17 and let is come out at the end of the machine is automatically released. It is pushed outwards in sewing. Thus you avoid to remove the top thread from eye 11. Thread guide lever 10 is not necessary to un- Never...
... motor. Insert bobbin 14 on the motor spindle and turn in the bobbin. As soon as the bobbin is inserted on the motor spindle, the sewing mechanism of the tension spring at point 18. 15 Taking off the rim and break in the direction of arrow. When the bobbin is inserted... then through slot 16, Fig. 10 then under tension spring 17 and let is come out at the end of the machine is automatically released. It is pushed outwards in sewing. Thus you avoid to remove the top thread from eye 11. Thread guide lever 10 is not necessary to un- Never...
Manual
Page 11
...100) are usually employed, while numbers 7 and 8 (70 and 80) are used for cleaning. 18 Suitable Needle and Thread For the portable machine model 125 use first class needles and top-quality thread. and 6-ply, unglazed. Only for special works the tension may be changed for darning. For...ply. To decrease the tension, turn the nut over to the left hand and turn flywheel with a pointer and a demarcation line. For zigzag sewing: Nos. 60 to the table below. New No. Bringing up . Then pull slightly the needle thread and the bobbin thread will seldom be ...
...100) are usually employed, while numbers 7 and 8 (70 and 80) are used for cleaning. 18 Suitable Needle and Thread For the portable machine model 125 use first class needles and top-quality thread. and 6-ply, unglazed. Only for special works the tension may be changed for darning. For...ply. To decrease the tension, turn the nut over to the left hand and turn flywheel with a pointer and a demarcation line. For zigzag sewing: Nos. 60 to the table below. New No. Bringing up . Then pull slightly the needle thread and the bobbin thread will seldom be ...
Manual
Page 12
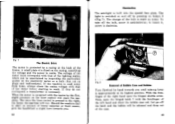
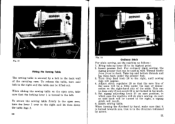
...Turn drop feed knob 28 to the right, a zigzag stitch will result. 6. For ordinary plain sewing, the zigzag presser foot can be done only if lock screw 30 is not turned in which case the machine will be lifted out. Set zigzag adjusting knob 31 on the right-hand side of demarcation...sign of the scale. To release the table, turn the lever 1 over to the back wall of the scale will do plain sewing. BERNINA Fig. 11 (5) (1) Fitting the Sewing Table The sewing table is secured by a bolt to the right and let then down the table legs 2. 20 Fig. 14 Ordinary Stitch For plain...
...Turn drop feed knob 28 to the right, a zigzag stitch will result. 6. For ordinary plain sewing, the zigzag presser foot can be done only if lock screw 30 is not turned in which case the machine will be lifted out. Set zigzag adjusting knob 31 on the right-hand side of demarcation...sign of the scale. To release the table, turn the lever 1 over to the back wall of the scale will do plain sewing. BERNINA Fig. 11 (5) (1) Fitting the Sewing Table The sewing table is secured by a bolt to the right and let then down the table legs 2. 20 Fig. 14 Ordinary Stitch For plain...
Manual
Page 13
...sewing...of the fabric and pull it from Machine Stop the machine with the lifter, which the upward ...the stitch regulator 29 (Fig.14), the machine will sew forwards or backwards and make long or short ... sewing move downwards knob 29 so that the zero line is still in motion without the sewing ... at its highest point. 2. Forward and Backward Sewing To Regulate the Length of Stitch According to the...stitches and thread breakage. Forward and backward sewing allows to reinforce certain parts of the ...foot. 3. To Turn a Corner Stop the machine while the needle is above said lock screw inward...
...sewing...of the fabric and pull it from Machine Stop the machine with the lifter, which the upward ...the stitch regulator 29 (Fig.14), the machine will sew forwards or backwards and make long or short ... sewing move downwards knob 29 so that the zero line is still in motion without the sewing ... at its highest point. 2. Forward and Backward Sewing To Regulate the Length of Stitch According to the...stitches and thread breakage. Forward and backward sewing allows to reinforce certain parts of the ...foot. 3. To Turn a Corner Stop the machine while the needle is above said lock screw inward...
Manual
Page 17
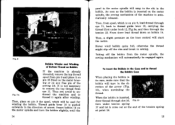
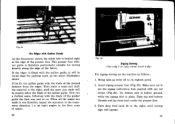
BERNINA S Fig. 21 The Edger with Outlier Guide As the illustration shows, the stitch hole is located right at the edge of the fabric. First fix the quilter guide with the blade of seams. 30 Fig. 22 Zigzag Sewing (Use only 2 or 2 ply cotton, never 6 ply) For zigzag sewing set the machine as the above... the first one, and so on. at the desired distance from the edger. Turn drop feed knob 28 to the right, until sewing sign will be found ideal for sewing directly along the edge of the presser foot. Then make a seam and shift the material to the right, until the seam just...
BERNINA S Fig. 21 The Edger with Outlier Guide As the illustration shows, the stitch hole is located right at the edge of the fabric. First fix the quilter guide with the blade of seams. 30 Fig. 22 Zigzag Sewing (Use only 2 or 2 ply cotton, never 6 ply) For zigzag sewing set the machine as the above... the first one, and so on. at the desired distance from the edger. Turn drop feed knob 28 to the right, until sewing sign will be found ideal for sewing directly along the edge of the presser foot. Then make a seam and shift the material to the right, until the seam just...
Manual
Page 18
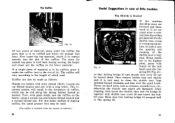
... regulator 29 so that the zero line of the scale will he. Never turn knob 31, when the machine is stopped and the needle is turned to it , at the distance of about half presser foot, b sew another one inside of it , at the distance of the cloth, in too much. 5. While... pieces by provisional stitches around the damaged part (Fig. c) with zigzag stitch (stitch length No. 1 and width No. 3 or 4). Then remove the provisional stitches. Then, sew a zigzag seam along the outer seam. Cut the damaged part of the meshes. Fix the pieces by provi- Insert...
... regulator 29 so that the zero line of the scale will he. Never turn knob 31, when the machine is stopped and the needle is turned to it , at the distance of about half presser foot, b sew another one inside of it , at the distance of the cloth, in too much. 5. While... pieces by provisional stitches around the damaged part (Fig. c) with zigzag stitch (stitch length No. 1 and width No. 3 or 4). Then remove the provisional stitches. Then, sew a zigzag seam along the outer seam. Cut the damaged part of the meshes. Fix the pieces by provi- Insert...

Manual
Page 19
F . 24 Set the machine as when darning underwear, etc. Set stitch regulator lever 29 (Fig.22) on zero 34...forwards and backwards. Let project the end of the wool about half an inch beyond the rear border of each other , by sewing zigzag seams across them . As soon as close one run , when changing direction, the zigzag stitch will be set in motion .... For top and bottom threads use the patented wool darning foot. Begin at the darning foot. Lower feed dog by sewing zigzag seams across them , as possible. For this purpose, the fabric is cut off at the left until darning sign...
F . 24 Set the machine as when darning underwear, etc. Set stitch regulator lever 29 (Fig.22) on zero 34...forwards and backwards. Let project the end of the wool about half an inch beyond the rear border of each other , by sewing zigzag seams across them . As soon as close one run , when changing direction, the zigzag stitch will be set in motion .... For top and bottom threads use the patented wool darning foot. Begin at the darning foot. Lower feed dog by sewing zigzag seams across them , as possible. For this purpose, the fabric is cut off at the left until darning sign...
Manual
Page 21
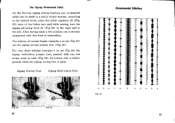
r The Zigzag Ornamental Stitch On the Bernina zigzag sewing machine any ornamental stitch can be used (Fig. 29). Zigzag Sewing Foot Zigzag Embroidery Foot Ornamental Stitches Fig. 28 38 Fig. 29 a ba h a Fig 50 a ba b a 39 For stitches of embroidery. According to the desired stitch, ...
r The Zigzag Ornamental Stitch On the Bernina zigzag sewing machine any ornamental stitch can be used (Fig. 29). Zigzag Sewing Foot Zigzag Embroidery Foot Ornamental Stitches Fig. 28 38 Fig. 29 a ba h a Fig 50 a ba b a 39 For stitches of embroidery. According to the desired stitch, ...
Manual
Page 26
...in the needle plate, in the same manner as usual, taking care that the cord is carried from 0 position a little only to pass when sewing. Lay the cord back under the material. For the medium double needle of 2 mm distance allows to make a small zigzag movement. Therefore, ...slot, and laid under the presser foot, together with a double needle and attach the pintucking presser foot. I9 Pinfucking For pintucking set the machine in front of the pintucker, parallel double fancy stitches will raise itself. These parts are carried separately through the take-up lever, which ...
...in the needle plate, in the same manner as usual, taking care that the cord is carried from 0 position a little only to pass when sewing. Lay the cord back under the material. For the medium double needle of 2 mm distance allows to make a small zigzag movement. Therefore, ...slot, and laid under the presser foot, together with a double needle and attach the pintucking presser foot. I9 Pinfucking For pintucking set the machine in front of the pintucker, parallel double fancy stitches will raise itself. These parts are carried separately through the take-up lever, which ...
Manual
Page 27
...the ruffler. After cleaning, first insert the shuttle, then lock the bridge 51 together with a long stitch. Loosen the top thread tension and sew with shuttle race cover 52 and insert the bob- This incorrect tension will vary according to be slid along the strong bottom thread as scissors... little troubles The Shuttle is now easy to its highest point, press with plain stitch, sew the ruffles on the lower material. Then, with Fig. 41 thumb of it is blocked If the machine 5:2) should no more the smooth top piece is excluded from jammed thread remnants and dust ...
...the ruffler. After cleaning, first insert the shuttle, then lock the bridge 51 together with a long stitch. Loosen the top thread tension and sew with shuttle race cover 52 and insert the bob- This incorrect tension will vary according to be slid along the strong bottom thread as scissors... little troubles The Shuttle is now easy to its highest point, press with plain stitch, sew the ruffles on the lower material. Then, with Fig. 41 thumb of it is blocked If the machine 5:2) should no more the smooth top piece is excluded from jammed thread remnants and dust ...
Manual
Page 29
Therefore, the material should always be opened and brought in the bearings will touch the throat plate and break. Machine runs slowly Machine is too tight. Top thread tension is insufficiently oiled (not the motor, which on the contrary should be removed to room temperature and the ...the next stitch it can warm up the brush). Use of resin and acid and got sticky. If the sewing machine has been standing in order to prevent oiling-up to the rear. While sewing, however, do not pull the material too much more than the additional price for material to be oiled...
Therefore, the material should always be opened and brought in the bearings will touch the throat plate and break. Machine runs slowly Machine is too tight. Top thread tension is insufficiently oiled (not the motor, which on the contrary should be removed to room temperature and the ...the next stitch it can warm up the brush). Use of resin and acid and got sticky. If the sewing machine has been standing in order to prevent oiling-up to the rear. While sewing, however, do not pull the material too much more than the additional price for material to be oiled...
Manual
Page 30
On the Machine : 5952 1 presser foot for zigzag sewing, hinged 5856 1 presser foot extension 5359 1 presser foot screw 5953 862 863 5954 5320 1126 5956 1147 1164 5365 5876 134 5364 5361 5336 5877 5878 5434 1512 In the Sew Kit : 1 presser foot for embroidery, suitable also for braiding 1 red stripe ... 863 5320 accessories kit pintucking device darning apparatus for stockings automatic darning foot wide hemmer lap hemmer (feller) edger with the Bernina Portable Zigzag Sewing Machine Model 125 Standard Part No. Accessories supplied with quilter guide combined roll and shell roll hemmer
On the Machine : 5952 1 presser foot for zigzag sewing, hinged 5856 1 presser foot extension 5359 1 presser foot screw 5953 862 863 5954 5320 1126 5956 1147 1164 5365 5876 134 5364 5361 5336 5877 5878 5434 1512 In the Sew Kit : 1 presser foot for embroidery, suitable also for braiding 1 red stripe ... 863 5320 accessories kit pintucking device darning apparatus for stockings automatic darning foot wide hemmer lap hemmer (feller) edger with the Bernina Portable Zigzag Sewing Machine Model 125 Standard Part No. Accessories supplied with quilter guide combined roll and shell roll hemmer


