
User Manual
Page 7
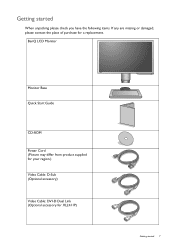
BenQ LCD Monitor Monitor Base Quick Start Guide CD-ROM Power Cord (Picture may differ from product supplied for your region.) Video Cable: D-Sub (Optional accessory) Video Cable: DVI-D Dual Link (Optional accessory for XL2411P) Getting started When unpacking please check you have the following items. If any are missing or damaged, please contact the place of purchase for a replacement. Getting started 7
BenQ LCD Monitor Monitor Base Quick Start Guide CD-ROM Power Cord (Picture may differ from product supplied for your region.) Video Cable: D-Sub (Optional accessory) Video Cable: DVI-D Dual Link (Optional accessory for XL2411P) Getting started When unpacking please check you have the following items. If any are missing or damaged, please contact the place of purchase for a replacement. Getting started 7
User Manual
Page 8
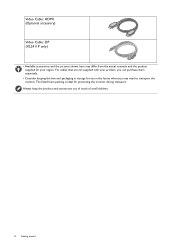
For cables that are not supplied with your product, you may need to transport the monitor. Always keep the product and accessories out of reach of small children. 8 Getting started Video Cable: HDMI (Optional accessory) Video Cable: DP (XL2411P only) • Available accessories and the pictures shown here may differ from the actual contents and the product supplied for use in the future when you can purchase them separately. • Consider keeping the box and packaging in storage for your region. The fitted foam packing is ideal for protecting the monitor during transport.
For cables that are not supplied with your product, you may need to transport the monitor. Always keep the product and accessories out of reach of small children. 8 Getting started Video Cable: HDMI (Optional accessory) Video Cable: DP (XL2411P only) • Available accessories and the pictures shown here may differ from the actual contents and the product supplied for use in the future when you can purchase them separately. • Consider keeping the box and packaging in storage for your region. The fitted foam packing is ideal for protecting the monitor during transport.
User Manual
Page 9
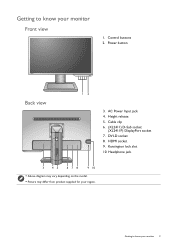
Control buttons 2. Cable clip 6. (XL2411) D-Sub socket (XL2411P) DisplayPort socket 7. HDMI socket 9. Power button Back view 12 3. Height release 5. DVI-D socket 8. Getting to know your region. Kensington lock slot 10. Headphone jack 3 45 678 9 10 • Above diagram may vary depending on the model. • Picture may differ from product supplied for your monitor 9 AC Power Input jack 4. Getting to know your monitor Front view 1.
Control buttons 2. Cable clip 6. (XL2411) D-Sub socket (XL2411P) DisplayPort socket 7. HDMI socket 9. Power button Back view 12 3. Height release 5. DVI-D socket 8. Getting to know your region. Kensington lock slot 10. Headphone jack 3 45 678 9 10 • Above diagram may vary depending on the model. • Picture may differ from product supplied for your monitor 9 AC Power Input jack 4. Getting to know your monitor Front view 1.
User Manual
Page 22
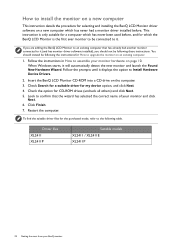
...Follow the prompts until it displays the option to it will automatically detect the new monitor and launch the Found New Hardware Wizard. Insert the BenQ LCD Monitor CD-ROM into a CD drive on page 10. Check the option for my device option, and click Next. 4. Look to... to it (and has monitor driver software installed), you are adding the BenQ LCD Monitor to an existing computer that the wizard has selected the correct name of your BenQ monitor Driver files XL2411 XL2411P Suitable models XL2411 / XL2411E XL2411P 22 Getting the most from your monitor and click Next. 6. Restart the...
...Follow the prompts until it displays the option to it will automatically detect the new monitor and launch the Found New Hardware Wizard. Insert the BenQ LCD Monitor CD-ROM into a CD drive on page 10. Check the option for my device option, and click Next. 4. Look to... to it (and has monitor driver software installed), you are adding the BenQ LCD Monitor to an existing computer that the wizard has selected the correct name of your BenQ monitor Driver files XL2411 XL2411P Suitable models XL2411 / XL2411E XL2411P 22 Getting the most from your monitor and click Next. 6. Restart the...
User Manual
Page 30
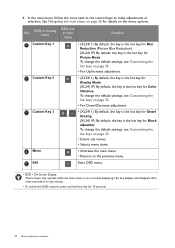
... the default settings, see Customizing the hot keys on page 33. • For Down/Decrease adjustment. • (XL2411) By default, the key is the hot key for Smart / Scaling. (XL2411P) By default, the key is the hot key for Black eQualizer. To change the default settings, see Customizing the... hot keys on page 33. • For Up/Increase adjustment. • (XL2411) By default, the key is the hot key for Display Mode. (XL2411P) By default, the key is the hot key for Color Vibrance. Hot key displays will disappear after a few seconds...
... the default settings, see Customizing the hot keys on page 33. • For Down/Decrease adjustment. • (XL2411) By default, the key is the hot key for Smart / Scaling. (XL2411P) By default, the key is the hot key for Black eQualizer. To change the default settings, see Customizing the... hot keys on page 33. • For Up/Increase adjustment. • (XL2411) By default, the key is the hot key for Display Mode. (XL2411P) By default, the key is the hot key for Color Vibrance. Hot key displays will disappear after a few seconds...
User Manual
Page 40
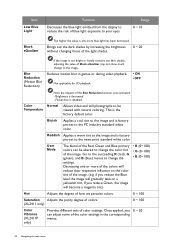
....) • R (0~100) • G (0~100) • B (0~100) Hue Adjusts the degree of how we perceive colors. 0 ~ 100 Saturation Adjusts the purity degree of colors. (XL2411 only) 0 ~ 100 Color Vibrance (XL2411P only) Provides different sets of the image. Range 0 ~ 10 Black eQualizer The higher the value is the factory default color. Flicker-free is...
....) • R (0~100) • G (0~100) • B (0~100) Hue Adjusts the degree of how we perceive colors. 0 ~ 100 Saturation Adjusts the purity degree of colors. (XL2411 only) 0 ~ 100 Color Vibrance (XL2411P only) Provides different sets of the image. Range 0 ~ 10 Black eQualizer The higher the value is the factory default color. Flicker-free is...
User Manual
Page 48
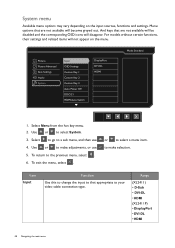
... select System. 3. To exit the menu, select . to a sub menu, and then use 5. Use or to the previous menu, select . 6. Range (XL2411) • D-Sub • DVI-DL • HDMI (XL2411P) • DisplayPort • DVI-DL • HDMI 48 Navigating the main menu System menu Available menu options may vary depending on the...
... select System. 3. To exit the menu, select . to a sub menu, and then use 5. Use or to the previous menu, select . 6. Range (XL2411) • D-Sub • DVI-DL • HDMI (XL2411P) • DisplayPort • DVI-DL • HDMI 48 Navigating the main menu System menu Available menu options may vary depending on the...
User Manual
Page 50
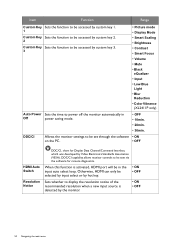
...; Brightness • Contrast • Smart Focus • Volume • Mute • Black eQualizer • Input • Low Blue Light • Blur Reduction • Color Vibrance (XL2411P only) Auto Power Sets the time to be in Off power saving mode. • OFF • 10min. • 20min. • 30min. When this function is...
...; Brightness • Contrast • Smart Focus • Volume • Mute • Black eQualizer • Input • Low Blue Light • Blur Reduction • Color Vibrance (XL2411P only) Auto Power Sets the time to be in Off power saving mode. • OFF • 10min. • 20min. • 30min. When this function is...