

User Manual
Page 5
Signal Cable: DVI-D (optional) Signal Cable: HDMI (optional) Consider keeping the box and packaging in storage for protecting the monitor during transport. Getting started 5 The fitted foam packing is ideal for use in the future when you may need to transport the monitor.
Signal Cable: DVI-D (optional) Signal Cable: HDMI (optional) Consider keeping the box and packaging in storage for protecting the monitor during transport. Getting started 5 The fitted foam packing is ideal for use in the future when you may need to transport the monitor.

User Manual
Page 6
Audio-out socket 5. DVI-D input socket 3. AC power input jack The earphone and the audio-out socket allow you to receive HDMI digital audio signal. 6 Getting to know your monitor Front view Back view Earphone socket 1. D-Sub input socket 2. Getting to know your monitor HDMI input socket 4. 2.
Audio-out socket 5. DVI-D input socket 3. AC power input jack The earphone and the audio-out socket allow you to receive HDMI digital audio signal. 6 Getting to know your monitor Front view Back view Earphone socket 1. D-Sub input socket 2. Getting to know your monitor HDMI input socket 4. 2.
User Manual
Page 8
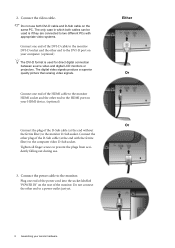
Plug one end of the HDMI cable to the monitor HDMI socket and the other end to prevent the plugs from accidently falling out during use both cables can be used for direct digital connection between source video and digital LCD monitors or projectors. Either Or Or 8 Assembling your computer.... (optional) The DVI-D format is used is if they are connected to two different PCs with the ferrite filter) to the monitor. The digital video signals produce a superior...
Plug one end of the HDMI cable to the monitor HDMI socket and the other end to prevent the plugs from accidently falling out during use both cables can be used for direct digital connection between source video and digital LCD monitors or projectors. Either Or Or 8 Assembling your computer.... (optional) The DVI-D format is used is if they are connected to two different PCs with the ferrite filter) to the monitor. The digital video signals produce a superior...
User Manual
Page 21
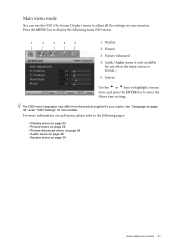
... page 30" under "OSD Settings" for use the OSD (On Screen Display) menu to adjust all the settings on page 30 How to adjust your monitor. Press the MENU key to enter the Menu item settings. Display 2. Audio (Audio menu is only available for more information on each menu, please refer... 22 • Picture menu on page 24 • Picture Advanced menu on page 26 • Audio menu on page 29 • System menu on your monitor 21 Main menu mode You can use when the input source is...
... page 30" under "OSD Settings" for use the OSD (On Screen Display) menu to adjust all the settings on page 30 How to adjust your monitor. Press the MENU key to enter the Menu item settings. Display 2. Audio (Audio menu is only available for more information on each menu, please refer... 22 • Picture menu on page 24 • Picture Advanced menu on page 26 • Audio menu on page 29 • System menu on your monitor 21 Main menu mode You can use when the input source is...
User Manual
Page 28
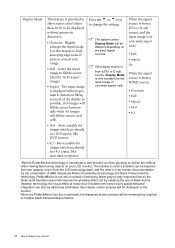
... • Full • Aspect Or When the signal source is from ghosting or motion blur effects while viewing fast moving objects on your LCD monitor. When the signal source is from a DVI or D-sub source, and the input image is of non-wide aspect ratio. Use this .... If the signal source is from a DVI or D-sub source, Display Mode is introduced to well prevent you from a HDMI source: • Overscan • Full • Aspect • 16:9 • 4:3 *BenQ's PerfectMotion technology is only available for images which are already in a 4:3 aspect, like DVD movies. • 4:3 -...
... • Full • Aspect Or When the signal source is from ghosting or motion blur effects while viewing fast moving objects on your LCD monitor. When the signal source is from a DVI or D-sub source, and the input image is of non-wide aspect ratio. Use this .... If the signal source is from a DVI or D-sub source, Display Mode is introduced to well prevent you from a HDMI source: • Overscan • Full • Aspect • 16:9 • 4:3 *BenQ's PerfectMotion technology is only available for images which are already in a 4:3 aspect, like DVD movies. • 4:3 -...

User Manual
Page 29
... 0 to 100 • ON • OFF How to select that item. 4. Audio menu Audio menu is only available for use when the input source is HDMI. 1. Press the t or u keys to move the highlight to a menu item and then press the ENTER key to adjust your...
... 0 to 100 • ON • OFF How to select that item. 4. Audio menu Audio menu is only available for use when the input source is HDMI. 1. Press the t or u keys to move the highlight to a menu item and then press the ENTER key to adjust your...

User Manual
Page 30
...Settings - adjust the value. connection type. Language Sets the OSD menu Press the t or u keys to adjust your monitor The language options displayed on your OSD may differ from those shown on the right, depending on the product supplied in ...your video cable Operation Press the t or u keys to the previous menu, press the MENU button. Range • DVI • D-sub • HDMI • English • French • German • Italian • Spanish • Polish/ Japanese • Czech/ Traditional Chinese • Hungarian/ Simplified Chinese &#...
...Settings - adjust the value. connection type. Language Sets the OSD menu Press the t or u keys to adjust your monitor The language options displayed on your OSD may differ from those shown on the right, depending on the product supplied in ...your video cable Operation Press the t or u keys to the previous menu, press the MENU button. Range • DVI • D-sub • HDMI • English • French • German • Italian • Spanish • Polish/ Japanese • Czech/ Traditional Chinese • Hungarian/ Simplified Chinese &#...