
Quick Start Guide
Page 5
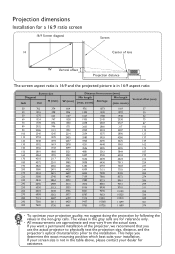
...suits your screen size is in the non-gray cells. If your installation. This helps you use the actual projector to physically test the projection size, distance, and the projector's optical characteristics prior to the installation. Projection dimensions Installation for a 16:9 ratio screen 16:9 Screen diagonal ...H Screen Center of the projector, we suggest doing the projection by following the values in 16:9 aspect ratio Screen size Diagonal Inch mm H (mm)...
...suits your screen size is in the non-gray cells. If your installation. This helps you use the actual projector to physically test the projection size, distance, and the projector's optical characteristics prior to the installation. Projection dimensions Installation for a 16:9 ratio screen 16:9 Screen diagonal ...H Screen Center of the projector, we suggest doing the projection by following the values in 16:9 aspect ratio Screen size Diagonal Inch mm H (mm)...

User Manual
Page 1
W1700/W1700S/HT2550 Digital Projector User Manual V 1.02
W1700/W1700S/HT2550 Digital Projector User Manual V 1.02

User Manual
Page 2
... warranty shall be void if the customer fails to operate the projector in a dusty environment. This warranty gives you specific legal rights, and you purchased the product of their respective companies or organizations. Further, BenQ Corporation reserves the right to revise this product is found to ... changes. *DLP, Digital Micromirror Device and DMD are copyrights of any warranties, merchantability or fitness for the details on BenQ projector patent coverage. 2 Warranty and Copyright information For other rights which you may be required with any defects in any form or by...
... warranty shall be void if the customer fails to operate the projector in a dusty environment. This warranty gives you specific legal rights, and you purchased the product of their respective companies or organizations. Further, BenQ Corporation reserves the right to revise this product is found to ... changes. *DLP, Digital Micromirror Device and DMD are copyrights of any warranties, merchantability or fitness for the details on BenQ projector patent coverage. 2 Warranty and Copyright information For other rights which you may be required with any defects in any form or by...

User Manual
Page 3
... Choosing a location ...11 Obtaining a preferred projected image size 12 Mounting the projector ...13 Adjusting the projected image...14 Connection ...16 Operation ...18 Starting up the projector ...18 Using the menus ...20 Securing the projector ...21 Switching input signal ...22 Shutting down the projector ...23 Direct power off ...23 Menu operation ...24 Menu system ...24...
... Choosing a location ...11 Obtaining a preferred projected image size 12 Mounting the projector ...13 Adjusting the projected image...14 Connection ...16 Operation ...18 Starting up the projector ...18 Using the menus ...20 Securing the projector ...21 Switching input signal ...22 Shutting down the projector ...23 Direct power off ...23 Menu operation ...24 Menu system ...24...

User Manual
Page 4
...is recommended that you follow the instructions mentioned in this manual and marked on the product. 1. In areas where the mains voltage may damage your projector. Excessive operation of this product, it for replacement. 8. Refer servicing to removing the lamp assembly for future reference. 2. To temporarily turn off...lamps beyond the rated lamp life. Always open the lens shutter (if any) or remove the lens cap (if any objects when the projector is designed to operate safely within a mains voltage between 100 to 240 volts AC, but could cause the objects to become heated and ...
...is recommended that you follow the instructions mentioned in this manual and marked on the product. 1. In areas where the mains voltage may damage your projector. Excessive operation of this product, it for replacement. 8. Refer servicing to removing the lamp assembly for future reference. 2. To temporarily turn off...lamps beyond the rated lamp life. Always open the lens shutter (if any) or remove the lens cap (if any objects when the projector is designed to operate safely within a mains voltage between 100 to 240 volts AC, but could cause the objects to become heated and ...

User Manual
Page 5
...and odor from its own removable cover. Do not use if tilted at an angle of more than 15 degrees front to the projector. 11. Do not stand the projector on a blanket, bedding or any other covers. Doing so may result in accidents and possible injury. 12. There are seriously ... upon it is not fully horizontal may cause a malfunction of more than 10 degrees left to right, nor at angle of , or damage to the projector, doing so may fall over, causing injury or resulting in damage to back. Do not place this product on a level, horizontal surface during operation....
...and odor from its own removable cover. Do not use if tilted at an angle of more than 15 degrees front to the projector. 11. Do not stand the projector on a blanket, bedding or any other covers. Doing so may result in accidents and possible injury. 12. There are seriously ... upon it is not fully horizontal may cause a malfunction of more than 10 degrees left to right, nor at angle of , or damage to the projector, doing so may fall over, causing injury or resulting in damage to back. Do not place this product on a level, horizontal surface during operation....
User Manual
Page 6
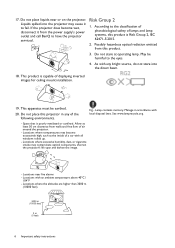
...rolled up. - Liquids spilled into the direct beam. 18. According to have the projector serviced. Do not stare at least 50 cm clearance from the power supply's power outlet and call BenQ to the classification of photobiological safety of a car with an ambient temperature above 40... inside of lamps and lamp systems, this product is poorly ventilated or confined. May be earthed. 20. This product is capable of air around the projector. - Locations where the altitudes are higher than 3000 m (10000 feet). 3000 m (10000 feet) 0 m (0 feet) 6 Important safety instructions Risk Group ...
...rolled up. - Liquids spilled into the direct beam. 18. According to have the projector serviced. Do not stare at least 50 cm clearance from the power supply's power outlet and call BenQ to the classification of photobiological safety of a car with an ambient temperature above 40... inside of lamps and lamp systems, this product is poorly ventilated or confined. May be earthed. 20. This product is capable of air around the projector. - Locations where the altitudes are higher than 3000 m (10000 feet). 3000 m (10000 feet) 0 m (0 feet) 6 Important safety instructions Risk Group ...

User Manual
Page 7
... bathroom, sauna, sunroom or in some specific regions. Introduction 7 There may differ from possible battery leakage. Optional accessories 1. BenQ QCast/QCast Mirror/WDP02 2. Slide the battery cover in until it clicks into a fire. Remove the old batteries (if ...applicable) and install two AAA batteries. Standard accessories Projector QDuigiictkalSPtraortjeGctuoidr e Remote control with batteries Power cord Quick start guide User manual CD Warranty card* • The supplied accessories ...
... bathroom, sauna, sunroom or in some specific regions. Introduction 7 There may differ from possible battery leakage. Optional accessories 1. BenQ QCast/QCast Mirror/WDP02 2. Slide the battery cover in until it clicks into a fire. Remove the old batteries (if ...applicable) and install two AAA batteries. Standard accessories Projector QDuigiictkalSPtraortjeGctuoidr e Remote control with batteries Power cord Quick start guide User manual CD Warranty card* • The supplied accessories ...

User Manual
Page 8
Projector exterior view 1 2 3 4 5 6 3 3 20 20 20 3 1. Projection lens 5. Vent (air inlet) 10. RS-232 control port 16. Vent (air exhaust) 3. Ceiling mount holes 8 Introduction Adjuster feet 4. ...
Projector exterior view 1 2 3 4 5 6 3 3 20 20 20 3 1. Projection lens 5. Vent (air inlet) 10. RS-232 control port 16. Vent (air exhaust) 3. Ceiling mount holes 8 Introduction Adjuster feet 4. ...

User Manual
Page 9
... Displays the source selection bar. 9. Arrow keys ( , , , ) When the On-Screen Display (OSD) menu is activated, these keys are available on the remote control or projector. 1 6 2 7 8 3 4 5 9 10 11 2 2 13 12 14 15 16 10 7 3 4 5 8 17 18 19 20 21 22 9 23 1. ECO BLANK Used to...from projecting as directional arrows to select the desired menu items and to make adjustments. POWER Toggles the projector between standby mode and on . Controls and functions Projector & Remote control All the key presses described in this document are used as this could cause the ...
... Displays the source selection bar. 9. Arrow keys ( , , , ) When the On-Screen Display (OSD) menu is activated, these keys are available on the remote control or projector. 1 6 2 7 8 3 4 5 9 10 11 2 2 13 12 14 15 16 10 7 3 4 5 8 17 18 19 20 21 22 9 23 1. ECO BLANK Used to...from projecting as directional arrows to select the desired menu items and to make adjustments. POWER Toggles the projector between standby mode and on . Controls and functions Projector & Remote control All the key presses described in this document are used as this could cause the ...
User Manual
Page 10
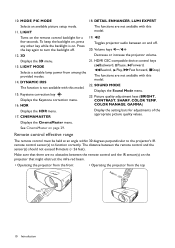
... control and the IR sensor(s) on . SOUND MODE The function is on the projector that might obstruct the infra-red beam. • Operating the projector from the front • Operating the projector from among the provided modes. See CinemaMaster on the remote control backlight for adjustments .... MODE, PIC MODE 18. Remote control effective range The remote control must be held at an angle within 30 degrees perpendicular to the projector's IR remote control sensor(s) to turn the backlight off . 20. Press the key again to function correctly. Displays the Sound Mode menu...
... control and the IR sensor(s) on . SOUND MODE The function is on the projector that might obstruct the infra-red beam. • Operating the projector from the front • Operating the projector from among the provided modes. See CinemaMaster on the remote control backlight for adjustments .... MODE, PIC MODE 18. Remote control effective range The remote control must be held at an angle within 30 degrees perpendicular to the projector's IR remote control sensor(s) to turn the backlight off . 20. Press the key again to function correctly. Displays the Sound Mode menu...
User Manual
Page 11
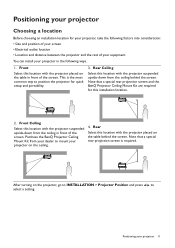
... is the most common way to select a setting. Front Ceiling Select this installation location. 2. Positioning your projector on the projector, go to INSTALLATION > Projector Position and press / to position the projector for quick setup and portability. 3. Purchase the BenQ Projector Ceiling Mount Kit from the ceiling behind the screen. After turning on the ceiling. 4. Rear Ceiling...
... is the most common way to select a setting. Front Ceiling Select this installation location. 2. Positioning your projector on the projector, go to INSTALLATION > Projector Position and press / to position the projector for quick setup and portability. 3. Purchase the BenQ Projector Ceiling Mount Kit from the ceiling behind the screen. After turning on the ceiling. 4. Rear Ceiling...

User Manual
Page 12
...are using a 120-inch screen, the recommended projection distance is in the projected image size. Obtaining a preferred projected image size The distance from the projector lens to the screen, the zoom setting, and the video format each factors in a 16:9 aspect ratio 16:9 Screen diagonal Screen H Center of... lens W Vertical offset Projection distance Screen size Distance from screen (mm)" column is required. 12 Positioning your projector Projection dimensions • The screen aspect ratio is 16:9 and the projected picture is 4290 mm.
...are using a 120-inch screen, the recommended projection distance is in the projected image size. Obtaining a preferred projected image size The distance from the projector lens to the screen, the zoom setting, and the video format each factors in a 16:9 aspect ratio 16:9 Screen diagonal Screen H Center of... lens W Vertical offset Projection distance Screen size Distance from screen (mm)" column is required. 12 Positioning your projector Projection dimensions • The screen aspect ratio is 16:9 and the projected picture is 4290 mm.

User Manual
Page 13
...to fall down the projector. Mounting the projector If you intend to install the projector for reference only. • All measurements are for you. Before mounting the projector • Purchase a BenQ projector mounting kit from the place you purchased your BenQ projector. • BenQ recommends that you also...the values in the non-gray cells. Tightening with a non-BenQ brand projector mounting kit. • Consider the surrounding temperature where the projector is ceiling mounted. Installing the projector on the projector and the base of the wrong gauge or length screws. ...
...to fall down the projector. Mounting the projector If you intend to install the projector for reference only. • All measurements are for you. Before mounting the projector • Purchase a BenQ projector mounting kit from the place you purchased your BenQ projector. • BenQ recommends that you also...the values in the non-gray cells. Tightening with a non-BenQ brand projector mounting kit. • Consider the surrounding temperature where the projector is ceiling mounted. Installing the projector on the projector and the base of the wrong gauge or length screws. ...

User Manual
Page 14
... function is only available when PC signal (analog RGB) is selected. Auto-adjusting the image In some cases, you 2. Press / on the projector or / / on the remote control. 14 Positioning your eyes. Do not look into the lens while the lamp is on the remote control.... focus ring. need to provide the best picture quality. Adjusting the projected image Adjusting the projection angle If the projector is not placed on a flat surface or the screen and the projector are not perpendicular to angled projection. • To automatically correct this : 1. Within 3 seconds, the built-...
... function is only available when PC signal (analog RGB) is selected. Auto-adjusting the image In some cases, you 2. Press / on the projector or / / on the remote control. 14 Positioning your eyes. Do not look into the lens while the lamp is on the remote control.... focus ring. need to provide the best picture quality. Adjusting the projected image Adjusting the projection angle If the projector is not placed on a flat surface or the screen and the projector are not perpendicular to angled projection. • To automatically correct this : 1. Within 3 seconds, the built-...

User Manual
Page 15
Press / to correct keystoning at the bottom of the image. Press / . 2. Press / . Positioning your projector 15 After the Keystone correction page appears, press / to correct keystoning at the top of the image.
Press / to correct keystoning at the bottom of the image. Press / . 2. Press / . Positioning your projector 15 After the Keystone correction page appears, press / to correct keystoning at the top of the image.

User Manual
Page 16
... combination. • If the selected video image is not displayed after the projector is turned on page 7). Press FN and the labeled function key simultaneously. You need only connect the projector to find your notebook's documentation to a video source device using just one... only. The rear connecting jacks available on their external video ports when connected to : 1. Connection When connecting a signal source to the projector, be included with each source. 3. Also check that the video source device is turned on /off before making any connections. 2. Turn...
... combination. • If the selected video image is not displayed after the projector is turned on page 7). Press FN and the labeled function key simultaneously. You need only connect the projector to find your notebook's documentation to a video source device using just one... only. The rear connecting jacks available on their external video ports when connected to : 1. Connection When connecting a signal source to the projector, be included with each source. 3. Also check that the video source device is turned on /off before making any connections. 2. Turn...

User Manual
Page 17
...audio functionality accompanying data presentations for stereo audio reproduction use as might be muted when the AUDIO OUT jack is connected. • The projector is only capable of playing mixed mono audio, even if a stereo audio input is connected. • If the selected video image is... operating correctly. Connection 17 Also check that the video source device is mixed into a common mono audio output through the projector speaker(s). Connecting audio The projector has built-in home theater or home cinema applications. Any stereo audio input (if provided), is turned on and the ...
...audio functionality accompanying data presentations for stereo audio reproduction use as might be muted when the AUDIO OUT jack is connected. • The projector is only capable of playing mixed mono audio, even if a stereo audio input is connected. • If the selected video image is... operating correctly. Connection 17 Also check that the video source device is mixed into a common mono audio output through the projector speaker(s). Connecting audio The projector has built-in home theater or home cinema applications. Any stereo audio input (if provided), is turned on and the ...
User Manual
Page 18
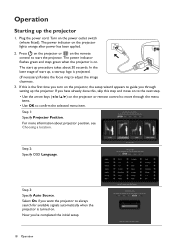
... Specify OSD Language. Now you through the menu items. • Use OK to start the projector. For more information about 30 seconds. The power indicator flashes green and stays green when the projector is the first time you have already done this, skip this is on. Step 3: Specify... Auto Source. Turn on the projector lights orange after power has been applied. 2. The start up the projector 1. In the later stage of start up the projector. Operation Starting up , a startup logo is turned on. The power indicator on ...
... Specify OSD Language. Now you through the menu items. • Use OK to start the projector. For more information about 30 seconds. The power indicator flashes green and stays green when the projector is the first time you have already done this, skip this is on. Step 3: Specify... Auto Source. Turn on the projector lights orange after power has been applied. 2. The start up the projector 1. In the later stage of start up the projector. Operation Starting up , a startup logo is turned on. The power indicator on ...

User Manual
Page 19
... Wizard screenshots are for reference only and may differ from the actual design. • If the frequency/resolution of the input signal exceeds the projector's operating range, you are prompted for a password, press the arrow keys to enter a 6-digit password. 4. See Switching input signal on page... 21. 5. See Timing chart on the background screen. Operation 19 power cord) to a lower setting. The projector will see the message "Out of the connected equipment on. 6. Switch all of Range" displayed on page 45. • If no signal is ...
... Wizard screenshots are for reference only and may differ from the actual design. • If the frequency/resolution of the input signal exceeds the projector's operating range, you are prompted for a password, press the arrow keys to enter a 6-digit password. 4. See Switching input signal on page... 21. 5. See Timing chart on the background screen. Operation 19 power cord) to a lower setting. The projector will see the message "Out of the connected equipment on. 6. Switch all of Range" displayed on page 45. • If no signal is ...


