Quick Start Guide
Page 4
... for assistance. If you determine the exact mounting position which best suits your dealer for a 16:9 ratio screen 16:9 Screen diagonal H Screen Center of the projector, we recommend that you use the actual projector to phys ically test the projection size, distance, and the...
... for assistance. If you determine the exact mounting position which best suits your dealer for a 16:9 ratio screen 16:9 Screen diagonal H Screen Center of the projector, we recommend that you use the actual projector to phys ically test the projection size, distance, and the...
User Manual
Page 2
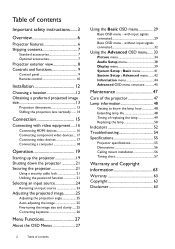
...: Basic menu 41 System Setup : Advanced menu ........42 Information menu 44 Advanced OSD menu structure 45 Maintenance 47 Care of the projector 47 Lamp information 48 Getting to know the lamp hour 48 Extending lamp life 48 Timing of contents Using the Basic OSD menu ... 16 Connecting component video devices.... 17 Connecting video devices 17 Connecting a computer 18 Operation 19 Starting up the projector 19 Shutting down the projector 21 Securing the projector 21 Using a security cable lock 21 Utilizing the password function 21 Selecting an input source 24 Renaming an input...
...: Basic menu 41 System Setup : Advanced menu ........42 Information menu 44 Advanced OSD menu structure 45 Maintenance 47 Care of the projector 47 Lamp information 48 Getting to know the lamp hour 48 Extending lamp life 48 Timing of contents Using the Basic OSD menu ... 16 Connecting component video devices.... 17 Connecting video devices 17 Connecting a computer 18 Operation 19 Starting up the projector 19 Shutting down the projector 21 Securing the projector 21 Using a security cable lock 21 Utilizing the password function 21 Selecting an input source 24 Renaming an input...

User Manual
Page 3
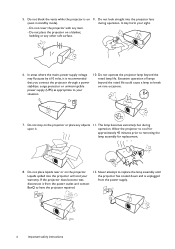
...level, horizontal surface during operation. - Doing so may fall over, causing injury or resulting in this product, it may cause the projector to back. 4. Locations near the projector. - Do not use of more than 10 degrees left to right, nor at least 50 cm clearance from walls and free ...flow of information technology equipment. Space that you operate your projector. Allow at angle of this manual and marked on an unstable cart, stand, or table as the inside of the following environments: -...
...level, horizontal surface during operation. - Doing so may fall over, causing injury or resulting in this product, it may cause the projector to back. 4. Locations near the projector. - Do not use of more than 10 degrees left to right, nor at least 50 cm clearance from walls and free ...flow of information technology equipment. Space that you operate your projector. Allow at angle of this manual and marked on an unstable cart, stand, or table as the inside of the following environments: -...
User Manual
Page 4
... supply. 4 Important safety instructions Do not block the vents while the projector is unplugged from the power outlet and contact BenQ to have the projector repaired. 12. Do not look straight into the projector will void your situation. 10. Do not step on the projector or place any other soft surface. 9. operation. Liquids spilled into...
... supply. 4 Important safety instructions Do not block the vents while the projector is unplugged from the power outlet and contact BenQ to have the projector repaired. 12. Do not look straight into the projector will void your situation. 10. Do not step on the projector or place any other soft surface. 9. operation. Liquids spilled into...
User Manual
Page 5
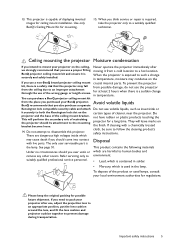
... • Mercury, which is Disposal the lamp. This will leave marks on the ceiling, Never operate the projector immediately after use a non-BenQ brand projector ceiling mount crucial internal parts. This product contains the following materials Under no circumstances should come into contact with ... use a proper fitting moving it securely to pack your BenQ projector. Avoid volatile liquids BenQ recommends that you use volatile liquids, such as insecticide or it from the place you purchased your projector after we strongly recommend that you think service or repair...
... • Mercury, which is Disposal the lamp. This will leave marks on the ceiling, Never operate the projector immediately after use a non-BenQ brand projector ceiling mount crucial internal parts. This product contains the following materials Under no circumstances should come into contact with ... use a proper fitting moving it securely to pack your BenQ projector. Avoid volatile liquids BenQ recommends that you use volatile liquids, such as insecticide or it from the place you purchased your projector after we strongly recommend that you think service or repair...

User Manual
Page 6
...(HDTV) 720p, 1080i/p 60Hz formats, with the 1080p format providing a true 1:1 image reproduction. • High picture quality The projector provides excellent picture quality due to its high resolution, excellent home theater brightness, high contrast ratio, vivid color and rich gray-scale ...to automated screen and environment lighting systems. • ISF certified calibration control To reach a higher standard of performance, the projector incorporates ISF NIGHT and ISF DAY mode settings in its OSD menus, which requires professional calibration service from authorized ISF installers...
...(HDTV) 720p, 1080i/p 60Hz formats, with the 1080p format providing a true 1:1 image reproduction. • High picture quality The projector provides excellent picture quality due to its high resolution, excellent home theater brightness, high contrast ratio, vivid color and rich gray-scale ...to automated screen and environment lighting systems. • ISF certified calibration control To reach a higher standard of performance, the projector incorporates ISF NIGHT and ISF DAY mode settings in its OSD menus, which requires professional calibration service from authorized ISF installers...
User Manual
Page 7
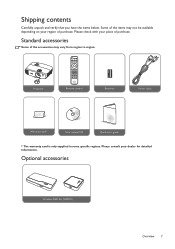
Standard accessories Some of purchase. Please check with your place of the accessories may not be available depending on your dealer for detailed information. Optional accessories Wireless FHD Kit (WDP01) Overview 7 Projector Remote control Batteries Power cable Warranty card* User manual CD Quick start guide * The warranty card is only supplied in some specific regions. Please consult your region of purchase. Shipping contents Carefully unpack and verify that you have the items below. Some of the items may vary from region to region.
Standard accessories Some of purchase. Please check with your place of the accessories may not be available depending on your dealer for detailed information. Optional accessories Wireless FHD Kit (WDP01) Overview 7 Projector Remote control Batteries Power cable Warranty card* User manual CD Quick start guide * The warranty card is only supplied in some specific regions. Please consult your region of purchase. Shipping contents Carefully unpack and verify that you have the items below. Some of the items may vary from region to region.
User Manual
Page 8
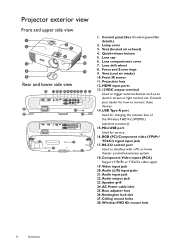
... terminal Used to interface with a PC or home theater control/automation system. 18. Audio (L/R) input jacks 21. Rear adjuster foot 26. Ceiling mount holes 28. Projector exterior view Front and upper side view 1 2 6 7 8 9 3 10 4 11 5 Rear and lower side view 12 13 14 15 16 17 18 19 20 21 22...
... terminal Used to interface with a PC or home theater control/automation system. 18. Audio (L/R) input jacks 21. Rear adjuster foot 26. Ceiling mount holes 28. Projector exterior view Front and upper side view 1 2 6 7 8 9 3 10 4 11 5 Rear and lower side view 12 13 14 15 16 17 18 19 20 21 22...
User Manual
Page 9
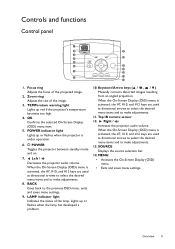
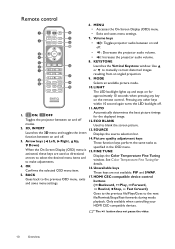
...#7, #10, and #12 keys are used as directional arrows to select the desired menu items and to make adjustments. 8. Left / Decreases the projector audio volume. When the On-Screen Display (OSD) menu is activated, the #7, #10, and #12 keys are used as directional arrows to ... and functions Control panel 1 2 9 3 4 10 5 6 11 12 7 10 8 13 14 1. TEMPerature warning light Lights up or flashes when the projector is activated, the #7, #10, and #12 keys are used as directional arrows to select the desired menu items and to make adjustments. 11. POWER indicator...
...#7, #10, and #12 keys are used as directional arrows to select the desired menu items and to make adjustments. 8. Left / Decreases the projector audio volume. When the On-Screen Display (OSD) menu is activated, the #7, #10, and #12 keys are used as directional arrows to ... and functions Control panel 1 2 9 3 4 10 5 6 11 12 7 10 8 13 14 1. TEMPerature warning light Lights up or flashes when the projector is activated, the #7, #10, and #12 keys are used as directional arrows to select the desired menu items and to make adjustments. 11. POWER indicator...
User Manual
Page 10
... approximately 10 seconds when pressing any other keys within 10 second again turns the LED backlight off . 3 • : Decreases the projector audio volume. 4 • : Increases the projector audio volume. 5 8. SOURCE 3. 4. 5. Launches the 3D menu and toggles the invert function between on and off 12. OK... Confirms the selected OSD menu item. Volume keys 2 12 • : Toggles projector audio between on and 16 off . 11. AUTO 1. Unavailable keys These keys are used as specified in the OSD menu. 15. HDMI...
... approximately 10 seconds when pressing any other keys within 10 second again turns the LED backlight off . 3 • : Decreases the projector audio volume. 4 • : Increases the projector audio volume. 5 8. SOURCE 3. 4. 5. Launches the 3D menu and toggles the invert function between on and off 12. OK... Confirms the selected OSD menu item. Volume keys 2 12 • : Toggles projector audio between on and 16 off . 11. AUTO 1. Unavailable keys These keys are used as specified in the OSD menu. 15. HDMI...
User Manual
Page 11
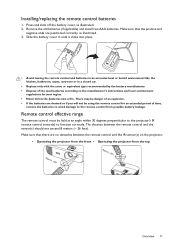
... of an explosion. • If the batteries are drained or if you will not be held at an angle within 30 degrees perpendicular to the projector's IR remote control sensor(s) to function correctly. Make sure that the positive and negative ends are no obstacles between the remote control and the sensor... that there are positioned correctly, as illustrated. 2. Installing/replacing the remote control batteries 1. The distance between the remote control and the IR sensor(s) on the projector. • Operating the projector from the front • Operating the...
... of an explosion. • If the batteries are drained or if you will not be held at an angle within 30 degrees perpendicular to the projector's IR remote control sensor(s) to function correctly. Make sure that the positive and negative ends are no obstacles between the remote control and the sensor... that there are positioned correctly, as illustrated. 2. Installing/replacing the remote control batteries 1. The distance between the remote control and the IR sensor(s) on the projector. • Operating the projector from the front • Operating the...
User Manual
Page 12
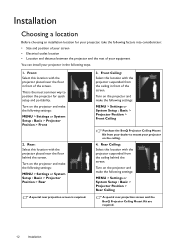
... front of your equipment You can install your projector on the projector and make the following settings: MENU > Settings or System Setup : Basic > Projector Position > Front 2. Turn on the projector and make the following settings: MENU > Settings or System Setup : Basic > Projector Position > Front Ceiling Purchase the BenQ Projector Ceiling Mount Kit from the ceiling behind the...
... front of your equipment You can install your projector on the projector and make the following settings: MENU > Settings or System Setup : Basic > Projector Position > Front 2. Turn on the projector and make the following settings: MENU > Settings or System Setup : Basic > Projector Position > Front Ceiling Purchase the BenQ Projector Ceiling Mount Kit from the ceiling behind the...
User Manual
Page 13
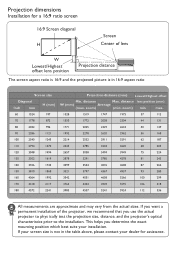
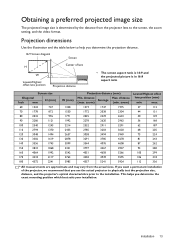
... 68 205 75 224 81 243 87 262 93 280 100 299 106 318 112 336 All measurements are approximate and may vary from the projector lens to the screen, the zoom setting, and the video format. This helps you use the actual... characteristics prior to help you determine the projection distance. 16:9 Screen diagonal Screen H W Lowest/Highest offset lens position Center of the projector, we recommend that you determine the exact mounting position which best suits your installation. Projection dimensions Use the illustration and the table below to the ...
... 68 205 75 224 81 243 87 262 93 280 100 299 106 318 112 336 All measurements are approximate and may vary from the projector lens to the screen, the zoom setting, and the video format. This helps you use the actual... characteristics prior to help you determine the projection distance. 16:9 Screen diagonal Screen H W Lowest/Highest offset lens position Center of the projector, we recommend that you determine the exact mounting position which best suits your installation. Projection dimensions Use the illustration and the table below to the ...
User Manual
Page 14
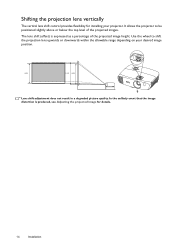
... the projected image for installing your desired image position. 100% 115% 105% Lens shift adjustment does not result in a degraded picture quality. It allows the projector to shift the projection lens upwards or downwards within the allowable range depending on your...
... the projected image for installing your desired image position. 100% 115% 105% Lens shift adjustment does not result in a degraded picture quality. It allows the projector to shift the projection lens upwards or downwards within the allowable range depending on your...
User Manual
Page 15
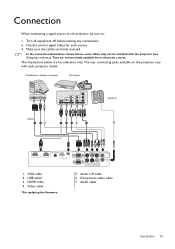
... inserted. • In the connection illustrations shown below are commercially available from electronics stores. The illustrations below , some cables may not be sure to the projector, be included with each source. 3. Audio cable Connection 15 Use the correct signal cables for reference only. VGA cable 2. Component video cable 7. They are for...
... inserted. • In the connection illustrations shown below are commercially available from electronics stores. The illustrations below , some cables may not be sure to the projector, be included with each source. 3. Audio cable Connection 15 Use the correct signal cables for reference only. VGA cable 2. Component video cable 7. They are for...
User Manual
Page 16
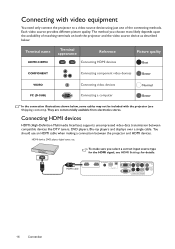
...etc. HDMI cable 16 Connection Each video source provides different picture quality. They are commercially available from electronics stores. Connecting with the projector (see HDMI Settings for the HDMI signal, see Shipping contents). You should use an HDMI cable when making a connection between ... over a single cable. To make sure you choose most likely depends upon the availability of matching terminals on both the projector and the video source device as described below: Terminal name HDMI1/HDMI2 Terminal appearance Reference Connecting HDMI devices Picture quality Best ...
...etc. HDMI cable 16 Connection Each video source provides different picture quality. They are commercially available from electronics stores. Connecting with the projector (see HDMI Settings for the HDMI signal, see Shipping contents). You should use an HDMI cable when making a connection between ... over a single cable. To make sure you choose most likely depends upon the availability of matching terminals on both the projector and the video source device as described below: Terminal name HDMI1/HDMI2 Terminal appearance Reference Connecting HDMI devices Picture quality Best ...
User Manual
Page 17
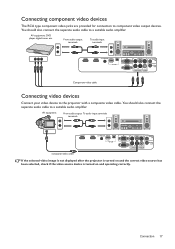
... output devices. AV equipment From audio output To audio input terminals terminals composite video cable If the selected video image is not displayed after the projector is turned on and the correct video source has been selected, check if the video source device is turned on and operating correctly. Connecting component...
... output devices. AV equipment From audio output To audio input terminals terminals composite video cable If the selected video image is not displayed after the projector is turned on and the correct video source has been selected, check if the video source device is turned on and operating correctly. Connecting component...
User Manual
Page 18
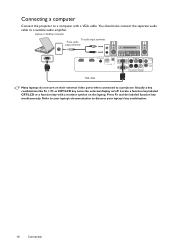
.../LCD key turns the external display on their external video ports when connected to a computer with a monitor symbol on the laptop. Connecting a computer Connect the projector to a projector. Press Fn and the labeled function key simultaneously. Locate a function key labeled CRT/LCD or a function key with a VGA cable.
.../LCD key turns the external display on their external video ports when connected to a computer with a monitor symbol on the laptop. Connecting a computer Connect the projector to a projector. Press Fn and the labeled function key simultaneously. Locate a function key labeled CRT/LCD or a function key with a VGA cable.
User Manual
Page 19
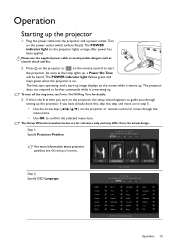
... possible dangers such as the lamp lights up the projector. Operation Starting up . Step 1: Specify Projector Position. Press on the projector or on the screen while it is on the projector or remote control to move on to start the projector. The fans start operating, and a start-up ...below are for details. 3. Step 2: Specify OSD Language. The POWER indicator light flashes green and stays green when the projector is warming up the projector 1. The projector does not respond to confirm the selected menu item. Operation 19 As soon as electric shock and fire. 2. If ...
... possible dangers such as the lamp lights up the projector. Operation Starting up . Step 1: Specify Projector Position. Press on the projector or on the screen while it is on the projector or remote control to move on to start the projector. The fans start operating, and a start-up ...below are for details. 3. Step 2: Specify OSD Language. The POWER indicator light flashes green and stays green when the projector is warming up the projector 1. The projector does not respond to confirm the selected menu item. Operation 19 As soon as electric shock and fire. 2. If ...
User Manual
Page 20
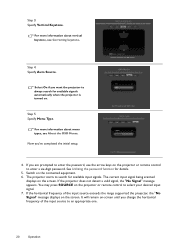
...completed the initial setup. 4. See Utilizing the password function for available input signals. If the projector does not detect a valid signal, the "No Signal" message appears. Switch on the projector or remote control to an appropriate one. 20 Operation Select On if you change the horizontal ...frequency of the input source exceeds the range supported the projector, the "No Signal" message displays on the screen. If the horizontal frequency of the input source to select your desired input signal...
...completed the initial setup. 4. See Utilizing the password function for available input signals. If the projector does not detect a valid signal, the "No Signal" message appears. Switch on the projector or remote control to an appropriate one. 20 Operation Select On if you change the horizontal ...frequency of the input source exceeds the range supported the projector, the "No Signal" message displays on the screen. If the horizontal frequency of the input source to select your desired input signal...


