
User Manual
Page 3
... where temperatures may become excessively high, such as it is poorly ventilated or confined. Locations near the projector. - Keep this user manual before you follow the instructions mentioned in damage. - Doing so may contaminate optical components, shorten the projector's lifespan and darken the ...screen. 3. Locations with all windows closed. - Please read this manual in any of a car with an ambient temperature above 35°C/95°F. - Do not place inflammables near fire alarms. - Do ...
... where temperatures may become excessively high, such as it is poorly ventilated or confined. Locations near the projector. - Keep this user manual before you follow the instructions mentioned in damage. - Doing so may contaminate optical components, shorten the projector's lifespan and darken the ...screen. 3. Locations with all windows closed. - Please read this manual in any of a car with an ambient temperature above 35°C/95°F. - Do not place inflammables near fire alarms. - Do ...
User Manual
Page 7
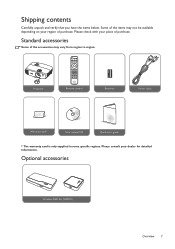
Please check with your dealer for detailed information. Standard accessories Some of purchase. Projector Remote control Batteries Power cable Warranty card* User manual CD Quick start guide * The warranty card is only supplied in some specific regions. Please consult your place of purchase. Some of the items may not be available depending on your region of the accessories may vary from region to region. Optional accessories Wireless FHD Kit (WDP01) Overview 7 Shipping contents Carefully unpack and verify that you have the items below.
Please check with your dealer for detailed information. Standard accessories Some of purchase. Projector Remote control Batteries Power cable Warranty card* User manual CD Quick start guide * The warranty card is only supplied in some specific regions. Please consult your place of purchase. Some of the items may not be available depending on your region of the accessories may vary from region to region. Optional accessories Wireless FHD Kit (WDP01) Overview 7 Shipping contents Carefully unpack and verify that you have the items below.
User Manual
Page 9
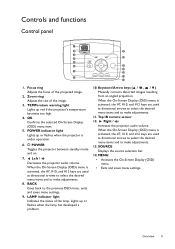
... is activated, the #7, #10, and #12 keys are used as directional arrows to select the desired menu items and to make adjustments. 8. Keystone/Arrow keys ( / , / ) Manually corrects distorted images resulting from an angled projection. LAMP indicator light Indicates the status of the projected image. 2. OK Confirms the selected On-Screen Display...
... is activated, the #7, #10, and #12 keys are used as directional arrows to select the desired menu items and to make adjustments. 8. Keystone/Arrow keys ( / , / ) Manually corrects distorted images resulting from an angled projection. LAMP indicator light Indicates the status of the projected image. 2. OK Confirms the selected On-Screen Display...
User Manual
Page 10
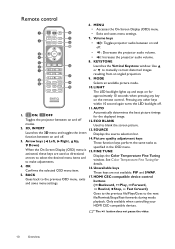
... off . 11. The button does not pause the video. 10 Overview Volume keys 2 12 • : Toggles projector audio between on and 16 off . Used to manually correct distorted images 8 9 17 resulting from an angled projection. 9. SOURCE 3. 4. 5. MENU • Accesses the On-Screen Display (OSD) menu. 1 10 • Exits and saves menu...
... off . 11. The button does not pause the video. 10 Overview Volume keys 2 12 • : Toggles projector audio between on and 16 off . Used to manually correct distorted images 8 9 17 resulting from an angled projection. 9. SOURCE 3. 4. 5. MENU • Accesses the On-Screen Display (OSD) menu. 1 10 • Exits and saves menu...
User Manual
Page 26
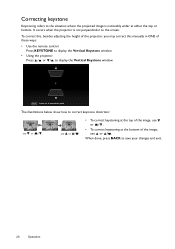
... is not perpendicular to save your changes and exit. 26 Operation To correct this, besides adjusting the height of the projector, you may correct this manually in ONE of these ways: • Use the remote control Press KEYSTONE to display the Vertical Keystone window. • Using the projector Press / or / to...
... is not perpendicular to save your changes and exit. 26 Operation To correct this, besides adjusting the height of the projector, you may correct this manually in ONE of these ways: • Use the remote control Press KEYSTONE to display the Vertical Keystone window. • Using the projector Press / or / to...
User Manual
Page 30
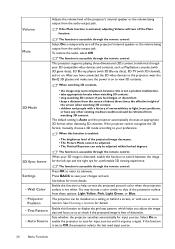
... from the audio output jack. The projector can only be refrained from watching 3D content. If the projector cannot recognize the 3D format, manually choose a 3D mode according to save your 3D image is free of distortion. Press BACK to your 3D-compatible video devices and contents,... preference. Press OK to Off, the projector selects the last used input source. 30 Menu Functions Enable this function to the projector, wear the BenQ 3D glasses and make sure the power is enabled: 3D Sync Invert Settings • Wall Color • Projector Position • Test Pattern &#...
... from the audio output jack. The projector can only be refrained from watching 3D content. If the projector cannot recognize the 3D format, manually choose a 3D mode according to save your 3D image is free of distortion. Press BACK to your 3D-compatible video devices and contents,... preference. Press OK to Off, the projector selects the last used input source. 30 Menu Functions Enable this function to the projector, wear the BenQ 3D glasses and make sure the power is enabled: 3D Sync Invert Settings • Wall Color • Projector Position • Test Pattern &#...
User Manual
Page 31
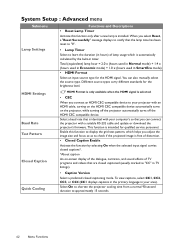
...; Reset Lamp Timer • Reset All Settings • Information Switches to "0". HDMI Format is only available when the HDMI signal is installed. You can also manually select the source type. The different source types carry different standards for the HDMI signal. Returns all settings to the factory preset values. Selects an...
...; Reset Lamp Timer • Reset All Settings • Information Switches to "0". HDMI Format is only available when the HDMI signal is installed. You can also manually select the source type. The different source types carry different standards for the HDMI signal. Returns all settings to the factory preset values. Selects an...
User Manual
Page 32
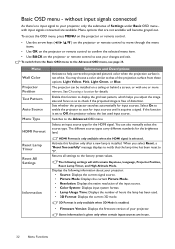
... menu items. • Use OK on the projector or remote control to Off, the projector selects the last used input source. The projector can also manually select the source type. without input signals connected As there's no input signal to help correct the projected picture's color when the projection surface is...
... menu items. • Use OK on the projector or remote control to Off, the projector selects the last used input source. The projector can also manually select the source type. without input signals connected As there's no input signal to help correct the projected picture's color when the projection surface is...
User Manual
Page 34
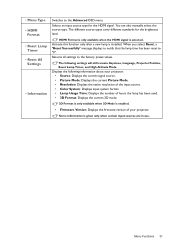
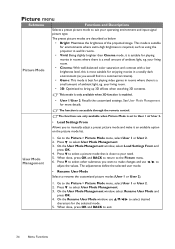
... level, this is most suitable for enjoying movies in rooms where there is set to User 1 or User 2. • Load Settings From Allows you to manually adjust a preset picture mode and make changes and use / / / to select desired characters for more details. Press to adjust the values. On the Rename User...
... level, this is most suitable for enjoying movies in rooms where there is set to User 1 or User 2. • Load Settings From Allows you to manually adjust a preset picture mode and make changes and use / / / to select desired characters for more details. Press to adjust the values. On the Rename User...
User Manual
Page 36
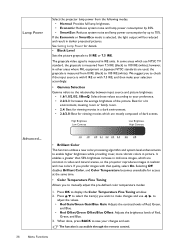
...make your selection accordingly. • Gamma Selection Gamma refers to the relationship between input source and picture brightness. • 1.6/1.8/2.0/2.1/BenQ: Select these values according to enable higher brightness while providing truer, more vibrant colors in realistic and true colors. High ...the item(s) you to save your preference. • 2.2/2.3: Increases the average brightness of dark scenes. When done, press BACK to manually adjust the pre-defined color temperature modes: 1. The function is measured in other areas where PAL equipment or Japanese NTSC standards are...
...make your selection accordingly. • Gamma Selection Gamma refers to the relationship between input source and picture brightness. • 1.6/1.8/2.0/2.1/BenQ: Select these values according to enable higher brightness while providing truer, more vibrant colors in realistic and true colors. High ...the item(s) you to save your preference. • 2.2/2.3: Increases the average brightness of dark scenes. When done, press BACK to manually adjust the pre-defined color temperature modes: 1. The function is measured in other areas where PAL equipment or Japanese NTSC standards are...
User Manual
Page 38
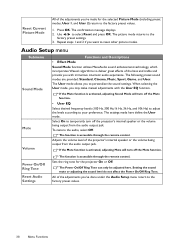
... Mode function utilizes MaxxAudio sound enhancement technology, which incorporates Waves's algorithms to deliver great effects of the bass and treble and provide you may make manual adjustments with immersive cinematic audio experience. Adjusts the volume level of the projector's internal speaker or the volume being output from the audio output jack...
... Mode function utilizes MaxxAudio sound enhancement technology, which incorporates Waves's algorithms to deliver great effects of the bass and treble and provide you may make manual adjustments with immersive cinematic audio experience. Adjusts the volume level of the projector's internal speaker or the volume being output from the audio output jack...
User Manual
Page 40
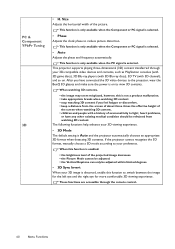
... adjusted. • the Vertical Keystone can only be refrained from watching 3D content. If the projector cannot recognize the 3D format, manually choose a 3D mode according to the projector, wear the BenQ 3D glasses and make sure the power is on . PC & Component YPbPr Tuning 3D • H. These functions are accessible through...
... adjusted. • the Vertical Keystone can only be refrained from watching 3D content. If the projector cannot recognize the 3D format, manually choose a 3D mode according to the projector, wear the BenQ 3D glasses and make sure the power is on . PC & Component YPbPr Tuning 3D • H. These functions are accessible through...
User Manual
Page 42
... Lamp Timer Activate this function to display the grid test pattern, which is intended for qualified service personnel. Select a baud rate that you can also manually select the source type. To view captions, select CC1, CC2, CC3, or CC4 (CC1 displays captions in the primary language in SmartEco mode) • HDMI...
... Lamp Timer Activate this function to display the grid test pattern, which is intended for qualified service personnel. Select a baud rate that you can also manually select the source type. To view captions, select CC1, CC2, CC3, or CC4 (CC1 displays captions in the primary language in SmartEco mode) • HDMI...
User Manual
Page 49
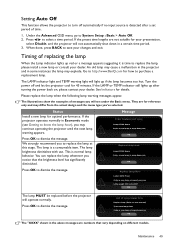
...for reference only and may differ from the actual design and the menu type you may explode. Press OK to user manual) Then reset lamp timer Order a new lamp at www.benq.com OK Press OK to replace the lamp, please install a new lamp or consult your presentation, select Disable, ... lengths are numbers that the brightness level has significantly diminished. Status Install a new lamp for details. Press / to replace the lamp at www.benq.com Lamp usage time exceeded OK The lamp MUST be replaced before the projector will light up after a set period of Lamp Usage Time Replace...
...for reference only and may differ from the actual design and the menu type you may explode. Press OK to user manual) Then reset lamp timer Order a new lamp at www.benq.com OK Press OK to replace the lamp, please install a new lamp or consult your presentation, select Disable, ... lengths are numbers that the brightness level has significantly diminished. Status Install a new lamp for details. Press / to replace the lamp at www.benq.com Lamp usage time exceeded OK The lamp MUST be replaced before the projector will light up after a set period of Lamp Usage Time Replace...

User Manual
Page 63
... material and workmanship, under normal usage and storage. Warranty and Copyright information 63 Copyright Copyright © 2015 by any means, electronic, mechanical, magnetic, optical, chemical, manual or otherwise, without obligation of BenQ Corporation to notify any person of purchase date will be required with any warranty claim. Disclaimer...
... material and workmanship, under normal usage and storage. Warranty and Copyright information 63 Copyright Copyright © 2015 by any means, electronic, mechanical, magnetic, optical, chemical, manual or otherwise, without obligation of BenQ Corporation to notify any person of purchase date will be required with any warranty claim. Disclaimer...

