

User Manual
Page 3
... menu ...28 INSTALLATION menu ...28 SYSTEM SETUP: BASIC menu ...29 SYSTEM SETUP: ADVANCED menu 30 INFORMATION menu ...31 Maintenance ...32 Care of the projector ...32 Lamp information ...32 Troubleshooting ...39 Specifications ...40 Projector specifications ...40 Dimensions ...40 Timing chart...41 Table of Contents 3
... menu ...28 INSTALLATION menu ...28 SYSTEM SETUP: BASIC menu ...29 SYSTEM SETUP: ADVANCED menu 30 INFORMATION menu ...31 Maintenance ...32 Care of the projector ...32 Lamp information ...32 Troubleshooting ...39 Specifications ...40 Projector specifications ...40 Dimensions ...40 Timing chart...41 Table of Contents 3
User Manual
Page 4
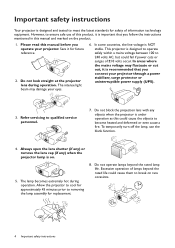
...). 3. In some countries, the line voltage is on the product. 1. Excessive operation of information technology equipment. Refer servicing to removing the lamp assembly for replacement. 8. Always open the lens shutter (if any) or remove the lens cap (if any objects when the projector is ..., it for approximately 45 minutes prior to qualified service personnel. 7. The lamp becomes extremely hot during operation. To temporarily turn off the lamp, use of ±10 volts occur. Do not operate lamps beyond the rated life could fail if power cuts or surges of this...
...). 3. In some countries, the line voltage is on the product. 1. Excessive operation of information technology equipment. Refer servicing to removing the lamp assembly for replacement. 8. Always open the lens shutter (if any) or remove the lens cap (if any objects when the projector is ..., it for approximately 45 minutes prior to qualified service personnel. 7. The lamp becomes extremely hot during operation. To temporarily turn off the lamp, use of ±10 volts occur. Do not operate lamps beyond the rated life could fail if power cuts or surges of this...
User Manual
Page 5
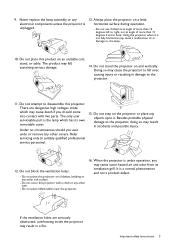
... high voltages inside the projector may fall over, causing injury or resulting in accidents and possible injury. 12. The only user serviceable part is the lamp which may cause death if you should you may sense some heated air and odor from its own removable cover. Do not cover this projector... the projector is a normal phenomenon and not a product defect. Do not place inflammables near the projector. 16. 9. Doing so may result in damage to , the lamp. 10. Never replace the lamp assembly or any other item. -
... high voltages inside the projector may fall over, causing injury or resulting in accidents and possible injury. 12. The only user serviceable part is the lamp which may cause death if you should you may sense some heated air and odor from its own removable cover. Do not cover this projector... the projector is a normal phenomenon and not a product defect. Do not place inflammables near the projector. 16. 9. Doing so may result in damage to , the lamp. 10. Never replace the lamp assembly or any other item. -
User Manual
Page 6
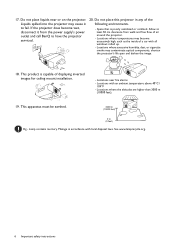
... ventilated or confined. Locations with all windows rolled up. - This apparatus must be earthed. 3000 m (10000 feet) 0 m (0 feet) Hg - Lamp contains mercury. Liquids spilled into the projector may contaminate optical components, shorten the projector's life span and darken the image. 18. Locations near or on... as the inside of air around the projector. - Allow at least 50 cm clearance from the power supply's power outlet and call BenQ to fail. Locations where temperatures may become wet, disconnect it to have the projector serviced. 20. Locations where excessive humidity, dust, or...
... ventilated or confined. Locations with all windows rolled up. - This apparatus must be earthed. 3000 m (10000 feet) 0 m (0 feet) Hg - Lamp contains mercury. Liquids spilled into the projector may contaminate optical components, shorten the projector's life span and darken the image. 18. Locations near or on... as the inside of air around the projector. - Allow at least 50 cm clearance from the power supply's power outlet and call BenQ to fail. Locations where temperatures may become wet, disconnect it to have the projector serviced. 20. Locations where excessive humidity, dust, or...

User Manual
Page 7
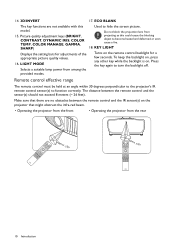
... QDuigiictkalSPtraortjeGctuoidr e Remote control with the same or equivalent type recommended by the battery manufacturer. • Dispose of these items are positioned correctly, as illustrated. 2. Spare lamp kit 3. If any of the used batteries according to the remote control from those illustrated. • *The warranty card is only supplied in a closed car...
... QDuigiictkalSPtraortjeGctuoidr e Remote control with the same or equivalent type recommended by the battery manufacturer. • Dispose of these items are positioned correctly, as illustrated. 2. Spare lamp kit 3. If any of the used batteries according to the remote control from those illustrated. • *The warranty card is only supplied in a closed car...

User Manual
Page 8
... 11 13 14 16 18 19 20 LAN IR I N 12V TRIGGHER 1 PC HDMI 1 HDMI 2 USB MINI-B 2 RS-232 HDCP 2.2 21 22 25 25 1. Lamp cover 9. Kensington anti-theft lock slot 23. Ceiling mount holes 13. IR-IN jack For use with an IR extender cable to external control panel... 20. RS-232 control port 19. HDMI input port (Version 2.0) and its cable tie hole 16. POWER indicator light/TEMPerature warning light/LAMP indicator light (See Indicators on page 9.) 22. External control panel (See Controls and functions on page 37.) 10. USB Mini-B port 17. 12 ...
... 11 13 14 16 18 19 20 LAN IR I N 12V TRIGGHER 1 PC HDMI 1 HDMI 2 USB MINI-B 2 RS-232 HDCP 2.2 21 22 25 25 1. Lamp cover 9. Kensington anti-theft lock slot 23. Ceiling mount holes 13. IR-IN jack For use with an IR extender cable to external control panel... 20. RS-232 control port 19. HDMI input port (Version 2.0) and its cable tie hole 16. POWER indicator light/TEMPerature warning light/LAMP indicator light (See Indicators on page 9.) 22. External control panel (See Controls and functions on page 37.) 10. USB Mini-B port 17. 12 ...
User Manual
Page 10
..., CONTRAST, DYNAMIC IRIS, COLOR TEMP, COLOR MANAGE, GAMMA, SHARP) projecting as this Used to become heated and deformed or even cause a fire. 18. Selects a suitable lamp power from the rear Approx. +30º Approx. +30º 10 Introduction Do not block the projection lens from 15.
..., CONTRAST, DYNAMIC IRIS, COLOR TEMP, COLOR MANAGE, GAMMA, SHARP) projecting as this Used to become heated and deformed or even cause a fire. 18. Selects a suitable lamp power from the rear Approx. +30º Approx. +30º 10 Introduction Do not block the projection lens from 15.

User Manual
Page 14
... Shifting the projection lens The lens shift control provides flexibility for installing your projector The horizontal position The vertical position 27% 1 screen width 27% 65% LAMP TEMP POWER LAN IR I N 12V TRIGGHER 1 PC HDMI 1 HDMI 2 USB MINI-B 2 RS-232 HDCP 2.2 1 screen height 65% The projection range Lens shift adjustment will not...
... Shifting the projection lens The lens shift control provides flexibility for installing your projector The horizontal position The vertical position 27% 1 screen width 27% 65% LAMP TEMP POWER LAN IR I N 12V TRIGGHER 1 PC HDMI 1 HDMI 2 USB MINI-B 2 RS-232 HDCP 2.2 1 screen height 65% The projection range Lens shift adjustment will not...

User Manual
Page 15
...in the corner of Frequency and Clock to provide the best picture quality. Positioning your eyes. Do not look into the lens while the lamp is on a flat surface or the screen and the projector are not perpendicular to optimize the picture quality. Adjust the projected image to ... to fine-tune the horizontal angle. Sharpen the image by rotating the focus ring. To do this, press AUTO. The strong light from the lamp may need using the zoom ring. Within 3 seconds, the built-in Intelligent Auto Adjustment function will be displayed in a reverse direction. The current...
...in the corner of Frequency and Clock to provide the best picture quality. Positioning your eyes. Do not look into the lens while the lamp is on a flat surface or the screen and the projector are not perpendicular to optimize the picture quality. Adjust the projected image to ... to fine-tune the horizontal angle. Sharpen the image by rotating the focus ring. To do this, press AUTO. The strong light from the lamp may need using the zoom ring. Within 3 seconds, the built-in Intelligent Auto Adjustment function will be displayed in a reverse direction. The current...

User Manual
Page 19
... change to an input signal which is still hot from previous activity, it will run the cooling fan for approximately 90 seconds before energizing the lamp. • The Setup Wizard screenshots are prompted for reference only and may differ from the actual design. • If the frequency/resolution of the input...
... change to an input signal which is still hot from previous activity, it will run the cooling fan for approximately 90 seconds before energizing the lamp. • The Setup Wizard screenshots are prompted for reference only and may differ from the actual design. • If the frequency/resolution of the input...
User Manual
Page 23
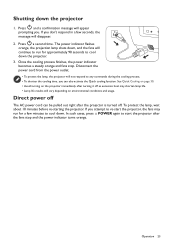
... stop and the power indicator turns orange. In such cases, press POWER again to start the projector, the fans may shorten lamp life. • Lamp life results will continue to run for approximately 90 seconds to re-start the projector after the projector is turned off. If... projector immediately after turning it off The AC power cord can also activate the Quick cooling function. The power indicator flashes orange, the projection lamp shuts down the projector. 3. See Quick Cooling on page 30. • Avoid turning on environmental conditions and usage. If you don't ...
... stop and the power indicator turns orange. In such cases, press POWER again to start the projector, the fans may shorten lamp life. • Lamp life results will continue to run for approximately 90 seconds to re-start the projector after the projector is turned off. If... projector immediately after turning it off The AC power cord can also activate the Quick cooling function. The power indicator flashes orange, the projection lamp shuts down the projector. 3. See Quick Cooling on page 30. • Avoid turning on environmental conditions and usage. If you don't ...

User Manual
Page 26
.... The available settings may vary according to your preference. This setting is suitable for white. • Cool: Makes images appear bluish white. • Lamp Native: With the lamp's original color temperature and higher brightness. a setting of that color will reflect to the image immediately. • Saturation: Adjusts the values to the signal...
.... The available settings may vary according to your preference. This setting is suitable for white. • Cool: Makes images appear bluish white. • Lamp Native: With the lamp's original color temperature and higher brightness. a setting of that color will reflect to the image immediately. • Saturation: Adjusts the values to the signal...

User Manual
Page 27
... light output when producing images with contrasting colors or bright and dark scales. The result is not available. • Light Mode: Selects a suitable lamp power from among the provided modes. Reset Current Picture Mode 1. It prevents discoloration of skin tones from fast switching of the projection beam, portraying every...If you to fine-tune the saturation of sharpness and detail enhancement for true-to optimized brightness and contrast. Menu operation 27 See Extending lamp life on page 33. Press OK. The current picture mode returns to select Reset and press OK.
... light output when producing images with contrasting colors or bright and dark scales. The result is not available. • Light Mode: Selects a suitable lamp power from among the provided modes. Reset Current Picture Mode 1. It prevents discoloration of skin tones from fast switching of the projection beam, portraying every...If you to fine-tune the saturation of sharpness and detail enhancement for true-to optimized brightness and contrast. Menu operation 27 See Extending lamp life on page 33. Press OK. The current picture mode returns to select Reset and press OK.

User Manual
Page 29
... high electronic signal out when the aspect ratio is switched from other aspect ratios to "Anamorphic 2.35:1" or "Anamorphic 16:9", a high to 0.75 times of lamp life. High Altitude Mode If you use the High Altitude Mode if your needs for installation scenarios. SYSTEM SETUP: BASIC menu Language Sets the language...
... high electronic signal out when the aspect ratio is switched from other aspect ratios to "Anamorphic 2.35:1" or "Anamorphic 16:9", a high to 0.75 times of lamp life. High Altitude Mode If you use the High Altitude Mode if your needs for installation scenarios. SYSTEM SETUP: BASIC menu Language Sets the language...

User Manual
Page 30
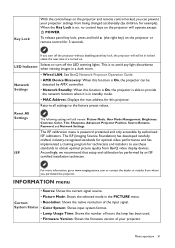
.... • Power On Link/Power Off Link When you connect an HDMI CEC-compatible device to approximately 15 seconds. Lamp Settings • Lamp Timer: See Getting to know the lamp hour on page 32. • HDMI Range Selects a suitable RGB color range to correct the color accuracy. •... / to set the behavior of time the OSD will be activated/shut down , too. SYSTEM SETUP: ADVANCED menu • Reset Lamp Timer: See Resetting the lamp timer on /off either the connected device or the projector can set the desired characters for a signal. Auto Source Allows the projector ...
.... • Power On Link/Power Off Link When you connect an HDMI CEC-compatible device to approximately 15 seconds. Lamp Settings • Lamp Timer: See Getting to know the lamp hour on page 32. • HDMI Range Selects a suitable RGB color range to correct the color accuracy. •... / to set the behavior of time the OSD will be activated/shut down , too. SYSTEM SETUP: ADVANCED menu • Reset Lamp Timer: See Resetting the lamp timer on /off either the connected device or the projector can set the desired characters for a signal. Auto Source Allows the projector ...
User Manual
Page 31
...for this projector. When the Key Lock is to avoid any light disturbance when viewing images in a dark room. • Wired LAN: See BenQ Network Projector Operation Guide. To release panel key lock, press and hold (the right key) on the projector or remote control for example). ...Time: Shows the number of hours the lamp has been used. • Firmware Version: Shows the firmware version of the input signal. If you purchased the projector. LED Indicator Selects to www.imagingscience.com or contact the dealer or retailer from BenQ video display devices. This is on,...
...for this projector. When the Key Lock is to avoid any light disturbance when viewing images in a dark room. • Wired LAN: See BenQ Network Projector Operation Guide. To release panel key lock, press and hold (the right key) on the projector or remote control for example). ...Time: Shows the number of hours the lamp has been used. • Firmware Version: Shows the firmware version of the input signal. If you purchased the projector. LED Indicator Selects to www.imagingscience.com or contact the dealer or retailer from BenQ video display devices. This is on,...
User Manual
Page 32
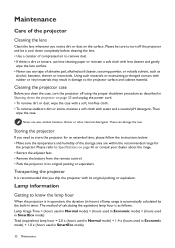
..., alkaline/acid cleaner, scouring powder, or volatile solvent, such as alcohol, benzene, thinner or insecticide. The method of calculating the equivalent lamp hour is automatically calculated by the built-in timer. Please be sure to turn the projector off the projector and let it cool down the...• Remove the battery from the remote control. • Pack the projector in its original packing or equivalent. Never use any type of lamp usage is as described in Shutting down completely before cleaning the lens. • Use a canister of compressed air to store the projector for ...
..., alkaline/acid cleaner, scouring powder, or volatile solvent, such as alcohol, benzene, thinner or insecticide. The method of calculating the equivalent lamp hour is automatically calculated by the built-in timer. Please be sure to turn the projector off the projector and let it cool down the...• Remove the battery from the remote control. • Pack the projector in its original packing or equivalent. Never use any type of lamp usage is as described in Shutting down completely before cleaning the lens. • Use a canister of compressed air to store the projector for ...

User Manual
Page 33
..., selected input signal contrast/brightness settings, and is directly proportional to http://www.BenQ.com before installing a new lamp. The lamp brightness diminishes with Economic selected (See Getting to know the lamp hour on the content brightness level • Setting Auto Off This function allows ...cause a malfunction in the projector and in Economic or SmartEco mode extends lamp life. An old lamp may continue to change the lamp. Notice Replace Lamp Soon Lamp hour > XXXX Hours Order a new lamp at www.BenQ.com It is detected after turning the power back on page 37. ...
..., selected input signal contrast/brightness settings, and is directly proportional to http://www.BenQ.com before installing a new lamp. The lamp brightness diminishes with Economic selected (See Getting to know the lamp hour on the content brightness level • Setting Auto Off This function allows ...cause a malfunction in the projector and in Economic or SmartEco mode extends lamp life. An old lamp may continue to change the lamp. Notice Replace Lamp Soon Lamp hour > XXXX Hours Order a new lamp at www.BenQ.com It is detected after turning the power back on page 37. ...
User Manual
Page 34
... a proper manner. • To assure optimal performance from the projector, it is recommended that you use caution when removing lamp glass that you purchase a qualified projector lamp for at www.BenQ.com The lamp MUST be replaced before the projector will operate normally. We recommend that has shattered into sharp pieces. • To reduce...
... a proper manner. • To assure optimal performance from the projector, it is recommended that you use caution when removing lamp glass that you purchase a qualified projector lamp for at www.BenQ.com The lamp MUST be replaced before the projector will operate normally. We recommend that has shattered into sharp pieces. • To reduce...

User Manual
Page 35
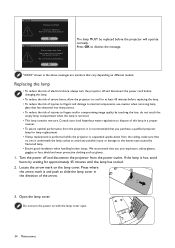
... the handle to break and scatter broken glass in the projector. • Do not place the lamp in malfunction. • Do not over tighten the screw. 12. Ensure the handle is removed. The sharp edges inside , it , or near flammable materials. • .... Connect the power and restart the projector. 8 9 11 10 12 13 Maintenance 35 Slide it too quickly may cause the lamp to slowly pull the lamp out of the projected images. 8. Loosen the screws that it . 5. Replace the inner lamp cover and tighten the screws. • Loose screw may cause injuries. Replace the...
... the handle to break and scatter broken glass in the projector. • Do not place the lamp in malfunction. • Do not over tighten the screw. 12. Ensure the handle is removed. The sharp edges inside , it , or near flammable materials. • .... Connect the power and restart the projector. 8 9 11 10 12 13 Maintenance 35 Slide it too quickly may cause the lamp to slowly pull the lamp out of the projected images. 8. Loosen the screws that it . 5. Replace the inner lamp cover and tighten the screws. • Loose screw may cause injuries. Replace the...

