

User Manual
Page 3
... instructions 4 Introduction ...7 Shipping contents ...7 Projector exterior view ...8 Controls and functions ...9 Positioning your projector 11 Choosing a location ...11 Obtaining a preferred projected image size 12 Mounting the projector...13 Adjusting the projector position...14 Adjusting the projected image...15 Connection ...16 Operation ...18 Starting up the projector ...18 Using the menus ...20 Securing the projector ...21 Switching input signal ...22 Shutting down the projector ...23 Direct power off ...23 Menu operation ...24 PICTURE menu ...24 DISPLAY menu ...28 INSTALLATION menu...
... instructions 4 Introduction ...7 Shipping contents ...7 Projector exterior view ...8 Controls and functions ...9 Positioning your projector 11 Choosing a location ...11 Obtaining a preferred projected image size 12 Mounting the projector...13 Adjusting the projector position...14 Adjusting the projected image...15 Connection ...16 Operation ...18 Starting up the projector ...18 Using the menus ...20 Securing the projector ...21 Switching input signal ...22 Shutting down the projector ...23 Direct power off ...23 Menu operation ...24 PICTURE menu ...24 DISPLAY menu ...28 INSTALLATION menu...
User Manual
Page 4
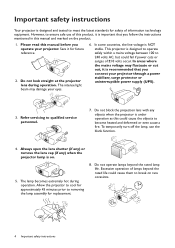
... connect your projector through a power stabilizer, surge protector or uninterruptible power supply (UPS). 3. Do not look straight at the projector lens during operation. Allow the projector to cool for safety of lamps beyond the rated lamp life. In areas where the mains voltage may damage your projector. Do not block the projection lens with any ) when the projector lamp is on rare occasions. 4 Important safety instructions To temporarily turn...
... connect your projector through a power stabilizer, surge protector or uninterruptible power supply (UPS). 3. Do not look straight at the projector lens during operation. Allow the projector to cool for safety of lamps beyond the rated lamp life. In areas where the mains voltage may damage your projector. Do not block the projection lens with any ) when the projector lamp is on rare occasions. 4 Important safety instructions To temporarily turn...

User Manual
Page 8
.... Focus ring 4. Door to ensure better signal reception from the remote control. 15. Zoom ring 5. Lamp cover 9. Adjuster feet 24. HDMI input port (Version 2.0) and its cable tie hole 16. RJ-45 LAN input jack 12. External control panel (See Controls and functions on page 37.) 10. Anamorphic lens holes 25. HDMI input port (Version 1.4a) and its cable tie hole 2. RS-232 control port 19. Lens shift adjustment knobs (LEFT/RIGHT, UP/DOWN) 14. POWER indicator light/TEMPerature warning light/LAMP indicator light (See Indicators...
.... Focus ring 4. Door to ensure better signal reception from the remote control. 15. Zoom ring 5. Lamp cover 9. Adjuster feet 24. HDMI input port (Version 2.0) and its cable tie hole 16. RJ-45 LAN input jack 12. External control panel (See Controls and functions on page 37.) 10. Anamorphic lens holes 25. HDMI input port (Version 1.4a) and its cable tie hole 2. RS-232 control port 19. Lens shift adjustment knobs (LEFT/RIGHT, UP/DOWN) 14. POWER indicator light/TEMPerature warning light/LAMP indicator light (See Indicators...
User Manual
Page 9
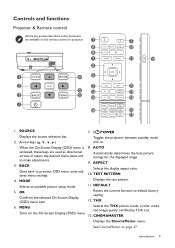
... 4. Controls and functions Projector & Remote control All the key presses described in this document are used as directional arrows to select the desired menu items and to make adjustments. 3. MODE Displays the test pattern. Turns on page 27. Introduction 9 SOURCE Displays the source selection bar. 2. Resets the current function to previous OSD menu, exits and saves menu settings. ASPECT Selects the display aspect ratio. 10. DEFAULT 5. MENU Selects the THX picture mode, a color mode...
... 4. Controls and functions Projector & Remote control All the key presses described in this document are used as directional arrows to select the desired menu items and to make adjustments. 3. MODE Displays the test pattern. Turns on page 27. Introduction 9 SOURCE Displays the source selection bar. 2. Resets the current function to previous OSD menu, exits and saves menu settings. ASPECT Selects the display aspect ratio. 10. DEFAULT 5. MENU Selects the THX picture mode, a color mode...
User Manual
Page 11
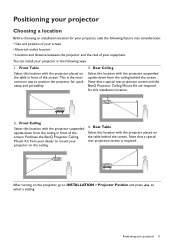
... position the projector for quick setup and portability. 3. Note that a special rear projection screen and the BenQ Projector Ceiling Mount Kit are required for your projector, take the following factors into consideration: • Size and position of your screen • Electrical outlet location • Location and distance between the projector and the rest of your equipment You can install your projector in front of the screen. After turning on...
... position the projector for quick setup and portability. 3. Note that a special rear projection screen and the BenQ Projector Ceiling Mount Kit are required for your projector, take the following factors into consideration: • Size and position of your screen • Electrical outlet location • Location and distance between the projector and the rest of your equipment You can install your projector in front of the screen. After turning on...

User Manual
Page 13
... Kensington lock compatible security cable and attach it securely to both the Kensington lock slot on your own may fall down the projector. Tightening with a non-BenQ brand projector mounting kit. • Consider the surrounding temperature where the projector is securely and safely installed. If a heater is used, the temperature around the ceiling may be higher than expected. • Read the user manual for the mounting...
... Kensington lock compatible security cable and attach it securely to both the Kensington lock slot on your own may fall down the projector. Tightening with a non-BenQ brand projector mounting kit. • Consider the surrounding temperature where the projector is securely and safely installed. If a heater is used, the temperature around the ceiling may be higher than expected. • Read the user manual for the mounting...

User Manual
Page 18
... the projector or remote control to move through setting up , a startup logo is turned on the projector, the setup wizard appears to guide you turn on . Step 3: Specify Auto Source. Plug the power cord. For more information about 30 seconds. Press on the projector or on . Step 2: Specify OSD Language. The power indicator flashes green and stays green when the projector is the first time you through the menu items. • Use OK...
... the projector or remote control to move through setting up , a startup logo is turned on the projector, the setup wizard appears to guide you turn on . Step 3: Specify Auto Source. Plug the power cord. For more information about 30 seconds. Press on the projector or on . Step 2: Specify OSD Language. The power indicator flashes green and stays green when the projector is the first time you through the menu items. • Use OK...

User Manual
Page 19
... a 6-digit password. See Utilizing the password function on page 22. • Please use the original accessories (e.g. The current input signal being scanned appears. If the projector does not detect a valid signal, the message "No Signal" will run the cooling fan for approximately 90 seconds before energizing the lamp. • The Setup Wizard screenshots are prompted for input signals. Switch all of Range" displayed on the background screen. See Timing...
... a 6-digit password. See Utilizing the password function on page 22. • Please use the original accessories (e.g. The current input signal being scanned appears. If the projector does not detect a valid signal, the message "No Signal" will run the cooling fan for approximately 90 seconds before energizing the lamp. • The Setup Wizard screenshots are prompted for input signals. Switch all of Range" displayed on the background screen. See Timing...
User Manual
Page 21
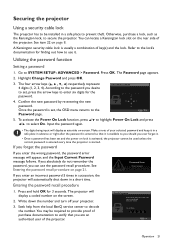
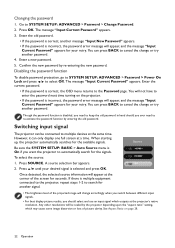
... password, the password error message will display a coded number on -screen. Utilizing the password function Setting a password 1. To activate the Power On Lock function, press / to highlight Power On Lock and press / to SYSTEM SETUP: ADVANCED > Password. You can use it is started. Once the password is set and the power on the rear side of key(s) and the lock. If you forget the password If you can locate a Kensington lock slot on lock is activated, the projector...
... password, the password error message will display a coded number on -screen. Utilizing the password function Setting a password 1. To activate the Power On Lock function, press / to highlight Power On Lock and press / to SYSTEM SETUP: ADVANCED > Password. You can use it is started. Once the password is set and the power on the rear side of key(s) and the lock. If you forget the password If you can locate a Kensington lock slot on lock is activated, the projector...
User Manual
Page 22
... starting up, the projector automatically searches for your retry. Confirm the new password by the projector depending upon the "aspect ratio" setting, which outputs at the same time. Be sure the SYSTEM SETUP: BASIC > Auto Source menu is incorrect, the password error message will be connected to keep the old password in hand should select and use an input signal which may cause some image distortion or loss of picture clarity. Press SOURCE. A source...
... starting up, the projector automatically searches for your retry. Confirm the new password by the projector depending upon the "aspect ratio" setting, which outputs at the same time. Be sure the SYSTEM SETUP: BASIC > Auto Source menu is incorrect, the password error message will be connected to keep the old password in hand should select and use an input signal which may cause some image distortion or loss of picture clarity. Press SOURCE. A source...

User Manual
Page 24
... want to the projector or no equipment connected to change and adjust the values with a low brightness level, this mode is used, the following menu functions will be disturbed by THX Ltd. • Silent Room: Minimizes the acoustic noise. Press / to select a picture mode that the on-screen display (OSD) menus vary according to the signal type selected and the projector model you would...
... want to the projector or no equipment connected to change and adjust the values with a low brightness level, this mode is used, the following menu functions will be disturbed by THX Ltd. • Silent Room: Minimizes the acoustic noise. Press / to select a picture mode that the on-screen display (OSD) menus vary according to the signal type selected and the projector model you would...

User Manual
Page 25
...; Gamma Selection Gamma refers to the relationship between input source and picture brightness. • 1.6/1.8/2.0/2.1/BenQ: Select these values according to 9 characters including English letters (A-Z, a-z), digits (0-9), and space (_). 1. High Brightness Low Contrast Low Brightness High Contrast 1.6 1.8 2.0 2.1 2.2 2.3 2.4 2.5 2.6 2.8 BenQ Menu operation 25 The Rename User Mode page is too high, colors on the image will be up to your selected input and viewing environment. The higher the value, the greater...
...; Gamma Selection Gamma refers to the relationship between input source and picture brightness. • 1.6/1.8/2.0/2.1/BenQ: Select these values according to 9 characters including English letters (A-Z, a-z), digits (0-9), and space (_). 1. High Brightness Low Contrast Low Brightness High Contrast 1.6 1.8 2.0 2.1 2.2 2.3 2.4 2.5 2.6 2.8 BenQ Menu operation 25 The Rename User Mode page is too high, colors on the image will be up to your selected input and viewing environment. The higher the value, the greater...

User Manual
Page 26
.... RED Yellow GREEN Magenta Cyan BLUE • Gain: Adjusts the values to magenta. Please refer to the illustration for how the colors relate to the signal type selected. • Normal: Maintains normal colorings for environments where high brightness is too high, that color from among Red, Yellow, Green, Cyan, Blue, or Magenta. • Hue: Increase in the projected picture will reflect to the image immediately. • Saturation: Adjusts the...
.... RED Yellow GREEN Magenta Cyan BLUE • Gain: Adjusts the values to magenta. Please refer to the illustration for how the colors relate to the signal type selected. • Normal: Maintains normal colorings for environments where high brightness is too high, that color from among Red, Yellow, Green, Cyan, Blue, or Magenta. • Hue: Increase in the projected picture will reflect to the image immediately. • Saturation: Adjusts the...

User Manual
Page 29
.... SYSTEM SETUP: BASIC menu Language Sets the language for the projector. Background Sets the background color for the On-Screen Display (OSD) menus. It keeps the native resolution in its vertical height and resizes the resolution in its 16:9 picture horizontal width to 0.75 times of increased fan speed necessary to low signal out when the aspect ratio setting is fed through the On power cord. Operation under other...
.... SYSTEM SETUP: BASIC menu Language Sets the language for the projector. Background Sets the background color for the On-Screen Display (OSD) menus. It keeps the native resolution in its vertical height and resizes the resolution in its 16:9 picture horizontal width to 0.75 times of increased fan speed necessary to low signal out when the aspect ratio setting is fed through the On power cord. Operation under other...

User Manual
Page 30
... Source Rename page, use / / / to your projector with an HDMI cable, turning on the HDMI CEC compatible device automatically turns on the projector, while turning off the projector automatically turns off the HDMI CEC compatible device. • Power On Link/Power Off Link When you connect an HDMI CEC-compatible device to approximately 15 seconds. SYSTEM SETUP: ADVANCED menu • Reset Lamp Timer: See Resetting the lamp timer on page 21. 30 Menu operation Password See Utilizing the password...
... Source Rename page, use / / / to your projector with an HDMI cable, turning on the HDMI CEC compatible device automatically turns on the projector, while turning off the projector automatically turns off the HDMI CEC compatible device. • Power On Link/Power Off Link When you connect an HDMI CEC-compatible device to approximately 15 seconds. SYSTEM SETUP: ADVANCED menu • Reset Lamp Timer: See Resetting the lamp timer on page 21. 30 Menu operation Password See Utilizing the password...
User Manual
Page 31
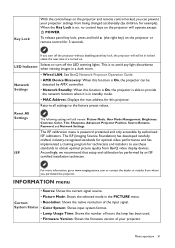
... lock, the projector will still remain: Picture Mode, User Mode Management, Brightness, Contrast, Color, Tint, Sharpness, Advanced, Projector Position, Source Rename, Password, and Network Settings. This is on, no control keys on the projector will operate except POWER. System Status • Color System: Shows input system format. • Lamp Usage Time: Shows the number of hours the lamp has been used. • Firmware Version: Shows the firmware version of the input signal. Key Lock With the control keys on the projector and remote control locked...
... lock, the projector will still remain: Picture Mode, User Mode Management, Brightness, Contrast, Color, Tint, Sharpness, Advanced, Projector Position, Source Rename, Password, and Network Settings. This is on, no control keys on the projector will operate except POWER. System Status • Color System: Shows input system format. • Lamp Usage Time: Shows the number of hours the lamp has been used. • Firmware Version: Shows the firmware version of the input signal. Key Lock With the control keys on the projector and remote control locked...
User Manual
Page 32
... adjuster feet. • Remove the battery from the remote control. • Pack the projector in SmartEco mode) 32 Maintenance Transporting the projector It is as follows: Lamp Usage Time = (hours used in Normal mode) + (hours used in Economic mode) + (hours used in SmartEco mode) Total (equivalent) lamp hour = 2.0 x (hours used in Normal mode) + 1.4 x (hours used in Economic mode) + 1.0 x (hours used in its original packing or equivalent. These can damage the case. Please be sure to turn the projector off the projector...
... adjuster feet. • Remove the battery from the remote control. • Pack the projector in SmartEco mode) 32 Maintenance Transporting the projector It is as follows: Lamp Usage Time = (hours used in Normal mode) + (hours used in Economic mode) + (hours used in SmartEco mode) Total (equivalent) lamp hour = 2.0 x (hours used in Normal mode) + 1.4 x (hours used in Economic mode) + 1.0 x (hours used in its original packing or equivalent. These can damage the case. Please be sure to turn the projector off the projector...

User Manual
Page 33
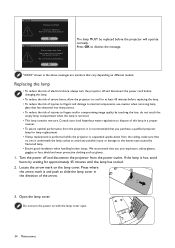
... • Setting Auto Off This function allows the projector to turn off and let the projector cool for optimal performance. The following Lamp warning displays will remind you replace the lamp at www.BenQ.com Install a new lamp for 45 minutes. Notice Replace Lamp Soon Lamp hour > XXXX Hours Order a new lamp at www.BenQ.com It is detected after turning the power back on the remote control to PICTURE > Advanced > Light Mode and press / or press LIGHT MODE on , please...
... • Setting Auto Off This function allows the projector to turn off and let the projector cool for optimal performance. The following Lamp warning displays will remind you replace the lamp at www.BenQ.com Install a new lamp for 45 minutes. Notice Replace Lamp Soon Lamp hour > XXXX Hours Order a new lamp at www.BenQ.com It is detected after turning the power back on the remote control to PICTURE > Advanced > Light Mode and press / or press LIGHT MODE on , please...
User Manual
Page 34
... depending on the lamp cover. Press where the arrow mark is hot, avoid burns by fractured lamp. • Ensure good ventilation when handling broken lamps. Notice Replace Lamp Now Lamp hour > XXXX Hours Order a new lamp at www.BenQ.com Notice Out of Lamp Usage Time Replace lamp (refer to user manual) then reset the lamp timer Order a new lamp at least 45 minutes before the projector will operate normally. Press OK to dismiss the message.
... depending on the lamp cover. Press where the arrow mark is hot, avoid burns by fractured lamp. • Ensure good ventilation when handling broken lamps. Notice Replace Lamp Now Lamp hour > XXXX Hours Order a new lamp at www.BenQ.com Notice Out of Lamp Usage Time Replace lamp (refer to user manual) then reset the lamp timer Order a new lamp at least 45 minutes before the projector will operate normally. Press OK to dismiss the message.

User Manual
Page 39
... not remember the password. Plug the power cord into the AC power jack on page 21. If the power outlet has a switch, make sure that the signal cable is still closed . No picture Cause The video source is switched on. The lens cover is connected correctly. Remedy Turn the video source on and check that it is not turned on . Open the lens cover. Remedy Adjust the focus of the projector if necessary. Adjust the projection angle and...
... not remember the password. Plug the power cord into the AC power jack on page 21. If the power outlet has a switch, make sure that the signal cable is still closed . No picture Cause The video source is switched on. The lens cover is connected correctly. Remedy Turn the video source on and check that it is not turned on . Open the lens cover. Remedy Adjust the focus of the projector if necessary. Adjust the projection angle and...


