
User Manual
Page 2
... Adjusting the sound 40 Locking control keys 40 Personalizing the projector menu display 41 Select the lamp saver mode 41 Shutting down the projector 42 Menu operation 43 Maintenance 58 Care of the projector 58 Lamp information 59 Troubleshooting......... 66 Specifications 67 Dimensions 68 Ceiling mount installation 68 Timing chart 69 Warranty...
... Adjusting the sound 40 Locking control keys 40 Personalizing the projector menu display 41 Select the lamp saver mode 41 Shutting down the projector 42 Menu operation 43 Maintenance 58 Care of the projector 58 Lamp information 59 Troubleshooting......... 66 Specifications 67 Dimensions 68 Ceiling mount installation 68 Timing chart 69 Warranty...
User Manual
Page 3
.... In some countries, the line voltage is 2. However, to qualified service personnel. 6. Always open the lens shutter or remove the lens cap when the projector lamp is under operation as this manual before 4. Do not block the projection lens with any objects when the projector is on the product. In areas...
.... In some countries, the line voltage is 2. However, to qualified service personnel. 6. Always open the lens shutter or remove the lens cap when the projector lamp is under operation as this manual before 4. Do not block the projection lens with any objects when the projector is on the product. In areas...

User Manual
Page 4
...sense some heated air and odor from its ventilation grill. Do not attempt to removing the lamp assembly for approximately 45 minutes prior to disassemble 8. Do not operate lamps beyond the rated life could cause them to suitably qualified professional service personnel. 9. Refer ...or table. Safety Instructions (Continued) 7. When the projector is under operation, you may fall, sustaining serious damage. 11. The lamp becomes extremely hot during operation. There are dangerous high voltages inside which may cause death if you ever undo or remove any electronic...
...sense some heated air and odor from its ventilation grill. Do not attempt to removing the lamp assembly for approximately 45 minutes prior to disassemble 8. Do not operate lamps beyond the rated life could cause them to suitably qualified professional service personnel. 9. Refer ...or table. Safety Instructions (Continued) 7. When the projector is under operation, you may fall, sustaining serious damage. 11. The lamp becomes extremely hot during operation. There are dangerous high voltages inside which may cause death if you ever undo or remove any electronic...

User Manual
Page 5
... a malfunction of, or damage to right, nor at least 50 cm clearance from walls and free flow of more than 10 degrees left to , the lamp. 3000 m (10000 feet) 0 m (0 feet) Important safety instructions 5 Do not block the ventilation holes.
... a malfunction of, or damage to right, nor at least 50 cm clearance from walls and free flow of more than 10 degrees left to , the lamp. 3000 m (10000 feet) 0 m (0 feet) Important safety instructions 5 Do not block the ventilation holes.
User Manual
Page 7
... in standby mode • The apparent brightness of the projected image will decline over time and may vary within the lamp manufacturers specifications. Introduction 7 This is proportional to projection distance. • The lamp brightness will vary depending on the ambient lighting conditions, selected input signal contrast/ brightness settings, and is normal and...
... in standby mode • The apparent brightness of the projected image will decline over time and may vary within the lamp manufacturers specifications. Introduction 7 This is proportional to projection distance. • The lamp brightness will vary depending on the ambient lighting conditions, selected input signal contrast/ brightness settings, and is normal and...

User Manual
Page 9
Carry bag 4. 3D glasses Introduction 9 Ceiling mount kit 3. Spare lamp kit 2. Optional accessories 1.
Carry bag 4. 3D glasses Introduction 9 Ceiling mount kit 3. Spare lamp kit 2. Optional accessories 1.

User Manual
Page 10
Lamp cover 3. Audio output jack 15. Vent (heated air exhaust) 18. Focus ring 5. Kensington anti-theft lock slot 16. Security bar 17. Vent (air inhale) 4. Projection ...
Lamp cover 3. Audio output jack 15. Vent (heated air exhaust) 18. Focus ring 5. Kensington anti-theft lock slot 16. Security bar 17. Vent (air inhale) 4. Projection ...
User Manual
Page 11
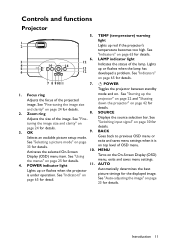
... "Fine-tuning the image size down the projector" on page 42 for and clarity" on page 24 for details. SOURCE Adjusts the size of the lamp. See "Fine- Displays the source selection bar. See "Using Turns on the On-Screen Display (OSD) the menus" on page 65 for details. 7 8 ...Selecting a picture mode" on page 23 for detail. Activates the selected On-Screen 10. POWER indicator light 11. AUTO Lights up or flashes when the lamp has 6 12 developed a problem. page 65 for details. See "Auto-adjusting the image" on page exits and saves menu settings when it is under...
... "Fine-tuning the image size down the projector" on page 42 for and clarity" on page 24 for details. SOURCE Adjusts the size of the lamp. See "Fine- Displays the source selection bar. See "Using Turns on the On-Screen Display (OSD) the menus" on page 65 for details. 7 8 ...Selecting a picture mode" on page 23 for detail. Activates the selected On-Screen 10. POWER indicator light 11. AUTO Lights up or flashes when the lamp has 6 12 developed a problem. page 65 for details. See "Auto-adjusting the image" on page exits and saves menu settings when it is under...

User Manual
Page 14
... perpendicular to the projector's IR remote control sensor to 20. See "Auto-adjusting the image" off the image for details. 70% lamp power saving. LIGHT MODE restore the image. The distance between the remote control and the IR sensor on page 39 for the displayed ...turn image. COLOR MANAGE Displays the contrast setting bar. SHARP SmartEco). CONTRAST 21. Automatically determines the best 22. See "Hiding the Displays the lamp power mode selection bar (Normal/Economic/ image" on the projector that might obstruct the infra-red beam. • Operating the projector from ...
... perpendicular to the projector's IR remote control sensor to 20. See "Auto-adjusting the image" off the image for details. 70% lamp power saving. LIGHT MODE restore the image. The distance between the remote control and the IR sensor on page 39 for the displayed ...turn image. COLOR MANAGE Displays the contrast setting bar. SHARP SmartEco). CONTRAST 21. Automatically determines the best 22. See "Hiding the Displays the lamp power mode selection bar (Normal/Economic/ image" on the projector that might obstruct the infra-red beam. • Operating the projector from ...

User Manual
Page 22
... signal. From the Advanced menu, you are two menu types for a password, press the arrow keys to search for approximately 90 seconds before energizing the lamp. 3. The projector will continue displaying until an input signal is without input signal. See "Switching input signal" on page 28 for details. 2. Turn on page...
... signal. From the Advanced menu, you are two menu types for a password, press the arrow keys to search for approximately 90 seconds before energizing the lamp. 3. The projector will continue displaying until an input signal is without input signal. See "Switching input signal" on page 28 for details. 2. Turn on page...

User Manual
Page 23
... the exhaust vent where hot air comes from. • If no signal is detected for details. • Do not look into the lens while the lamp is on. If the projector is close to lock the foot in Intelligent Auto Adjustment function will re-adjust the values of the projector. To... perpendicular to your eyes. • Be careful when you want it is not placed on the projector or remote control. The strong light from the lamp may cause damage to each other, the projected image becomes trapezoidal. Within 3 seconds, the built-in position. Pull the quick-release lever and lift the...
... the exhaust vent where hot air comes from. • If no signal is detected for details. • Do not look into the lens while the lamp is on. If the projector is close to lock the foot in Intelligent Auto Adjustment function will re-adjust the values of the projector. To... perpendicular to your eyes. • Be careful when you want it is not placed on the projector or remote control. The strong light from the lamp may cause damage to each other, the projected image becomes trapezoidal. Within 3 seconds, the built-in position. Pull the quick-release lever and lift the...

User Manual
Page 36
..., the grayscale is with a high color temperature appears to 100 IRE (white); Selecting a Color Temperature Select Color Temperaturein the Advanced menu > Picture > Advanced... Lamp Native: With the lamp's original color temperature and higher brightness. A white color with 0 IRE or 7.5 IRE, then select accordingly. If you check the input source to match the...
..., the grayscale is with a high color temperature appears to 100 IRE (white); Selecting a Color Temperature Select Color Temperaturein the Advanced menu > Picture > Advanced... Lamp Native: With the lamp's original color temperature and higher brightness. A white color with 0 IRE or 7.5 IRE, then select accordingly. If you check the input source to match the...

User Manual
Page 37
... be necessary, such as boardrooms, lecture theaters, or home theaters, should you want to be considered. Operation 37 Select Color Temperature and select Cool, Normal, Lamp Native or Warm by pressing / . • Red Gain/Green Gain/Blue Gain: Adjusts the contrast levels of Red, Green, and Blue. • Red Offset/Green...
... be necessary, such as boardrooms, lecture theaters, or home theaters, should you want to be considered. Operation 37 Select Color Temperature and select Cool, Normal, Lamp Native or Warm by pressing / . • Red Gain/Green Gain/Blue Gain: Adjusts the contrast levels of Red, Green, and Blue. • Red Offset/Green...

User Manual
Page 39
... Mode to solve these symptoms. However, this function is between 0 m and 1500 m and ambient temperature is activated with up 70% of the projector lamp. To activate the High Altitude Mode: 1. A confirmation message displays.. 3. In cases like this, you use the High Altitude Mode if your altitude is...not use this projector can still be over cooled, if you use the High Altitude Mode when your environment is designed to protect your lamp power. If the projector is installed a filter cover, make sure the Menu Type is turned on the projector or remote control. Press ...
... Mode to solve these symptoms. However, this function is between 0 m and 1500 m and ambient temperature is activated with up 70% of the projector lamp. To activate the High Altitude Mode: 1. A confirmation message displays.. 3. In cases like this, you use the High Altitude Mode if your altitude is...not use this projector can still be over cooled, if you use the High Altitude Mode when your environment is designed to protect your lamp power. If the projector is installed a filter cover, make sure the Menu Type is turned on the projector or remote control. Press ...

User Manual
Page 41
...screen to select a preferred position. • Menu Display Time in 5-second increments. Operation 41 Use / to be displayed during projector start-up. The lamp brightness vary from 5 to select a preferred type. • Menu Position in the Advanced menu > System Setup: Basic > Menu Settings menu sets ... Settings menu sets the length of time the OSD will be set according to the Advanced menu > Picture > Lamp Power menu. 2. The time length ranges from the different lamp mode,see the description list in the Advanced menu > System Setup: Basic > Menu Settings menu sets whether to...
...screen to select a preferred position. • Menu Display Time in 5-second increments. Operation 41 Use / to be displayed during projector start-up. The lamp brightness vary from 5 to select a preferred type. • Menu Position in the Advanced menu > System Setup: Basic > Menu Settings menu sets ... Settings menu sets the length of time the OSD will be set according to the Advanced menu > Picture > Lamp Power menu. 2. The time length ranges from the different lamp mode,see the description list in the Advanced menu > System Setup: Basic > Menu Settings menu sets whether to...

User Manual
Page 42
... in an extended period of time. • If the projector is a steady orange and fans stop and the POWER turns green. • Actual lamp life may vary due to different environmental conditions and usage. • If the projector is not properly shut down . Press II POWER on the projector...run for details. 3. Press II POWER on the projector or OFF on page 56 for approximately 90 seconds to cool down , it will damage the lamp and cause an effect on the remote control and a confirmation message displays prompting you. See "Quick Cooling" on the remote control a second time. ...
... in an extended period of time. • If the projector is a steady orange and fans stop and the POWER turns green. • Actual lamp life may vary due to different environmental conditions and usage. • If the projector is not properly shut down . Press II POWER on the projector...run for details. 3. Press II POWER on the projector or OFF on page 56 for approximately 90 seconds to cool down , it will damage the lamp and cause an effect on the remote control and a confirmation message displays prompting you. See "Quick Cooling" on the remote control a second time. ...

User Manual
Page 43
...without signal menus above. Basic menu Sub-menu Wall Color Without signal Projector Position Test Pattern Auto Source Search Menu Type HDMI Range Reset Lamp Timer Reset All Settings Information Picture Mode Volume Mute With signal 3D Mode 3D Sync Invert Settings Options Off/Light Yellow/Pink/Green/ ...Front/Front Ceiling/Rear/Rear Ceiling Off/On On/Off Basic/Advanced Auto/Full/Limited Reset/Cancel Reset/Cancel Source Picture Mode Resolution Color System Lamp Usage Time 3D Format Firmware Version Bright/Vivid TV/Cinema/Sport/ User 1/User 2/3D Off/On Auto/3D Off/Frame Sequential/ Frame ...
...without signal menus above. Basic menu Sub-menu Wall Color Without signal Projector Position Test Pattern Auto Source Search Menu Type HDMI Range Reset Lamp Timer Reset All Settings Information Picture Mode Volume Mute With signal 3D Mode 3D Sync Invert Settings Options Off/Light Yellow/Pink/Green/ ...Front/Front Ceiling/Rear/Rear Ceiling Off/On On/Off Basic/Advanced Auto/Full/Limited Reset/Cancel Reset/Cancel Source Picture Mode Resolution Color System Lamp Usage Time 3D Format Firmware Version Bright/Vivid TV/Cinema/Sport/ User 1/User 2/3D Off/On Auto/3D Off/Frame Sequential/ Frame ...

User Manual
Page 44
... On/Off Ring Tone Reset Audio Settings Options Bright/Vivid TV/Cinema/Sport/ User 1/User 2/3D Bright/Vivid TV/Cinema/Sport/ User 1/User 2 Normal/Cool/Lamp Native/ Warm Normal/Economic/SmartEco 0 IRE/7.5 IRE 1.6/ 1.8/ 2.0/ 2.1/ 2.2/2.3/ 2.4/ 2.6/ 2.8 On/Off Red Gain/Green Gain/Blue Gain/Red Offset/Green Offset/ Blue Offset Primary ...functions will be gray out. Advanced menu Picture Audio Sub-menu Picture Mode User Mode Management Brightness Contrast Color Tint Sharpness Color Temperature Lamp Power Advanced... Supported functions in each Advanced menu vary by different input sources.
... On/Off Ring Tone Reset Audio Settings Options Bright/Vivid TV/Cinema/Sport/ User 1/User 2/3D Bright/Vivid TV/Cinema/Sport/ User 1/User 2 Normal/Cool/Lamp Native/ Warm Normal/Economic/SmartEco 0 IRE/7.5 IRE 1.6/ 1.8/ 2.0/ 2.1/ 2.2/2.3/ 2.4/ 2.6/ 2.8 On/Off Red Gain/Green Gain/Blue Gain/Red Offset/Green Offset/ Blue Offset Primary ...functions will be gray out. Advanced menu Picture Audio Sub-menu Picture Mode User Mode Management Brightness Contrast Color Tint Sharpness Color Temperature Lamp Power Advanced... Supported functions in each Advanced menu vary by different input sources.

User Manual
Page 47
... the projector or no signal detected, limited menu items are available when the projector detects at least one valid signal. Reset Lamp Timer Lamp Settings Lamp Timer Reset/Cancel Lamp Usage Time Equivalent Lamp Hour HDMI Settings HDMI Range Auto/Full/Limited Baud Rate 9600/14400/19200/38400/ 57600/115200 Test Pattern Off/On System... Lock On/Off Key Lock Off/On Yes/No LED Indicator On/Off Reset All Settings Reset/Cancel Source Picture Mode Resolution Information Color System Lamp Usage Time 3D Format Firmware Version Note that the menu items are accessible.
... the projector or no signal detected, limited menu items are available when the projector detects at least one valid signal. Reset Lamp Timer Lamp Settings Lamp Timer Reset/Cancel Lamp Usage Time Equivalent Lamp Hour HDMI Settings HDMI Range Auto/Full/Limited Baud Rate 9600/14400/19200/38400/ 57600/115200 Test Pattern Off/On System... Lock On/Off Key Lock Off/On Yes/No LED Indicator On/Off Reset All Settings Reset/Cancel Source Picture Mode Resolution Information Color System Lamp Usage Time 3D Format Firmware Version Note that the menu items are accessible.
User Manual
Page 48
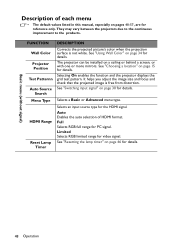
See "Resetting the lamp timer" on page 34 for details. See "Using Wall Color" on page 66 for details. 48 Operation Selects a Basic or Advanced menu type. They may ... grid test pattern. Limited Selects RGB limited range for details. FUNCTION Wall Color Projector Position Test Patternn Auto Source Search Menu Type HDMI Range Reset Lamp Timer DESCRIPTION Corrects the projected picture's color when the projection surface is free from distortion.
See "Resetting the lamp timer" on page 34 for details. See "Using Wall Color" on page 66 for details. 48 Operation Selects a Basic or Advanced menu type. They may ... grid test pattern. Limited Selects RGB limited range for details. FUNCTION Wall Color Projector Position Test Patternn Auto Source Search Menu Type HDMI Range Reset Lamp Timer DESCRIPTION Corrects the projected picture's color when the projection surface is free from distortion.


