

User Manual
Page 2
... projected image size 17 Connection 18 Connecting a computer 19 Connecting Video source devices ...... 20 Operation 22 Starting up the projector 22 Adjusting the projected image 23 Using the menus 25 Securing the projector 28 Switching input signal 30 Selecting the aspect ratio 31 Optimizing the image 33 Advanced picture quality controls...... 36 Hiding the image 39 Operating in a high altitude environment 39 Adjusting the sound 40 Locking control keys 40 Personalizing the projector menu display 41 Select the lamp saver mode 41 Shutting down the projector...
... projected image size 17 Connection 18 Connecting a computer 19 Connecting Video source devices ...... 20 Operation 22 Starting up the projector 22 Adjusting the projected image 23 Using the menus 25 Securing the projector 28 Switching input signal 30 Selecting the aspect ratio 31 Optimizing the image 33 Advanced picture quality controls...... 36 Hiding the image 39 Operating in a high altitude environment 39 Adjusting the sound 40 Locking control keys 40 Personalizing the projector menu display 41 Select the lamp saver mode 41 Shutting down the projector...
User Manual
Page 3
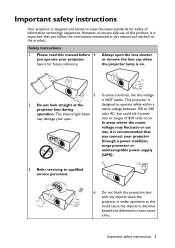
... ensure safe use of information technology equipment. However, to meet the latest standards for future reference. Safety Instructions 1. The intense light beam may fluctuate or cut out, it for safety of this manual before 4. Always open the lens shutter or remove the lens cap when the projector lamp is important that you operate your projector through a power stabilizer, surge protector or uninterruptible power supply (UPS...
... ensure safe use of information technology equipment. However, to meet the latest standards for future reference. Safety Instructions 1. The intense light beam may fluctuate or cut out, it for safety of this manual before 4. Always open the lens shutter or remove the lens cap when the projector lamp is important that you operate your projector through a power stabilizer, surge protector or uninterruptible power supply (UPS...
User Manual
Page 7
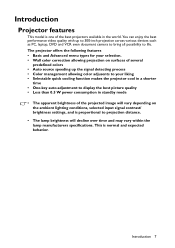
... the projected image will vary depending on the ambient lighting conditions, selected input signal contrast/ brightness settings, and is proportional to display the best picture quality • Less than 0.5 W power consumption in standby mode • The apparent brightness of the best projectors available in a shorter time • One-key auto-adjustment to projection distance. • The lamp brightness will decline over time and may vary within the lamp manufacturers specifications. You...
... the projected image will vary depending on the ambient lighting conditions, selected input signal contrast/ brightness settings, and is proportional to display the best picture quality • Less than 0.5 W power consumption in standby mode • The apparent brightness of the best projectors available in a shorter time • One-key auto-adjustment to projection distance. • The lamp brightness will decline over time and may vary within the lamp manufacturers specifications. You...
User Manual
Page 11
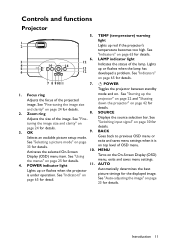
... an available picture setup mode. menu, exits and saves menu settings. 4. AUTO Lights up red if the projector's temperature becomes too high. Introduction 11 Lights 13 up the Adjusts the focus of OSD menu. See "Indicators" on page 22 and "Shutting image. Focus ring mode and on top level of the projected projector" on page 65 for details. See "Starting up or flashes when the lamp has 6 12 developed a problem. details. 3. on . See "Using Turns on the On-Screen Display (OSD...
... an available picture setup mode. menu, exits and saves menu settings. 4. AUTO Lights up red if the projector's temperature becomes too high. Introduction 11 Lights 13 up the Adjusts the focus of OSD menu. See "Indicators" on page 22 and "Shutting image. Focus ring mode and on top level of the projected projector" on page 65 for details. See "Starting up or flashes when the lamp has 6 12 developed a problem. details. 3. on . See "Using Turns on the On-Screen Display (OSD...

User Manual
Page 12
... Kensington lock slot on page 24 for details. details. Ceiling mounting the projector We want you ensure it securely to your BenQ projector. BenQ recommends that the projector may fall from the ceiling due to person and property. 12. Keystone/Arrow keys ( / Up, 14. Volume /Arrow keys ( / Left, / Down) / Right) Manually corrects distorted images Adjusts the sound level. ECO BLANK When the On-Screen Display (OSD) menu...
... Kensington lock slot on page 24 for details. details. Ceiling mounting the projector We want you ensure it securely to your BenQ projector. BenQ recommends that the projector may fall from the ceiling due to person and property. 12. Keystone/Arrow keys ( / Up, 14. Volume /Arrow keys ( / Left, / Down) / Right) Manually corrects distorted images Adjusts the sound level. ECO BLANK When the On-Screen Display (OSD) menu...

User Manual
Page 13
.... exits and saves menu settings when it is not supported 1 2 11 3 12 by this model. 7. 3D Activates the 3D On-Screen Display 3 3 (OSD) menu item. 4 13 8. ON "Switching input signal" on page 30 for Turns on page 33 for details. See "Selecting a picture mode" on the projector. Introduction 13 OFF 10 21 22 Turns off . PIC MODE and off the projector. Remote control 6. Volume keys (VOL / ) See "Using the menus...
.... exits and saves menu settings when it is not supported 1 2 11 3 12 by this model. 7. 3D Activates the 3D On-Screen Display 3 3 (OSD) menu item. 4 13 8. ON "Switching input signal" on page 30 for Turns on page 33 for details. See "Selecting a picture mode" on the projector. Introduction 13 OFF 10 21 22 Turns off . PIC MODE and off the projector. Remote control 6. Volume keys (VOL / ) See "Using the menus...
User Manual
Page 16
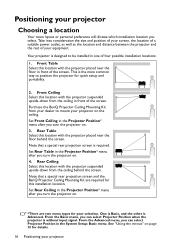
... installation locations: 1. Set Front Ceiling in front of your equipment. Set Rear Table in the Projector Position* menu after you turn the projector on . 3. This is Advanced. Rear Table Select this location with the projector suspended upside-down from the ceiling in one of the screen. Set Rear Ceiling in the System Setup: Basic menu. Purchase the BenQ Projector Ceiling Mounting Kit from the ceiling behind the screen. Note that a special rear projection screen and the BenQ Projector Ceiling Mounting...
... installation locations: 1. Set Front Ceiling in front of your equipment. Set Rear Table in the Projector Position* menu after you turn the projector on . 3. This is Advanced. Rear Table Select this location with the projector suspended upside-down from the ceiling in one of the screen. Set Rear Ceiling in the System Setup: Basic menu. Purchase the BenQ Projector Ceiling Mounting Kit from the ceiling behind the screen. Note that a special rear projection screen and the BenQ Projector Ceiling Mounting...

User Manual
Page 22
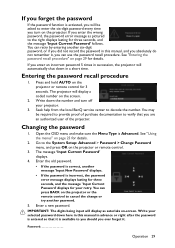
... POWER flashes and stays orange when the projector is without input signal. Turn on page 54 for details. • *There are prompted for your desired input signal. Check that the POWER indicator light on the projector or remote control to enter a six digit password. See "Direct Power On" on the power outlet switch (where fitted). From the Basic menu, you are two menu types for a password, press the arrow keys to select your selection. Operation Starting...
... POWER flashes and stays orange when the projector is without input signal. Turn on page 54 for details. • *There are prompted for your desired input signal. Check that the POWER indicator light on the projector or remote control to enter a six digit password. See "Direct Power On" on the power outlet switch (where fitted). From the Basic menu, you are two menu types for a password, press the arrow keys to select your selection. Operation Starting...
User Manual
Page 29
... it . The projector will display a coded number on page 29 for three seconds, and the message 'Input Current Password' follows. Seek help from the local BenQ service center to decode the number. You may be asked to enter the six-digit password every time you turn off your retry. IMPORTANT: The digits being input will display as pictured to the System Setup: Advanced > Password > Change Password menu, and press OK on the projector or remote control. 3. If...
... it . The projector will display a coded number on page 29 for three seconds, and the message 'Input Current Password' follows. Seek help from the local BenQ service center to decode the number. You may be asked to enter the six-digit password every time you turn off your retry. IMPORTANT: The digits being input will display as pictured to the System Setup: Advanced > Password > Change Password menu, and press OK on the projector or remote control. 3. If...
User Manual
Page 30
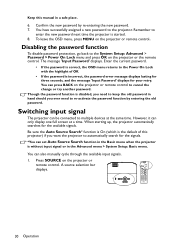
... displays. 30 Operation To leave the OSD menu, press MENU on the projector or remote control. However, it can press BACK on the projector or remote control to the System Setup: Advanced > Password > Power On Lock menu and press OK on the projector or the remote control. Though the password function is incorrect, the password error message displays lasting for three seconds, and the message 'Input Password' displays for the available signals. Remember to enter the new password next time the projector...
... displays. 30 Operation To leave the OSD menu, press MENU on the projector or remote control. However, it can press BACK on the projector or remote control to the System Setup: Advanced > Password > Power On Lock menu and press OK on the projector or the remote control. Though the password function is incorrect, the password error message displays lasting for three seconds, and the message 'Input Password' displays for the available signals. Remember to enter the new password next time the projector...

User Manual
Page 36
... you check the input source to be reddish white. menu and adjust the values by pressing / on the projector or remote control. One of the common methods of an image in order to 100 IRE (white); The grayscale video signal is measured from 7.5 IRE (black) to match the source more vibrant colors in picture. Choose a preferred gamma mode from 0 IRE (black) to the light intensity (brightness) of representing white color...
... you check the input source to be reddish white. menu and adjust the values by pressing / on the projector or remote control. One of the common methods of an image in order to 100 IRE (white); The grayscale video signal is measured from 7.5 IRE (black) to match the source more vibrant colors in picture. Choose a preferred gamma mode from 0 IRE (black) to the light intensity (brightness) of representing white color...

User Manual
Page 38
... projector or remote control. Select Noise Reduction in the Advanced menu > Picture > Advanced... menu and select by different media players. When Off is selected, the Film Mode function is the default and recommended selection for how the colors relate to the image immediately. 6. Please refer to the illustration to the right for this projector. RED Yellow GREEN Magenta Cyan BLUE 5. If the saturation is too high...
... projector or remote control. Select Noise Reduction in the Advanced menu > Picture > Advanced... menu and select by different media players. When Off is selected, the Film Mode function is the default and recommended selection for how the colors relate to the image immediately. 6. Please refer to the illustration to the right for this projector. RED Yellow GREEN Magenta Cyan BLUE 5. If the saturation is too high...

User Manual
Page 39
... time with an audio input connected,the audio can operate under such a condition. Do not use the High Altitude Mode if your environment is between 0°C- 35°C. A confirmation message displays.. 3. Open the OSD menu and make sure that this projector under "High Altitude Mode" may display auto shut-down symptoms, which is between 0 m and 1500 m and ambient temperature is designed to protect your projector from remote control to restore the image. Hiding the image...
... time with an audio input connected,the audio can operate under such a condition. Do not use the High Altitude Mode if your environment is between 0°C- 35°C. A confirmation message displays.. 3. Open the OSD menu and make sure that this projector under "High Altitude Mode" may display auto shut-down symptoms, which is between 0 m and 1500 m and ambient temperature is designed to protect your projector from remote control to restore the image. Hiding the image...

User Manual
Page 41
... menu > System Setup: Basic > Menu Settings menu sets the length of time the OSD will be displayed during projector start-up. Use / / / and OK on the projector or remote control to extend the lamp life and decreases the fan noise Adjusts the lamp power automatically depending on the content brightness level If the Economic mode or SmartEco mode is selected, the light output will remain active after your last key press. Use / to select a screen...
... menu > System Setup: Basic > Menu Settings menu sets the length of time the OSD will be displayed during projector start-up. Use / / / and OK on the projector or remote control to extend the lamp life and decreases the fan noise Adjusts the lamp power automatically depending on the content brightness level If the Economic mode or SmartEco mode is selected, the light output will remain active after your last key press. Use / to select a screen...

User Manual
Page 43
... the on-screen display (OSD) menus vary according to without signal menus above. Operation 43 Basic menu Sub-menu Wall Color Without signal Projector Position Test Pattern Auto Source Search Menu Type HDMI Range Reset Lamp Timer Reset All Settings Information Picture Mode Volume Mute With signal 3D Mode 3D Sync Invert Settings Options Off/Light Yellow/Pink/Green/ Blue Front/Front Ceiling/Rear/Rear Ceiling Off/On On/Off Basic/Advanced Auto/Full/Limited Reset/Cancel Reset/Cancel Source Picture Mode Resolution Color System Lamp Usage Time 3D Format Firmware Version...
... the on-screen display (OSD) menus vary according to without signal menus above. Operation 43 Basic menu Sub-menu Wall Color Without signal Projector Position Test Pattern Auto Source Search Menu Type HDMI Range Reset Lamp Timer Reset All Settings Information Picture Mode Volume Mute With signal 3D Mode 3D Sync Invert Settings Options Off/Light Yellow/Pink/Green/ Blue Front/Front Ceiling/Rear/Rear Ceiling Off/On On/Off Basic/Advanced Auto/Full/Limited Reset/Cancel Reset/Cancel Source Picture Mode Resolution Color System Lamp Usage Time 3D Format Firmware Version...

User Manual
Page 49
... firmware version. Basic menu (without signal) FUNCTION Reset All Settings Information DESCRIPTION Returns all settings to default: Aspect Ratio, Wall Color, Image Position, Overscan Adjustment, PC Tuning, 3D, Language, Background Color, Splash Screen, Auto Off, Direct Power On, Menu Settings, Auto Source Search, HDMI Settings, Baud Rate, Test Pattern, Closed Caption, Quick Cooling, High Altitude Mode and Key Lock. Picture Mode Shows the selected mode in the Picture menu. Color System Shows input system format RGB or YUV. Lamp Usage Time Displays the number...
... firmware version. Basic menu (without signal) FUNCTION Reset All Settings Information DESCRIPTION Returns all settings to default: Aspect Ratio, Wall Color, Image Position, Overscan Adjustment, PC Tuning, 3D, Language, Background Color, Splash Screen, Auto Off, Direct Power On, Menu Settings, Auto Source Search, HDMI Settings, Baud Rate, Test Pattern, Closed Caption, Quick Cooling, High Altitude Mode and Key Lock. Picture Mode Shows the selected mode in the Picture menu. Color System Shows input system format RGB or YUV. Lamp Usage Time Displays the number...
User Manual
Page 55
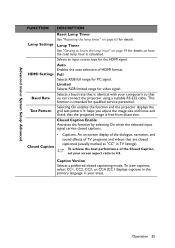
... sound effects of HDMI format. Baud Rate Selects a baud rate that is identical with your area). Auto Enables the auto selection of TV programs and videos that are closed captioning mode. Selecting On enables the function and the projector displays the Test Pattern grid test pattern. It helps you adjust the image size and focus and check that ou can connect the projector using a suitable RS-232 cable...
... sound effects of HDMI format. Baud Rate Selects a baud rate that is identical with your area). Auto Enables the auto selection of TV programs and videos that are closed captioning mode. Selecting On enables the function and the projector displays the Test Pattern grid test pattern. It helps you adjust the image size and focus and check that ou can connect the projector using a suitable RS-232 cable...

User Manual
Page 62
... of electrical shock, always turn the projector off and disconnect the projector from the projector, it is recommended that you use caution when removing lamp glass that no one is removed. • This lamp contains mercury. Manage in a proper manner. • To assure optimal performance from the power outlet. Turn the power off and disconnect the power cord before replacing the lamp. • To reduce the...
... of electrical shock, always turn the projector off and disconnect the projector from the projector, it is recommended that you use caution when removing lamp glass that no one is removed. • This lamp contains mercury. Manage in a proper manner. • To assure optimal performance from the power outlet. Turn the power off and disconnect the power cord before replacing the lamp. • To reduce the...

User Manual
Page 65
Indicators Light Status & Description POWER TEMP LAMP Orange Green Flashing Green Orange Flashing Red Flashing Green Green Green Off Off Red Red Green Green Green Green Flashing System Message Off Off Stand-by mode Off Off Powering up Off Off Normal operation Off Off Normal power-down cooling Red Flashing Red Flashing Download Off Red CW start fail Burn-In Messages Off Green Off Burn-in ON Green Burn-in OFF Lamp Error Messages Off Red Lamp1 error in normal operation Off Orange Flashing Lamp is not lit up Thermal Error Messages Red Red Flashing Red Red Flashing ...
Indicators Light Status & Description POWER TEMP LAMP Orange Green Flashing Green Orange Flashing Red Flashing Green Green Green Off Off Red Red Green Green Green Green Flashing System Message Off Off Stand-by mode Off Off Powering up Off Off Normal operation Off Off Normal power-down cooling Red Flashing Red Flashing Download Off Red CW start fail Burn-In Messages Off Green Off Burn-in ON Green Burn-in OFF Lamp Error Messages Off Red Lamp1 error in normal operation Off Orange Flashing Lamp is not lit up Thermal Error Messages Red Red Flashing Red Red Flashing ...

User Manual
Page 66
... power outlet has a switch, make sure that the signal cable is not correctly connected to turn on the projector, and plug the power cord into the AC inlet on . Select the correct input signal with new one. Remote control does not work Cause Remedy The battery is switched on the projector or remote control. The password is not correctly focused. Turn the video source on page 29 for details. 66 Troubleshooting Blurred image Cause Remedy The projection lens...
... power outlet has a switch, make sure that the signal cable is not correctly connected to turn on the projector, and plug the power cord into the AC inlet on . Select the correct input signal with new one. Remote control does not work Cause Remedy The battery is switched on the projector or remote control. The password is not correctly focused. Turn the video source on page 29 for details. 66 Troubleshooting Blurred image Cause Remedy The projection lens...


