
User Manual
Page 2
... and be easily accessible. • This product should never be operated from time to time in any form or by BenQ Corporation. Clean the LCD monitor surface with respect to the contents hereof and specifically disclaims any warranties, merchantability or fitness for pluggable equipment. v Servicing •...top of the cabinet are not sure of the type of such revision or changes. If any of BenQ Corporation. iv Care And Cleaning • Cleaning. Always unplug your monitor iii Power Safety • The AC plug isolates this product. Avoid using any liquid, aerosol or ...
... and be easily accessible. • This product should never be operated from time to time in any form or by BenQ Corporation. Clean the LCD monitor surface with respect to the contents hereof and specifically disclaims any warranties, merchantability or fitness for pluggable equipment. v Servicing •...top of the cabinet are not sure of the type of such revision or changes. If any of BenQ Corporation. iv Care And Cleaning • Cleaning. Always unplug your monitor iii Power Safety • The AC plug isolates this product. Avoid using any liquid, aerosol or ...
User Manual
Page 4
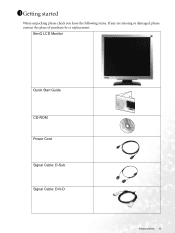
1111Getting started 4 BenQ LCD Monitor Quick Start Guide CD-ROM Power Cord Signal Cable: D-Sub Signal Cable: DVI-D 02 P/N:53.L900 3 .0 Getting started When unpacking please check you have the following items. If any are missing or damaged, please contact the place of purchase for a replacement.
1111Getting started 4 BenQ LCD Monitor Quick Start Guide CD-ROM Power Cord Signal Cable: D-Sub Signal Cable: DVI-D 02 P/N:53.L900 3 .0 Getting started When unpacking please check you have the following items. If any are missing or damaged, please contact the place of purchase for a replacement.
User Manual
Page 6
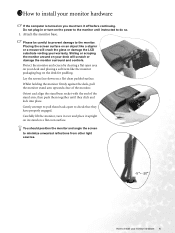
... unwanted reflections from other light sources. -5 ~ -20 How to install your desk will crack the glass or damage the LCD substrate voiding your warranty. 1311How to install your monitor hardware If the computer is turned on a flat even surface. Please be careful to prevent damage to do so. 1. ...Do not plug-in or turn it upright on its stand on you must turn -on your monitor hardware 6 Sliding or scraping the monitor around on the power to the monitor until they have properly engaged. Lay the screen face down on a flat clean padded surface. Orient and align...
... unwanted reflections from other light sources. -5 ~ -20 How to install your desk will crack the glass or damage the LCD substrate voiding your warranty. 1311How to install your monitor hardware If the computer is turned on a flat even surface. Please be careful to prevent damage to do so. 1. ...Do not plug-in or turn it upright on its stand on you must turn -on your monitor hardware 6 Sliding or scraping the monitor around on the power to the monitor until they have properly engaged. Lay the screen face down on a flat clean padded surface. Orient and align...
User Manual
Page 7
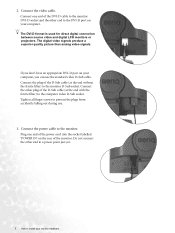
... during use the standard video D-Sub cable. The DVI-D format is used for direct digital connection between source video and digital LCD monitors or projectors. Tighten all finger screws to the monitor D-Sub socket. Connect the video cable. Connect the other plug of the D-Sub cable (at the end with the ferrite... filter) to the monitor. If you don't have an appropriate DVI-D port on your computer. Connect the power cable to the computer video D-Sub socket. Connect one end...
... during use the standard video D-Sub cable. The DVI-D format is used for direct digital connection between source video and digital LCD monitors or projectors. Tighten all finger screws to the monitor D-Sub socket. Connect the video cable. Connect the other plug of the D-Sub cable (at the end with the ferrite... filter) to the monitor. If you don't have an appropriate DVI-D port on your computer. Connect the power cable to the computer video D-Sub socket. Connect one end...
User Manual
Page 9
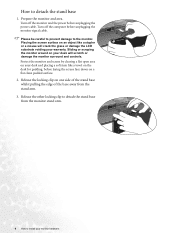
...power cable. Please be careful to prevent damage to detach the stand base 1. Release the other locking clip to install your monitor hardware Prepare the monitor and area. Placing the screen surface on one side of the stand base whilst pulling the edge of the base away ...will crack the glass or damage the LCD substrate voiding your desk and placing a soft item like a stapler or a mouse will scratch or damage the monitor surround and controls. Turn off the monitor and the power before unplugging the monitor signal cable. Protect the monitor and screen by clearing a flat open...
...power cable. Please be careful to prevent damage to detach the stand base 1. Release the other locking clip to install your monitor hardware Prepare the monitor and area. Placing the screen surface on one side of the stand base whilst pulling the edge of the base away ...will crack the glass or damage the LCD substrate voiding your desk and placing a soft item like a stapler or a mouse will scratch or damage the monitor surround and controls. Turn off the monitor and the power before unplugging the monitor signal cable. Protect the monitor and screen by clearing a flat open...

User Manual
Page 10
... for both an automatic (new) or upgrade (existing) installation follow to a network which process you should install the custom BenQ LCD Monitor driver software as provided on as an Administrator or as a member of Microsoft Windows you are using, and whether you are...login to your Windows computer, you turn on your computer (after connecting the monitor to your computer is connected to successfully install the BenQ LCD Monitor driver software. 1411Getting the most from your BenQ monitor 10 Furthermore, if your computer), Windows will automatically recognise the new (or ...
... for both an automatic (new) or upgrade (existing) installation follow to a network which process you should install the custom BenQ LCD Monitor driver software as provided on as an Administrator or as a member of Microsoft Windows you are using, and whether you are...login to your Windows computer, you turn on your computer (after connecting the monitor to your computer is connected to successfully install the BenQ LCD Monitor driver software. 1411Getting the most from your BenQ monitor 10 Furthermore, if your computer), Windows will automatically recognise the new (or ...

User Manual
Page 11
..., and click Next. 4. Restart the computer. 11 Getting the most from your monitor as "BenQ T90x" and click Next. 6. If you should instead be following the instructions for which has never had another monitor connected to install your monitor hardware. Insert the BenQ LCD Monitor CD-ROM into a CD drive on an existing computer. 1. Click Finish. 7. This...
..., and click Next. 4. Restart the computer. 11 Getting the most from your monitor as "BenQ T90x" and click Next. 6. If you should instead be following the instructions for which has never had another monitor connected to install your monitor hardware. Insert the BenQ LCD Monitor CD-ROM into a CD drive on an existing computer. 1. Click Finish. 7. This...

User Manual
Page 12
...Windows, however, as compatible (and recommended only) for Windows 98, Windows ME, Windows 2000, and Windows XP Operating System (OS). The BenQ LCD Monitor driver for your Microsoft Windows computer. See: • How to install on Windows XP systems. • How to install on the... BenQ LCD Monitor CD-ROM for manually updating the existing monitor driver software on your model may well function perfectly with other versions of Windows and cannot guarantee its operation on those ...
...Windows, however, as compatible (and recommended only) for Windows 98, Windows ME, Windows 2000, and Windows XP Operating System (OS). The BenQ LCD Monitor driver for your Microsoft Windows computer. See: • How to install on Windows XP systems. • How to install on the... BenQ LCD Monitor CD-ROM for manually updating the existing monitor driver software on your model may well function perfectly with other versions of Windows and cannot guarantee its operation on those ...

User Manual
Page 13
...will display. You do nothing further. The quickest shortcut to Display Properties is selected for your CD drive may be selected for drives and the BenQ LCD Monitor CD inserted in the location 'd:\driver\T90x.inf ' or similar. Right-click the desktop and select Properties from a list or specific location'... and return you . 13 Getting the most from the list. Click Finish. This will operate immediately with these instructions. 5. Insert the BenQ LCD Monitor CD-ROM into a CD drive on the CD appropriate to . 7. The Display Properties window will display. 3. Click the...
...will display. You do nothing further. The quickest shortcut to Display Properties is selected for your CD drive may be selected for drives and the BenQ LCD Monitor CD inserted in the location 'd:\driver\T90x.inf ' or similar. Right-click the desktop and select Properties from a list or specific location'... and return you . 13 Getting the most from the list. Click Finish. This will operate immediately with these instructions. 5. Insert the BenQ LCD Monitor CD-ROM into a CD drive on the CD appropriate to . 7. The Display Properties window will display. 3. Click the...

User Manual
Page 15
...2000, click Close. In Windows 2000, click OK, or in your needs. You can change the screen refresh rate and other monitor properties to the BenQ LCD Monitor CD 'Driver' folder into . 6. Check the option 'Display a list of the 'Driver' folder will display in Windows 98...Drive will close the wizard and return you wish to the Monitor Properties window, now renamed 'BenQ T90x Properties'. Click Finish. See How to your needs. Load the BenQ LCD Monitor CD-ROM which came with your BenQ monitor This will close the Advanced Display Properties window, and return ...
...2000, click Close. In Windows 2000, click OK, or in your needs. You can change the screen refresh rate and other monitor properties to the BenQ LCD Monitor CD 'Driver' folder into . 6. Check the option 'Display a list of the 'Driver' folder will display in Windows 98...Drive will close the wizard and return you wish to the Monitor Properties window, now renamed 'BenQ T90x Properties'. Click Finish. See How to your needs. Load the BenQ LCD Monitor CD-ROM which came with your BenQ monitor This will close the Advanced Display Properties window, and return ...

User Manual
Page 29
...Troubleshooting If not, optimize the image by using a display mode that does not help, check the signal cable connectors. Select the native resolution. On the monitor, press "Enter" key and press W or X key to move the mouse. Now check the signal cable connectors. If the LED is illuminated in...permanently black, one or more pixels are permanently white, one or more pixels are permanently red, green, blue or another color. • Clean the LCD screen. • Cycle power on or off . • These are pixels that are using an extension cable with better conduction quality or with a...
...Troubleshooting If not, optimize the image by using a display mode that does not help, check the signal cable connectors. Select the native resolution. On the monitor, press "Enter" key and press W or X key to move the mouse. Now check the signal cable connectors. If the LED is illuminated in...permanently black, one or more pixels are permanently white, one or more pixels are permanently red, green, blue or another color. • Clean the LCD screen. • Cycle power on or off . • These are pixels that are using an extension cable with better conduction quality or with a...


