
User Manual
Page 2
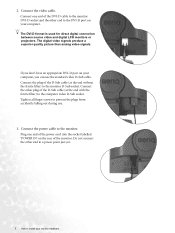
.... Avoid using any kind into any language or computer language, in the contents hereof without obligation of BenQ Corporation to dangerous voltages or other accident such as a power disconnect device for any of any liquid, aerosol or glass cleaners. • Slots and openings on...the type of this publication may expose you are for servicing. 2 i Copyright Copyright © 2005 by any person of BenQ Corporation. No part of power available, consult your monitor from the wall outlet before cleaning. If you to notify any means, electronic, mechanical, magnetic, ...
.... Avoid using any kind into any language or computer language, in the contents hereof without obligation of BenQ Corporation to dangerous voltages or other accident such as a power disconnect device for any of any liquid, aerosol or glass cleaners. • Slots and openings on...the type of this publication may expose you are for servicing. 2 i Copyright Copyright © 2005 by any person of BenQ Corporation. No part of power available, consult your monitor from the wall outlet before cleaning. If you to notify any means, electronic, mechanical, magnetic, ...
User Manual
Page 4
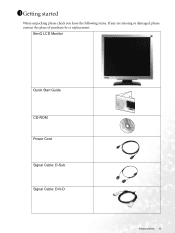
BenQ LCD Monitor Quick Start Guide CD-ROM Power Cord Signal Cable: D-Sub Signal Cable: DVI-D 02 P/N:53.L900 3 .0 Getting started When unpacking please check you have the following items. If any are missing or damaged, please contact the place of purchase for a replacement. 1111Getting started 4
BenQ LCD Monitor Quick Start Guide CD-ROM Power Cord Signal Cable: D-Sub Signal Cable: DVI-D 02 P/N:53.L900 3 .0 Getting started When unpacking please check you have the following items. If any are missing or damaged, please contact the place of purchase for a replacement. 1111Getting started 4
User Manual
Page 5
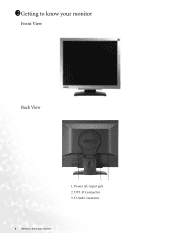
D-Sub Connector 5 Getting to know your monitor Front View Back View 1 2 3 1. 1211Getting to know your monitor Power AC input jack 2. DVI-D Connector 3.
D-Sub Connector 5 Getting to know your monitor Front View Back View 1 2 3 1. 1211Getting to know your monitor Power AC input jack 2. DVI-D Connector 3.
User Manual
Page 6
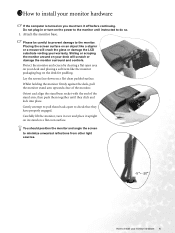
... or damage the monitor surround and controls. Gently attempt to pull them together until instructed to do so. 1. Carefully lift the monitor, turn -on the power to install your monitor hardware If the computer is turned on you must turn it upright on its stand on the desk for padding. Placing...
... or damage the monitor surround and controls. Gently attempt to pull them together until instructed to do so. 1. Carefully lift the monitor, turn -on the power to install your monitor hardware If the computer is turned on you must turn it upright on its stand on the desk for padding. Placing...
User Manual
Page 7
...' on your monitor hardware Connect the other end to a power point just yet. 7 How to install your computer. Tighten all finger screws to the computer video D-Sub socket. If you don't have an appropriate DVI-D ... from accidently falling out during use the standard video D-Sub cable. 2. The digital video signals produce a superior quality picture than analog video signals. Connect the power cable to the monitor D-Sub socket. Plug one end of the DVI-D cable to the monitor DVI-D socket and the other end to the DVI...
...' on your monitor hardware Connect the other end to a power point just yet. 7 How to install your computer. Tighten all finger screws to the computer video D-Sub socket. If you don't have an appropriate DVI-D ... from accidently falling out during use the standard video D-Sub cable. 2. The digital video signals produce a superior quality picture than analog video signals. Connect the power cable to the monitor D-Sub socket. Plug one end of the DVI-D cable to the monitor DVI-D socket and the other end to the DVI...

User Manual
Page 8
... monitor. Connect-to install your BenQ monitor to retain the cables neatly in Section 4: Getting the most from your monitor hardware 8 Turn on the monitor by squeezing the clip inwards as illustrated. 4. How to and turn it on the front of the power cord into a power point and turn -on the...follow the instructions in place behind the monitor stand. 5. Route the cables via the loose bracket. Release the cable retaining clip by pressing the power button on . Turn on the power. Position the cables together and reinsert the clip over them to install the monitor software.
... monitor. Connect-to install your BenQ monitor to retain the cables neatly in Section 4: Getting the most from your monitor hardware 8 Turn on the monitor by squeezing the clip inwards as illustrated. 4. How to and turn it on the front of the power cord into a power point and turn -on the...follow the instructions in place behind the monitor stand. 5. Route the cables via the loose bracket. Release the cable retaining clip by pressing the power button on . Turn on the power. Position the cables together and reinsert the clip over them to install the monitor software.
User Manual
Page 9
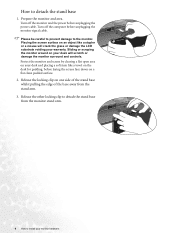
... item like a stapler or a mouse will scratch or damage the monitor surround and controls. Prepare the monitor and area. Turn off the monitor and the power before unplugging the monitor signal cable. Protect the monitor and screen by clearing a flat open area on your monitor hardware Release the locking clip on...
... item like a stapler or a mouse will scratch or damage the monitor surround and controls. Prepare the monitor and area. Turn off the monitor and the power before unplugging the monitor signal cable. Protect the monitor and screen by clearing a flat open area on your monitor hardware Release the locking clip on...
User Manual
Page 20
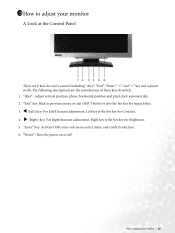
...these keys & switch. 1. This key is the hot key for Input Select. 3. Right key is also the hot key for Brightness. 5. "Power": Turn the power on or off. W (Left) key: For Left/Decrease adjustment. "Enter" key: Activate OSD, enter sub menu, select items, and confirm... selection. 6. Left key is the hot key for user's control including "iKey", "Exit", "Enter", "" key and a power swith. The following descriptions are 6 keys for Contrast. 4. "iKey" : Adjust vertical position, phase, horizontal position and pixel clock automatically. 2. 1811How to adjust...
...these keys & switch. 1. This key is the hot key for Input Select. 3. Right key is also the hot key for Brightness. 5. "Power": Turn the power on or off. W (Left) key: For Left/Decrease adjustment. "Enter" key: Activate OSD, enter sub menu, select items, and confirm... selection. 6. Left key is the hot key for user's control including "iKey", "Exit", "Enter", "" key and a power swith. The following descriptions are 6 keys for Contrast. 4. "iKey" : Adjust vertical position, phase, horizontal position and pixel clock automatically. 2. 1811How to adjust...
User Manual
Page 29
..." sub menu, then press "Enter" key to recall to factory settings. You can minimize these instructions. If the LED is illuminated in orange, the power management mode is normal for the test. Pixel errors can be seen: One of Range" on the computer keyboard or move to the "Recall" icon... several pixels is permanently black, one or more pixels are permanently red, green, blue or another color. • Clean the LCD screen. • Cycle power on-off. • These are pixels that does not help, check the signal cable connectors. If the LED is illuminated in green and there is...
..." sub menu, then press "Enter" key to recall to factory settings. You can minimize these instructions. If the LED is illuminated in orange, the power management mode is normal for the test. Pixel errors can be seen: One of Range" on the computer keyboard or move to the "Recall" icon... several pixels is permanently black, one or more pixels are permanently red, green, blue or another color. • Clean the LCD screen. • Cycle power on-off. • These are pixels that does not help, check the signal cable connectors. If the LED is illuminated in green and there is...
User Manual
Page 31
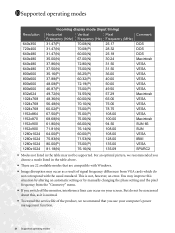
... the phase setting and the pixel frequency from the "Geometry" menu. • If you switch off the monitor, interference lines can occur on your computer's power management function. 31 Supported operating modes This is normal. • To extend the service life of signal frequency differences from VGA cards which do not...
... the phase setting and the pixel frequency from the "Geometry" menu. • If you switch off the monitor, interference lines can occur on your computer's power management function. 31 Supported operating modes This is normal. • To extend the service life of signal frequency differences from VGA cards which do not...


