

BH and S Series X-Sign Software Manual
Page 9
... the icon to add. Setting Region Properties Anytime you should be a certain color or pick your own image from a drop down list by the right of Repeated Count excluding time sets. BenQ X-Sign Designer 9 The higher the value is, the more text sets, click on , , , or respectively. Click on the box of Height and input. • position your region...
... the icon to add. Setting Region Properties Anytime you should be a certain color or pick your own image from a drop down list by the right of Repeated Count excluding time sets. BenQ X-Sign Designer 9 The higher the value is, the more text sets, click on , , , or respectively. Click on the box of Height and input. • position your region...
BH and S Series X-Sign Software Manual
Page 13
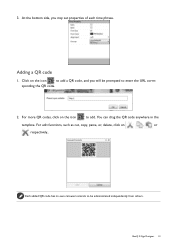
Each added QR code has its own carousel controls to be prompted to enter the URL corre- sponding the QR code. 2. Click on the icon to add. For more QR codes, click on , , , or respectively.. BenQ X-Sign Designer 13 At the bottom side, you will be administrated independently from others. For edit functions, such as cut, copy, paste, or, delete, click on the icon to add a QR code, and you may set properties of each time phrase. Adding a QR code 1. 3. You can drag the QR code anywhere in the template.
Each added QR code has its own carousel controls to be prompted to enter the URL corre- sponding the QR code. 2. Click on the icon to add. For more QR codes, click on , , , or respectively.. BenQ X-Sign Designer 13 At the bottom side, you will be administrated independently from others. For edit functions, such as cut, copy, paste, or, delete, click on the icon to add a QR code, and you may set properties of each time phrase. Adding a QR code 1. 3. You can drag the QR code anywhere in the template.
BH and S Series X-Sign Software Manual
Page 15
..., & Windows 8. Once the program is suggested. It is compatible with only one single generated task into a USB port of the generated tasks to be played is running for optimal viewing experiences. • Only will be performed automatically based on your tasks for the very first time. To change default folder to install the program, click Browse to begin installation. Simply press ESC on...
..., & Windows 8. Once the program is suggested. It is compatible with only one single generated task into a USB port of the generated tasks to be played is running for optimal viewing experiences. • Only will be performed automatically based on your tasks for the very first time. To change default folder to install the program, click Browse to begin installation. Simply press ESC on...
US Digital Signage 3 Year Warranty
Page 1
... USER LIMITED WARRANTY Digital Signage Subject to the terms and conditions set forth below , BenQ America Corp. ("BenQ") warrants the BenQ Digital Signage ("Product") you are entitled to depot repair service during the warranty period. DOA (Dead On Arrival): Must be free from a BenQ authorized reseller/retailer, to process the replacement. An RMA number must contact BenQ Technical Support Center at its option, repair or replace the Product. BenQ...
... USER LIMITED WARRANTY Digital Signage Subject to the terms and conditions set forth below , BenQ America Corp. ("BenQ") warrants the BenQ Digital Signage ("Product") you are entitled to depot repair service during the warranty period. DOA (Dead On Arrival): Must be free from a BenQ authorized reseller/retailer, to process the replacement. An RMA number must contact BenQ Technical Support Center at its option, repair or replace the Product. BenQ...
US Digital Signage 3 Year Warranty
Page 3
.... You may not apply to you specific legal rights. Hours of God. You are responsible for damage to report a defective product. YOU AGREE THAT REPAIR OR REPLACEMENT, AS APPLICABLE, UNDER THE WARRANTY SERVICES DESCRIBED HEREIN IS YOUR SOLE AND EXCLUSIVE REMEDY WITH RESPECT TO ANY BREACH OF THE BenQ LIMITED WARRANTY SET FORTH HEREIN. In such states or...
.... You may not apply to you specific legal rights. Hours of God. You are responsible for damage to report a defective product. YOU AGREE THAT REPAIR OR REPLACEMENT, AS APPLICABLE, UNDER THE WARRANTY SERVICES DESCRIBED HEREIN IS YOUR SOLE AND EXCLUSIVE REMEDY WITH RESPECT TO ANY BREACH OF THE BenQ LIMITED WARRANTY SET FORTH HEREIN. In such states or...

SV500 User Manual
Page 3
... BenQ ecoFACTS 4 Package contents 5 Setting up the display 6 Mounting the display 6 Parts of the display and their functions 8 Front panel 8 Rear panel 8 Input/output terminals 10 Remote control 12 Using the remote control 13 Connection 15 Connecting audio/video signals 15 Connecting power 18 Basic operations 19 Turning the display on or off 19 Switching input signals 19 Adjusting audio volume level 19 Network connection 20 Connecting to a LAN 20 Controlling the display 20 The OSD (On-Screen Display) menu 21 OSD menu overview 21 Operations in the OSD menu 23 Picture menu...
... BenQ ecoFACTS 4 Package contents 5 Setting up the display 6 Mounting the display 6 Parts of the display and their functions 8 Front panel 8 Rear panel 8 Input/output terminals 10 Remote control 12 Using the remote control 13 Connection 15 Connecting audio/video signals 15 Connecting power 18 Basic operations 19 Turning the display on or off 19 Switching input signals 19 Adjusting audio volume level 19 Network connection 20 Connecting to a LAN 20 Controlling the display 20 The OSD (On-Screen Display) menu 21 OSD menu overview 21 Operations in the OSD menu 23 Picture menu...

SV500 User Manual
Page 5
...; Installation of this display. Check the installation regularly and maintain the display periodically to ensure the best working condition. • Use only the accessories approved or recommended by the manufacturer to mount this display should only be performed by a qualified technician. Refer servicing to the personnels and the display itself. Wrongly wired extension cords are strong enough to sustain the weight of the display...
...; Installation of this display. Check the installation regularly and maintain the display periodically to ensure the best working condition. • Use only the accessories approved or recommended by the manufacturer to mount this display should only be performed by a qualified technician. Refer servicing to the personnels and the display itself. Wrongly wired extension cords are strong enough to sustain the weight of the display...

SV500 User Manual
Page 6
.... Please handle with care. • The response time and brightness of these instructions. 2. Follow all instructions. 5. A polarized plug has two blades with the cart, stand, tripod, bracket, or table specified by the manufacturer. 12. Servicing is also liable to the design specifications. Use only with one wider than necessary. • The LCD panel consists of time. 14. Unplug this apparatus near any heat...
.... Please handle with care. • The response time and brightness of these instructions. 2. Follow all instructions. 5. A polarized plug has two blades with the cart, stand, tripod, bracket, or table specified by the manufacturer. 12. Servicing is also liable to the design specifications. Use only with one wider than necessary. • The LCD panel consists of time. 14. Unplug this apparatus near any heat...

SV500 User Manual
Page 11
... exceed the thickness of the screw should be strong enough to the wall. • Please consult a professional technician for installations not performed by at least 10 mm of clear space from the back cover of the display to bear the weight of connectors when rotating your display. Setting up the display 7 5. The length of the wall mounting bracket by a professional technician.
... exceed the thickness of the screw should be strong enough to the wall. • Please consult a professional technician for installations not performed by at least 10 mm of clear space from the back cover of the display to bear the weight of connectors when rotating your display. Setting up the display 7 5. The length of the wall mounting bracket by a professional technician.

SV500 User Manual
Page 13
... signals from the remote control. Power indicator • Indicates the operating status of the display and their functions 9 No. Opens or closes the OSD menu. 3 INPUT 4 +/- • Selects a video source. • Enters a submenu in the OSD menu. 6 Power button Turns the display on . 2 MENU - Hot keys for audio volume adjustment. Scrolls through settings and options in the OSD menu. 5 / Scrolls through settings and options in the On-Screen Display (OSD) menu. Lights up red...
... signals from the remote control. Power indicator • Indicates the operating status of the display and their functions 9 No. Opens or closes the OSD menu. 3 INPUT 4 +/- • Selects a video source. • Enters a submenu in the OSD menu. 6 Power button Turns the display on . 2 MENU - Hot keys for audio volume adjustment. Scrolls through settings and options in the OSD menu. 5 / Scrolls through settings and options in the On-Screen Display (OSD) menu. Lights up red...

SV500 User Manual
Page 14
... your Ethernet or router. Connects to another display. Outputs control signals from the RS232C IN input to ensure better response from a computer or another display for multimedia playback or software update. For use with an IR Extender - Receives control signals from the remote control. to another display. Outputs DVI signals to the RJ-45 port on or off the main power. Connects to a USB flash drive for external control and multi-display operation. Connects to a power outlet via the supplied power cord.
... your Ethernet or router. Connects to another display. Outputs control signals from the RS232C IN input to ensure better response from a computer or another display for multimedia playback or software update. For use with an IR Extender - Receives control signals from the remote control. to another display. Outputs DVI signals to the RJ-45 port on or off the main power. Connects to a USB flash drive for external control and multi-display operation. Connects to a power outlet via the supplied power cord.

SV500 User Manual
Page 19
... OUT RS232 IN USB DVI OUT The audio cable is not supplied and should be purchased separately. Connection 15 Connection Connecting audio/video signals Pay attention to the following notes when you want to use. Connecting the VGA input 1. Connect the computer's audio output jack to the AUDIO IN jack on the display using a D-Sub (15-pin) cable. 2. Be aware that all devices. • Familiarize yourself with the audio/video ports on the remote control.
... OUT RS232 IN USB DVI OUT The audio cable is not supplied and should be purchased separately. Connection 15 Connection Connecting audio/video signals Pay attention to the following notes when you want to use. Connecting the VGA input 1. Connect the computer's audio output jack to the AUDIO IN jack on the display using a D-Sub (15-pin) cable. 2. Be aware that all devices. • Familiarize yourself with the audio/video ports on the remote control.

SV500 User Manual
Page 20
... the display using a DVI-D cable. If needed, connect the computer's audio output jack to the HDMI input jack on the display using a suitable audio cable. 3. Connect the DVI-IN jack on the display to HDMI conversion cable. 2. To select an appropriate audio source, see Audio menu on a computer using an HDMI cable or a DVI-D to the DVI-D output jack on page 25 for details. To view video image from this input, press the DVI or HDMI-1 button on the remote control. AC SWITCH...
... the display using a DVI-D cable. If needed, connect the computer's audio output jack to the HDMI input jack on the display using a suitable audio cable. 3. Connect the DVI-IN jack on the display to HDMI conversion cable. 2. To select an appropriate audio source, see Audio menu on a computer using an HDMI cable or a DVI-D to the DVI-D output jack on page 25 for details. To view video image from this input, press the DVI or HDMI-1 button on the remote control. AC SWITCH...

SV500 User Manual
Page 23
... remote control. • The display's standby mode still consumes power. Basic operations 19 Basic operations Turning the display on or off To turn on or off the display, press the power button on the display's control panel or on the control panel or VOL+/VOL- Adjusting audio volume level Press /- To completely cut off power supply, set the power switch to adjust the volume. on the control panel to select an input signal. Switching input signals Press the INPUT button or those signal selection buttons on the remote control or the INPUT button...
... remote control. • The display's standby mode still consumes power. Basic operations 19 Basic operations Turning the display on or off To turn on or off the display, press the power button on the display's control panel or on the control panel or VOL+/VOL- Adjusting audio volume level Press /- To completely cut off power supply, set the power switch to adjust the volume. on the control panel to select an input signal. Switching input signals Press the INPUT button or those signal selection buttons on the remote control or the INPUT button...

SV500 User Manual
Page 24
... in a DHCP environment, select DHCP and press OK. Connect a RJ45 cable to the corresponding ports on the display with LAN control. Enter the next OSD menu Setting > Network Settings. If you would like to a local area network: 1. You cannot control the display via the RS-232C connector when LAN control is set the display to connect to turn on the display and your network administrator for information on the remote control.
... in a DHCP environment, select DHCP and press OK. Connect a RJ45 cable to the corresponding ports on the display with LAN control. Enter the next OSD menu Setting > Network Settings. If you would like to a local area network: 1. You cannot control the display via the RS-232C connector when LAN control is set the display to connect to turn on the display and your network administrator for information on the remote control.

SV500 User Manual
Page 25
... • Adaptive Contrast • Color Range • Overscan • Gamma • Reset Picture Setting • Equalizer • Surround Sound • Audio Source • Speaker • Audio Only • Reset Audio Setting • Time Format • Clock • Schedule • Menu Language • Software Update (USB) • CEC • Control Setting • Screen ID • Ethernet Setting • Power Save • Image Retention • Auto Search • Auto Adjustment • Restore Default • Enlarge • Enlarge Mode • Screen Position •...
... • Adaptive Contrast • Color Range • Overscan • Gamma • Reset Picture Setting • Equalizer • Surround Sound • Audio Source • Speaker • Audio Only • Reset Audio Setting • Time Format • Clock • Schedule • Menu Language • Software Update (USB) • CEC • Control Setting • Screen ID • Ethernet Setting • Power Save • Image Retention • Auto Search • Auto Adjustment • Restore Default • Enlarge • Enlarge Mode • Screen Position •...

SV500 User Manual
Page 31
... display. Retention Auto Search Adjusts auto search setting. Setup menu Setup The OSD (On-Screen Display) menu 27 Menu Language Software Update (USB) CEC Control Setting Screen ID Ethernet Setting Power Save Image Retention Auto Search Auto Adjustment Reset Default English Off 01 High Disable Disable Disable Name Description Menu Sets your preferred language for the current display when multiple displays are connected. Auto Adjusts auto adjustment setting. Sets a terminal to their default values. Power Save Sets the display to enter the power saving mode when there is no signal...
... display. Retention Auto Search Adjusts auto search setting. Setup menu Setup The OSD (On-Screen Display) menu 27 Menu Language Software Update (USB) CEC Control Setting Screen ID Ethernet Setting Power Save Image Retention Auto Search Auto Adjustment Reset Default English Off 01 High Disable Disable Disable Name Description Menu Sets your preferred language for the current display when multiple displays are connected. Auto Adjusts auto adjustment setting. Sets a terminal to their default values. Power Save Sets the display to enter the power saving mode when there is no signal...

SV500 User Manual
Page 40
... - 80% (without condensation) -20 - 60oC, 4 - 140oF 10 - 90% (without condensation) Landscape/Portrait < 21 1123*643*110.5 10.4/10.4/10.4/10.4 36 Product information Product information Specifications LCD panel Input Output Audio Power Environment Mechanical Item Backlight Panel size Pixel pitch (mm) Native resolution (pixels) Brightness (cd/m2) (typical) Contrast (typical) Response time (ms) (typical) Panel Bit Computer Video Audio USB Control Computer Video Audio Control Audio W (Amp) Internal speaker Supply Consumption Max.
... - 80% (without condensation) -20 - 60oC, 4 - 140oF 10 - 90% (without condensation) Landscape/Portrait < 21 1123*643*110.5 10.4/10.4/10.4/10.4 36 Product information Product information Specifications LCD panel Input Output Audio Power Environment Mechanical Item Backlight Panel size Pixel pitch (mm) Native resolution (pixels) Brightness (cd/m2) (typical) Contrast (typical) Response time (ms) (typical) Panel Bit Computer Video Audio USB Control Computer Video Audio Control Audio W (Amp) Internal speaker Supply Consumption Max.

SV500 User Manual
Page 45
... to Supported input signal resolution on page 39 to select a supported resolution and try again. • Use the Auto Adjustment function (See Setup menu on the computer? Troubleshooting 41 Troubleshooting Problem No picture No sound The computer input image looks strange The control panel buttons do not work Solution Check the following : • Have you locked the control panel buttons? Make sure that all cables are connected firmly. • Have you chosen an unsupported output resolution on ? Turn off the...
... to Supported input signal resolution on page 39 to select a supported resolution and try again. • Use the Auto Adjustment function (See Setup menu on the computer? Troubleshooting 41 Troubleshooting Problem No picture No sound The computer input image looks strange The control panel buttons do not work Solution Check the following : • Have you locked the control panel buttons? Make sure that all cables are connected firmly. • Have you chosen an unsupported output resolution on ? Turn off the...
SV500 Spec sheet
Page 1
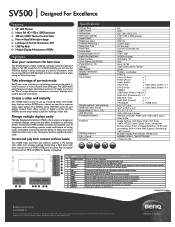
... a stunning video wall. Outputs analog RGB signals from a computer or another display. 6 USB 7 DVI-OUT 8 DVI-IN 9 HDMI 2 10 HDMI 1 11 VGA IN 12 VGA OUT 13 AUDIO IN 14 LINE OUT Connects to a USB flash drive for external control and multi-display operation. 5 RS232 IN Receives control signals from the VGA IN input to access files in either analog or digital sources, and the SV500's narrow bezel makes it matters Outputs audio signals to display in popular formats such as...
... a stunning video wall. Outputs analog RGB signals from a computer or another display. 6 USB 7 DVI-OUT 8 DVI-IN 9 HDMI 2 10 HDMI 1 11 VGA IN 12 VGA OUT 13 AUDIO IN 14 LINE OUT Connects to a USB flash drive for external control and multi-display operation. 5 RS232 IN Receives control signals from the VGA IN input to access files in either analog or digital sources, and the SV500's narrow bezel makes it matters Outputs audio signals to display in popular formats such as...


