
Digital Signage Reference Guide
Page 2
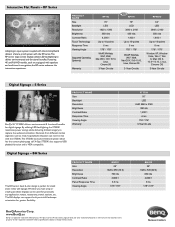
... models, each are equipped with the ST550K.The ST550K has built-in this material are the property of BenQ Corp. By utilizing LED backlighting, the ST550K maximizes power savings while delivering brilliant imagery to change without notice. Specifications subject to capture the audience's attention. PRODUCT NAME Size Backlight Resolution Brightness Contrast Ratio Touch Technology Response Time Viewing Angle Supported Operating System(s) Warranty RP702 70" LED...
... models, each are equipped with the ST550K.The ST550K has built-in this material are the property of BenQ Corp. By utilizing LED backlighting, the ST550K maximizes power savings while delivering brilliant imagery to change without notice. Specifications subject to capture the audience's attention. PRODUCT NAME Size Backlight Resolution Brightness Contrast Ratio Touch Technology Response Time Viewing Angle Supported Operating System(s) Warranty RP702 70" LED...
RP702 User Manual
Page 3
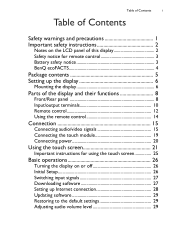
... 6 Mounting the display 6 Parts of the display and their functions 8 Front/Rear panel 8 Input/output terminals 10 Remote control 12 Using the remote control 14 Connection 15 Connecting audio/video signals 15 Connecting the touch module 19 Connecting power 20 Using the touch screen 21 Important instructions for using the touch screen 25 Basic operations 26 Turning the display on or off 26 Initial Setup 26 Switching input signals 27 Downloading software 27 Setting up Internet connection 28 Updating software 29 Restoring to the default settings 29 Adjusting audio volume level...
... 6 Mounting the display 6 Parts of the display and their functions 8 Front/Rear panel 8 Input/output terminals 10 Remote control 12 Using the remote control 14 Connection 15 Connecting audio/video signals 15 Connecting the touch module 19 Connecting power 20 Using the touch screen 21 Important instructions for using the touch screen 25 Basic operations 26 Turning the display on or off 26 Initial Setup 26 Switching input signals 27 Downloading software 27 Setting up Internet connection 28 Updating software 29 Restoring to the default settings 29 Adjusting audio volume level...

RP702 User Manual
Page 4
ii Table of Contents The OSD (On-Screen Display) menu 30 OSD menu overview 30 Operations in the OSD menu 31 Picture menu 32 Sound menu 34 Setting menu 35 Working with Android OS 36 About All Apps 37 EZWrite 2.0 38 Browser 39 ES File Explorer 40 WPS Office 41 Multimedia 42 Settings 44 Product information 45 Specifications 45 Dimensions 48 Supported input signal resolution 51 Troubleshooting 53
ii Table of Contents The OSD (On-Screen Display) menu 30 OSD menu overview 30 Operations in the OSD menu 31 Picture menu 32 Sound menu 34 Setting menu 35 Working with Android OS 36 About All Apps 37 EZWrite 2.0 38 Browser 39 ES File Explorer 40 WPS Office 41 Multimedia 42 Settings 44 Product information 45 Specifications 45 Dimensions 48 Supported input signal resolution 51 Troubleshooting 53

RP702 User Manual
Page 5
... surface (such as in a closed cabinet. Using wrong or unsuitable accessories may cause the display to persons. Refer servicing to the presence of the power supply cord shall remain readily operable. Do not block any doubt about the effective grounding of the power outlet, please consult a qualified electrician. • The mains plug of important operating and maintenance (servicing) instructions in serious personal injuries...
... surface (such as in a closed cabinet. Using wrong or unsuitable accessories may cause the display to persons. Refer servicing to the presence of the power supply cord shall remain readily operable. Do not block any doubt about the effective grounding of the power outlet, please consult a qualified electrician. • The mains plug of important operating and maintenance (servicing) instructions in serious personal injuries...

RP702 User Manual
Page 6
... your safety. A grounding-type plug has two blades and a third grounding prong. Use only with the cart, stand, tripod, bracket, or table specified by the manufacturer. 12. While 99.9% of these pixels work normally, 0.01% of the pixels may damage the panel and the external casing of the display, and the bright light will shine onto the LCD panel, as the heat may...
... your safety. A grounding-type plug has two blades and a third grounding prong. Use only with the cart, stand, tripod, bracket, or table specified by the manufacturer. 12. While 99.9% of these pixels work normally, 0.01% of the pixels may damage the panel and the external casing of the display, and the bright light will shine onto the LCD panel, as the heat may...
RP702 User Manual
Page 10
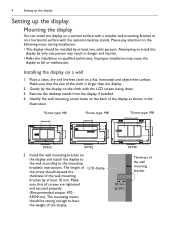
... the installation to the mounting bracket's instructions. The length of LCD display the screw should exceed the thickness of the display. Identify the wall mounting screw holes on a flat, horizontal and object-free surface. Remove the desktop stands from the display if installed. 4. Please pay attention to bear the weight of the wall mounting bracket by at least 10 mm. Improper installation may result in the illustration. *Screw type: M6 *Screw type: M8 *Screw type: M8 RP652 RP702 5. Make...
... the installation to the mounting bracket's instructions. The length of LCD display the screw should exceed the thickness of the display. Identify the wall mounting screw holes on a flat, horizontal and object-free surface. Remove the desktop stands from the display if installed. 4. Please pay attention to bear the weight of the wall mounting bracket by at least 10 mm. Improper installation may result in the illustration. *Screw type: M6 *Screw type: M8 *Screw type: M8 RP652 RP702 5. Make...

RP702 User Manual
Page 12
... screen. 8 Parts of the display and their functions Parts of computer to use the touch module. Receives HDMI signals from the display to a computer to OPS USB at front. Connects the USB cable from an external device. Name 1 OPS USB 2 M-USB 3 TOUCH USB 1 4 HDMI 1 5 6 7 ON/OFF/BLANK 8 MENU 9 / / 10 FREEZE/HOME 11 INPUT/BACK 7 89 10 11 Description Extends the USB port of the display and their functions Front/Rear panel...
... screen. 8 Parts of the display and their functions Parts of computer to use the touch module. Receives HDMI signals from the display to a computer to OPS USB at front. Connects the USB cable from an external device. Name 1 OPS USB 2 M-USB 3 TOUCH USB 1 4 HDMI 1 5 6 7 ON/OFF/BLANK 8 MENU 9 / / 10 FREEZE/HOME 11 INPUT/BACK 7 89 10 11 Description Extends the USB port of the display and their functions Front/Rear panel...
RP702 User Manual
Page 15
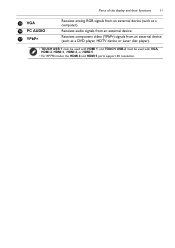
Receives component video (YPbPr) signals from an external device (such as a computer). Receives audio signals from an external device. Parts of the display and their functions 11 15 VGA 16 PC AUDIO 17 YPbPr Receives analog RGB signals from an external device (such as a DVD player, HDTV device or Laser disc player). • TOUCH USB 1 must be used with HDMI 1, and TOUCH USB-2 must be used with VGA, HDMI 2, HDMI 3, HDMI 4, or HDMI 5. • For RP790 model, the HDMI 4 and HDMI 5 ports support 4K resolution.
Receives component video (YPbPr) signals from an external device (such as a computer). Receives audio signals from an external device. Parts of the display and their functions 11 15 VGA 16 PC AUDIO 17 YPbPr Receives analog RGB signals from an external device (such as a DVD player, HDTV device or Laser disc player). • TOUCH USB 1 must be used with HDMI 1, and TOUCH USB-2 must be used with VGA, HDMI 2, HDMI 3, HDMI 4, or HDMI 5. • For RP790 model, the HDMI 4 and HDMI 5 ports support 4K resolution.

RP702 User Manual
Page 16
... the previous program channel. 4 INFO Shows the current input source and resolution. 5 FAV Shows the favorite program channel. 6 16:9 Changes the aspect ratio of the display and their functions Remote control 1 3 5 7 8 9 12 14 16 18 21 22 23 1 POWER Turns the display on . 17 9 SCREEN SHOT 19 Captures a screenshot and automatically save it to control the media playback. 13 8 Numeric buttons (0-9) Performs as numeric buttons when the OSD menu 15...
... the previous program channel. 4 INFO Shows the current input source and resolution. 5 FAV Shows the favorite program channel. 6 16:9 Changes the aspect ratio of the display and their functions Remote control 1 3 5 7 8 9 12 14 16 18 21 22 23 1 POWER Turns the display on . 17 9 SCREEN SHOT 19 Captures a screenshot and automatically save it to control the media playback. 13 8 Numeric buttons (0-9) Performs as numeric buttons when the OSD menu 15...

RP702 User Manual
Page 19
... the audio/video ports on the remote control and select VGA. Connect the computer's audio output jack to the VGA output jack on the display using a D-Sub (15-pin) cable. 2. Connection 15 Connection Connecting audio/video signals Pay attention to the following notes when you want to use. Connecting the VGA input 1. Always grasp and pull the connectors at the end of the cable. • Ensure that incorrect connections may adversely affect picture quality...
... the audio/video ports on the remote control and select VGA. Connect the computer's audio output jack to the VGA output jack on the display using a D-Sub (15-pin) cable. 2. Connection 15 Connection Connecting audio/video signals Pay attention to the following notes when you want to use. Connecting the VGA input 1. Always grasp and pull the connectors at the end of the cable. • Ensure that incorrect connections may adversely affect picture quality...

RP702 User Manual
Page 20
HDMI cable Computer The cables are not supplied and should be purchased separately. To view video image from this input, press the INPUT button on the display using an HDMI cable. 2. 16 Connection Connecting the digital inputs 1. Connect the HDMI output jack of a computer or A/V device (such as a VCR or DVD player) to the HDMI 3 input jack on the remote control and select HDMI 3.
HDMI cable Computer The cables are not supplied and should be purchased separately. To view video image from this input, press the INPUT button on the display using an HDMI cable. 2. 16 Connection Connecting the digital inputs 1. Connect the HDMI output jack of a computer or A/V device (such as a VCR or DVD player) to the HDMI 3 input jack on the remote control and select HDMI 3.

RP702 User Manual
Page 22
To view video image from this input, press the INPUT button on the display using an appropriate video cable. 2. AV cable Audio cable DVD player / VCR The cables are not supplied and should be purchased separately. Connect the VCR's audio output jacks to the output jack on an A/V device (such as a VCR) using a suitable audio cable. 3. Connect the AV IN(L/R) jack on the display to the AV OUT(L/R) jacks on the remote control and select AV. 18 Connection Connecting the AV and S-Video inputs 1.
To view video image from this input, press the INPUT button on the display using an appropriate video cable. 2. AV cable Audio cable DVD player / VCR The cables are not supplied and should be purchased separately. Connect the VCR's audio output jacks to the output jack on an A/V device (such as a VCR) using a suitable audio cable. 3. Connect the AV IN(L/R) jack on the display to the AV OUT(L/R) jacks on the remote control and select AV. 18 Connection Connecting the AV and S-Video inputs 1.

RP702 User Manual
Page 23
... failures in the M-USB port. 2. The touch module of a computer using the supplied USB cable. Connection 19 Connecting the multimedia inputs To view multimedia files on the display to the USB port of the display supports easy Plug-and-Play operation. USB cable Computer • Avoid blocking the touch screen frame (where sensors are not supplied and should be used with HDMI 1, and TOUCH USB-2 must be used with VGA, HDMI 2, HDMI 3, HDMI 4, or HDMI 5. USB flash drive The cables are located) when initiating the...
... failures in the M-USB port. 2. The touch module of a computer using the supplied USB cable. Connection 19 Connecting the multimedia inputs To view multimedia files on the display to the USB port of the display supports easy Plug-and-Play operation. USB cable Computer • Avoid blocking the touch screen frame (where sensors are not supplied and should be used with HDMI 1, and TOUCH USB-2 must be used with VGA, HDMI 2, HDMI 3, HDMI 4, or HDMI 5. USB flash drive The cables are located) when initiating the...

RP702 User Manual
Page 24
... ones used in this display. 20 Connection Connecting power Plug one end of the power loading when you intend to move the display. Never use extension cords or multiple outlet power boards. • There are dangerous voltages inside the display. Turn off the power and unplug the power cord if you use a power cord which appears damaged or frayed, or change the plug type on the switch). • The supplied power cord is switched, turn on the power cord. •...
... ones used in this display. 20 Connection Connecting power Plug one end of the power loading when you intend to move the display. Never use extension cords or multiple outlet power boards. • There are dangerous voltages inside the display. Turn off the power and unplug the power cord if you use a power cord which appears damaged or frayed, or change the plug type on the switch). • The supplied power cord is switched, turn on the power cord. •...
RP702 User Manual
Page 30
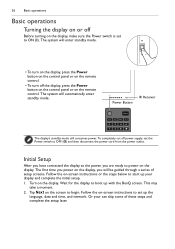
... control panel or on the remote control. • To turn off power supply, set up with the BenQ screen. The first time you power on the display. Wait for the display to ON (I). Or your display and complete the initial setup. 1. Turn on the display, you are ready to power on -screen instructions or the steps below to the power, you will automatically enter standby mode. Power Button IR Receiver The display's standby mode still consumes power. Initial Setup After you have connected...
... control panel or on the remote control. • To turn off power supply, set up with the BenQ screen. The first time you power on the display. Wait for the display to ON (I). Or your display and complete the initial setup. 1. Turn on the display, you are ready to power on -screen instructions or the steps below to the power, you will automatically enter standby mode. Power Button IR Receiver The display's standby mode still consumes power. Initial Setup After you have connected...
RP702 User Manual
Page 32
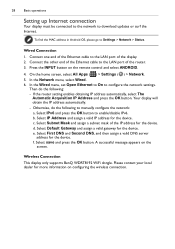
... port of the display. 2. c. Select IPv6 and press the OK button to configure the network settings. A successful message appears on the remote control and select ANDROID. 4. b. Then do the following : - Wireless Connection This display only supports BenQ WDRT8192 WiFi dongle. 28 Basic operations Setting up Internet connection Your display must be connected to the network to Settings > Network > Status. Connect the other end of the Ethernet cable to manually configure the network: a. Press the INPUT button on the screen...
... port of the display. 2. c. Select IPv6 and press the OK button to configure the network settings. A successful message appears on the remote control and select ANDROID. 4. b. Then do the following : - Wireless Connection This display only supports BenQ WDRT8192 WiFi dongle. 28 Basic operations Setting up Internet connection Your display must be connected to the network to Settings > Network > Status. Connect the other end of the Ethernet cable to manually configure the network: a. Press the INPUT button on the screen...

RP702 User Manual
Page 33
.... Via OSD menu 1. upgrade package version:1.0.3, size:193M No Yes If you want to update? Restoring to the default settings If you encounter problems with your can restore all parameters to reset your display. A confirmation appears on the remote control to adjust the volume. Adjusting audio volume level Press oron the control panel or VOL- / VOL+ on the screen, select Yes to reset your display. Basic operations 29 Updating software Whenever...
.... Via OSD menu 1. upgrade package version:1.0.3, size:193M No Yes If you want to update? Restoring to the default settings If you encounter problems with your can restore all parameters to reset your display. A confirmation appears on the remote control to adjust the volume. Adjusting audio volume level Press oron the control panel or VOL- / VOL+ on the screen, select Yes to reset your display. Basic operations 29 Updating software Whenever...

RP702 User Manual
Page 34
30 The OSD (On-Screen Display) menu The OSD (On-Screen Display) menu OSD menu overview Menu name Picture Sound Setting Options/functions • Picture Mode • Contrast • Brightness • Hue • Sharpness • Saturation • Color Temperature • Zoom Mode • Image Noise Reduction • PC Image Mode • Sound Mode • Low Pitch • High Pitch • Balance • Surround • Coaxial Output • Menu Time • Recall See page 32 34 35 Some options are only available when a certain input signal source is selected.
30 The OSD (On-Screen Display) menu The OSD (On-Screen Display) menu OSD menu overview Menu name Picture Sound Setting Options/functions • Picture Mode • Contrast • Brightness • Hue • Sharpness • Saturation • Color Temperature • Zoom Mode • Image Noise Reduction • PC Image Mode • Sound Mode • Low Pitch • High Pitch • Balance • Surround • Coaxial Output • Menu Time • Recall See page 32 34 35 Some options are only available when a certain input signal source is selected.

RP702 User Manual
Page 40
... screen appears. 2. 36 Working with Android OS Working with Android OS To switch to the home screen, tap the icon on the screen or press the Home button ( ) on the remote control/control panel and select ANDROID. Press the INPUT button on the remote control. • Since the system does not support any third party applications, user may be unable to open an application even if the installation...
... screen appears. 2. 36 Working with Android OS Working with Android OS To switch to the home screen, tap the icon on the screen or press the Home button ( ) on the remote control/control panel and select ANDROID. Press the INPUT button on the remote control. • Since the system does not support any third party applications, user may be unable to open an application even if the installation...
RP702 User Manual
Page 57
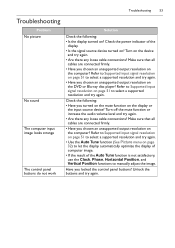
... that all cables are connected firmly. • Have you locked the control panel buttons? Turn on the device and try again. • Are there any loose cable connections? Unlock the buttons and try again. Troubleshooting 53 Troubleshooting Problem No picture No sound The computer input image looks strange The control panel buttons do not work Solution Check the following : • Have you chosen an unsupported output resolution on the computer? Refer to Supported input signal resolution on...
... that all cables are connected firmly. • Have you locked the control panel buttons? Turn on the device and try again. • Are there any loose cable connections? Unlock the buttons and try again. Troubleshooting 53 Troubleshooting Problem No picture No sound The computer input image looks strange The control panel buttons do not work Solution Check the following : • Have you chosen an unsupported output resolution on the computer? Refer to Supported input signal resolution on...


