
Safety Warning and Notice
Page 1
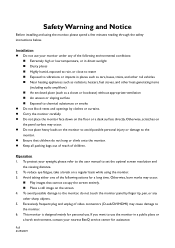
... desk surface directly. Operation 1. Full 3/29/2019 Safety Warning and Notice Before installing and using the monitor. 3. To protect your nearest BenQ service center for a long time. Avoid taking either one of the following environmental conditions: Extremely high or low temperature, or ... Exposed to vibrations or impacts in a public place or a harsh environment, contact your eyesight, please refer to the user manual to chemical substances or smoke Do not block vents and openings by finger tip, pen, or any of children. Excessively frequent...
... desk surface directly. Operation 1. Full 3/29/2019 Safety Warning and Notice Before installing and using the monitor. 3. To protect your nearest BenQ service center for a long time. Avoid taking either one of the following environmental conditions: Extremely high or low temperature, or ... Exposed to vibrations or impacts in a public place or a harsh environment, contact your eyesight, please refer to the user manual to chemical substances or smoke Do not block vents and openings by finger tip, pen, or any of children. Excessively frequent...
Resolution file
Page 1
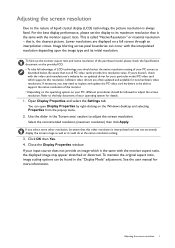
... the native resolution setting. 3. Be aware that this resolution value. If necessary, you may appear stretched or distorted. Click OK then Yes. 4. See the user manual for details. 1. This is the same with the monitor aspect ratio, the displayed image may need to replace and update the PC video card hardware...
... the native resolution setting. 3. Be aware that this resolution value. If necessary, you may appear stretched or distorted. Click OK then Yes. 4. See the user manual for details. 1. This is the same with the monitor aspect ratio, the displayed image may need to replace and update the PC video card hardware...
Resolution file
Page 3
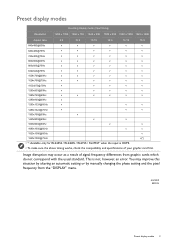
...v v 1280x1024@75Hz v v v 1360x768@60Hz v 1440x900@60Hz v v 1600x900@60Hz v v 1680x1050@60Hz v v 1920x1080@60Hz v 1920x1080@75Hz v(*) • *: Available only for RL2455S / RL2460S / RL2755 / RL2755T when the input is not, however, an error. This is HDMI. • To make sure the above timing works, check the compatibility and specifications of... modes 3 Image disruption may improve this situation by altering an automatic setting or by manually changing the phase setting and the pixel frequency from graphic cards which do not correspond with the usual standard.
...v v 1280x1024@75Hz v v v 1360x768@60Hz v 1440x900@60Hz v v 1600x900@60Hz v v 1680x1050@60Hz v v 1920x1080@60Hz v 1920x1080@75Hz v(*) • *: Available only for RL2455S / RL2460S / RL2755 / RL2755T when the input is not, however, an error. This is HDMI. • To make sure the above timing works, check the compatibility and specifications of... modes 3 Image disruption may improve this situation by altering an automatic setting or by manually changing the phase setting and the pixel frequency from graphic cards which do not correspond with the usual standard.
User Manual
Page 2
... at purchase. All rights reserved. BenQ ecoFACTS label lists key eco-friendly design highlights of each product, hoping to ensure that consumers make changes from time to time in any form or by any means, electronic, mechanical, magnetic, optical, chemical, manual or otherwise, without obligation of BenQ Corporation to notify any particular purpose...
... at purchase. All rights reserved. BenQ ecoFACTS label lists key eco-friendly design highlights of each product, hoping to ensure that consumers make changes from time to time in any form or by any means, electronic, mechanical, magnetic, optical, chemical, manual or otherwise, without obligation of BenQ Corporation to notify any particular purpose...
User Manual
Page 19
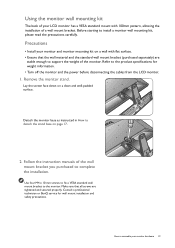
... and safety precautions. Refer to install a monitor wall mounting kit, please read the precautions carefully. Follow the instruction manuals of the wall mount bracket you purchased to the monitor. Consult a professional technician or BenQ service for weight information. • Turn off the monitor and the power before disconnecting the cables from the...
... and safety precautions. Refer to install a monitor wall mounting kit, please read the precautions carefully. Follow the instruction manuals of the wall mount bracket you purchased to the monitor. Consult a professional technician or BenQ service for weight information. • Turn off the monitor and the power before disconnecting the cables from the...
User Manual
Page 27
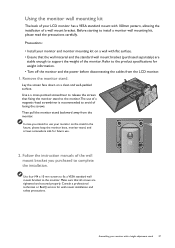
.... Make sure that the wall material and the standard wall mount bracket (purchased separately) are tightened and secured properly. Follow the instruction manuals of the monitor. Consult a professional technician or BenQ service for weight information. • Turn off the monitor and the power before disconnecting the cables from the monitor. Assembling your...
.... Make sure that the wall material and the standard wall mount bracket (purchased separately) are tightened and secured properly. Follow the instruction manuals of the monitor. Consult a professional technician or BenQ service for weight information. • Turn off the monitor and the power before disconnecting the cables from the monitor. Assembling your...
User Manual
Page 30
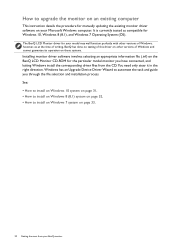
... and guide you have connected, and letting Windows install the corresponding driver files from your BenQ monitor How to upgrade the monitor on an existing computer This instruction details the procedure for manually updating the existing monitor driver software on page 33. 30 Getting the most from the ...CD. It is currently tested as at the time of writing, BenQ has done no testing of Windows, however, as compatible ...
... and guide you have connected, and letting Windows install the corresponding driver files from your BenQ monitor How to upgrade the monitor on an existing computer This instruction details the procedure for manually updating the existing monitor driver software on page 33. 30 Getting the most from the ...CD. It is currently tested as at the time of writing, BenQ has done no testing of Windows, however, as compatible ...
User Manual
Page 37
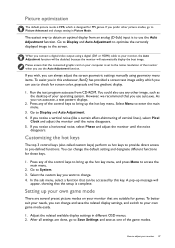
...If you connect a digital video output using geometry menu items. To assist you can be disabled, because the monitor will be accessed by this endeavour, BenQ has provided a screen test image utility which is designed for these keys. 1. Select Menu to Picture Advanced and change . 4. In the sub menu...hot key menu. A pop-up your needs, you in different OSD menus. 2. If you wish, you can always adjust the screen geometric settings manually using a digital (DVI or HDMI) cable to change setting in Picture Mode. Run the test program auto.exe from an analog (D-Sub) input ...
...If you connect a digital video output using geometry menu items. To assist you can be disabled, because the monitor will be accessed by this endeavour, BenQ has provided a screen test image utility which is designed for these keys. 1. Select Menu to Picture Advanced and change . 4. In the sub menu...hot key menu. A pop-up your needs, you in different OSD menus. 2. If you wish, you can always adjust the screen geometric settings manually using a digital (DVI or HDMI) cable to change setting in Picture Mode. Run the test program auto.exe from an analog (D-Sub) input ...
User Manual
Page 47
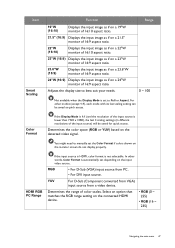
... the resolution of the input source is set the Color Format if colors shown on a 24"W monitor of 16:9 aspect ratio. You might need to manually set to best suit your needs. Item Smart Scaling Function 19"W (16:10) Displays the input image as if on a 19"W monitor of 16:10...
... the resolution of the input source is set the Color Format if colors shown on a 24"W monitor of 16:9 aspect ratio. You might need to manually set to best suit your needs. Item Smart Scaling Function 19"W (16:10) Displays the input image as if on a 19"W monitor of 16:10...
User Manual
Page 56
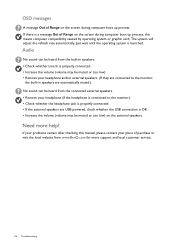
If there is a message Out of Range on the screen during computer boot up process, this manual, please contact your headphone and/or external speakers. (If they are connected to the monitor). • Check whether the headphone jack is properly connected. • ... to the monitor, the built-in speakers. • Check whether Line In is properly connected. • Increase the volume (volume may be heard from www.BenQ.com for more help? Need more support and local customer service. 56 Troubleshooting No sound can be muted or too low) on the external speakers...
If there is a message Out of Range on the screen during computer boot up process, this manual, please contact your headphone and/or external speakers. (If they are connected to the monitor). • Check whether the headphone jack is properly connected. • ... to the monitor, the built-in speakers. • Check whether Line In is properly connected. • Increase the volume (volume may be heard from www.BenQ.com for more help? Need more support and local customer service. 56 Troubleshooting No sound can be muted or too low) on the external speakers...

