
US 3 Year LCD Monitor Warranty
Page 1
...or replace the Product with a brand new replacement. BenQ LCD Monitor Standard Limited Warranty: Subject to process the replacement. BenQ is available for all Products purchased and located in the continental United States, Hawaii, and Alaska. BenQ will , at its option, repair or replace the...(the "Customer") (except for the remainder of purchase. END USER LIMITED WARRANTY LCD MONITORS Subject to the terms and conditions set forth below , BenQ America Corp. ("BenQ") warrants the BenQ LCD Monitor ("Product") you are entitled to depot repair service during the warranty period in the...
...or replace the Product with a brand new replacement. BenQ LCD Monitor Standard Limited Warranty: Subject to process the replacement. BenQ is available for all Products purchased and located in the continental United States, Hawaii, and Alaska. BenQ will , at its option, repair or replace the...(the "Customer") (except for the remainder of purchase. END USER LIMITED WARRANTY LCD MONITORS Subject to the terms and conditions set forth below , BenQ America Corp. ("BenQ") warrants the BenQ LCD Monitor ("Product") you are entitled to depot repair service during the warranty period in the...
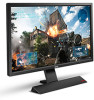
Rl2755HM User Manual
Page 2
... the type of power available, consult your monitor. • The AC plug isolates this publication and to notify any liquid, aerosol or glass cleaners. • Slots and openings on the marked label. Disclaimer BenQ Corporation makes no representations or warranties, either expressed or implied, with ... performance of any kind into any language or computer language, in the contents hereof without the prior written permission of BenQ Corporation. Your monitor should never be placed near the equipment and be easily accessible. • This product should be installed near or over...
... the type of power available, consult your monitor. • The AC plug isolates this publication and to notify any liquid, aerosol or glass cleaners. • Slots and openings on the marked label. Disclaimer BenQ Corporation makes no representations or warranties, either expressed or implied, with ... performance of any kind into any language or computer language, in the contents hereof without the prior written permission of BenQ Corporation. Your monitor should never be placed near the equipment and be easily accessible. • This product should be installed near or over...
Rl2755HM User Manual
Page 4
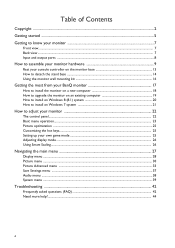
... Input and output ports ...8 How to assemble your monitor hardware 9 Rest your console controller on the monitor base 13 How to detach the stand base ...14 Using the monitor wall mounting kit 16 Getting the most from your BenQ monitor 17 How to install the monitor on a new computer 18 How to upgrade the... monitor on an existing computer 19 How to install on Windows 8 (8.1) system 20 How to install ...
... Input and output ports ...8 How to assemble your monitor hardware 9 Rest your console controller on the monitor base 13 How to detach the stand base ...14 Using the monitor wall mounting kit 16 Getting the most from your BenQ monitor 17 How to install the monitor on a new computer 18 How to upgrade the... monitor on an existing computer 19 How to install on Windows 8 (8.1) system 20 How to install ...
Rl2755HM User Manual
Page 5
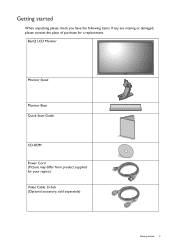
Getting started 5 BenQ LCD Monitor Monitor Stand Monitor Base Quick Start Guide CD-ROM Power Cord (Picture may differ from product supplied for your region.) Video Cable: D-Sub (Optional accessory, sold separately) Getting started When unpacking please check you have the following items. If any are missing or damaged, please contact the place of purchase for a replacement.
Getting started 5 BenQ LCD Monitor Monitor Stand Monitor Base Quick Start Guide CD-ROM Power Cord (Picture may differ from product supplied for your region.) Video Cable: D-Sub (Optional accessory, sold separately) Getting started When unpacking please check you have the following items. If any are missing or damaged, please contact the place of purchase for a replacement.

Rl2755HM User Manual
Page 6
... box and packaging in storage for use in the future when you may differ from the actual contents and the product supplied for protecting the monitor during transport. And the package contents may subject to transport the...
... box and packaging in storage for use in the future when you may differ from the actual contents and the product supplied for protecting the monitor during transport. And the package contents may subject to transport the...
Rl2755HM User Manual
Page 7
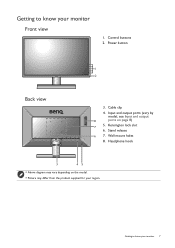
Input and output ports (vary by model, see Input and output 8 ports on the model. • Picture may differ from the product supplied for your region. Wall mount holes 8. Cable clip 4. Stand release 6 7. Control buttons 2. Power button Back view 1 2 3. Kensington lock slot 6. Getting to know your monitor 7 Headphone hook 3 45 • Above diagram may vary depending on page 8) 7 5. Getting to know your monitor Front view 1.
Input and output ports (vary by model, see Input and output 8 ports on the model. • Picture may differ from the product supplied for your region. Wall mount holes 8. Cable clip 4. Stand release 6 7. Control buttons 2. Power button Back view 1 2 3. Kensington lock slot 6. Getting to know your monitor 7 Headphone hook 3 45 • Above diagram may vary depending on page 8) 7 5. Getting to know your monitor Front view 1.
Rl2755HM User Manual
Page 8
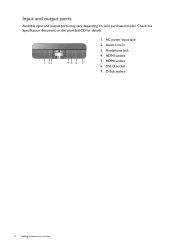
AC power input jack 2. HDMI socket 6. D-Sub socket 8 Getting to know your purchased model. HDMI socket 5. Audio Line In 3. Input and output ports Available input and output ports may vary depending on the provided CD for details. 1 23 45 6 7 1. Headphone jack 4. Check the Specification document on your monitor DVI-D socket 7.
AC power input jack 2. HDMI socket 6. D-Sub socket 8 Getting to know your purchased model. HDMI socket 5. Audio Line In 3. Input and output ports Available input and output ports may vary depending on the provided CD for details. 1 23 45 6 7 1. Headphone jack 4. Check the Specification document on your monitor DVI-D socket 7.

Rl2755HM User Manual
Page 9
...surface on an object like the monitor packaging bag on the bottom of the monitor base as illustrated until it off before continuing. Attach the monitor stand to assemble your monitor hardware 9 How to the monitor base as illustrated. 1 2 Orient and align the stand arm with the monitor, then push them together until they...padding. Do not plug-in place. Available input and output jacks may vary depending on a flat clean padded surface. Sliding or scraping the monitor around on your desk will crack the glass or damage the LCD substrate voiding your warranty. How to assemble your...
...surface on an object like the monitor packaging bag on the bottom of the monitor base as illustrated until it off before continuing. Attach the monitor stand to assemble your monitor hardware 9 How to the monitor base as illustrated. 1 2 Orient and align the stand arm with the monitor, then push them together until they...padding. Do not plug-in place. Available input and output jacks may vary depending on a flat clean padded surface. Sliding or scraping the monitor around on your desk will crack the glass or damage the LCD substrate voiding your warranty. How to assemble your...
Rl2755HM User Manual
Page 10
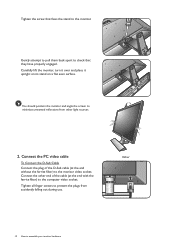
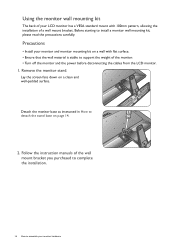
Gently attempt to pull them back apart to check that fixes the stand to the monitor. You should position the monitor and angle the screen to the computer video socket. Connect the other light sources. 2. Tighten all finger screws to prevent the plugs from other end ... Cable Connect the plug of the cable (at the end without the ferrite filter) to assemble your monitor hardware Either 10 How to the monitor video socket. Tighten the screw that they have properly engaged. Carefully lift the monitor, turn it over and place it upright on its stand on a flat even surface.
Gently attempt to pull them back apart to check that fixes the stand to the monitor. You should position the monitor and angle the screen to the computer video socket. Connect the other light sources. 2. Tighten all finger screws to prevent the plugs from other end ... Cable Connect the plug of the cable (at the end without the ferrite filter) to assemble your monitor hardware Either 10 How to the monitor video socket. Tighten the screw that they have properly engaged. Carefully lift the monitor, turn it over and place it upright on its stand on a flat even surface.
Rl2755HM User Manual
Page 11
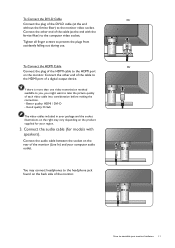
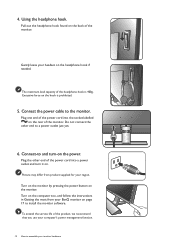
... end with speakers). Good quality: D-Sub The video cables included in your computer audio outlet. Connect the audio cable between the socket on the monitor. To Connect the HDMI Cable Or Connect the plug of the HDMI cable to the computer video socket. You may connect headphones to the headphone... jack found on the product supplied for models with the ferrite filter) to the HDMI port on the rear of the monitor (Line In) and your package and the socket illustrations on the right may vary depending on the back side of a digital output device. ...
... end with speakers). Good quality: D-Sub The video cables included in your computer audio outlet. Connect the audio cable between the socket on the monitor. To Connect the HDMI Cable Or Connect the plug of the HDMI cable to the computer video socket. You may connect headphones to the headphone... jack found on the product supplied for models with the ferrite filter) to the HDMI port on the rear of the monitor (Line In) and your package and the socket illustrations on the right may vary depending on the back side of a digital output device. ...
Rl2755HM User Manual
Page 12
... force on the rear of the headphone hook is prohibited. 5. Picture may differ from your monitor hardware Connect the power cable to and turn it on the computer too, and follow the instructions in Getting the most from product supplied for ... your computer's power management function. 12 How to assemble your BenQ monitor on the power. Plug the other end to install the monitor software. Do not connect the other end of the monitor. Pull out the headphone hook found on the monitor. Turn on the monitor by pressing the power button on the back of the...
... force on the rear of the headphone hook is prohibited. 5. Picture may differ from your monitor hardware Connect the power cable to and turn it on the computer too, and follow the instructions in Getting the most from product supplied for ... your computer's power management function. 12 How to assemble your BenQ monitor on the power. Plug the other end to install the monitor software. Do not connect the other end of the monitor. Pull out the headphone hook found on the monitor. Turn on the monitor by pressing the power button on the back of the...

Rl2755HM User Manual
Page 13
You can put the controller on the monitor base The base is not in use. How to assemble your console controller on the base when it is designed for holding the controller. Rest your monitor hardware 13
You can put the controller on the monitor base The base is not in use. How to assemble your console controller on the base when it is designed for holding the controller. Rest your monitor hardware 13

Rl2755HM User Manual
Page 14
...prevent damage to detach the stand base 1. Placing the screen surface on an object like a towel on a flat clean padded surface. Turn off the monitor and the power before laying the screen face down on the desk for padding, before unplugging the power cable. Sliding or scraping the... monitor around on your monitor hardware Protect the monitor and screen by clearing a flat open area on your desk will crack the glass or damage the LCD substrate voiding your ...
...prevent damage to detach the stand base 1. Placing the screen surface on an object like a towel on a flat clean padded surface. Turn off the monitor and the power before laying the screen face down on the desk for padding, before unplugging the power cable. Sliding or scraping the... monitor around on your monitor hardware Protect the monitor and screen by clearing a flat open area on your desk will crack the glass or damage the LCD substrate voiding your ...

Rl2755HM User Manual
Page 15
Remove the monitor base. 3. Release the thumbscrew on the bottom of the monitor base and detach the monitor base as illustrated. 1 2 How to assemble your monitor hardware 15
Remove the monitor base. 3. Release the thumbscrew on the bottom of the monitor base and detach the monitor base as illustrated. 1 2 How to assemble your monitor hardware 15
Rl2755HM User Manual
Page 16
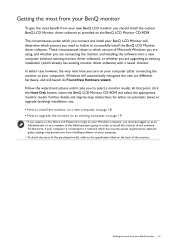
... How to detach the stand base on page 14. 2. Remove the monitor stand. Detach the monitor base as instructed in How to assemble your monitor hardware Before starting to install a monitor wall mounting kit, please read the precautions carefully. Precautions • Install your monitor and monitor mounting kit on a clean and well-padded surface. Using the...
... How to detach the stand base on page 14. 2. Remove the monitor stand. Detach the monitor base as instructed in How to assemble your monitor hardware Before starting to install a monitor wall mounting kit, please read the precautions carefully. Precautions • Install your monitor and monitor mounting kit on a clean and well-padded surface. Using the...
Rl2755HM User Manual
Page 17
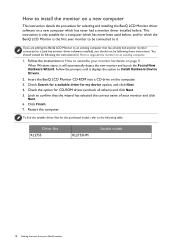
...• To check the name of the monitor. The circumstances under which you connect and install your BenQ LCD Monitor will determine which process you turn on your computer (after connecting the monitor to successfully install the BenQ LCD Monitor driver software. Furthermore, if your computer is ...connected to the specification label on the BenQ LCD Monitor CD-ROM. Getting the most benefit from your new BenQ LCD monitor, you must be logged on ...
...• To check the name of the monitor. The circumstances under which you connect and install your BenQ LCD Monitor will determine which process you turn on your computer (after connecting the monitor to successfully install the BenQ LCD Monitor driver software. Furthermore, if your computer is ...connected to the specification label on the BenQ LCD Monitor CD-ROM. Getting the most benefit from your new BenQ LCD monitor, you must be logged on ...
Rl2755HM User Manual
Page 18
... for selecting and installing the BenQ LCD Monitor driver software on the computer. 3. Insert the BenQ LCD Monitor CD-ROM into a CD drive on a new computer which has never had another monitor connected to it . Check the option for my device option, and click Next. 4. Restart the computer. Driver files RL2755 RL2755HM Suitable models 18 Getting...
... for selecting and installing the BenQ LCD Monitor driver software on the computer. 3. Insert the BenQ LCD Monitor CD-ROM into a CD drive on a new computer which has never had another monitor connected to it . Check the option for my device option, and click Next. 4. Restart the computer. Driver files RL2755 RL2755HM Suitable models 18 Getting...
Rl2755HM User Manual
Page 19
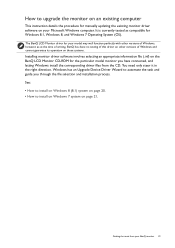
... other versions of Windows and cannot guarantee its operation on those systems. Installing monitor driver software involves selecting an appropriate information file (.inf) on the BenQ LCD Monitor CD-ROM for Windows 8.1, Windows 8, and Windows 7 Operating System (OS). The BenQ LCD Monitor driver for your model may well function perfectly with other versions of Windows...
... other versions of Windows and cannot guarantee its operation on those systems. Installing monitor driver software involves selecting an appropriate information file (.inf) on the BenQ LCD Monitor CD-ROM for Windows 8.1, Windows 8, and Windows 7 Operating System (OS). The BenQ LCD Monitor driver for your model may well function perfectly with other versions of Windows...
Rl2755HM User Manual
Page 20
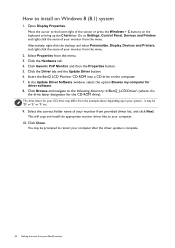
... update is the drive letter designator for the CD-ROM drive). The drive letter for driver software. 8. Click the Hardware tab. 4. Insert the BenQ LCD Monitor CD-ROM into a CD drive on Windows 8 (8.1) system 1. You may be 'D:' or 'E:' or 'F:' etc. 9. Move the cursor to ...may be prompted to the following directory: d:\BenQ_LCD\Driver\ (where d is complete. 20 Getting the most from your BenQ monitor Select the correct folder name of your monitor from the menu. 2. Alternatively, right-click the desktop and select Personalize, Display, Devices and Printers, and right-...
... update is the drive letter designator for the CD-ROM drive). The drive letter for driver software. 8. Click the Hardware tab. 4. Insert the BenQ LCD Monitor CD-ROM into a CD drive on Windows 8 (8.1) system 1. You may be 'D:' or 'E:' or 'F:' etc. 9. Move the cursor to ...may be prompted to the following directory: d:\BenQ_LCD\Driver\ (where d is complete. 20 Getting the most from your BenQ monitor Select the correct folder name of your monitor from the menu. 2. Alternatively, right-click the desktop and select Personalize, Display, Devices and Printers, and right-...
Rl2755HM User Manual
Page 21
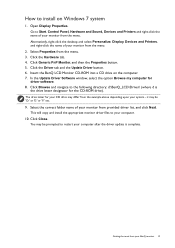
...Click the Driver tab and the Update Driver button. 6. Insert the BenQ LCD Monitor CD-ROM into a CD drive on Windows 7 system 1. This will copy and install the appropriate monitor driver files to your BenQ monitor 21 How to install on the computer. 7. Open Display Properties. ...Click Browse and navigate to Start, Control Panel, Hardware and Sound, Devices and Printers and right-click the name of your monitor from the menu. 3....
...Click the Driver tab and the Update Driver button. 6. Insert the BenQ LCD Monitor CD-ROM into a CD drive on Windows 7 system 1. This will copy and install the appropriate monitor driver files to your BenQ monitor 21 How to install on the computer. 7. Open Display Properties. ...Click Browse and navigate to Start, Control Panel, Hardware and Sound, Devices and Printers and right-click the name of your monitor from the menu. 3....


