
Palette Master - How to use guide
Page 1
BenQ ProGraphi Series Monitor Palette Master Color Management Software How to Use Guide
BenQ ProGraphi Series Monitor Palette Master Color Management Software How to Use Guide
Palette Master - How to use guide
Page 2
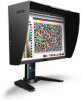
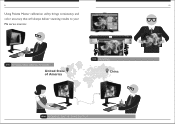
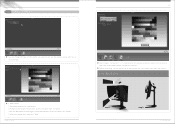
01 02 Using Palette Master calibration utility brings consistency and color accuracy that will always deliver stunning results to your PG series monitor. one RETOUCHING DIGITAL PHOTOS United State of America two PRINTING China three WORKING ON THE SAME OUTPUT
01 02 Using Palette Master calibration utility brings consistency and color accuracy that will always deliver stunning results to your PG series monitor. one RETOUCHING DIGITAL PHOTOS United State of America two PRINTING China three WORKING ON THE SAME OUTPUT
Palette Master - How to use guide
Page 3
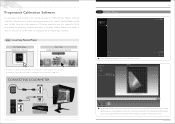
...accurate number. Select the desired RGB primaries and Luminance. After setting, click "Next." By providing reliable calibr ation in PG series monitors and fully suppor ts X-Rite color imeter. CONNECTING COLORIMETER USB USB PC IN Launching Palette Master 04 two In Basic Mode i ...Click "Display Profiling" to both monitor and computer. 03 Proprietary Calibration Software Co-developed with leading color calibration exper ts X-Rite, Palette Master software simplifies calibration and ...
...accurate number. Select the desired RGB primaries and Luminance. After setting, click "Next." By providing reliable calibr ation in PG series monitors and fully suppor ts X-Rite color imeter. CONNECTING COLORIMETER USB USB PC IN Launching Palette Master 04 two In Basic Mode i ...Click "Display Profiling" to both monitor and computer. 03 Proprietary Calibration Software Co-developed with leading color calibration exper ts X-Rite, Palette Master software simplifies calibration and ...
Palette Master - How to use guide
Page 4
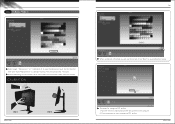
... get " Calibr ation 1" or " Calibr ation 2" to save the calibr ation result into the monitor, then click "Star t Measurement" to ensure that the color imeter snaps onto the monitor. Before calibr ating, tilt the monitor up to calibr ate monitor. CALIBRATION When calibration is finished, you will take around 7 minutes. In Basic Mode step...
... get " Calibr ation 1" or " Calibr ation 2" to save the calibr ation result into the monitor, then click "Star t Measurement" to ensure that the color imeter snaps onto the monitor. Before calibr ating, tilt the monitor up to calibr ate monitor. CALIBRATION When calibration is finished, you will take around 7 minutes. In Basic Mode step...
Palette Master - How to use guide
Page 7
...Select tar get " Calibr ation 1" or " Calibr ation 2" to save the calibr ation result into the monitor, then click "Star t Measurement" to ensure that the color imeter snaps onto the monitor. Set size according to make the calibr ation results accur ate for your requirements. 3. Before calibr ating, tilt... the monitor up to calibr ate monitor. A larger set size usually provides better accuracy, but takes longer to use , but the default setting (ICC V4) is recommended. ...
...Select tar get " Calibr ation 1" or " Calibr ation 2" to save the calibr ation result into the monitor, then click "Star t Measurement" to ensure that the color imeter snaps onto the monitor. Set size according to make the calibr ation results accur ate for your requirements. 3. Before calibr ating, tilt... the monitor up to calibr ate monitor. A larger set size usually provides better accuracy, but takes longer to use , but the default setting (ICC V4) is recommended. ...
Palette Master - How to use guide
Page 9
Here you can choose Delta E 1976 or 2000, as tar get to check your monitor passed and lists the Delta E for each standard color. After the measurement, this report shows if your monitor. QA report QA report 15 16 four QA report Click "Quality." You can choose G7, Fogr a or Ugr a 's standards as needed. Click "Next" and "Star t Measurement."
Here you can choose Delta E 1976 or 2000, as tar get to check your monitor passed and lists the Delta E for each standard color. After the measurement, this report shows if your monitor. QA report QA report 15 16 four QA report Click "Quality." You can choose G7, Fogr a or Ugr a 's standards as needed. Click "Next" and "Star t Measurement."

Palette Master - How to use guide
Page 10
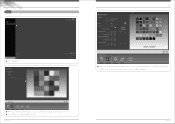
... ate 5x5 tar get. Click "Next" and "Star t Measurement." Uniformity Change the gray levels - 63/128/255 to your needs. six System Required OS system Monitor Hardware PC Mac Win 8 /7 (32 or 64 bits) 10.6 -10.8 Win Vista /XP (32 bits) All PG series At least 2 USB port Intel® Core...
... ate 5x5 tar get. Click "Next" and "Star t Measurement." Uniformity Change the gray levels - 63/128/255 to your needs. six System Required OS system Monitor Hardware PC Mac Win 8 /7 (32 or 64 bits) 10.6 -10.8 Win Vista /XP (32 bits) All PG series At least 2 USB port Intel® Core...

PG2401PT User Manual
Page 1
PG2401PT LCD Monitor User Manual
PG2401PT LCD Monitor User Manual
PG2401PT User Manual
Page 2
...8226; Slots and openings on the marked label. Further, BenQ Corporation reserves the right to revise this product. Clean the LCD monitor surface with respect to H03VV-F or H05VV-F, 2G or 3G, 0.75mm2 must not be used. Your monitor should never be placed near the equipment and be easily ... into any language or computer language, in this equipment from the wall outlet before cleaning. Copyright Copyright © 2013 by any person of BenQ Corporation. Safety warning and precautions • The warranty may be installed near or over a radiator or heat source, or in a built...
...8226; Slots and openings on the marked label. Further, BenQ Corporation reserves the right to revise this product. Clean the LCD monitor surface with respect to H03VV-F or H05VV-F, 2G or 3G, 0.75mm2 must not be used. Your monitor should never be placed near the equipment and be easily ... into any language or computer language, in this equipment from the wall outlet before cleaning. Copyright Copyright © 2013 by any person of BenQ Corporation. Safety warning and precautions • The warranty may be installed near or over a radiator or heat source, or in a built...
PG2401PT User Manual
Page 3
..., as opening or removing covers may expose you should always adjust the monitor brightness according to the light condition around the monitor. • It is recommended to set the monitor to a lower brightness for long-term use the original accessories (e.g. Check out BenQ's CSR Website at purchase. For works that consumers make informed green...
..., as opening or removing covers may expose you should always adjust the monitor brightness according to the light condition around the monitor. • It is recommended to set the monitor to a lower brightness for long-term use the original accessories (e.g. Check out BenQ's CSR Website at purchase. For works that consumers make informed green...

PG2401PT User Manual
Page 4
... base 16 Installing shading hood ...18 Adjusting the monitor height ...21 Rotating the monitor ...22 Viewing angle adjustment ...23 Using the monitor wall mounting kit 24 Getting the most from your BenQ monitor 25 How to install the monitor on a new computer 26 How to upgrade the monitor on an existing computer 27 How to install on...
... base 16 Installing shading hood ...18 Adjusting the monitor height ...21 Rotating the monitor ...22 Viewing angle adjustment ...23 Using the monitor wall mounting kit 24 Getting the most from your BenQ monitor 25 How to install the monitor on a new computer 26 How to upgrade the monitor on an existing computer 27 How to install on...
PG2401PT User Manual
Page 5
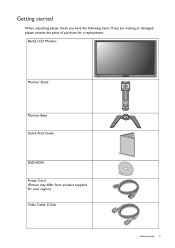
Getting started When unpacking please check you have the following items. If any are missing or damaged, please contact the place of purchase for your region.) Video Cable: D-Sub Getting started 5 BenQ LCD Monitor Monitor Stand Monitor Base Quick Start Guide DVD-ROM Power Cord (Picture may differ from product supplied for a replacement.
Getting started When unpacking please check you have the following items. If any are missing or damaged, please contact the place of purchase for your region.) Video Cable: D-Sub Getting started 5 BenQ LCD Monitor Monitor Stand Monitor Base Quick Start Guide DVD-ROM Power Cord (Picture may differ from product supplied for a replacement.
PG2401PT User Manual
Page 6
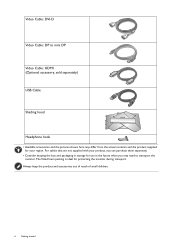
...(Optional accessory, sold separately) USB Cable Shading hood Headphone hook • Available accessories and the pictures shown here may need to transport the monitor. The fitted foam packing is ideal for your product, you can purchase them separately. • Consider keeping the box and packaging in storage ...for use in the future when you may differ from the actual contents and the product supplied for protecting the monitor during transport. Always keep the product and accessories out of reach of small children. 6 Getting started For cables that are not ...
...(Optional accessory, sold separately) USB Cable Shading hood Headphone hook • Available accessories and the pictures shown here may need to transport the monitor. The fitted foam packing is ideal for your product, you can purchase them separately. • Consider keeping the box and packaging in storage ...for use in the future when you may differ from the actual contents and the product supplied for protecting the monitor during transport. Always keep the product and accessories out of reach of small children. 6 Getting started For cables that are not ...
PG2401PT User Manual
Page 7
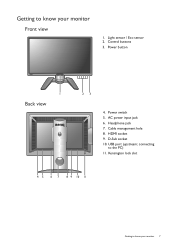
Power button 1 Back view 23 4. AC power input jack 6. D-Sub socket 10. connecting to the PC) 11. Kensington lock slot 4 5 6 7 8 9 10 11 Getting to know your monitor 7 Power switch 5. HDMI socket 9. Cable management hole 8. USB port (upstream; Light sensor / Eco sensor 2. Getting to know your monitor Front view 1. Control buttons 3. Headphone jack 7.
Power button 1 Back view 23 4. AC power input jack 6. D-Sub socket 10. connecting to the PC) 11. Kensington lock slot 4 5 6 7 8 9 10 11 Getting to know your monitor 7 Power switch 5. HDMI socket 9. Cable management hole 8. USB port (upstream; Light sensor / Eco sensor 2. Getting to know your monitor Front view 1. Control buttons 3. Headphone jack 7.
PG2401PT User Manual
Page 8
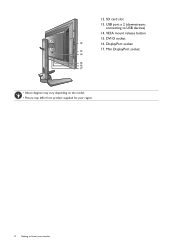
DisplayPort socket 13 17. Mini DisplayPort socket 14 15 16 17 • Above diagram may vary depending on the model. • Picture may differ from product supplied for your monitor connecting to know your region. 8 Getting to USB devices) 14. DVI-D socket 12 16. VESA mount release button 15. USB port x 2 (downstream; 12. SD card slot 13.
DisplayPort socket 13 17. Mini DisplayPort socket 14 15 16 17 • Above diagram may vary depending on the model. • Picture may differ from product supplied for your monitor connecting to know your region. 8 Getting to USB devices) 14. DVI-D socket 12 16. VESA mount release button 15. USB port x 2 (downstream; 12. SD card slot 13.
PG2401PT User Manual
Page 9
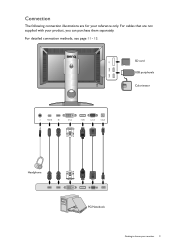
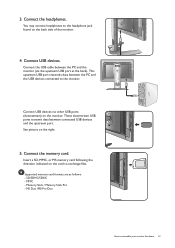
For detailed connection methods, see page 11 - 13. For cables that are for your reference only. SD card USB peripherals Colorimeter Headphone PC/Notebook Getting to know your product, you can purchase them separately. Connection The following connection illustrations are not supplied with your monitor 9
For detailed connection methods, see page 11 - 13. For cables that are for your reference only. SD card USB peripherals Colorimeter Headphone PC/Notebook Getting to know your product, you can purchase them separately. Connection The following connection illustrations are not supplied with your monitor 9
PG2401PT User Manual
Page 10
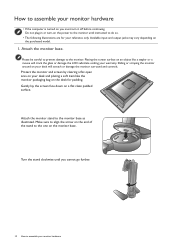
... output jacks may vary depending on a flat clean padded surface. Gently lay the screen face down on the purchased model. 1. Attach the monitor stand to the monitor. Make sure to align the arrow on your desk and placing a soft item like a stapler or a mouse will scratch or damage the... monitor surround and controls. Sliding or scraping the monitor around on the monitor base. Turn the stand clockwise until instructed to the one on your desk will crack the glass or damage ...
... output jacks may vary depending on a flat clean padded surface. Gently lay the screen face down on the purchased model. 1. Attach the monitor stand to the monitor. Make sure to align the arrow on your desk and placing a soft item like a stapler or a mouse will scratch or damage the... monitor surround and controls. Sliding or scraping the monitor around on the monitor base. Turn the stand clockwise until instructed to the one on your desk will crack the glass or damage ...
PG2401PT User Manual
Page 11
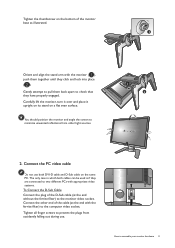
... D-Sub cable on the same PC. Tighten the thumbscrew on the bottom of the monitor base as illustrated. 1 2 Orient and align the stand arm with the monitor ( ), push them back apart to assemble your monitor hardware 11 Carefully lift the monitor, turn it over and place it upright on its stand on a flat even... unwanted reflections from accidently falling out during use both cables can be used is if they click and lock into place ( ). You should position the monitor and angle the screen to prevent the plugs from other end of the D-Sub cable (at the end with the ferrite filter) to the...
... D-Sub cable on the same PC. Tighten the thumbscrew on the bottom of the monitor base as illustrated. 1 2 Orient and align the stand arm with the monitor ( ), push them back apart to assemble your monitor hardware 11 Carefully lift the monitor, turn it over and place it upright on its stand on a flat even... unwanted reflections from accidently falling out during use both cables can be used is if they click and lock into place ( ). You should position the monitor and angle the screen to prevent the plugs from other end of the D-Sub cable (at the end with the ferrite filter) to the...
PG2401PT User Manual
Page 12
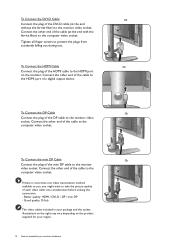
...computer video socket. To Connect the mini DP Cable Or Connect the plug of the DP cable to the monitor video socket. To Connect the DP Cable Or Connect the plug of the mini DP cable to the ...your package and the socket illustrations on the right may vary depending on the monitor. Connect the other end of the HDMI cable to the monitor video socket. To Connect the HDMI Cable Or Connect the plug of the... cable to the monitor video socket. Better quality: HDMI / DVI-D / DP / mini DP - Connect the other...
...computer video socket. To Connect the mini DP Cable Or Connect the plug of the DP cable to the monitor video socket. To Connect the DP Cable Or Connect the plug of the mini DP cable to the ...your package and the socket illustrations on the right may vary depending on the monitor. Connect the other end of the HDMI cable to the monitor video socket. To Connect the HDMI Cable Or Connect the plug of the... cable to the monitor video socket. Better quality: HDMI / DVI-D / DP / mini DP - Connect the other...
PG2401PT User Manual
Page 13
... (downstream) on the card to the headphone jack found on the right. 5. MS Duo /MS-Pro Duo How to the monitor. See picture on the back side of the monitor. 4. TV OUT SDIF-OUT PDIF-OUT 3. Connect the USB cable between connected USB devices and the upstream port. You may... connect headphones to exchange files. This upstream USB port transmits data between the PC and the USB devices connected to assemble your monitor hardware 13 Connect USB devices via the upstream USB port at the back). Supported memory card formats are as follows: - MMC - Connect the ...
... (downstream) on the card to the headphone jack found on the right. 5. MS Duo /MS-Pro Duo How to the monitor. See picture on the back side of the monitor. 4. TV OUT SDIF-OUT PDIF-OUT 3. Connect the USB cable between connected USB devices and the upstream port. You may... connect headphones to exchange files. This upstream USB port transmits data between the PC and the USB devices connected to assemble your monitor hardware 13 Connect USB devices via the upstream USB port at the back). Supported memory card formats are as follows: - MMC - Connect the ...


