
User Manual
Page 21
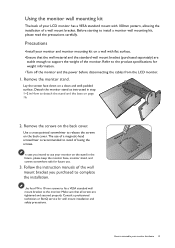
Consult a professional technician or BenQ service for weight information. •Turn off the monitor and the power .... Precautions •Install your monitor on the back cover. Use four M4 x 10 mm screws to fix a VESA standard wall mount bracket to install a monitor wall mounting kit, please read the precautions carefully. Before starting to the...monitor wall mounting kit The back of your monitor hardware 21 Refer to assemble your LCD monitor has a VESA standard mount with flat surface. •Ensure that the wall material and the standard wall mount bracket (purchased ...
Consult a professional technician or BenQ service for weight information. •Turn off the monitor and the power .... Precautions •Install your monitor on the back cover. Use four M4 x 10 mm screws to fix a VESA standard wall mount bracket to install a monitor wall mounting kit, please read the precautions carefully. Before starting to the...monitor wall mounting kit The back of your monitor hardware 21 Refer to assemble your LCD monitor has a VESA standard mount with flat surface. •Ensure that the wall material and the standard wall mount bracket (purchased ...

User Manual
Page 43
.../CI capability allows monitor controls to be sent via the software for Display Data Channel/Command Interface, which was developed by Video Electronics Standards Association (VESA). Otherwise, HDMI can only be in the • ON input auto select loop. HDMI Auto Switch When this function is activated, DP port will be...
.../CI capability allows monitor controls to be sent via the software for Display Data Channel/Command Interface, which was developed by Video Electronics Standards Association (VESA). Otherwise, HDMI can only be in the • ON input auto select loop. HDMI Auto Switch When this function is activated, DP port will be...
