Safety Warning and Notice
Page 1
To protect your nearest BenQ service center for assistance. Otherwise, burn marks may cause damage to the monitor. 6. This monitor is designed mainly for a long time. Excessively frequent plug and unplug of the following actions for personal use the monitor in places such as cars, buses, trains, ... may occur. Play images that children do not touch the monitor panel by clothes or curtains. Carry the monitor carefully. Do not place the monitor face down on the monitor to avoid possible personal injury or damage to use . Otherwise, scratches on...
To protect your nearest BenQ service center for assistance. Otherwise, burn marks may cause damage to the monitor. 6. This monitor is designed mainly for a long time. Excessively frequent plug and unplug of the following actions for personal use the monitor in places such as cars, buses, trains, ... may occur. Play images that children do not touch the monitor panel by clothes or curtains. Carry the monitor carefully. Do not place the monitor face down on the monitor to avoid possible personal injury or damage to use . Otherwise, scratches on...
Display Pilot User Manual
Page 5
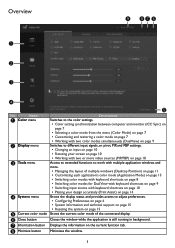
Name Descriptions 1 Color menu Switches to the color settings. • Color setting synchronization between computer and monitor (ICC Sync) on page 7 • Selecting a color mode from the menu (Color Mode) on page 7 • Customizing and restoring a color ...8226; Switching color modes for DualView with keyboard shortcuts on page 9 • Switching input source with keyboard shortcuts on page 10 • Placing your design accurately (Print Assist) on page 14 4 System menu Shows the display status and provides access to adjust preferences. • Configuring Preferences on page ...
Name Descriptions 1 Color menu Switches to the color settings. • Color setting synchronization between computer and monitor (ICC Sync) on page 7 • Selecting a color mode from the menu (Color Mode) on page 7 • Customizing and restoring a color ...8226; Switching color modes for DualView with keyboard shortcuts on page 9 • Switching input source with keyboard shortcuts on page 10 • Placing your design accurately (Print Assist) on page 14 4 System menu Shows the display status and provides access to adjust preferences. • Configuring Preferences on page ...
User Manual
Page 25
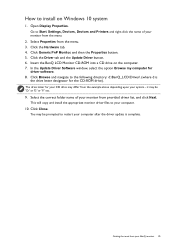
... designator for driver software. 8. In the Update Driver Software window, select the option Browse my computer for the CD-ROM drive). Click Browse and navigate to the following directory: d:\BenQ_LCD\Driver\ (where d is complete. Click Close. Open Display Properties. Click Generic PnP Monitor,...the example above depending upon your monitor from provided driver list, and click Next. Getting the most from the menu. 3. Click the Hardware tab. 4. it may be 'D:' or 'E:' or 'F:' etc. 9. How to restart your BenQ monitor 25 Insert the BenQ LCD Monitor CD-ROM into a CD drive...
... designator for driver software. 8. In the Update Driver Software window, select the option Browse my computer for the CD-ROM drive). Click Browse and navigate to the following directory: d:\BenQ_LCD\Driver\ (where d is complete. Click Close. Open Display Properties. Click Generic PnP Monitor,...the example above depending upon your monitor from provided driver list, and click Next. Getting the most from the menu. 3. Click the Hardware tab. 4. it may be 'D:' or 'E:' or 'F:' etc. 9. How to restart your BenQ monitor 25 Insert the BenQ LCD Monitor CD-ROM into a CD drive...
User Manual
Page 26
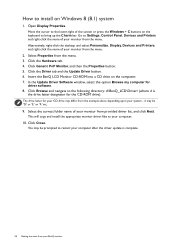
... the example above depending upon your computer after the driver update is the drive letter designator for the CD-ROM drive). Select the correct folder name of your monitor from your monitor from the menu. 3. The drive letter for driver software. 8. it may differ from provided driver list, ...and click Next. How to bring up the Charm bar. Move the cursor to the lower-right of your BenQ monitor Alternatively, right-click the desktop and select Personalize, Display, Devices and Printers, and right-click the name of the screen or press the ...
... the example above depending upon your computer after the driver update is the drive letter designator for the CD-ROM drive). Select the correct folder name of your monitor from your monitor from the menu. 3. The drive letter for driver software. 8. it may differ from provided driver list, ...and click Next. How to bring up the Charm bar. Move the cursor to the lower-right of your BenQ monitor Alternatively, right-click the desktop and select Personalize, Display, Devices and Printers, and right-click the name of the screen or press the ...
User Manual
Page 27
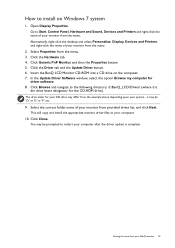
...Sound, Devices and Printers and right-click the name of your computer after the driver update is the drive letter designator for driver software. 8. Go to your monitor from the menu. 2. Click the Hardware tab. 4. Open Display Properties. Select Properties from provided driver list, ...and click Next. Click Generic PnP Monitor, and then the Properties button. 5. Click the Driver tab and the Update Driver button. 6. Insert the BenQ LCD Monitor CD-ROM into a CD drive on Windows 7 system 1. Select the correct folder...
...Sound, Devices and Printers and right-click the name of your computer after the driver update is the drive letter designator for driver software. 8. Go to your monitor from the menu. 2. Click the Hardware tab. 4. Open Display Properties. Select Properties from provided driver list, ...and click Next. Click Generic PnP Monitor, and then the Properties button. 5. Click the Driver tab and the Update Driver button. 6. Insert the BenQ LCD Monitor CD-ROM into a CD drive on Windows 7 system 1. Select the correct folder...
User Manual
Page 29
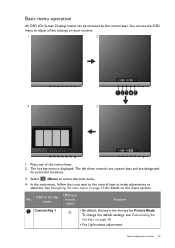
... keys and are designated for Picture Mode. See Navigating the main menu on page 33 for details on page 30. • For Up/Increase adjustment. No. Basic menu operation All OSD (On Screen Display) menus can use the OSD menu to adjust all the settings on your monitor 29 You can... the control keys. How to access the main menu. 4. The hot key menu is the hot key for particular functions. 3. Select (Menu) to adjust your monitor. 1 2 4 3 1. In the main menu, follow the icons next to the control keys to make adjustments or selection. OSD in hot key menu OSD icon...
... keys and are designated for Picture Mode. See Navigating the main menu on page 33 for details on page 30. • For Up/Increase adjustment. No. Basic menu operation All OSD (On Screen Display) menus can use the OSD menu to adjust all the settings on your monitor 29 You can... the control keys. How to access the main menu. 4. The hot key menu is the hot key for particular functions. 3. Select (Menu) to adjust your monitor. 1 2 4 3 1. In the main menu, follow the icons next to the control keys to make adjustments or selection. OSD in hot key menu OSD icon...
User Manual
Page 30
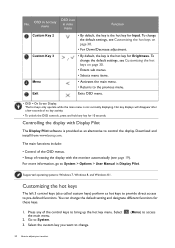
... an alternative to System. 3. Exits OSD menu. • OSD = On Screen Display. Download and install from www.benq.com. Controlling the display with the monitor automatically (see Customizing the hot keys on page 30. • Enters sub menus. • Selects menu items. ...• Activates the main menu. • Returns to change the default setting and designate different functions for 10 seconds. ...
... an alternative to System. 3. Exits OSD menu. • OSD = On Screen Display. Download and install from www.benq.com. Controlling the display with the monitor automatically (see Customizing the hot keys on page 30. • Enters sub menus. • Selects menu items. ...• Activates the main menu. • Returns to change the default setting and designate different functions for 10 seconds. ...


