
User Manual
Page 1
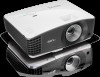
MX704/MW705 Digital Projector User Manual
MX704/MW705 Digital Projector User Manual

User Manual
Page 2
...........19 Connecting video streaming dongle QCast (optional accessory 20 Operation 22 Starting up the projector 22 Adjusting the projected image 23 Using the menus 26 Securing the projector 27 Switching input signal 29 Magnifying and searching for details ...30 Selecting the aspect ...pattern 38 Using the teaching templates 39 Shutting down the projector 40 Direct power off 40 Menu operation 41 Maintenance 51 Care of the projector 51 Lamp information 52 Troubleshooting 58 Specifications 59 Projector specifications 59 Dimensions 60 Ceiling mount installation 60 Timing chart...
...........19 Connecting video streaming dongle QCast (optional accessory 20 Operation 22 Starting up the projector 22 Adjusting the projected image 23 Using the menus 26 Securing the projector 27 Switching input signal 29 Magnifying and searching for details ...30 Selecting the aspect ...pattern 38 Using the teaching templates 39 Shutting down the projector 40 Direct power off 40 Menu operation 41 Maintenance 51 Care of the projector 51 Lamp information 52 Troubleshooting 58 Specifications 59 Projector specifications 59 Dimensions 60 Ceiling mount installation 60 Timing chart...
User Manual
Page 3
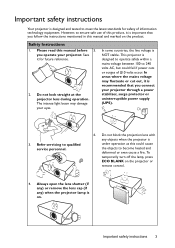
... during operation. However, to ensure safe use of ±10 volts occur. In areas where the mains voltage may damage your projector. Safety Instructions 1. This projector is designed to operate safely within a mains voltage between 100 to 240 volts AC, but could fail if power cuts or surges of ...in this could cause the objects to become heated and deformed or even cause a fire. Do not block the projection lens with any ) when the projector lamp is on. Please read this manual before 5. Important safety instructions 3 Always open the lens shutter (if any) or remove the lens cap (...
... during operation. However, to ensure safe use of ±10 volts occur. In areas where the mains voltage may damage your projector. Safety Instructions 1. This projector is designed to operate safely within a mains voltage between 100 to 240 volts AC, but could fail if power cuts or surges of ...in this could cause the objects to become heated and deformed or even cause a fire. Do not block the projection lens with any ) when the projector lamp is on. Please read this manual before 5. Important safety instructions 3 Always open the lens shutter (if any) or remove the lens cap (...

User Manual
Page 4
... ventilation grill. The only user serviceable occasions. part is under operation, you may cause death lamps beyond the projector. Do not operate lamps beyond the rated life could if you ever undo or remove any electronic components unless the.... 4 Important safety instructions Refer servicing only to break on an during operation. Allow the projector unstable cart, stand, or table. Safety Instructions (Continued) 7. Do not place this 8. When the projector is the lamp which may sense some heated air and odor from its own removable cover....
... ventilation grill. The only user serviceable occasions. part is under operation, you may cause death lamps beyond the projector. Do not operate lamps beyond the rated life could if you ever undo or remove any electronic components unless the.... 4 Important safety instructions Refer servicing only to break on an during operation. Allow the projector unstable cart, stand, or table. Safety Instructions (Continued) 7. Do not place this 8. When the projector is the lamp which may sense some heated air and odor from its own removable cover....

User Manual
Page 5
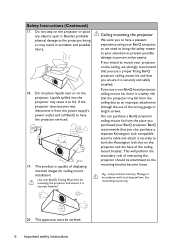
...windows rolled up. - the following environments. - Locations where excessive humidity, dust, or cigarette smoke may result in a fire. Do not place this projector on a blanket, bedding or any other soft surface. - Locations where the altitudes are seriously obstructed, overheating inside of , or damage to, the lamp.... 3000 m (10000 feet) 0 m (0 feet) 16. Allow at angle of more than 15 degrees front to the projector. Do not place this projector with an ambient temperature above 40°C / 104°F - If the ventilation holes are higher than 10 degrees left to right, ...
...windows rolled up. - the following environments. - Locations where excessive humidity, dust, or cigarette smoke may result in a fire. Do not place this projector on a blanket, bedding or any other soft surface. - Locations where the altitudes are seriously obstructed, overheating inside of , or damage to, the lamp.... 3000 m (10000 feet) 0 m (0 feet) 16. Allow at angle of more than 15 degrees front to the projector. Do not place this projector with an ambient temperature above 40°C / 104°F - If the ventilation holes are higher than 10 degrees left to right, ...
User Manual
Page 6
... upon it is securely and safely installed. You can purchase a BenQ projector ceiling mount kit from the power supply's power outlet and call BenQ to person and property. If you intend to mount your BenQ projector, so we strongly recommend that you also purchase a separate Kensington ...place you use of displaying inverted images for ceiling mount installation. This will perform the secondary role of restraining the projector should its attachment to your BenQ projector. Safety Instructions (Continued) 17. Do not step on the ceiling, we need to bring this safety matter ...
... upon it is securely and safely installed. You can purchase a BenQ projector ceiling mount kit from the power supply's power outlet and call BenQ to person and property. If you intend to mount your BenQ projector, so we strongly recommend that you also purchase a separate Kensington ...place you use of displaying inverted images for ceiling mount installation. This will perform the secondary role of restraining the projector should its attachment to your BenQ projector. Safety Instructions (Continued) 17. Do not step on the ceiling, we need to bring this safety matter ...
User Manual
Page 7
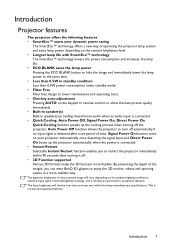
...The apparent brightness of the projected image will decline over time and may vary within 90 seconds after a set period of operating the projector lamp system and saves lamp power depending on the content brightness level. • Longest lamp life with SmartEco™ technology The ...Power Off, Signal Power On, Direct Power On Quick Cooling function speeds up the projector automatically when the power is connected. • Instant Restart Selectable Instant Restart function enables you can wear BenQ 3D glasses to enjoy the 3D movies, videos and sporting events in standby condition...
...The apparent brightness of the projected image will decline over time and may vary within 90 seconds after a set period of operating the projector lamp system and saves lamp power depending on the content brightness level. • Longest lamp life with SmartEco™ technology The ...Power Off, Signal Power On, Direct Power On Quick Cooling function speeds up the projector automatically when the power is connected. • Instant Restart Selectable Instant Restart function enables you can wear BenQ 3D glasses to enjoy the 3D movies, videos and sporting events in standby condition...

User Manual
Page 8
Standard accessories The supplied accessories will be suitable for your dealer for detailed information. Spare lamp kit 2. Projector QDuigiictkalSPtraortjeGctuoidr e Quick start guide Power cord VGA cable User manual CD Warranty card* Remote control with batteries Optional accessories 1. RS232 cable 8 Introduction Please consult your ...
Standard accessories The supplied accessories will be suitable for your dealer for detailed information. Spare lamp kit 2. Projector QDuigiictkalSPtraortjeGctuoidr e Quick start guide Power cord VGA cable User manual CD Warranty card* Remote control with batteries Optional accessories 1. RS232 cable 8 Introduction Please consult your ...

User Manual
Page 9
... input jack S-Video input jack Video input jack Audio (L/R) input jacks AC power jack Adjuster foot Ceiling mount holes Kensington anti-theft lock slot Introduction 9 Projector exterior view Front/upper side 1 2 3 4 5 6 7 8 9 10 11 Rear/lower side 12 13 14 15 16 17 18 19 20 21 22 23 24 24 1. 2. 3. 4. 5. 6. 7. 8. 9. 10...
... input jack S-Video input jack Video input jack Audio (L/R) input jacks AC power jack Adjuster foot Ceiling mount holes Kensington anti-theft lock slot Introduction 9 Projector exterior view Front/upper side 1 2 3 4 5 6 7 8 9 10 11 Rear/lower side 12 13 14 15 16 17 18 19 20 21 22 23 24 24 1. 2. 3. 4. 5. 6. 7. 8. 9. 10...
User Manual
Page 10
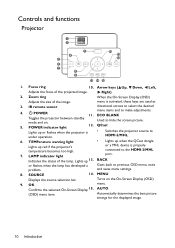
...menu, exits problem. BACK or flashes when the lamp has developed a Goes back to hide the screen picture. 12. Right) 2. POWER Toggles the projector between standby mode and on the On-Screen Display (OSD) 9. TEMPerature warning light • Lights up when the QCast dongle Lights up 13. ...the projected image. Zoom ring When the On-Screen Display (OSD) Adjusts the size of the image. QCast Lights up or flashes when the projector is activated, these keys are used as 3. LAMP indicator light or a MHL device is properly connected to HDMI-2/MHL. 6. Confirms the selected...
...menu, exits problem. BACK or flashes when the lamp has developed a Goes back to hide the screen picture. 12. Right) 2. POWER Toggles the projector between standby mode and on the On-Screen Display (OSD) 9. TEMPerature warning light • Lights up when the QCast dongle Lights up 13. ...the projected image. Zoom ring When the On-Screen Display (OSD) Adjusts the size of the image. QCast Lights up or flashes when the projector is activated, these keys are used as 3. LAMP indicator light or a MHL device is properly connected to HDMI-2/MHL. 6. Confirms the selected...

User Manual
Page 11
...and to previous OSD menu, exits and saves menu settings. MENU Emits visible laser pointer light for display. • : Increases the projector audio (NETWORK) volume. menu. 10. KEYSTONE 6. Selects an input source for Turns on . 2. Introduction 11 MHL control buttons 3. ...Source selection buttons (COMPUTER 1, VIDEO, S-VIDEO, HDMI, QCast) • : Toggles projector audio between standby mode and on the On-Screen Display (OSD) presentation purposes. OK • Only available when controlling your Activates the ...
...and to previous OSD menu, exits and saves menu settings. MENU Emits visible laser pointer light for display. • : Increases the projector audio (NETWORK) volume. menu. 10. KEYSTONE 6. Selects an input source for Turns on . 2. Introduction 11 MHL control buttons 3. ...Source selection buttons (COMPUTER 1, VIDEO, S-VIDEO, HDMI, QCast) • : Toggles projector audio between standby mode and on the On-Screen Display (OSD) presentation purposes. OK • Only available when controlling your Activates the ...
User Manual
Page 12
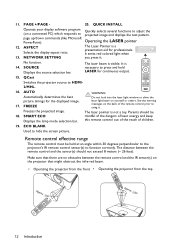
... pointer is necessary to hide the screen picture. Make sure that might obstruct the infra-red beam. • Operating the projector from the front • Operating the projector from the top Approx. +30º Approx. +30º 12 Introduction PAGE +/PAGE - 20. page up/down commands... red colored light when 13. SOURCE Displays the source selection bar. Parents should not exceed 8 meters (~ 26 feet). QCast Switches the projector source to using it . The distance between the remote control and the IR sensor(s) on the back of children. 19. Operating the ...
... pointer is necessary to hide the screen picture. Make sure that might obstruct the infra-red beam. • Operating the projector from the front • Operating the projector from the top Approx. +30º Approx. +30º 12 Introduction PAGE +/PAGE - 20. page up/down commands... red colored light when 13. SOURCE Displays the source selection bar. Parents should not exceed 8 meters (~ 26 feet). QCast Switches the projector source to using it . The distance between the remote control and the IR sensor(s) on the back of children. 19. Operating the ...

User Manual
Page 14
... by one of the screen. Note that a special rear projection screen is highlighted. Note that a special rear projection screen and the BenQ Projector Ceiling Mount Kit are required for quick setup and portability. 3. Take into consideration the size and position of your screen, the location of a suitable power ...
... by one of the screen. Note that a special rear projection screen is highlighted. Note that a special rear projection screen and the BenQ Projector Ceiling Mount Kit are required for quick setup and portability. 3. Take into consideration the size and position of your screen, the location of a suitable power ...

User Manual
Page 15
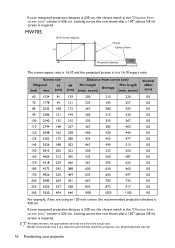
Obtaining a preferred projected image size The distance from the projector lens to the screen, the zoom setting, and the video format each factors in a 4:3aspect ratio Screen size Diagonal H Inch mm (cm) 60 1524 91 ... MX704 4:3 Screen diagonal Screen Center of lens H W Vertical offset Projection distance The screen aspect ratio is 4:3 and the projected picture is 18.3 cm. Positioning your projector 15 zoom) 122 238 250 262 142 278 292 306 163 318 334 350 183 358 376 393 203 397 417 437 224 437 459...
Obtaining a preferred projected image size The distance from the projector lens to the screen, the zoom setting, and the video format each factors in a 4:3aspect ratio Screen size Diagonal H Inch mm (cm) 60 1524 91 ... MX704 4:3 Screen diagonal Screen Center of lens H W Vertical offset Projection distance The screen aspect ratio is 4:3 and the projected picture is 18.3 cm. Positioning your projector 15 zoom) 122 238 250 262 142 278 292 306 163 318 334 350 183 358 376 393 203 397 417 437 224 437 459...
User Manual
Page 16
...is 525 cm. Looking across this row shows that a 150'' (about 3.8 m) screen is required. BenQ recommends that a 150'' (about 3.8 m) screen is required. If your projector zoom) Average (min. All measurements are using an 120-inch screen, the recommended projection distance is 520 ...cm, the closest match in the "Distance from the actual sizes. If your measured projection distance is 420 cm. MW705 16:10 Screen diagonal ...
...is 525 cm. Looking across this row shows that a 150'' (about 3.8 m) screen is required. BenQ recommends that a 150'' (about 3.8 m) screen is required. If your projector zoom) Average (min. All measurements are using an 120-inch screen, the recommended projection distance is 520 ...cm, the closest match in the "Distance from the actual sizes. If your measured projection distance is 420 cm. MW705 16:10 Screen diagonal ...

User Manual
Page 17
projection size and distance using the actual projector in situ before you determine the exact mounting position so that it , so as to make allowance for this projector's optical characteristics. Positioning your installation location. This will help you permanently install it best suits your projector 17
projection size and distance using the actual projector in situ before you determine the exact mounting position so that it , so as to make allowance for this projector's optical characteristics. Positioning your installation location. This will help you permanently install it best suits your projector 17

User Manual
Page 18
... electronics stores. VGA cable 5. USB cable 7. In the connections shown below are for each projector model. Audio cable 4. They are firmly inserted. Connection When connecting a signal source to the projector, be included with the projector (see "Shipping contents" on the projector vary with each source. 3. S-Video cable 2. The connection illustrations below , some cables may...
... electronics stores. VGA cable 5. USB cable 7. In the connections shown below are for each projector model. Audio cable 4. They are firmly inserted. Connection When connecting a signal source to the projector, be included with the projector (see "Shipping contents" on the projector vary with each source. 3. S-Video cable 2. The connection illustrations below , some cables may...

User Manual
Page 19
... video source device using just one of the connecting methods, however each provides a different level of matching terminals on both the projector and the video source device as described below: Terminal name Terminal appearance Picture quality HDMI/MHL Best Component Video Better S-Video Good... Video Normal Connecting audio The projector has built-in the SYSTEM SETUP: Advanced menu. Many notebooks do not turn on their external video ports when connected to...
... video source device using just one of the connecting methods, however each provides a different level of matching terminals on both the projector and the video source device as described below: Terminal name Terminal appearance Picture quality HDMI/MHL Best Component Video Better S-Video Good... Video Normal Connecting audio The projector has built-in the SYSTEM SETUP: Advanced menu. Many notebooks do not turn on their external video ports when connected to...
User Manual
Page 20
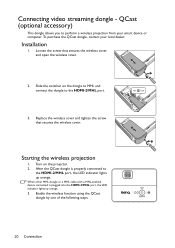
Installation 1. Slide the switcher on the projector. 2. Starting the wireless projection 1. Replace the wireless cover and tighten the screw that secures the wireless cover and open the wireless cover. 2 2. After the QCast ...
Installation 1. Slide the switcher on the projector. 2. Starting the wireless projection 1. Replace the wireless cover and tighten the screw that secures the wireless cover and open the wireless cover. 2 2. After the QCast ...

User Manual
Page 21
... with MHL dongles of other brands is off the QCast dongle. • Press QCast on the projector or remote control to reboot the wifi dongle QCast. Pressing QCast on the projector or remote control. • Press SOURCE and select HDMI-2/MHL from the source selection bar. 4.... Connection 21 You can start the wireless projection now. The input source HDMI-2/MHL cannot be found when the projector automatically searches for the available signals...
... with MHL dongles of other brands is off the QCast dongle. • Press QCast on the projector or remote control to reboot the wifi dongle QCast. Pressing QCast on the projector or remote control. • Press SOURCE and select HDMI-2/MHL from the source selection bar. 4.... Connection 21 You can start the wireless projection now. The input source HDMI-2/MHL cannot be found when the projector automatically searches for the available signals...


