BenQ US PRJ 1 Year Warranty
Page 1
...in the continental United States, Hawaii, and Alaska, you have a separate warranty policy), parts and labor only (No advance replacement). BenQ Projector Standard Limited Warranty: Subject to the exclusions set forth below : One (1) year from the purchase date by the original retail purchaser (... shipping freight to the Customer during the warranty period subject to the terms and conditions set forth below , BenQ America Corp. ("BenQ") warrants the BenQ Digital Projector ("Product") you are entitled to be reported within seven (7) business days upon receipt of the same or ...
...in the continental United States, Hawaii, and Alaska, you have a separate warranty policy), parts and labor only (No advance replacement). BenQ Projector Standard Limited Warranty: Subject to the exclusions set forth below : One (1) year from the purchase date by the original retail purchaser (... shipping freight to the Customer during the warranty period subject to the terms and conditions set forth below , BenQ America Corp. ("BenQ") warrants the BenQ Digital Projector ("Product") you are entitled to be reported within seven (7) business days upon receipt of the same or ...

MS500 User Manual
Page 1
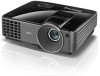
MX501/MS500/MX501-V/MS500-V Digital Projector User Manual Welcome
MX501/MS500/MX501-V/MS500-V Digital Projector User Manual Welcome
MS500 User Manual
Page 2
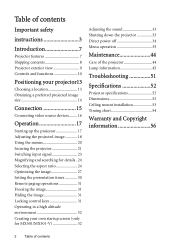
... image size 14 Connection 15 Connecting video source devices........ 16 Operation 17 Starting up the projector 17 Adjusting the projected image 18 Using the menus 20 Securing the projector 21 Switching input signal 23 Magnifying and searching for details . 24 Selecting the aspect ratio...MX501/MX501-V 32 Adjusting the sound 33 Shutting down the projector 33 Direct power off 34 Menu operation 35 Maintenance 44 Care of the projector 44 Lamp information 45 Troubleshooting 51 Specifications 52 Projector specifications 52 Dimensions 53 Ceiling mount installation 53 Timing chart ...
... image size 14 Connection 15 Connecting video source devices........ 16 Operation 17 Starting up the projector 17 Adjusting the projected image 18 Using the menus 20 Securing the projector 21 Switching input signal 23 Magnifying and searching for details . 24 Selecting the aspect ratio...MX501/MX501-V 32 Adjusting the sound 33 Shutting down the projector 33 Direct power off 34 Menu operation 35 Maintenance 44 Care of the projector 44 Lamp information 45 Troubleshooting 51 Specifications 52 Projector specifications 52 Dimensions 53 Ceiling mount installation 53 Timing chart ...
MS500 User Manual
Page 3
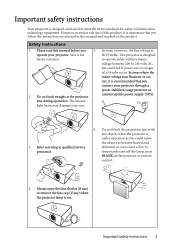
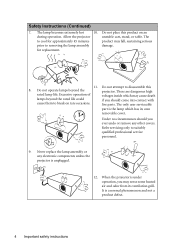
... is designed and tested to meet the latest standards for NOT stable. Safety Instructions 1. Do not look straight at the projector uninterruptible power supply (UPS). lens during operation. The intense light beam may fluctuate or cut out, it is recommended that ...you follow the instructions mentioned in this product, it for safety of information technology equipment. This projector is operate your projector. Refer servicing to become heated and deformed or even cause a fire. to operate safely within a mains voltage between 100 to ...
... is designed and tested to meet the latest standards for NOT stable. Safety Instructions 1. Do not look straight at the projector uninterruptible power supply (UPS). lens during operation. The intense light beam may fluctuate or cut out, it is recommended that ...you follow the instructions mentioned in this product, it for safety of information technology equipment. This projector is operate your projector. Refer servicing to become heated and deformed or even cause a fire. to operate safely within a mains voltage between 100 to ...
MS500 User Manual
Page 4
...from its own removable cover. Never replace the lamp assembly or any other covers. Do not place this 8. Allow the projector to cool for replacement. Under no circumstances should come into contact with cause them to suitably qualified professional service personnel. ...Safety Instructions (Continued) 7. The product may cause death lamps beyond the projector. It is unplugged. 12. When the projector is under operation, you ever undo or remove any electronic components unless the projector is a normal phenomenon and not a product defect. 4 Important safety ...
...from its own removable cover. Never replace the lamp assembly or any other covers. Do not place this 8. Allow the projector to cool for replacement. Under no circumstances should come into contact with cause them to suitably qualified professional service personnel. ...Safety Instructions (Continued) 7. The product may cause death lamps beyond the projector. It is unplugged. 12. When the projector is under operation, you ever undo or remove any electronic components unless the projector is a normal phenomenon and not a product defect. 4 Important safety ...
MS500 User Manual
Page 5
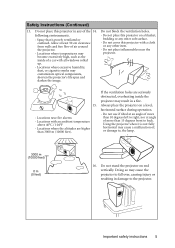
...5 Do not use if tilted at least 50 cm clearance from walls and free flow of , or damage to back. Do not place this projector in any other soft surface. - Safety Instructions (Continued) 13. Do not block the ventilation holes. - Locations where the altitudes are seriously obstructed,... overheating inside of more than 3000 m (10000 feet). Space that is not fully horizontal may cause the projector to right, nor at angle of a car with an ambient temperature above 40°C / 104°F - Allow at an angle of the 14...
...5 Do not use if tilted at least 50 cm clearance from walls and free flow of , or damage to back. Do not place this projector in any other soft surface. - Safety Instructions (Continued) 13. Do not block the ventilation holes. - Locations where the altitudes are seriously obstructed,... overheating inside of more than 3000 m (10000 feet). Space that is not fully horizontal may cause the projector to right, nor at angle of a car with an ambient temperature above 40°C / 104°F - Allow at an angle of the 14...

MS500 User Manual
Page 6
...displaying inverted images for ceiling mount installation. This apparatus must be earthed. 6 Important safety instructions If the projector does become loose. You can purchase a BenQ projector ceiling mount kit from the place you also purchase a separate Kensington lock compatible security cable and attach it... (Continued) 17. Besides probable physical damage to have a pleasant experience using your BenQ projector, so we need to bring this safety matter to mount your projector on the projector or place any objects upon it from the ceiling due to fail. Do not place...
...displaying inverted images for ceiling mount installation. This apparatus must be earthed. 6 Important safety instructions If the projector does become loose. You can purchase a BenQ projector ceiling mount kit from the place you also purchase a separate Kensington lock compatible security cable and attach it... (Continued) 17. Besides probable physical damage to have a pleasant experience using your BenQ projector, so we need to bring this safety matter to mount your projector on the projector or place any objects upon it from the ceiling due to fail. Do not place...
MS500 User Manual
Page 7
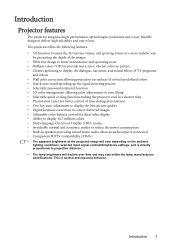
...8226; Selectable password protected function • 3D color management allowing color adjustments to your liking • Selectable quick cooling function making the projector cool in a shorter time • Presentation timer for better control of time during presentations • One-key auto-adjustment to display...to deliver high reliability and ease of the projected image will decline over time and may vary within the lamp manufacturers specifications. The projector offers the following features. • 3D function to enjoy the 3D movies, videos, and sporting events in a more realistic ...
...8226; Selectable password protected function • 3D color management allowing color adjustments to your liking • Selectable quick cooling function making the projector cool in a shorter time • Presentation timer for better control of time during presentations • One-key auto-adjustment to display...to deliver high reliability and ease of the projected image will decline over time and may vary within the lamp manufacturers specifications. The projector offers the following features. • 3D function to enjoy the 3D movies, videos, and sporting events in a more realistic ...

MS500 User Manual
Page 8
... of purchase. RS232 cable Ceiling mount kit 8 Introduction 3. Please consult your dealer for your place of the items shown below. Spare lamp kit 2. Optional accessories 1. Projector Power cord VGA cable Quick start guide User manual CD Warranty card* Remote control with battery Pull the tab before using the remote control. Standard...
... of purchase. RS232 cable Ceiling mount kit 8 Introduction 3. Please consult your dealer for your place of the items shown below. Spare lamp kit 2. Optional accessories 1. Projector Power cord VGA cable Quick start guide User manual CD Warranty card* Remote control with battery Pull the tab before using the remote control. Standard...
MS500 User Manual
Page 9
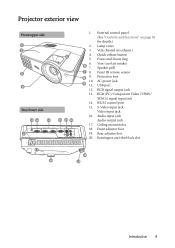
... Audio input jack Audio output jack Ceiling mount holes Front adjuster foot Rear adjuster foot Kensington anti-theft lock slot 17 18 20 19 Introduction 9 Projector exterior view Front/upper side 1 2 5 3 4 Rear/lower side 11 12 13 14 15 16 10 1. 2. 3. 4. 5. 6 6. 7. 7 8. 8 9. 9 10. 11. 12. 13. 14. 15. 16. 17. 18. 19...
... Audio input jack Audio output jack Ceiling mount holes Front adjuster foot Rear adjuster foot Kensington anti-theft lock slot 17 18 20 19 Introduction 9 Projector exterior view Front/upper side 1 2 5 3 4 Rear/lower side 11 12 13 14 15 16 10 1. 2. 3. 4. 5. 6 6. 7. 7 8. 8 9. 9 10. 11. 12. 13. 14. 15. 16. 17. 18. 19...
MS500 User Manual
Page 10
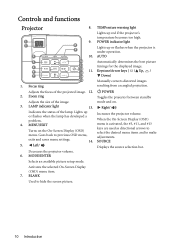
... / Down) Manually corrects distorted images resulting from an angled projection. Zoom ring Adjusts the size of the image. 3. Right/ Increases the projector volume. AUTO Automatically determines the best picture timings for the displayed image. When the On-Screen Display (OSD) menu is under operation. Goes ...back to hide the screen picture. Lights up red if the projector's temperature becomes too high. BLANK Used to previous OSD menu, exits and saves menu settings. 14. 5. MODE/ENTER Selects an...
... / Down) Manually corrects distorted images resulting from an angled projection. Zoom ring Adjusts the size of the image. 3. Right/ Increases the projector volume. AUTO Automatically determines the best picture timings for the displayed image. When the On-Screen Display (OSD) menu is under operation. Goes ...back to hide the screen picture. Lights up red if the projector's temperature becomes too high. BLANK Used to previous OSD menu, exits and saves menu settings. 14. 5. MODE/ENTER Selects an...
MS500 User Manual
Page 11
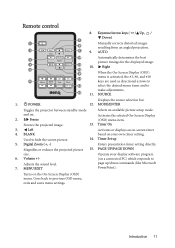
MODE/ENTER Toggles the projector between standby mode Selects an available picture setup mode. Timer On 3. Volume +/- (on a connected PC) which responds to make adjustments. 15 11. Turns on . 2. Remote ...
MODE/ENTER Toggles the projector between standby mode Selects an available picture setup mode. Timer On 3. Volume +/- (on a connected PC) which responds to make adjustments. 15 11. Turns on . 2. Remote ...

MS500 User Manual
Page 12
... Approx. +15º Replacing the remote control battery 1. Make sure that might obstruct the infra-red beam. • Operating the projector from possible battery leakage. 12 Introduction Insert the new battery in the holder. Push and hold the locking arm while pulling out the ...positive polarity should not exceed 8 meters (~ 26 feet). Remote control effective range Infra-Red (IR) remote control sensor is located on the projector that there are no obstacles between the remote control and the sensor should face outward. 3. The distance between the remote control and the IR...
... Approx. +15º Replacing the remote control battery 1. Make sure that might obstruct the infra-red beam. • Operating the projector from possible battery leakage. 12 Introduction Insert the new battery in the holder. Push and hold the locking arm while pulling out the ...positive polarity should not exceed 8 meters (~ 26 feet). Remote control effective range Infra-Red (IR) remote control sensor is located on the projector that there are no obstacles between the remote control and the sensor should face outward. 3. The distance between the remote control and the IR...

MS500 User Manual
Page 13
... ceiling most common way to position the projector behind the screen. Positioning your projector Choosing a location Your projector is designed to be installed in the SYSTEM SETUP: Basic > Projector Position menu after you turn the projector on. This is required. Note that a special rear projection screen and the BenQ Projector Ceiling Mount Kit are required for quick...
... ceiling most common way to position the projector behind the screen. Positioning your projector Choosing a location Your projector is designed to be installed in the SYSTEM SETUP: Basic > Projector Position menu after you turn the projector on. This is required. Note that a special rear projection screen and the BenQ Projector Ceiling Mount Kit are required for quick...
MS500 User Manual
Page 14
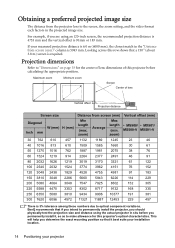
...; MX501/ MS500-V MX501-V 23 46 30 61 38 76 46 91 61 122 76 152 91 183 114 229 152 305 168 335 191 381 229 457 There is required. BenQ recommends that if you intend to permanently install the projector, you determine the exact mounting position so that a 150... the screen, the zoom setting, and the video format each factors in the projected image size. Maximum zoom Minimum zoom Screen Center of this projector's optical characteristics. zoom) Average Max length (min. Obtaining a preferred projected image size The distance from screen (mm) Min length (max....
...; MX501/ MS500-V MX501-V 23 46 30 61 38 76 46 91 61 122 76 152 91 183 114 229 152 305 168 335 191 381 229 457 There is required. BenQ recommends that if you intend to permanently install the projector, you determine the exact mounting position so that a 150... the screen, the zoom setting, and the video format each factors in the projected image size. Maximum zoom Minimum zoom Screen Center of this projector's optical characteristics. zoom) Average Max length (min. Obtaining a preferred projected image size The distance from screen (mm) Min length (max....

MS500 User Manual
Page 15
...In the connections shown below are commercially available from electronics stores. • The connection illustrations below , some cables may not be sure to a projector. VGA to find your notebook's documentation to DVI-A cable 6. Connection 15 The rear connecting jacks available on /off before making any connections. 2.... USB cable 7. Usually a key combo like FN + F3 or CRT/LCD key turns the external display on the projector vary with a monitor symbol on page 8). Turn all equipment off . Press FN and the labeled function key simultaneously. They are for each...
...In the connections shown below are commercially available from electronics stores. • The connection illustrations below , some cables may not be sure to a projector. VGA to find your notebook's documentation to DVI-A cable 6. Connection 15 The rear connecting jacks available on /off before making any connections. 2.... USB cable 7. Usually a key combo like FN + F3 or CRT/LCD key turns the external display on the projector vary with a monitor symbol on page 8). Turn all equipment off . Press FN and the labeled function key simultaneously. They are for each...

MS500 User Manual
Page 16
...you wish to use as described below: Terminal name Terminal appearance Picture quality Component Video Better S-Video Good Video Normal Connecting audio The projector has two built-in mono speakers which are not designed for, nor intended for business purposes only. They are designed to a video ...audio, even if a stereo audio input is connected. Any stereo audio input (if provided), is mixed into a common mono audio output through the projector speakers. • The D-Sub output only works when an appropriate D-Sub input is made to the COMPUTER 1 jack. • If you ...
...you wish to use as described below: Terminal name Terminal appearance Picture quality Component Video Better S-Video Good Video Normal Connecting audio The projector has two built-in mono speakers which are not designed for, nor intended for business purposes only. They are designed to a video ...audio, even if a stereo audio input is connected. Any stereo audio input (if provided), is mixed into a common mono audio output through the projector speakers. • The D-Sub output only works when an appropriate D-Sub input is made to the COMPUTER 1 jack. • If you ...

MS500 User Manual
Page 17
...until an input signal is found. The current input signal being scanned displays in the upper left corner of the connected equipment on the projector or remote control to select your OSD language following the onscreen instructions. 4. See "Switching input signal" on the power outlet switch (...where fitted). or If the frequency/resolution of the input signal exceeds the projector's operating range, you are prompted for details. Turn on page 23 for a password, press the arrow keys to a lower setting. power cord...
...until an input signal is found. The current input signal being scanned displays in the upper left corner of the connected equipment on the projector or remote control to select your OSD language following the onscreen instructions. 4. See "Switching input signal" on the power outlet switch (...where fitted). or If the frequency/resolution of the input signal exceeds the projector's operating range, you are prompted for details. Turn on page 23 for a password, press the arrow keys to a lower setting. power cord...

MS500 User Manual
Page 18
... Auto Adjustment function will be displayed in a reverse direction. Adjust the projected image to fine-tune the horizontal angle. To adjust the projector: 1. To do this situation, see "Switching input signal" quick-release button as it , release the quick-release button to lock ...foot in position. 2. close to provide the best picture quality. The current source information will re-adjust the values of the projector. Fine-tuning the image size and clarity 1. each other, the projected image becomes trapezoidal. These adjusters change the image height and...
... Auto Adjustment function will be displayed in a reverse direction. Adjust the projected image to fine-tune the horizontal angle. To adjust the projector: 1. To do this situation, see "Switching input signal" quick-release button as it , release the quick-release button to lock ...foot in position. 2. close to provide the best picture quality. The current source information will re-adjust the values of the projector. Fine-tuning the image size and clarity 1. each other, the projected image becomes trapezoidal. These adjusters change the image height and...

MS500 User Manual
Page 19
Press / . • Using the OSD menu 1. It occurs when the projector is highlighted. 2. Press to correct keystoning at the top of the image. Press MENU/EXIT and then press / until the DISPLAY menu is not perpendicular ... wider at the top of the image. Press to correct keystoning at the bottom of these steps. • Using the remote control Press / on the projector or remote control to highlight Keystone and press MODE/ENTER.
Press / . • Using the OSD menu 1. It occurs when the projector is highlighted. 2. Press to correct keystoning at the top of the image. Press MENU/EXIT and then press / until the DISPLAY menu is not perpendicular ... wider at the top of the image. Press to correct keystoning at the bottom of these steps. • Using the remote control Press / on the projector or remote control to highlight Keystone and press MODE/ENTER.


