
User Manual
Page 3
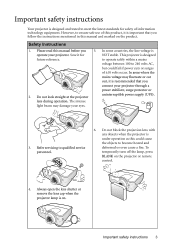
lens during operation. Do not look straight at the projector uninterruptible power supply (UPS). Important safety instructions Your projector is designed and tested to 240 volts AC, but could cause the objects to become heated and deformed or even cause a fire. to operate safely ... follow the instructions mentioned in this manual and marked on the product. Save it is under operation as this manual before you connect your projector. To temporarily turn off the lamp, press BLANK on . In areas where the mains voltage may damage your eyes. 3. The intense...
lens during operation. Do not look straight at the projector uninterruptible power supply (UPS). Important safety instructions Your projector is designed and tested to 240 volts AC, but could cause the objects to become heated and deformed or even cause a fire. to operate safely ... follow the instructions mentioned in this manual and marked on the product. Save it is under operation as this manual before you connect your projector. To temporarily turn off the lamp, press BLANK on . In areas where the mains voltage may damage your eyes. 3. The intense...
User Manual
Page 11
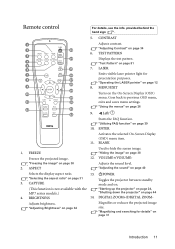
... 3 14 Displays the test pattern. 4 "Test Pattern" on page 34 2 13 6. MENU/EXIT 19 10 Turns on page 44 4. Left/ Starts the FAQ function. ENTER Activates the selected On-Screen Display (OSD) menu item. 11. BLANK 1. CAPTURE Toggles the projector between standby mode and on. (This function is not available with the "Starting...
... 3 14 Displays the test pattern. 4 "Test Pattern" on page 34 2 13 6. MENU/EXIT 19 10 Turns on page 44 4. Left/ Starts the FAQ function. ENTER Activates the selected On-Screen Display (OSD) menu item. 11. BLANK 1. CAPTURE Toggles the projector between standby mode and on. (This function is not available with the "Starting...
User Manual
Page 18
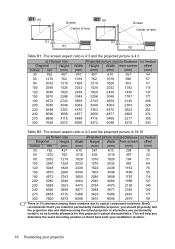
BenQ recommends that it , so as to make allowance for this projector's optical characteristics. This will help you determine the exact mounting position so that if you permanently install it best suits your installation location. 18 Positioning your projector B1 (a) Screen Center of lens B2 (a) Screen Center of lens ...2681 171 3810 6096 2979 191 There is 3% tolerance among these numbers due to permanently install the projector, you should physically test the projection size and distance using the actual projector in situ before you intend to optical component variations.
BenQ recommends that it , so as to make allowance for this projector's optical characteristics. This will help you determine the exact mounting position so that if you permanently install it best suits your installation location. 18 Positioning your projector B1 (a) Screen Center of lens B2 (a) Screen Center of lens ...2681 171 3810 6096 2979 191 There is 3% tolerance among these numbers due to permanently install the projector, you should physically test the projection size and distance using the actual projector in situ before you intend to optical component variations.
User Manual
Page 35
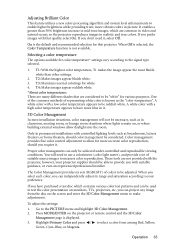
... should be able to provide you with that are considered to be "white" for this projector. These tools are not provided with a high color temperature appears to have purchased a test disc which are many different shades that quality, select On. When you select each color, you can only be ...Primary Color and press / to select a color from the disc on the screen and enter the 3D Color Management menu to test the color presentation on the projector or remote control and the 3D Color Management page is the default and recommended selection for various purposes. Press MODE/ENTER on...
... should be able to provide you with that are considered to be "white" for this projector. These tools are not provided with a high color temperature appears to have purchased a test disc which are many different shades that quality, select On. When you select each color, you can only be ...Primary Color and press / to select a color from the disc on the screen and enter the 3D Color Management menu to test the color presentation on the projector or remote control and the 3D Color Management page is the default and recommended selection for various purposes. Press MODE/ENTER on...
User Manual
Page 46
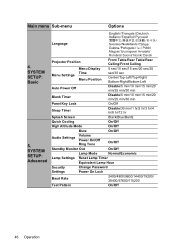
SYSTEM SETUP: Basic 5. SYSTEM SETUP: Advanced Projector Position Front Table/Rear Table/Rear Ceiling/Front Ceiling Menu Display 5 sec/10 sec/15 sec/20 sec/...Panel Key Lock On/Off Sleep Timer Disable/30 min/1 hr/2 hr/3 hr/4 hr/8 hr/12 hr Splash Screen Black/Blue/BenQ Quick Cooling On/Off High Altitude Mode On/Off Mute On/Off Audio Settings Volume Power On/Off Ring Tone On/Off Standby... Hour Security Change Password Settings Power On Lock Baud Rate 2400/4800/9600/14400/19200/ 38400/57600/115200 Test Pattern On/Off 46 Operation Main menu Sub-menu Options Language 4.
SYSTEM SETUP: Basic 5. SYSTEM SETUP: Advanced Projector Position Front Table/Rear Table/Rear Ceiling/Front Ceiling Menu Display 5 sec/10 sec/15 sec/20 sec/...Panel Key Lock On/Off Sleep Timer Disable/30 min/1 hr/2 hr/3 hr/4 hr/8 hr/12 hr Splash Screen Black/Blue/BenQ Quick Cooling On/Off High Altitude Mode On/Off Mute On/Off Audio Settings Volume Power On/Off Ring Tone On/Off Standby... Hour Security Change Password Settings Power On Lock Baud Rate 2400/4800/9600/14400/19200/ 38400/57600/115200 Test Pattern On/Off 46 Operation Main menu Sub-menu Options Language 4.

User Manual
Page 51
...asked to enter the current password before changing to make the connection. A mode for details. The projector can connect the projector using a suitable RS-232 cable and update or download the projector's firmware. Power On Lock See "Utilizing the password function" on page 27 for details. 5. .... See "Utilizing the password function" on page 27 for operation in high altitude areas. Selecting On enables the function and the projector displays the grid test pattern. See "Connecting a monitor" on page 40 for how to a new one. Selecting On enables the function. Enabling this...
...asked to enter the current password before changing to make the connection. A mode for details. The projector can connect the projector using a suitable RS-232 cable and update or download the projector's firmware. Power On Lock See "Utilizing the password function" on page 27 for details. 5. .... See "Utilizing the password function" on page 27 for operation in high altitude areas. Selecting On enables the function and the projector displays the grid test pattern. See "Connecting a monitor" on page 40 for how to a new one. Selecting On enables the function. Enabling this...


