
User Manual
Page 1
MP782 ST Digital Projector User Manual Welcome
MP782 ST Digital Projector User Manual Welcome

User Manual
Page 2
... or monitor... 20 Connecting video source devices........ 21 Operation 24 Starting up the projector 24 Adjusting the projected image 25 Using the menus 26 Securing the projector 27 Switching input signal 30 Magnifying and searching for details . 31 Selecting the ...Table of contents Personalizing the projector menu display 41 Controlling the projector through a Lan environment 41 Shutting down the projector 44 Menu operation 45 Maintenance 54 Care of the projector 54 Lamp information 55 Troubleshooting 61 Specifications 62 Projector specifications 62 Dimensions 63 Ceiling...
... or monitor... 20 Connecting video source devices........ 21 Operation 24 Starting up the projector 24 Adjusting the projected image 25 Using the menus 26 Securing the projector 27 Switching input signal 30 Magnifying and searching for details . 31 Selecting the ...Table of contents Personalizing the projector menu display 41 Controlling the projector through a Lan environment 41 Shutting down the projector 44 Menu operation 45 Maintenance 54 Care of the projector 54 Lamp information 55 Troubleshooting 61 Specifications 62 Projector specifications 62 Dimensions 63 Ceiling...
User Manual
Page 3
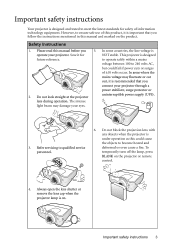
...cut out, it is recommended that you 5. Safety Instructions 1. In areas where the mains voltage may damage your projector. Do not block the projection lens with any objects when the projector is under operation as this product, it for safety of ±10 volts occur. However, to ensure safe... use of this could fail if power cuts or surges of information technology equipment. This projector is designed future reference. to operate safely within a mains voltage between 100 to 240 volts AC, but could cause the objects to become ...
...cut out, it is recommended that you 5. Safety Instructions 1. In areas where the mains voltage may damage your projector. Do not block the projection lens with any objects when the projector is under operation as this product, it for safety of ±10 volts occur. However, to ensure safe... use of this could fail if power cuts or surges of information technology equipment. This projector is designed future reference. to operate safely within a mains voltage between 100 to 240 volts AC, but could cause the objects to become ...
User Manual
Page 4
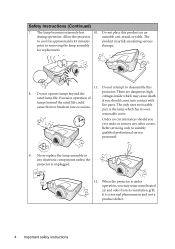
...into contact with live parts. Never replace the lamp assembly or any other covers. Safety Instructions (Continued) 7. Allow the projector to cool for replacement. Do not attempt to removing the lamp assembly for approximately 45 minutes prior to disassemble this product ... which may cause death if you ever undo or remove any electronic components unless the projector is unplugged. 12. Excessive operation of lamps beyond the rated lamp life. projector. When the projector is a normal phenomenon and not a product defect. 4 Important safety instructions
...into contact with live parts. Never replace the lamp assembly or any other covers. Safety Instructions (Continued) 7. Allow the projector to cool for replacement. Do not attempt to removing the lamp assembly for approximately 45 minutes prior to disassemble this product ... which may cause death if you ever undo or remove any electronic components unless the projector is unplugged. 12. Excessive operation of lamps beyond the rated lamp life. projector. When the projector is a normal phenomenon and not a product defect. 4 Important safety instructions
User Manual
Page 5
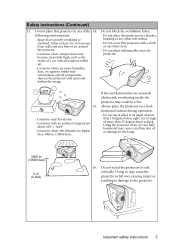
...darken the image. 15. - Space that is not fully horizontal may become excessively high, such as the inside the projector may result in damage to the projector. Do not cover this projector on a blanket, bedding or any of a car with an ambient temperature above 40°C / 104°F -.... - Allow at angle of more than 15 degrees front to , the lamp. 3000 m (10000 feet) 0 m (0 feet) 16. Do not place this projector with a cloth or any other soft surface. - If the ventilation holes are higher than 10 degrees left to right, nor at least 50 cm clearance...
...darken the image. 15. - Space that is not fully horizontal may become excessively high, such as the inside the projector may result in damage to the projector. Do not cover this projector on a blanket, bedding or any of a car with an ambient temperature above 40°C / 104°F -.... - Allow at angle of more than 15 degrees front to , the lamp. 3000 m (10000 feet) 0 m (0 feet) 16. Do not place this projector with a cloth or any other soft surface. - If the ventilation holes are higher than 10 degrees left to right, nor at least 50 cm clearance...
User Manual
Page 6
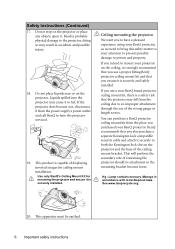
...apparatus must be earthed. 6 Important safety instructions This product is capable of restraining the projector should its attachment to mount your projector on the projector. If you use a proper fitting BenQ projector ceiling mount kit and that you ensure it is a safety risk that you intend to... the mounting bracket become wet, disconnect it . If you use a non-BenQ brand projector ceiling mount kit, there is securely installed. Safety Instructions (Continued) 17. This will perform the secondary role of displaying inverted...
...apparatus must be earthed. 6 Important safety instructions This product is capable of restraining the projector should its attachment to mount your projector on the projector. If you use a proper fitting BenQ projector ceiling mount kit and that you ensure it is a safety risk that you intend to... the mounting bracket become wet, disconnect it . If you use a non-BenQ brand projector ceiling mount kit, there is securely installed. Safety Instructions (Continued) 17. This will perform the secondary role of displaying inverted...
User Manual
Page 7
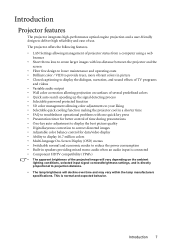
... password protected function • 3D color management allowing color adjustments to your liking • Selectable quick cooling function making the projector cool in a shorter time • FAQ to troubleshoot operational problems with one quick key press • Presentation timer for...when an audio input is connected • Component HDTV compatibility (YPbPr) • The apparent brightness of use. Introduction Projector features The projector integrates high-performance optical engine projection and a user-friendly design to projection distance. • The lamp brightness will ...
... password protected function • 3D color management allowing color adjustments to your liking • Selectable quick cooling function making the projector cool in a shorter time • FAQ to troubleshoot operational problems with one quick key press • Presentation timer for...when an audio input is connected • Component HDTV compatibility (YPbPr) • The apparent brightness of use. Introduction Projector features The projector integrates high-performance optical engine projection and a user-friendly design to projection distance. • The lamp brightness will ...
User Manual
Page 8
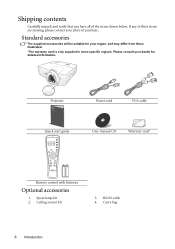
... of these items are missing, please contact your region, and may differ from those illustrated. *The warranty card is only supplied in some specific regions. Projector Power cord VGA cable Quick start guide User manual CD Warranty card* Remote control with batteries Optional accessories 1. RS232 cable 4. Please consult your dealer for...
... of these items are missing, please contact your region, and may differ from those illustrated. *The warranty card is only supplied in some specific regions. Projector Power cord VGA cable Quick start guide User manual CD Warranty card* Remote control with batteries Optional accessories 1. RS232 cable 4. Please consult your dealer for...

User Manual
Page 9
Rear adjuster foot 13. RGB (PC)/Component Video (YPbPr/ YCbCr) signal input jack 19. Audio input jack Audio output jack 22. Projector exterior view Front/upper side 2 1 3 4 5 Rear/lower side 14 15 16 17 6 7 8 9 18 19 20 21 22 1. Vent (heated air exhaust) 4. DVI-D input port 18. ...
Rear adjuster foot 13. RGB (PC)/Component Video (YPbPr/ YCbCr) signal input jack 19. Audio input jack Audio output jack 22. Projector exterior view Front/upper side 2 1 3 4 5 Rear/lower side 14 15 16 17 6 7 8 9 18 19 20 21 22 1. Vent (heated air exhaust) 4. DVI-D input port 18. ...
User Manual
Page 10
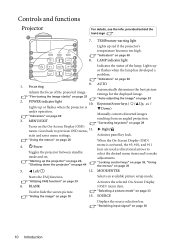
...settings. Goes back to hide the screen picture. Left/ 12. BLANK Activates the selected On-Screen Display (OSD) menu item. Controls and functions Projector 1 For details, see the info. AUTO 1. "Using the menus" on page 39 6. provided behind the hand sign . 7. "Utilizing FAQ...on page 26 4. Activates panel key lock. SOURCE Displays the source selection bar. TEMPerature warning light 7 Lights up or flashes when the projector is activated, the #5, #10, and #11 keys are used as directional arrows to select the desired menu items and to make adjustments...
...settings. Goes back to hide the screen picture. Left/ 12. BLANK Activates the selected On-Screen Display (OSD) menu item. Controls and functions Projector 1 For details, see the info. AUTO 1. "Using the menus" on page 39 6. provided behind the hand sign . 7. "Utilizing FAQ...on page 26 4. Activates panel key lock. SOURCE Displays the source selection bar. TEMPerature warning light 7 Lights up or flashes when the projector is activated, the #5, #10, and #11 keys are used as directional arrows to select the desired menu items and to make adjustments...
User Manual
Page 11
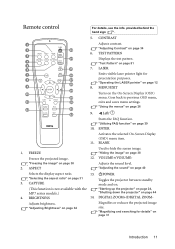
.... VOLUME+/VOLUME- POWER "Selecting the aspect ratio" on page 44 4. CAPTURE Toggles the projector between standby mode and on. (This function is not available with the "Starting up the projector" on page 24, MP7 series models.) "Shutting down the projector" on page 31 3. FREEZE Freezes the projected image. "Magnifying and searching for 8 17...
.... VOLUME+/VOLUME- POWER "Selecting the aspect ratio" on page 44 4. CAPTURE Toggles the projector between standby mode and on. (This function is not available with the "Starting up the projector" on page 24, MP7 series models.) "Shutting down the projector" on page 31 3. FREEZE Freezes the projected image. "Magnifying and searching for 8 17...
User Manual
Page 12
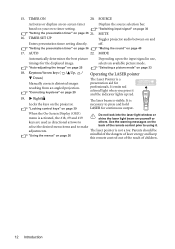
... the warning messages on page 26 The laser pointer is visible. "Setting the presentation timer" on page 36 "Muting the sound" on the projector. "Correcting keystone" on page 25 Depending upon the input signal in use, selects an available picture mode. "Auto-adjusting the image" on...screen timer Displays the source selection bar. 15. SOURCE Activates or displays an on page 36 21. MUTE 16. TIMER SET UP Toggles projector audio between on yourself or keys are used as directional arrows to others. off. MODE Automatically determines the best picture timings for professionals....
... the warning messages on page 26 The laser pointer is visible. "Setting the presentation timer" on page 36 "Muting the sound" on the projector. "Correcting keystone" on page 25 Depending upon the input signal in use, selects an available picture mode. "Auto-adjusting the image" on...screen timer Displays the source selection bar. 15. SOURCE Activates or displays an on page 36 21. MUTE 16. TIMER SET UP Toggles projector audio between on yourself or keys are used as directional arrows to others. off. MODE Automatically determines the best picture timings for professionals....

User Manual
Page 13
... explosion. • If the batteries are dead or if you will slide off. 2. The distance between the remote control and the IR sensors on the projector that there are located on the front and the back of the arrow as indicated in the direction of the... polarities as illustrated. Positive (+) goes to positive and negative (-) goes to function correctly. Make sure that might obstruct the infra-red beam. • Operating the projector from the front • Operating the projector from possible battery leakage. There may be held at an angle within 30 degrees perpendicular to the...
... explosion. • If the batteries are dead or if you will slide off. 2. The distance between the remote control and the IR sensors on the projector that there are located on the front and the back of the arrow as indicated in the direction of the... polarities as illustrated. Positive (+) goes to positive and negative (-) goes to function correctly. Make sure that might obstruct the infra-red beam. • Operating the projector from the front • Operating the projector from possible battery leakage. There may be held at an angle within 30 degrees perpendicular to the...
User Manual
Page 14
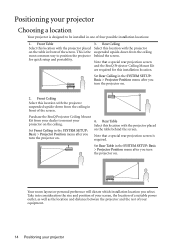
... Ceiling in front of four possible installation locations: 1. Front Table 3. Purchase the BenQ Projector Ceiling Mount Kit from the ceiling in the SYSTEM SETUP: Basic > Projector Position menu after you turn the projector on . Note that a special rear projection screen and the BenQ Projector Ceiling Mount Kit are required for quick setup and portability. Set Rear...
... Ceiling in front of four possible installation locations: 1. Front Table 3. Purchase the BenQ Projector Ceiling Mount Kit from the ceiling in the SYSTEM SETUP: Basic > Projector Position menu after you turn the projector on . Note that a special rear projection screen and the BenQ Projector Ceiling Mount Kit are required for quick setup and portability. Set Rear...
User Manual
Page 15
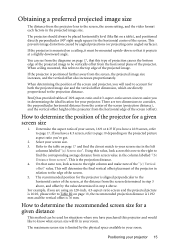
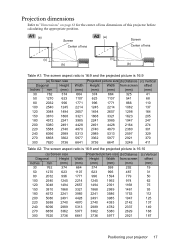
... in step 4 above , and offset by angled projections (or projecting onto angled surfaces). How to determine the position of the screen. BenQ has provided tables of the screen, at a slightly downward angle. This is aligned perpendicular to the horizontal center of 16:9-aspect-ratio and... distance This method can see from the diagrams on page 17, that same row, look across to the horizontal center of the projector for the projector is the projection distance. 4. There are two dimensions to consider, the perpendicular horizontal distance from the center of the screen (projection...
... in step 4 above , and offset by angled projections (or projecting onto angled surfaces). How to determine the position of the screen. BenQ has provided tables of the screen, at a slightly downward angle. This is aligned perpendicular to the horizontal center of 16:9-aspect-ratio and... distance This method can see from the diagrams on page 17, that same row, look across to the horizontal center of the projector for the projector is the projection distance. 4. There are two dimensions to consider, the perpendicular horizontal distance from the center of the screen (projection...

User Manual
Page 16
...distortion will determine the final placement of the screen in relation to the horizontal plane of the projector at that row to the left to find the closest match to your projector This will occur. The closest match in the average distance from screen column labelled "(b) Distance ... different position (to correct the distortion. Use the Keystone function to that row. This is the projection distance. 3. Measure the distance between the projector and where you need a 16:9 screen to position the screen. For example, if you want to project a 16:9 picture and your measured ...
...distortion will determine the final placement of the screen in relation to the horizontal plane of the projector at that row to the left to find the closest match to your projector This will occur. The closest match in the average distance from screen column labelled "(b) Distance ... different position (to correct the distortion. Use the Keystone function to that row. This is the projection distance. 3. Measure the distance between the projector and where you need a 16:9 screen to position the screen. For example, if you want to project a 16:9 picture and your measured ...
User Manual
Page 17
A1 (a) Screen Center of lens A2 (a) Screen Center of this projector before calculating the appropriate position. Projection dimensions Refer to "Dimensions" on page 63 for the center of lens dimensions of lens (c) (b) (c) (b) Table A1: The screen ... 6096 2989 5313 2989 4782 2337 149 270 6858 3362 5977 3362 5380 2629 168 300 7620 3736 6641 3736 5977 2921 187 Positioning your projector 17
A1 (a) Screen Center of lens A2 (a) Screen Center of this projector before calculating the appropriate position. Projection dimensions Refer to "Dimensions" on page 63 for the center of lens dimensions of lens (c) (b) (c) (b) Table A1: The screen ... 6096 2989 5313 2989 4782 2337 149 270 6858 3362 5977 3362 5380 2629 168 300 7620 3736 6641 3736 5977 2921 187 Positioning your projector 17
User Manual
Page 18
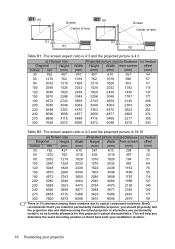
BenQ recommends that it , so as to optical component variations. B1 (a) Screen Center of lens B2 (a) Screen Center of lens (c) (b) (c) (b) Table B1: The screen aspect ratio ... 140 3048 4877 2383 152 3429 5486 2681 171 3810 6096 2979 191 There is 3% tolerance among these numbers due to make allowance for this projector's optical characteristics. This will help you determine the exact mounting position so that if you intend to permanently install the...
BenQ recommends that it , so as to optical component variations. B1 (a) Screen Center of lens B2 (a) Screen Center of lens (c) (b) (c) (b) Table B1: The screen aspect ratio ... 140 3048 4877 2383 152 3429 5486 2681 171 3810 6096 2979 191 There is 3% tolerance among these numbers due to make allowance for this projector's optical characteristics. This will help you determine the exact mounting position so that if you intend to permanently install the...

User Manual
Page 19
... cable 2. Monitor Notebook or desktop computer A/V device Speakers (VGA) (DVI) 1 or 2 18 3 4 56 8 78 9 1. They are for each projector model. • For detailed connection methods, see "Shipping contents" on the projector vary with the projector (see pages 20-23. VGA to VGA (D-Sub) adapter cable Connection 19 DVI-D cable 9. Turn all equipment off...
... cable 2. Monitor Notebook or desktop computer A/V device Speakers (VGA) (DVI) 1 or 2 18 3 4 56 8 78 9 1. They are for each projector model. • For detailed connection methods, see "Shipping contents" on the projector vary with the projector (see pages 20-23. VGA to VGA (D-Sub) adapter cable Connection 19 DVI-D cable 9. Turn all equipment off...

User Manual
Page 20
...Monitor Out function is available on page 51 for details. 20 Connection If you wish and the AUDIO OUT jack is turned on in your projector, you are connecting legacy version Macintosh computers. Press FN and the labeled function key simultaneously. Refer to your notebook's documentation to find your...and the MONITOR-OUT jack is equipped with a monitor symbol on their external video ports when connected to the AUDIO or AUDIO (L/R) jack of the projector (mixed mono) speakers in the SYSTEM SETUP: Advanced menu. Usually a key combo like FN + F3 or CRT/LCD key turns the external ...
...Monitor Out function is available on page 51 for details. 20 Connection If you wish and the AUDIO OUT jack is turned on in your projector, you are connecting legacy version Macintosh computers. Press FN and the labeled function key simultaneously. Refer to your notebook's documentation to find your...and the MONITOR-OUT jack is equipped with a monitor symbol on their external video ports when connected to the AUDIO or AUDIO (L/R) jack of the projector (mixed mono) speakers in the SYSTEM SETUP: Advanced menu. Usually a key combo like FN + F3 or CRT/LCD key turns the external ...


