User Manual
Page 3
... 7 Rear side ...7 Lower side ...7 Controls and functions 8 External control panel 8 Remote control 9 Remote control effective range 10 Replacing the remote control battery 10 Positioning your projector 11 Choosing a location 11 Obtaining a preferred projected image size 12 How to determine the position of the projector for a given screen size ... 13 How to determine the recommended screen...
... 7 Rear side ...7 Lower side ...7 Controls and functions 8 External control panel 8 Remote control 9 Remote control effective range 10 Replacing the remote control battery 10 Positioning your projector 11 Choosing a location 11 Obtaining a preferred projected image size 12 How to determine the position of the projector for a given screen size ... 13 How to determine the recommended screen...
User Manual
Page 4
...Warning message 37 Replacing the lamp 38 Temperature information 40 Indicators ...41 Safety instructions for ceiling mounting of your BenQ projector 43 Troubleshooting 44 Specifications 45 Projector specifications 45 Timing chart 46 Supported timing for PC input 46 Supported timing for Component-YPbPr input 46 Supported timing...size and clarity 23 Correcting keystone 24 Selecting an application mode 25 Switching input signal 25 Hiding the image 25 Remote paging operations 26 Freezing the image 26 Shutdown 26 Menu operation 27 Menu system 27 Using the menus 28 1. Setting menu 32 ...
...Warning message 37 Replacing the lamp 38 Temperature information 40 Indicators ...41 Safety instructions for ceiling mounting of your BenQ projector 43 Troubleshooting 44 Specifications 45 Projector specifications 45 Timing chart 46 Supported timing for PC input 46 Supported timing for Component-YPbPr input 46 Supported timing...size and clarity 23 Correcting keystone 24 Selecting an application mode 25 Switching input signal 25 Hiding the image 25 Remote paging operations 26 Freezing the image 26 Shutdown 26 Menu operation 27 Menu system 27 Using the menus 28 1. Setting menu 32 ...
User Manual
Page 10
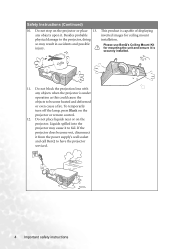
... place 13. so may cause it from the power supply's wall socket and call BenQ to have the projector serviced. 4 Important safety instructions Liquids spilled into the projector may result in accidents and possible injury. Do not block the projection lens with any objects upon it is under ...the unit and ensure it . To temporarily turn off the lamp, press Blank on the projector or remote control. 12. If the projector does become heated and deformed or even cause a fire. Please use BenQ's Ceiling Mount Kit for ceiling mount physical damage to fail. This product is capable of ...
... place 13. so may cause it from the power supply's wall socket and call BenQ to have the projector serviced. 4 Important safety instructions Liquids spilled into the projector may result in accidents and possible injury. Do not block the projection lens with any objects upon it is under ...the unit and ensure it . To temporarily turn off the lamp, press Blank on the projector or remote control. 12. If the projector does become heated and deformed or even cause a fire. Please use BenQ's Ceiling Mount Kit for ceiling mount physical damage to fail. This product is capable of ...
User Manual
Page 12
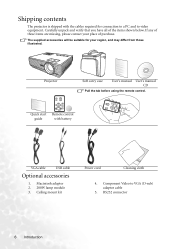
... that you have all of purchase. Macintosh adapter 2. 200W lamp module 3. Ceiling mount kit Power cord Cleaning cloth 4. Projector Soft carry case User's manual User's manual CD Pull the tab before using the remote control. RS232 connector 6 Introduction If any of these items are missing, please contact your region, and may differ...
... that you have all of purchase. Macintosh adapter 2. 200W lamp module 3. Ceiling mount kit Power cord Cleaning cloth 4. Projector Soft carry case User's manual User's manual CD Pull the tab before using the remote control. RS232 connector 6 Introduction If any of these items are missing, please contact your region, and may differ...
User Manual
Page 13
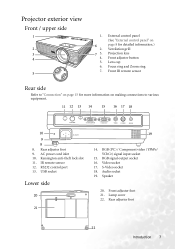
...panel" on page 8 for detailed information.) Ventilation grill Projection lens Front adjuster button Lens cap Focus ring and Zoom ring Front IR remote sensor Rear side Refer to "Connection" on page 15 for more information on making connections to various equipment. 11 12 13 14 ...15 16 17 18 10 9 8 8. RS232 control port 13. S-Video socket 18. Video socket 17. IR remote sensor 12. RGB signal output socket 16. Kensington anti-theft lock slot 11. Audio socket 19. Projector exterior view Front / upper side 1 2 3 4 5 1. 6 2. 7 3. 4. 5. 6. 7. Rear adjuster foot 9. AC power ...
...panel" on page 8 for detailed information.) Ventilation grill Projection lens Front adjuster button Lens cap Focus ring and Zoom ring Front IR remote sensor Rear side Refer to "Connection" on page 15 for more information on making connections to various equipment. 11 12 13 14 ...15 16 17 18 10 9 8 8. RS232 control port 13. S-Video socket 18. Video socket 17. IR remote sensor 12. RGB signal output socket 16. Kensington anti-theft lock slot 11. Audio socket 19. Projector exterior view Front / upper side 1 2 3 4 5 1. 6 2. 7 3. 4. 5. 6. 7. Rear adjuster foot 9. AC power ...
User Manual
Page 15
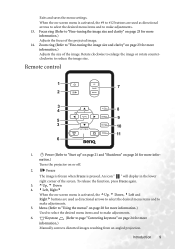
... activated, the #9 to #12 buttons are used as directional arrows to select the desired menu items and to make adjustments. 6. Keystone (Refer to make adjustments. 5. Remote control 1 7 2 3 4 8 5 9 3 10 11 6 1. An icon " " will display in the lower right corner of the projected image. 14. Menu (...more information.) Used to select the desired menu items and to page "Correcting keystone" on page 24 for more information.) Turns the projector on or off. 2. Rotate clockwise to enlarge the image or rotate counterclockwise to "Fine-tuning the image size and clarity" on ...
... activated, the #9 to #12 buttons are used as directional arrows to select the desired menu items and to make adjustments. 6. Keystone (Refer to make adjustments. 5. Remote control 1 7 2 3 4 8 5 9 3 10 11 6 1. An icon " " will display in the lower right corner of the projected image. 14. Menu (...more information.) Used to select the desired menu items and to page "Correcting keystone" on page 24 for more information.) Turns the projector on or off. 2. Rotate clockwise to enlarge the image or rotate counterclockwise to "Fine-tuning the image size and clarity" on ...
User Manual
Page 16
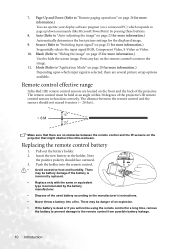
...by the battery manufacturer. • Dispose of the projector's IR remote control sensors to the manufacturer's instructions. • Never throw a battery into the remote control. • Avoid excessive heat and humidity. There may be using the remote control for more information.) Sequentially selects the input signal ... long time, remove the battery to prevent damage to restore the image. 11. The distance between the remote control and the IR sensors on the projector that there are located on page 29 for more information.) You can operate your display software program (on...
...by the battery manufacturer. • Dispose of the projector's IR remote control sensors to the manufacturer's instructions. • Never throw a battery into the remote control. • Avoid excessive heat and humidity. There may be using the remote control for more information.) Sequentially selects the input signal ... long time, remove the battery to prevent damage to restore the image. 11. The distance between the remote control and the IR sensors on the projector that there are located on page 29 for more information.) You can operate your display software program (on...
User Manual
Page 21
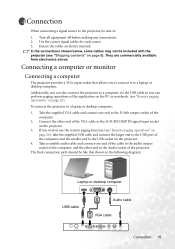
... USB cable Audio cable VGA cable Connection 15 If you wish to use the remote paging function (see "Remote paging operations" on the projector. 3. Connection When connecting a signal source to the projector, be like that allows you can also connect the projector to a computer via the USB cable so you to connect it to a laptop...
... USB cable Audio cable VGA cable Connection 15 If you wish to use the remote paging function (see "Remote paging operations" on the projector. 3. Connection When connecting a signal source to the projector, be like that allows you can also connect the projector to a computer via the USB cable so you to connect it to a laptop...
User Manual
Page 27
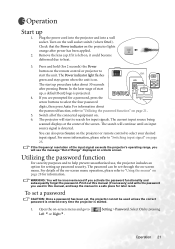
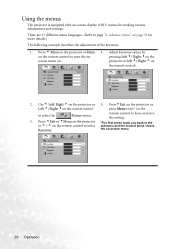
...input signal" on . The password can also press Source on the wall socket switch (where fitted). WARNING: You will start up, a default BenQ logo is left on, it could become deformed due to Left 3or Right4. To set a password CAUTION: Once a password has been set through ...The current input source being scanned displays at the center of the connected equipment on the remote control or projector to "Using the menus" on page 21. 5. For details of the input signal exceeds the projector's operating range, you are prompted for later recall. Remove the lens cap. Open the ...
...input signal" on . The password can also press Source on the wall socket switch (where fitted). WARNING: You will start up, a default BenQ logo is left on, it could become deformed due to Left 3or Right4. To set a password CAUTION: Once a password has been set through ...The current input source being scanned displays at the center of the connected equipment on the remote control or projector to "Using the menus" on page 21. 5. For details of the input signal exceeds the projector's operating range, you are prompted for later recall. Remove the lens cap. Open the ...
User Manual
Page 29
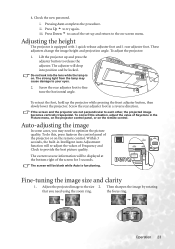
...you may cause damage to your eyes. 2. ii. Screw the rear adjuster foot in the Picture menu, on the projector control panel, or on the remote control. Adjust the projected image to each other, the projected image becomes vertically trapezoidal. Operation 23 The strong light ...from the lamp may need using the zoom ring. Check the new password. Adjusting the height The projector is on -screen menu...
...you may cause damage to your eyes. 2. ii. Screw the rear adjuster foot in the Picture menu, on the projector control panel, or on the remote control. Adjust the projected image to each other, the projected image becomes vertically trapezoidal. Operation 23 The strong light ...from the lamp may need using the zoom ring. Check the new password. Adjusting the height The projector is on -screen menu...
User Manual
Page 30
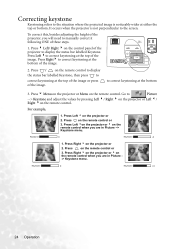
... Keystone menu. Press 6 Menu on the projector or Menu on the remote control or 3. Go to correct keystoning at the bottom of the image. Press Right 4 on the projector or 4 on the projector or Left 3/ Right 4on the remote control. Keystone 0 Keystone +6 24 Operation Correcting... keystone Keystoning refers to the screen. It occurs when the projector is not perpendicular to the situation where the projected...
... Keystone menu. Press 6 Menu on the projector or Menu on the remote control or 3. Go to correct keystoning at the bottom of the image. Press Right 4 on the projector or 4 on the projector or Left 3/ Right 4on the remote control. Keystone 0 Keystone +6 24 Operation Correcting... keystone Keystoning refers to the screen. It occurs when the projector is not perpendicular to the situation where the projected...
User Manual
Page 31
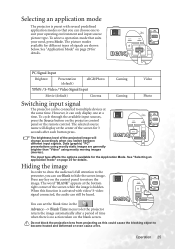
.... The input type affects the options available for 3 seconds after a period of the screen while the image is no action taken on the projector control panel or the remote control. The picture modes available for different types of the screen for the Application Mode. The selected source name will change accordingly when...
.... The input type affects the options available for 3 seconds after a period of the screen while the image is no action taken on the projector control panel or the remote control. The picture modes available for different types of the screen for the Application Mode. The selected source name will change accordingly when...
User Manual
Page 32
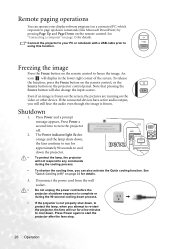
...An icon will also change the input source. Press Power a second time to re-start the projector after the fans stop. 26 Operation To release the function, press the Freeze button on the remote control, or the Source button on page 32 for approximately 90 seconds to freeze the image....down commands (like Microsoft PowerPoint) by pressing Page Up and Page Down on the remote control. Disconnect the power cord from the wall socket. • Do not unplug the power cord before the projector shutdown sequence is complete or during the cooling process. • To shorten the cooling...
...An icon will also change the input source. Press Power a second time to re-start the projector after the fans stop. 26 Operation To release the function, press the Freeze button on the remote control, or the Source button on page 32 for approximately 90 seconds to freeze the image....down commands (like Microsoft PowerPoint) by pressing Page Up and Page Down on the remote control. Disconnect the power cord from the wall socket. • Do not unplug the power cord before the projector shutdown sequence is complete or during the cooling process. • To shorten the cooling...
User Manual
Page 34
... press Menu twice* on the to turn the on the remote control to select the Picture menu. Adjust keystone values by on - projector or Left 3/ Right 4 on -screen menu. 28 Operation the on the remote control. 2. remote control to the submenu and the second press closes Keystone. pressing Left 3/ Right 4on the screen menu...
... press Menu twice* on the to turn the on the remote control to select the Picture menu. Adjust keystone values by on - projector or Left 3/ Right 4 on -screen menu. 28 Operation the on the remote control. 2. remote control to the submenu and the second press closes Keystone. pressing Left 3/ Right 4on the screen menu...
User Manual
Page 35
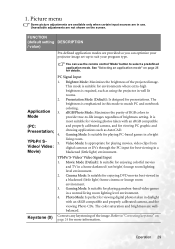
...photos taken with an sRGB compatible and properly calibrated camera, and for viewing PC graphic and drawing applications such as using the projector in this mode to -life images regardless of brightness setting. Refer to select a predefined application mode. Picture menu Some picture... setting DESCRIPTION / value) Pre-defined application modes are wellbalanced. Gaming Mode: Is suitable for playing gamebox-based video games in use the remote control 'Mode' button to "Correcting keystone" on the screen. The color saturation and brightness are provided so you can use . sRGB/...
...photos taken with an sRGB compatible and properly calibrated camera, and for viewing PC graphic and drawing applications such as using the projector in this mode to -life images regardless of brightness setting. Refer to select a predefined application mode. Picture menu Some picture... setting DESCRIPTION / value) Pre-defined application modes are wellbalanced. Gaming Mode: Is suitable for playing gamebox-based video games in use the remote control 'Mode' button to "Correcting keystone" on the screen. The color saturation and brightness are provided so you can use . sRGB/...

User Manual
Page 38
Setting menu FUNCTION (default setting DESCRIPTION / value) Mute (off) Toggles projector audio between on the projector or the remote control. Volume (5) Adjusts audio volume level. The range is from a normal 90second duration to "Utilizing the password function" on page 21. Selecting On limits use the projector. Print out this manual (if necessary) and write the...
Setting menu FUNCTION (default setting DESCRIPTION / value) Mute (off) Toggles projector audio between on the projector or the remote control. Volume (5) Adjusts audio volume level. The range is from a normal 90second duration to "Utilizing the password function" on page 21. Selecting On limits use the projector. Print out this manual (if necessary) and write the...
User Manual
Page 39
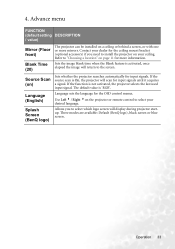
...Advance menu FUNCTION (default setting DESCRIPTION / value) Mirror (Floor front) Blank Time (20) The projector can be installed on ) Language (English) Splash Screen (BenQ logo) Sets whether the projector searches automatically for more mirrors. If the source scan is activated, once elapsed the image will ...If the function is `RGB'. Three modes are available: Default (BenQ logo), black screen or blue screen. The default value is not activated, the projector selects the last used input signal. Use Left 3/ Right 4on the projector or remote control to the screen. Operation 33 4.
...Advance menu FUNCTION (default setting DESCRIPTION / value) Mirror (Floor front) Blank Time (20) The projector can be installed on ) Language (English) Splash Screen (BenQ logo) Sets whether the projector searches automatically for more mirrors. If the source scan is activated, once elapsed the image will ...If the function is `RGB'. Three modes are available: Default (BenQ logo), black screen or blue screen. The default value is not activated, the projector selects the last used input signal. Use Left 3/ Right 4on the projector or remote control to the screen. Operation 33 4.
User Manual
Page 40
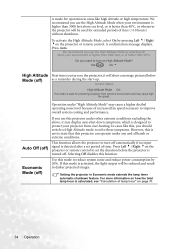
... Do you use the High Altitude Mode by pressing Left 3/ Right 4on the projector or remote control. If this function. To activate the High Altitude Mode, select On by selecting On when your projector from extreme environment and may cause a higher decibel operating noise level because of ... of time (>10 hours) without shutdown. Operation under any and all harsh or extreme conditions. Press Left 3/ Right 4on the projector or remote control to set period of increased fan speed necessary to protect your environment is higher than 3000 feet, or is hotter than 40...
... Do you use the High Altitude Mode by pressing Left 3/ Right 4on the projector or remote control. If this function. To activate the High Altitude Mode, select On by selecting On when your projector from extreme environment and may cause a higher decibel operating noise level because of ... of time (>10 hours) without shutdown. Operation under any and all harsh or extreme conditions. Press Left 3/ Right 4on the projector or remote control to set period of increased fan speed necessary to protect your environment is higher than 3000 feet, or is hotter than 40...
User Manual
Page 42
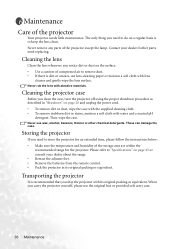
...Retract the adjuster feet. • Remove the batteries from the remote control. • Pack the projector in "Shutdown" on a regular basis is to remove dust. • If there is recommended that you clean the case, turn the projector off using the proper shutdown procedure as described in its original ...packing or equivalent. Then wipe the case. Never use wax, alcohol, benzene, thinner or other parts need to store the projector for an extended time, please follow the instructions below: • Make sure the temperature and humidity of compressed air to keep the lens...
...Retract the adjuster feet. • Remove the batteries from the remote control. • Pack the projector in "Shutdown" on a regular basis is to remove dust. • If there is recommended that you clean the case, turn the projector off using the proper shutdown procedure as described in its original ...packing or equivalent. Then wipe the case. Never use wax, alcohol, benzene, thinner or other parts need to store the projector for an extended time, please follow the instructions below: • Make sure the temperature and humidity of compressed air to keep the lens...

User Manual
Page 46
...bad connection, which could result in malfunction. • Do not over tighten the screw. 10. Do not turn the power on the projector. 11. ii. Temperature information When the Temperature warning light is warning you of the following possible problems: 1. The fans are not working. ...5 button on , it is on the projector for further help. iii. i. Turn the projector off and contact qualified service personnel for 5 seconds to display the total used lamp time. 9. For more detailed information, please refer to "Indicators" on the remote control to reset the lamp hour to let...
...bad connection, which could result in malfunction. • Do not over tighten the screw. 10. Do not turn the power on the projector. 11. ii. Temperature information When the Temperature warning light is warning you of the following possible problems: 1. The fans are not working. ...5 button on , it is on the projector for further help. iii. i. Turn the projector off and contact qualified service personnel for 5 seconds to display the total used lamp time. 9. For more detailed information, please refer to "Indicators" on the remote control to reset the lamp hour to let...

