User Manual
Page 3
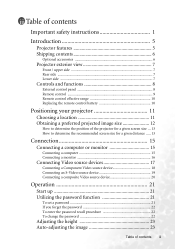
... a location 11 Obtaining a preferred projected image size 12 How to determine the position of the projector for a given screen size ... 13 How to determine the recommended screen size for a given distance ..... 13 Connection 15 Connecting a computer or monitor 15 Connecting a computer 15 Connecting a monitor 16 Connecting Video source devices 17 Connecting a Component Video source device 18 Connecting an S-Video source device 19 Connecting a composite Video source device 20 Operation 21 Start up 21 Utilizing the password function 21 To set a password...
... a location 11 Obtaining a preferred projected image size 12 How to determine the position of the projector for a given screen size ... 13 How to determine the recommended screen size for a given distance ..... 13 Connection 15 Connecting a computer or monitor 15 Connecting a computer 15 Connecting a monitor 16 Connecting Video source devices 17 Connecting a Component Video source device 18 Connecting an S-Video source device 19 Connecting a composite Video source device 20 Operation 21 Start up 21 Utilizing the password function 21 To set a password...
User Manual
Page 4
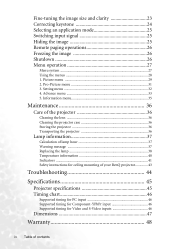
... Switching input signal 25 Hiding the image 25 Remote paging operations 26 Freezing the image 26 Shutdown 26 Menu operation 27 Menu system 27 Using the menus 28 1. Pro-Picture menu 31 3. Information menu 35 Maintenance 36 Care of the projector 36 Cleaning the lens 36 Cleaning the projector case 36 Storing the projector 36 Transporting the projector 36 Lamp information 37 Calculation of lamp hour 37 Warning message 37 Replacing the lamp 38 Temperature information 40 Indicators ...41 Safety instructions for ceiling mounting...
... Switching input signal 25 Hiding the image 25 Remote paging operations 26 Freezing the image 26 Shutdown 26 Menu operation 27 Menu system 27 Using the menus 28 1. Pro-Picture menu 31 3. Information menu 35 Maintenance 36 Care of the projector 36 Cleaning the lens 36 Cleaning the projector case 36 Storing the projector 36 Transporting the projector 36 Lamp information 37 Calculation of lamp hour 37 Warning message 37 Replacing the lamp 38 Temperature information 40 Indicators ...41 Safety instructions for ceiling mounting...
User Manual
Page 7
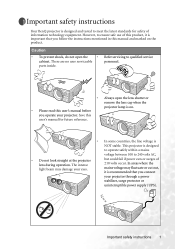
... • To prevent shock, do not open the lens shutter or remove the lens cap when the projector lamp is on the product. Save this manual and marked on . • Please read this user's manual before you follow the instructions mentioned in this user's manual for safety of ±10 volts occur. There are no user serviceable personnel. In areas where the mains voltage...
... • To prevent shock, do not open the lens shutter or remove the lens cap when the projector lamp is on the product. Save this manual and marked on . • Please read this user's manual before you follow the instructions mentioned in this user's manual for safety of ±10 volts occur. There are no user serviceable personnel. In areas where the mains voltage...
User Manual
Page 10
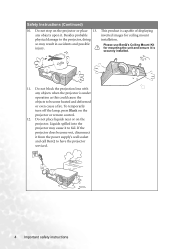
This product is under operation as this could cause the objects to the projector, doing installation. To temporarily turn off the lamp, press Blank on the projector or place 13. Safety Instructions (Continued) 10. Do not step on the projector or remote control. 12. Please use BenQ's Ceiling Mount Kit for ceiling mount physical damage to become wet, disconnect it is securely installed. 11. Do not place liquids...
This product is under operation as this could cause the objects to the projector, doing installation. To temporarily turn off the lamp, press Blank on the projector or place 13. Safety Instructions (Continued) 10. Do not step on the projector or remote control. 12. Please use BenQ's Ceiling Mount Kit for ceiling mount physical damage to become wet, disconnect it is securely installed. 11. Do not place liquids...

User Manual
Page 11
...; High quality manual zoom lens • One-key auto-adjustment to display the best picture quality • Digital keystone correction to correct distorted images • Adjustable color balance control for data/video display • Ultra-high brightness projection lamp • Ability to display 16.7 million colors • Multi-language on-screen menus • Switchable normal and Economic modes to reduce the power consumption • Built-in speaker provides mixed mono audio when an audio input is connected • Powerful AV...
...; High quality manual zoom lens • One-key auto-adjustment to display the best picture quality • Digital keystone correction to correct distorted images • Adjustable color balance control for data/video display • Ultra-high brightness projection lamp • Ability to display 16.7 million colors • Multi-language on-screen menus • Switchable normal and Economic modes to reduce the power consumption • Built-in speaker provides mixed mono audio when an audio input is connected • Powerful AV...
User Manual
Page 14
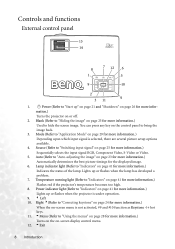
... operation. 9. 3 Left 10. I Power (Refer to hide the screen image. You can press any key on page 25 for more information.) Used to "Start up" on page 21 and "Shutdown" on page 28 for more information.) Turns on the on-screen display control menu. 12. 5Exit 8 Introduction Temperature warning light (Refer to "Switching input signal" on page 41 for more information.) Lights up or flashes when the lamp has developed a problem. 7. Source...
... operation. 9. 3 Left 10. I Power (Refer to hide the screen image. You can press any key on page 25 for more information.) Used to "Start up" on page 21 and "Shutdown" on page 28 for more information.) Turns on the on-screen display control menu. 12. 5Exit 8 Introduction Temperature warning light (Refer to "Switching input signal" on page 41 for more information.) Lights up or flashes when the lamp has developed a problem. 7. Source...
User Manual
Page 16
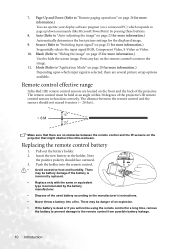
... are several picture setup options available. Source (Refer to restore the image. 11. Mode (Refer to "Application Mode" on the projector that might obstruct the infra-red beam. Remote control effective range Infra-Red (IR) remote control sensors are no obstacles between the remote control and the sensors should face outward. 3. Push the holder into a fire. Replacing the remote control battery 1. 7. Auto (Refer to function correctly. The remote control must be...
... are several picture setup options available. Source (Refer to restore the image. 11. Mode (Refer to "Application Mode" on the projector that might obstruct the infra-red beam. Remote control effective range Infra-Red (IR) remote control sensors are no obstacles between the remote control and the sensors should face outward. 3. Push the holder into a fire. Replacing the remote control battery 1. 7. Auto (Refer to function correctly. The remote control must be...
User Manual
Page 17
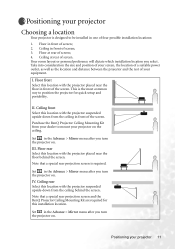
... > Mirror menu after you turn the projector on . Note that a special rear projection screen and the BenQ Projector Ceiling Mounting Kit are required for quick setup and portability. Positioning your projector Choosing a location Your projector is required. Floor in front of your projector 11 Take into consideration the size and position of your screen, the location of a suitable power outlet, as well as the location and distance between the projector and...
... > Mirror menu after you turn the projector on . Note that a special rear projection screen and the BenQ Projector Ceiling Mounting Kit are required for quick setup and portability. Positioning your projector Choosing a location Your projector is required. Floor in front of your projector 11 Take into consideration the size and position of your screen, the location of a suitable power outlet, as well as the location and distance between the projector and...
User Manual
Page 18
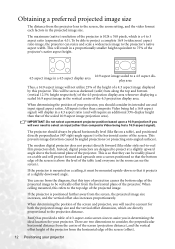
... it must be mounted upside-down so that this type of projection causes the bottom edge of the projected image to be vertically offset from the projector lens to the top edge of the projected image. This prevents image distortion caused by this refers to the screen, the zoom setting, and the video format each factors in a 4:3 aspect display area 16:9 aspect image scaled to a 4:3 aspect...
... it must be mounted upside-down so that this type of projection causes the bottom edge of the projected image to be vertically offset from the projector lens to the top edge of the projected image. This prevents image distortion caused by this refers to the screen, the zoom setting, and the video format each factors in a 4:3 aspect display area 16:9 aspect image scaled to a 4:3 aspect...
User Manual
Page 21
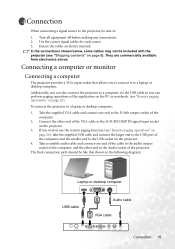
... connect the projector to a computer via the USB cable so you wish to the Audio socket of the VGA cable to a laptop or desktop computer. Connection When connecting a signal source to the projector, be sure to a laptop or desktop computer: 1. They are firmly inserted. Connecting a computer or monitor Connecting a computer The projector provides a VGA input socket that shown in the following diagram: Laptop or desktop computer USB cable Audio cable VGA cable Connection 15 Take the supplied VGA cable and connect...
... connect the projector to a computer via the USB cable so you wish to the Audio socket of the VGA cable to a laptop or desktop computer. Connection When connecting a signal source to the projector, be sure to a laptop or desktop computer: 1. They are firmly inserted. Connecting a computer or monitor Connecting a computer The projector provides a VGA input socket that shown in the following diagram: Laptop or desktop computer USB cable Audio cable VGA cable Connection 15 Take the supplied VGA cable and connect...
User Manual
Page 24
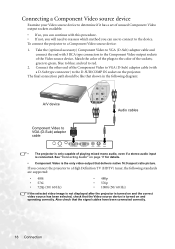
... the selected video image is not displayed after the projector is turned on and the correct video source has been selected, check that the signal cables have been connected correctly. 18 Connection See "Connecting Audio" on page 17 for details. • Component Video is connected. If you connect the projector to a High Definition TV (HDTV) tuner, the following diagram: A/V device Audio cables Component Video to VGA (D-Sub) adaptor cable • The projector is only capable...
... the selected video image is not displayed after the projector is turned on and the correct video source has been selected, check that the signal cables have been connected correctly. 18 Connection See "Connecting Audio" on page 17 for details. • Component Video is connected. If you connect the projector to a High Definition TV (HDTV) tuner, the following diagram: A/V device Audio cables Component Video to VGA (D-Sub) adaptor cable • The projector is only capable...
User Manual
Page 26
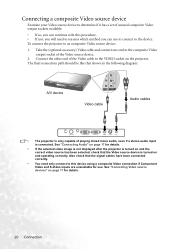
... audio input is connected. See "Connecting Audio" on page 17 for details. 20 Connection Connect the other end of the Video cable to the VIDEO socket on and operating correctly. To connect the projector to an composite Video source device: 1. See "Connecting Video source devices" on page 17 for details. • If the selected video image is not displayed after the projector is turned on and the correct video source has been selected, check that the Video source...
... audio input is connected. See "Connecting Audio" on page 17 for details. 20 Connection Connect the other end of the Video cable to the VIDEO socket on and operating correctly. To connect the projector to an composite Video source device: 1. See "Connecting Video source devices" on page 17 for details. • If the selected video image is not displayed after the projector is turned on and the correct video source has been selected, check that the Video source...
User Manual
Page 27
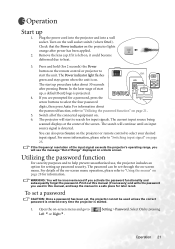
... -screen menu operation, please refer to select the four password digits, then press Auto. Plug the power cord into the projector and into a wall socket. The Power indicator light flashes green and stays green when the unit is projected. 4. In the later stage of the on page 28 for later recall. WARNING: You will continue until an input source signal is left on the wall socket switch (where fitted). Remove the lens cap. Turn...
... -screen menu operation, please refer to select the four password digits, then press Auto. Plug the power cord into the projector and into a wall socket. The Power indicator light flashes green and stays green when the unit is projected. 4. In the later stage of the on page 28 for later recall. WARNING: You will continue until an input source signal is left on the wall socket switch (where fitted). Remove the lens cap. Turn...
User Manual
Page 28
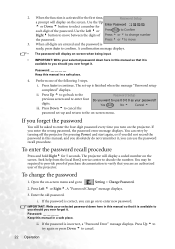
... the screen. Open the on -screen menu. ii. 2. The set -up is finished when the message "Password setup completed" displays. Press Down 6 to enter new password. If you forget the password You will display on to cancel the Password Setup Do you enter the wrong password, the password error message displays. i. ii. You may be asked to you should you ever forget it. A confirmation message displays. • The password will display a coded number on the projector. iii. A "Password Change" message displays...
... the screen. Open the on -screen menu. ii. 2. The set -up is finished when the message "Password setup completed" displays. Press Down 6 to enter new password. If you forget the password You will display on to cancel the Password Setup Do you enter the wrong password, the password error message displays. i. ii. You may be asked to you should you ever forget it. A confirmation message displays. • The password will display a coded number on the projector. iii. A "Password Change" message displays...
User Manual
Page 29
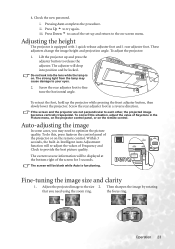
... lens while the lamp is on the remote control. Fine-tuning the image size and clarity 1. Press Down 6 to cancel the set-up and press the adjuster button to release the adjuster. These adjusters change the image height and projection angle. The adjuster will re-adjust the values of the projector or on -screen menu. Auto-adjusting the image In some cases, you need to the size 2. Adjust the projected image to optimize the picture quality. 4. Check the new password. Screw...
... lens while the lamp is on the remote control. Fine-tuning the image size and clarity 1. Press Down 6 to cancel the set-up and press the adjuster button to release the adjuster. These adjusters change the image height and projection angle. The adjuster will re-adjust the values of the projector or on -screen menu. Auto-adjusting the image In some cases, you need to the size 2. Adjust the projected image to optimize the picture quality. 4. Check the new password. Screw...
User Manual
Page 32
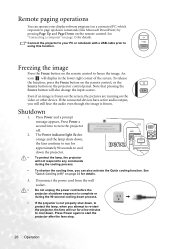
... image is frozen on the screen, the pictures are running on a connected PC) which responds to your display software program (on the video or other device. Shutdown 1. The Power indicator light flashes orange and the lamp shuts down, the fans continue to run for approximately 90 seconds to cool down , to protect the lamp, when you can operate your PC or notebook with a USB cable prior to re-start the projector...
... image is frozen on the screen, the pictures are running on a connected PC) which responds to your display software program (on the video or other device. Shutdown 1. The Power indicator light flashes orange and the lamp shuts down, the fans continue to run for approximately 90 seconds to cool down , to protect the lamp, when you can operate your PC or notebook with a USB cable prior to re-start the projector...
User Manual
Page 40
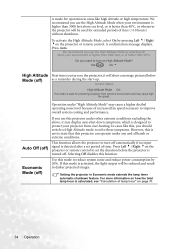
.... 34 Operation A mode for protecting projector from over-heating. Current Status High Altitude Mode On This mode is activated, the light output will show a message pictured below Mode (off ) signal is detected after a set the duration before the projector is hotter than 40°C. Selecting Off disables this mode is used for extended periods of lamp hour" on High Altitude Mode? Yes Auto No 5 High Altitude Next time you want to turn on the projector...
.... 34 Operation A mode for protecting projector from over-heating. Current Status High Altitude Mode On This mode is activated, the light output will show a message pictured below Mode (off ) signal is detected after a set the duration before the projector is hotter than 40°C. Selecting Off disables this mode is used for extended periods of lamp hour" on High Altitude Mode? Yes Auto No 5 High Altitude Next time you want to turn on the projector...
User Manual
Page 43
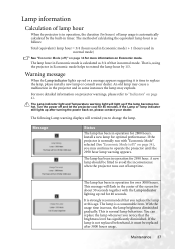
... hot. The Lamp indicator light and Temperature warning light will flash in the center of the screen for more detailed information on page 41. If the Lamp or Temp indicator still lights up red for 45 minutes. It is strongly recommended that the brightness level has significantly diminished. This is a consumable item. That is, using the projector in Economic mode helps to replace the lamp, please install a new lamp or consult your...
... hot. The Lamp indicator light and Temperature warning light will flash in the center of the screen for more detailed information on page 41. If the Lamp or Temp indicator still lights up red for 45 minutes. It is strongly recommended that the brightness level has significantly diminished. This is a consumable item. That is, using the projector in Economic mode helps to replace the lamp, please install a new lamp or consult your...

User Manual
Page 46
... Tighten the screw that secures the lamp cover. • Loose screw may cause a bad connection, which could cause damage. Do not turn the power on the projector. 11. Press and hold the Exit 5 button on the remote control to reset the lamp hour to display the total used lamp time. Press Auto on the projector or on the projector for further help. Temperature information When the Temperature warning light is warning you of the following possible problems: 1. For...
... Tighten the screw that secures the lamp cover. • Loose screw may cause a bad connection, which could cause damage. Do not turn the power on the projector. 11. Press and hold the Exit 5 button on the remote control to reset the lamp hour to display the total used lamp time. Press Auto on the projector or on the projector for further help. Temperature information When the Temperature warning light is warning you of the following possible problems: 1. For...
User Manual
Page 50
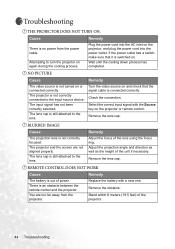
... input signal with a new one. The lens cap is out of the unit if necessary. Wait until the cooling down process has completed. BLURRED IMAGE Cause Remedy The projection lens is not turned on again during the cooling process. Remove the obstacle. NO PICTURE Cause Remedy The video source is not correctly focused. The projector and the screen are too far away from the power cable. Adjust the focus...
... input signal with a new one. The lens cap is out of the unit if necessary. Wait until the cooling down process has completed. BLURRED IMAGE Cause Remedy The projection lens is not turned on again during the cooling process. Remove the obstacle. NO PICTURE Cause Remedy The video source is not correctly focused. The projector and the screen are too far away from the power cable. Adjust the focus...


