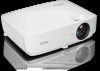
Quick Start Guide
Page 13
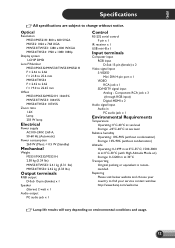
...at 0°C-35°C; 1500-3000 m at 0°C-30°C (with High Altitude Mode on environmental conditions and usage. 12 http://www.benq.com/welcome Lamp life results will vary depending on ) Storage: 0-12200 m at sea level Relative humidity Operating: 10%-90% (without condensation) Storage: 10... 2.62 f = 19.0 to find your country to 22.65 mm Offset MS531/MX532/MS521H: 106±5% MW533/TW533: 104±5% MH534/TH534: 107±5% Zoom ratio 1.2X Lamp 203 W lamp Electrical Power supply AC100-240V, 2.60 A, 50-60 Hz (Automatic) Power consumption 260 W (Max); < 0.5 W (Standby) Mechanical ...
...at 0°C-35°C; 1500-3000 m at 0°C-30°C (with High Altitude Mode on environmental conditions and usage. 12 http://www.benq.com/welcome Lamp life results will vary depending on ) Storage: 0-12200 m at sea level Relative humidity Operating: 10%-90% (without condensation) Storage: 10... 2.62 f = 19.0 to find your country to 22.65 mm Offset MS531/MX532/MS521H: 106±5% MW533/TW533: 104±5% MH534/TH534: 107±5% Zoom ratio 1.2X Lamp 203 W lamp Electrical Power supply AC100-240V, 2.60 A, 50-60 Hz (Automatic) Power consumption 260 W (Max); < 0.5 W (Standby) Mechanical ...
User Manual
Page 2
... a high altitude environment 42 Adjusting the sound 42 Personalizing the projector menu display 43 Select the lamp saver mode 43 Shutting down the projector 44 Menu operation 45 Maintenance 58 Care of the projector 58 Lamp information 59 Troubleshooting ........ 67 Specifications 68 Dimensions 69 Ceiling mount installation 69 Timing chart 70 Warranty...
... a high altitude environment 42 Adjusting the sound 42 Personalizing the projector menu display 43 Select the lamp saver mode 43 Shutting down the projector 44 Menu operation 45 Maintenance 58 Care of the projector 58 Lamp information 59 Troubleshooting ........ 67 Specifications 68 Dimensions 69 Ceiling mount installation 69 Timing chart 70 Warranty...

User Manual
Page 3
... latest standards for future reference. However, to qualified service personnel. 6. Safety Instructions 1. Always open the lens shutter or remove the lens cap when the projector lamp is important that you connect your eyes. Please read this product, it is NOT stable.
... latest standards for future reference. However, to qualified service personnel. 6. Safety Instructions 1. Always open the lens shutter or remove the lens cap when the projector lamp is important that you connect your eyes. Please read this product, it is NOT stable.
User Manual
Page 4
... come into contact with live parts. this product on rare occasions. Excessive operation of lamps beyond the rated lamp life. Allow the projector to cool for replacement. 10. Do not attempt to removing the lamp assembly for approximately 45 minutes prior to disassemble 8. Refer servicing only to break on ...an unstable cart, stand, or table. The lamp becomes extremely hot during operation. There are dangerous high voltages inside which may cause death if you ever undo or remove any...
... come into contact with live parts. this product on rare occasions. Excessive operation of lamps beyond the rated lamp life. Allow the projector to cool for replacement. 10. Do not attempt to removing the lamp assembly for approximately 45 minutes prior to disassemble 8. Refer servicing only to break on ...an unstable cart, stand, or table. The lamp becomes extremely hot during operation. There are dangerous high voltages inside which may cause death if you ever undo or remove any...
User Manual
Page 5
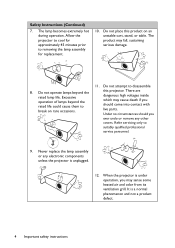
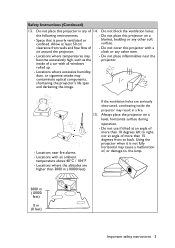
... during operation. - Do not place inflammables near fire alarms - Locations near the projector. - If the ventilation holes are higher than 15 degrees front to , the lamp. 3000 m (10000 feet) 0 m (0 feet) Important safety instructions 5 Allow at angle of more than 10 degrees left to right, nor at least 50 cm clearance from...
... during operation. - Do not place inflammables near fire alarms - Locations near the projector. - If the ventilation holes are higher than 15 degrees front to , the lamp. 3000 m (10000 feet) 0 m (0 feet) Important safety instructions 5 Allow at angle of more than 10 degrees left to right, nor at least 50 cm clearance from...

User Manual
Page 7
... Pressing the ECO BLANK bottom to immediately hide the image, lowering the lamp power at the same time your projector when the power is normal and expected behavior. You can wear BenQ 3D glassed to enjoy the 3D movies, videos and sporting events in a more flexible. By ...presenting the depth of the images, you to restart the projector immediately within the lamp manufacturers specifications. Introduction 7 Auto Power Off function allows...
... Pressing the ECO BLANK bottom to immediately hide the image, lowering the lamp power at the same time your projector when the power is normal and expected behavior. You can wear BenQ 3D glassed to enjoy the 3D movies, videos and sporting events in a more flexible. By ...presenting the depth of the images, you to restart the projector immediately within the lamp manufacturers specifications. Introduction 7 Auto Power Off function allows...
User Manual
Page 9
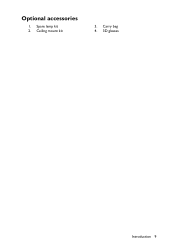
Carry bag 4. 3D glasses Introduction 9 Optional accessories 1. Ceiling mount kit 3. Spare lamp kit 2.
Carry bag 4. 3D glasses Introduction 9 Optional accessories 1. Ceiling mount kit 3. Spare lamp kit 2.
User Manual
Page 10
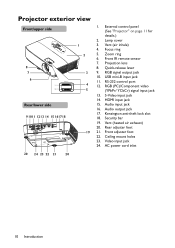
... inhale) 4. Zoom ring 6. Projection lens 8. USB mini-B input jack 11. S-Video input jack 14. Security bar 19. Ceiling mount holes 23. HDMI input jack 15. Lamp cover 3. RGB (PC)/Component video (YPbPr/ YCbCr) signal input jack 13. AC power cord inlet 20 24 23 22 21 20 10 Introduction Projector exterior...
... inhale) 4. Zoom ring 6. Projection lens 8. USB mini-B input jack 11. S-Video input jack 14. Security bar 19. Ceiling mount holes 23. HDMI input jack 15. Lamp cover 3. RGB (PC)/Component video (YPbPr/ YCbCr) signal input jack 13. AC power cord inlet 20 24 23 22 21 20 10 Introduction Projector exterior...
User Manual
Page 11
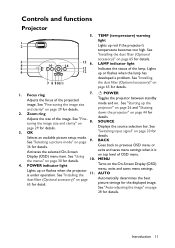
...saves menu settings when it is under operation. POWER indicator light Turns on . TEMP (temperature) warning light 1 2 Lights up or flashes when the lamp has developed a problem. See "Installing 7 8 91011 the dust filter (Optional accessory)" on page 44 for Adjusts the size of OSD menu. ...the dust filter (Optional accessory)" on page 33 for details. tuning the image size and clarity" on page 26 and "Shutting 2. LAMP indicator light 13 Indicates the status of the projected Toggles the projector between standby image. See "Starting up or flashes when the projector ...
...saves menu settings when it is under operation. POWER indicator light Turns on . TEMP (temperature) warning light 1 2 Lights up or flashes when the lamp has developed a problem. See "Installing 7 8 91011 the dust filter (Optional accessory)" on page 44 for Adjusts the size of OSD menu. ...the dust filter (Optional accessory)" on page 33 for details. tuning the image size and clarity" on page 26 and "Shutting 2. LAMP indicator light 13 Indicates the status of the projected Toggles the projector between standby image. See "Starting up or flashes when the projector ...
User Manual
Page 13
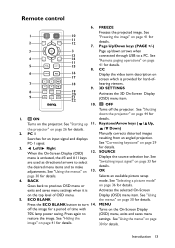
... for details. Keystone/Arrow keys ( / Up, the projector" on page 30 for details. / Down) 2. adjustments. See "Using the menus" on the On-Screen Display 70% lamp power saving. See "Using the menus" on page 33 for details. FREEZE Freezes the projected image. CC 6 16 Display the video term description on 17...
... for details. Keystone/Arrow keys ( / Up, the projector" on page 30 for details. / Down) 2. adjustments. See "Using the menus" on the On-Screen Display 70% lamp power saving. See "Using the menus" on page 33 for details. FREEZE Freezes the projected image. CC 6 16 Display the video term description on 17...
User Manual
Page 14
... keys (VOL / ) projector. 21. See "Auto-adjusting the image" 20. INFO on the front of the 16. SMART ECO Automatically determines the best Displays the lamp mode selection bar picture timings for details. AUTO 19.
... keys (VOL / ) projector. 21. See "Auto-adjusting the image" 20. INFO on the front of the 16. SMART ECO Automatically determines the best Displays the lamp mode selection bar picture timings for details. AUTO 19.
User Manual
Page 26
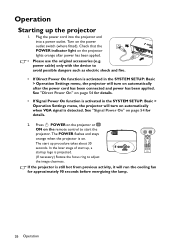
... projector is activated in the SYSTEM SETUP: Basic > Operation Settings menu, the projector will run the cooling fan for approximately 90 seconds before energizing the lamp. 26 Operation Turn on the projector lights orange after the power cord has been connected and power has been applied. See "Direct Power On" on...
... projector is activated in the SYSTEM SETUP: Basic > Operation Settings menu, the projector will run the cooling fan for approximately 90 seconds before energizing the lamp. 26 Operation Turn on the projector lights orange after the power cord has been connected and power has been applied. See "Direct Power On" on...
User Manual
Page 27
... is positioned where you want it is not placed on the projector or remote control to the exhaust vent where hot air comes from the lamp may also screw the front adjuster foot to enter a six digit password. If the projector is close to select your OSD language following the on... for the first time, select your desired input signal. 3. If the projector is activated for details. • Do not look into the lens while the lamp is on page 33 for details. • If no signal is equipped with 1 front adjuster foot and 2 rear adjuster feet. Switch all of the projector...
... is positioned where you want it is not placed on the projector or remote control to the exhaust vent where hot air comes from the lamp may also screw the front adjuster foot to enter a six digit password. If the projector is close to select your OSD language following the on... for the first time, select your desired input signal. 3. If the projector is activated for details. • Do not look into the lens while the lamp is on page 33 for details. • If no signal is equipped with 1 front adjuster foot and 2 rear adjuster feet. Switch all of the projector...
User Manual
Page 41
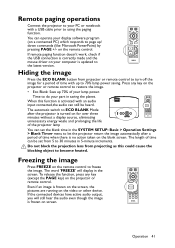
... to turn off the image for over three minutes without a display source, eliminating unnecessary energy waste and prolonging the life of the projector lamp You can still be set the blank time in 5-minute increments. Freezing the image Press FREEZE on the remote control. Even if an ...SETUP: Basic > Operation Settings > Blank Timer menu to let the projector return the image automatically after a period of time with up to 70% lamp power saving. When this could cause the blocking object to become heated. If remote paging function doesn't work, check if the USB connection is ...
... to turn off the image for over three minutes without a display source, eliminating unnecessary energy waste and prolonging the life of the projector lamp You can still be set the blank time in 5-minute increments. Freezing the image Press FREEZE on the remote control. Even if an ...SETUP: Basic > Operation Settings > Blank Timer menu to let the projector return the image automatically after a period of time with up to 70% lamp power saving. When this could cause the blocking object to become heated. If remote paging function doesn't work, check if the USB connection is ...
User Manual
Page 43
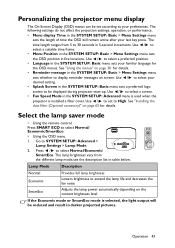
...message in 5-second increments. Press / to 30 seconds in the SYSTEM SETUP: Basic > Menu Settings menu sets whether to your last key press. The lamp brightness vary from 5 to select Normal/Economic/ SmartEco. Use / to select a suitable time frame. • Menu Position in the SYSTEM SETUP: Basic...position in the SYSTEM SETUP: Advanced menu is used when the projector is selected, the light output will remain active after your preferences. Select the lamp saver mode • Using the remote control. Use / to select a screen. • Fan Speed Mode in five locations. Use / ...
...message in 5-second increments. Press / to 30 seconds in the SYSTEM SETUP: Basic > Menu Settings menu sets whether to your last key press. The lamp brightness vary from 5 to select Normal/Economic/ SmartEco. Use / to select a suitable time frame. • Menu Position in the SYSTEM SETUP: Basic...position in the SYSTEM SETUP: Advanced menu is used when the projector is selected, the light output will remain active after your preferences. Select the lamp saver mode • Using the remote control. Use / to select a screen. • Fan Speed Mode in five locations. Use / ...

User Manual
Page 44
...process. • To shorten the cooling time, you don't respond in the SYSTEM SETUP: Basic > Operation Settings. The POWER flashes orange, the projection lamp shuts down, and the fans will continue to run for details. 3. See "Quick Cooling" on page 54 for a few seconds, the message will run...restart projector immediately within 90 secs after the fans stop . 4. Once the cooling process finishes, the POWER is Off, users need to wait lamp to cool down the projector 1. Press II POWER on the projector or ON on the remote control and a confirmation message displays prompting you ...
...process. • To shorten the cooling time, you don't respond in the SYSTEM SETUP: Basic > Operation Settings. The POWER flashes orange, the projection lamp shuts down, and the fans will continue to run for details. 3. See "Quick Cooling" on page 54 for a few seconds, the message will run...restart projector immediately within 90 secs after the fans stop . 4. Once the cooling process finishes, the POWER is Off, users need to wait lamp to cool down the projector 1. Press II POWER on the projector or ON on the remote control and a confirmation message displays prompting you ...
User Manual
Page 48
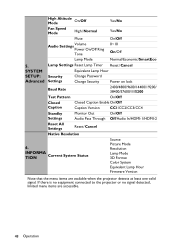
...Yes/No Mute On/Off Audio Settings Volume Power On/Off Ring Tone 0~10 On/Off Lamp Mode Normal/Economic/SmartEco 5. Lamp Settings Reset Lamp Timer Reset/Cancel SYSTEM Equivalent Lamp Hour SETUP: Security Advanced Settings Change Password Change Security Power on lock Baud Rate 2400/...-1/HDMI-2 Reset All Settings Reset/Cancel Native Resolution 6. INFORMA TION Current System Status Source Picture Mode Resolution Lamp Mode 3D Format Color System Equivalent Lamp Hour Firmware Version Note that the menu items are accessible. 48 Operation If there is no equipment connected ...
...Yes/No Mute On/Off Audio Settings Volume Power On/Off Ring Tone 0~10 On/Off Lamp Mode Normal/Economic/SmartEco 5. Lamp Settings Reset Lamp Timer Reset/Cancel SYSTEM Equivalent Lamp Hour SETUP: Security Advanced Settings Change Password Change Security Power on lock Baud Rate 2400/...-1/HDMI-2 Reset All Settings Reset/Cancel Native Resolution 6. INFORMA TION Current System Status Source Picture Mode Resolution Lamp Mode 3D Format Color System Equivalent Lamp Hour Firmware Version Note that the menu items are accessible. 48 Operation If there is no equipment connected ...
User Manual
Page 55
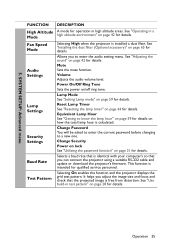
... the projector's firmware. It helps you to enter the audio setting menu. This function is free from distortion. Fan Speed Mode Audio Settings Lamp Settings Security Settings Baud Rate Test Pattern Selecting High when the projector is calculated. Mute Sets the mute function. Selects a baud rate that... Operation 55 See "Use build-in high altitude areas. See "Installing the dust filter (Optional accessory)" on page 31 for details. Lamp Mode See "Setting Lamp mode" on /off ring tone. Power On/Off Ring Tone Sets the power on page 59 for details. Change Password You will ...
... the projector's firmware. It helps you to enter the audio setting menu. This function is free from distortion. Fan Speed Mode Audio Settings Lamp Settings Security Settings Baud Rate Test Pattern Selecting High when the projector is calculated. Mute Sets the mute function. Selects a baud rate that... Operation 55 See "Use build-in high altitude areas. See "Installing the dust filter (Optional accessory)" on page 31 for details. Lamp Mode See "Setting Lamp mode" on /off ring tone. Power On/Off Ring Tone Sets the power on page 59 for details. Change Password You will ...
User Manual
Page 57
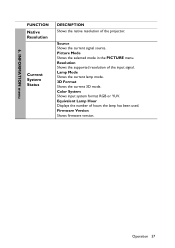
Picture Mode Shows the selected mode in the PICTURE menu. Lamp Mode Shows the current lamp mode. 3D Format Shows the current 3D mode. Equivalent Lamp Hour Displays the number of the input signal. Firmware Version Shows firmware version. Source Shows the current signal source. Operation 57 6. Resolution Shows the supported resolution of hours the lamp has been used. Color System Shows input system format RGB or YUV. INFORMATION menu FUNCTION Native Resolution Current System Status DESCRIPTION Shows the native resolution of the projector.
Picture Mode Shows the selected mode in the PICTURE menu. Lamp Mode Shows the current lamp mode. 3D Format Shows the current 3D mode. Equivalent Lamp Hour Displays the number of the input signal. Firmware Version Shows firmware version. Source Shows the current signal source. Operation 57 6. Resolution Shows the supported resolution of hours the lamp has been used. Color System Shows input system format RGB or YUV. INFORMATION menu FUNCTION Native Resolution Current System Status DESCRIPTION Shows the native resolution of the projector.
User Manual
Page 58
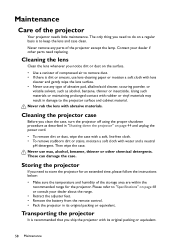
... below: • Make sure the temperature and humidity of compressed air to the projector surface and cabinet material. Maintenance Care of the projector except the lamp.
... below: • Make sure the temperature and humidity of compressed air to the projector surface and cabinet material. Maintenance Care of the projector except the lamp.

